
How to Get Started using Semantic Kernel .NET
Hi all,
With Microsoft Build approaching, we wanted to share some walk throughs of using Semantic Kernel to get started if you haven’t already. Today we’re going to dive into the Getting Started guide we have in the main Semantic Kernel GitHub repository for .NET.
Getting Started with Semantic Kernel
We are excited to announce new enhancements to Semantic Kernel documentation and samples, and this blog post is focused in the new Getting Started steps in details, making your adoption seamless.
Throughout the steps we are going to introduce many important Semantic Kernel features, like:
- The Kernel
- Connector Services
- Plugins
- Prompt Functions
- Method Functions
- Prompt Execution Settings
- Prompt Templates
- Chat Prompting
- Filtering
- Dependency Injection
A Glimpse into the Gettings Started Steps:
In the guide below we’ll start from scratch and navigate with you through each of the example steps, clarifying the code, details and running them in real time.
All sample projects in Semantic Kernel are Unit Test enabled projects where you can with ease in your IDE using a Test Explorer UI execute each individually or all at once.
Preparing to use the samples:
- Clone semantic kernel repository in (https://github.com/microsoft/semantic-kernel.git)
- Configure the secrets using dotnet user-secrets or `environment variables` to use in the samples
- Open a Terminal and go to GettingStarted sample project folder:
<repository root>/dotnet/samples/GettingStarted
- Execute dotnet user-secrets set “Key” “Value” for every key and value described below.
| Key | Value |
| OpenAI:ApiKey | Your OpenAI key |
| OpenAI:ChatModelId | Model to use (i.e. gpt-3.5-turbo) |
i.e: dotnet user-secrets set “OpenAI:ChatModelId” “gpt-3.5-turbo”
3. Open your favorite IDE i.e.:
- VSCode
- Open Folder in the root repository

- Select Testing Icon on the left menu

- Look for GettingStarted project and select the Step that you want to execute and click to Run or Debug it.
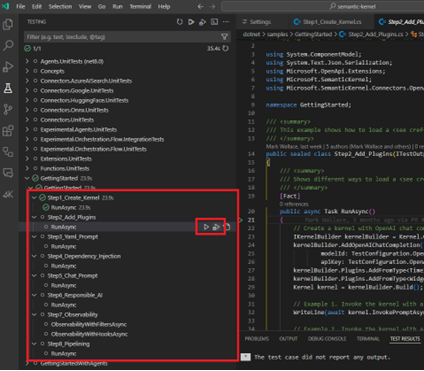
- After executing the test, a Test Result panel will appear, displaying the current test result
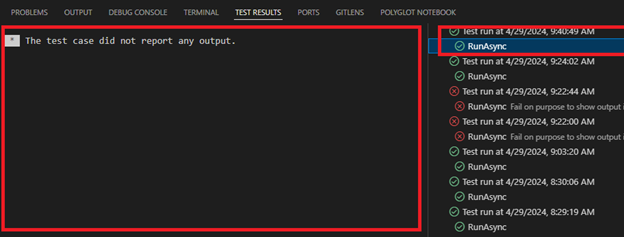
Currently xUnit tests in VSCode, only show Output when fail. For that reason if you want to see the full output of it, add a failing last line for the tests like:
Assert.Fail(“Fail on purpose to show output”);
Visual Studio
- Open SK-dotnet.sln solution file inside <repository root folder>/dotnet. This will trigger your Visual Studio IDE.

- GettingStarted samples will be within samples folder in the solution

- On the Test Menu Open the Test Explorer and Navigate to GettingStarted
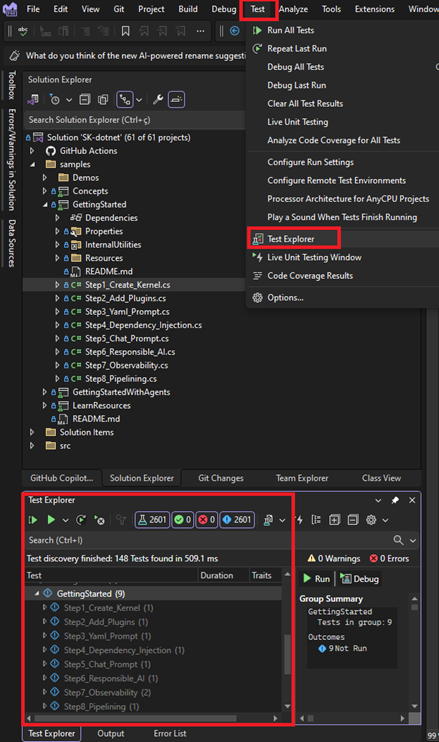
- Run or Debug the test with Right mouse click on it and wait until the test has completed with the Output result in the right panel.

Steps Details
In this session we are going to walk through each step code explaining what is being done one each line.
1. Creating and using the Kernel
Creating
Kernel is one of the main components of Semantic Kernel and works like a glue on how other components can be combined for a great result. In this sample we are going thru the most common scenarios using this component.
Kernel kernel = Kernel.CreateBuilder()
    .AddOpenAIChatCompletion(
        modelId: TestConfiguration.OpenAI.ChatModelId,
        apiKey: TestConfiguration.OpenAI.ApiKey)
    .Build();
Using Kernel Builder to configure and build your kernel with OpenAI Chat Completion Connector support.
Depending on the connector packages you have installed the IntelliSense will bring you a list of different configurations you are able to use while configuring your Kernel.

To facilitate the usage of our examples all secrets created using the user-secrets tool are available in the code in the `TestConfiguration` static class properties which is loaded automatically by the BaseTest class.
1.1 Using InvokePrompt
Console.WriteLine(await kernel.InvokePromptAsync("What color is the sky?"));
Once you have a Kernel built, this is the simplest way you can define a prompt and get the result from an AI Model.
Kernel provides many different Invocation options each serving its purpose, `InvokePromptAsync` is a dedicated function where you can specify a prompt and easily get the result from the AI Model. The result from a InvokePromptAsync is a FunctionResult type which has a ToString() override that will be implicitly be called in the `Console.WriteLine`.
1.2 Using InvokePrompt with arguments
KernelArguments arguments = new() { { "topic", "sea" } };
Console.WriteLine(await kernel.InvokePromptAsync("What color is the {{$topic}}?", arguments));
Another very interesting aspect of prompt in Semantic Kernel is the ability to use templating, in this example the prompt has a `{{$topic}}` templating mark which signals that to Invoke this Prompt you will need a dynamic topic argument that can be specified at the invocation time, using the KernelArguments dictionary, providing the matching topic argument to render properly before calling the AI Model.
1.3 Using InvokePromptStreaming with arguments
await foreach (var update in kernel.InvokePromptStreamingAsync("What color is the {{$topic}}? Provide a detailed explanation.", arguments))
{
     Write(update);
}
Streaming is one of the interesting invocation options you have using Kernel, this allows you to update your UI as the information arrives from the Model reducing the perception of delay between the request and the result. This example uses the same strategy as the second example, providing a parameterized prompt template and the argument during invocation.
await foreach (var update in kernel.InvokePromptStreamingAsync(...))
When using streaming function above we return an IAsyncEnumerable<StreamingKernelContent> interface which makes it simple to iterate over each update chunk with a foreach loop.
Each StreamingKernelContent chunk has an override on the ToString() to return the most significant representation of it in a loop depending on the Modality (Text Generation, Chat Completion, …) which in this sample is a ChatCompletion and gives back the `Content` of a message.
1.4 Invoking with Custom Settings
While invoking you can also define your specific AI Settings like Max Tokens, Temperature, and many more.
Those settings will vary depending on the type of model, modality and connector used.
arguments = new(new OpenAIPromptExecutionSettings { MaxTokens = 500, Temperature = 0.5 }) { { "topic", "dogs" } };
Console.WriteLine(await kernel.InvokePromptAsync("Tell me a story about {{$topic}}", arguments));
When creating a KernelArguments class you can specify on its constructor the settings you want to use while invoking the AI.
Note that we are using a specific OpenAI execution settings class that may vary with other settings to be used on other connectors.
1.5 Getting JSON with Custom Settings
arguments = new(new OpenAIPromptExecutionSettings { ResponseFormat = "json_object" }) { { "topic", "chocolate" } };
Console.WriteLine(await kernel.InvokePromptAsync("Create a recipe for a {{$topic}} cake in JSON format", arguments));
In the usage above we are using the ResponseFormat setting from an OpenAI connector to instruct the model to return in JSON format.
2. Using Plugins with Kernel
Plugins are one of the most powerful features of Semantic Kernel. A plugin is a set of functions that can be either Native C# Functions (MethodFunctions), or PromptFunctions that as the name suggest have a Prompt Definition to call the AI Model.
C# Method Functions
public class TimeInformation
{
    [KernelFunction, Description("Retrieves the current time in UTC.")]
    public string GetCurrentUtcTime() => DateTime.UtcNow.ToString("R");
}
C# functions that can be imported to Plugins are marked with KernelFunction that will instruct the Kernel what are going to be imported into Plugins using Description attribute will be used on how those functions will be detailed to the AI Model for calling so it will have a better understanding on when to use your functions.
When implementing functions in your plugins you can use many different signatures, including asynchronous tasks and different types.
Suggestion: Is very important provide descriptions to your functions and arguments when using them against the AI for best results.
C# Method Functions with Complex Objects
public class WidgetFactory
{
    [KernelFunction, Description("Creates a new widget of the specified type and colors")]
    public WidgetDetails CreateWidget(
        [Description("The type of widget to be created")]
        WidgetType widgetType,
        [Description("The colors of the widget to be created")]
        WidgetColor[] widgetColors)
    {
        var colors = string.Join('-', widgetColors.Select(c => c.GetDisplayName()).ToArray());
        return new()
        {
            SerialNumber = $"{widgetType}-{colors}-{Guid.NewGuid()}",
            Type = widgetType,
            Colors = widgetColors
        };
    }
}
You can also work with complex objects and Enum types as parameters of your Method Functions.
[JsonConverter(typeof(JsonStringEnumConverter))]
public enum WidgetType
{
    [Description("A widget that is useful.")]
    Useful,

    [Description("A widget that is decorative.")]
    Decorative
}
To be able to fully use this with an AI Model the Enums need to be annotated with a JsonDeserialization converter. Note again the importance of having a description for each Enum, so the AI will pick the best one to call your function.
public class WidgetDetails
{
    public string SerialNumber { get; init; }
    public WidgetType Type { get; init; }
    public WidgetColor[] Colors { get; init; }
}
The returning complex object of CreateWidget function. Since this is a returning object processed by Native C# Code, a description for its properties is not necessary.
Adding Plugins to Kernel
IKernelBuilder kernelBuilder = Kernel.CreateBuilder();
kernelBuilder.AddOpenAIChatCompletion(
        modelId: TestConfiguration.OpenAI.ChatModelId,
        apiKey: TestConfiguration.OpenAI.ApiKey);
kernelBuilder.Plugins.AddFromType<TimeInformation>();
kernelBuilder.Plugins.AddFromType<WidgetFactory>();
Kernel kernel = kernelBuilder.Build();
On the above lines pay attention to the Plugins.AddFromType<T>(), Plugins can be added from different sources like other functions, objects, types and prompt directories.

After configuring plugins and creating your Kernel it has awareness of functions that can be used while invoking.
2.1 Questioning that no plugin supports
Console.WriteLine(await kernel.InvokePromptAsync("How many days until Christmas?"));
If you invoke the kernel with a prompt that asks the AI for information that no plugin previously added to the kernel can provide, the AI Model may hallucinate or deny.
2.2 Using Template to Invoke Plugin Functions
Console.WriteLine(await kernel.InvokePromptAsync("The current time is {{TimeInformation.GetCurrentUtcTime}}. How many days until Christmas?"));Using template with Semantic Kernel you can also provide template function you want to append its result to the template. Important to note that while executing this invocation, the template will be rendered using the GetCurrentUtcTime, appending the current time to the prompt and sending the final rendered prompt it to the AI Model.
2.3 Auto Function Invoking – Making the AI Model call your Plugin Functions
OpenAIPromptExecutionSettings settings = new() { ToolCallBehavior = ToolCallBehavior.AutoInvokeKernelFunctions };
Console.WriteLine(await kernel.InvokePromptAsync("How many days until Christmas? Explain your thinking.", new(settings)));
To allow the AI Model to call your functions you need to provide in the settings that you want a specific ToolCallingBehavior, not providing it the AI won’t have visibility to your functions.
Note that this functionality will only work with AI models and connectors that support Tool/Function Calling like Open AI latest chat completion models.
In this example the AI Model will have visibility to your plugins and will call the functions it sees as necessary to fulfil the ask.
2.4 Auto Function Invoking with your Complex Object Plugin Functions One interesting aspect of complex objects in regards to the AI Model is that it knows the structure of the parameters of your functions and provide them following the description and the deserialization representation of those parameters.
Console.WriteLine(await kernel.InvokePromptAsync("Create a handy lime colored widget for me.", new(settings)));
Console.WriteLine(await kernel.InvokePromptAsync("Create a beautiful scarlet colored widget for me.", new(settings)));
Console.WriteLine(await kernel.InvokePromptAsync("Create an attractive maroon and navy colored widget for me.", new(settings)));
The above examples send prompts that will influence the AI decision on different parameter combinations to call the CreateWidget function.
3. Using Yaml Prompt Files
While you can provide templates in the code you can also import those from Yaml files. This sample show how can you create a Prompt Function in that way.
Semantic Kernel Format Configuration
name: GenerateStory
template: |
  Tell a story about {{$topic}} that is {{$length}} sentences long.

template_format: semantic-kernel
description: A function that generates a story about a topic.
input_variables:
  - name: topic
    description: The topic of the story.
    is_required: true
  - name: length
    description: The number of sentences in the story.
    is_required: true
output_variable:
  description: The generated story.
execution_settings:
  default:
    temperature: 0.6
Handlebars Format Configuration
name: GenerateStory
template: |
  Tell a story about {{topic}} that is {{length}} sentences long.
template_format: handlebars
description: A function that generates a story about a topic.
input_variables:
  - name: topic
    description: The topic of the story.
    is_required: true
  - name: length
    description: The number of sentences in the story.
    is_required: true
output_variable:
  description: The generated story.
execution_settings:
  service1:
    model_id: gpt-4
    temperature: 0.6
  service2:
    model_id: gpt-3
    temperature: 0.4
  default:
    temperature: 0.5
The Yaml file structures above provides important details. about the prompt used, description to the AI Model, specially:
- Template: That the prompt also has the template variables {{$topic}} and {{$length}}
- Template Format: Semantic Kernel provide abstractions to use different template engines like Handlebars.
Note that the template variables according to Handlerbars spec don’t have the “$” before the variable name
- Template variable details are defined in “input_variables” list
- Execution Settings can be provided in a per-function level for improved results.
-
- ServiceId: Settings that will be used for the service Id.
- When creating a AI Service (i.e. builder.AddOpenAIChatCompletion) you can provide what is the service Id.
- ModelId: Settings will be used only if the model id matches the provided one else defaults.
var generateStoryYaml = EmbeddedResource.Read("GenerateStory.yaml");
var function = kernel.CreateFunctionFromPromptYaml(generateStoryYaml);
CreateFunctionFromPromptYaml, without specifying a formatter, uses the “semantic-kernel” default formatter to load the above yaml file content into the generateStoryYaml variable and creates a function instance expecting two arguments resulting from the provided configuration.
Console.WriteLine(await kernel.InvokeAsync(function, arguments: new()
{
    { "topic", "Dog" },
    { "length", "3" },
}))
Invoke the created function providing the arguments that will be used to render the prompt to the AI Model.
Important: Parameters must match the name defined in the template and must be provided if required.
using Microsoft.SemanticKernel.PromptTemplates.Handlebars;This package allows you to use Handlebars templates for prompt rendering that will be used in the following snippets.
var generateStoryHandlebarsYaml = EmbeddedResource.Read("GenerateStoryHandlebars.yaml");
function = kernel.CreateFunctionFromPromptYaml(generateStoryHandlebarsYaml, new HandlebarsPromptTemplateFactory());
Using a different template format, and specifying a different HandlevarsPromptTemplateFactory template formatter to CreateFunctionFromPromptYaml available in the Microsoft.SemanticKernel.PromptTemplates.Handlebars package.
Console.WriteLine(await kernel.InvokeAsync(function, arguments: new()
{
   { "topic", "Cat" },
   { "length", "3" },
}));
As both templates provide the same input variables, calling the created function with a new template formatter don’t require any calling code change.
4. Applying Dependency Injection
Semantic Kernel is fully compatible with .Net Dependency Injection abstractions and supports the IServiceCollection pattern.
In this step we are going through how you can leverage DI into your code.
var collection = new ServiceCollection();
collection.AddSingleton<ILoggerFactory>(new XunitLogger(this.Output));

var kernelBuilder = collection.AddKernel();
kernelBuilder.Services.AddOpenAITextGeneration(TestConfiguration.OpenAI.ModelId, TestConfiguration.OpenAI.ApiKey);
kernelBuilder.Plugins.AddFromType<TimeInformation>();

var serviceProvider = collection.BuildServiceProvider();
var kernel = serviceProvider.GetRequiredService<Kernel>();
Semantic Kernel package provides a new AddKernel() extension method to the IServiceCollection interface which allows you to configure and provide the Kernel straight to your DI container.
The main focus of this step relies on how you can configure your service collection and get a instance of the Kernel already with a Plugin working with all injected dependencies automatically.
KernelArguments arguments = new() { { "topic", "earth when viewed from space" } };
await foreach (var update in kernel.InvokePromptStreamingAsync("What color is the {{$topic}}? Provide a detailed explanation.", arguments))
{
        Console.Write(update);
}
With the kernel created you can use it normally to get your streaming Text Completion result.
Note that this example uses Text Generation service instead of Chat Completion, if using OpenAI ensure you use the “gpt-3.5-turbo-instruct” model.
5. Creating a Chat Prompt
We do also have an awesome feature that allows you to represent a chat history in a template with usage of special `<message role=”…”>messaga</message>` XML like tags.
string chatPrompt = """
     <message role="user">What is Seattle?</message>
     <message role="system">Respond with JSON.</message>
     """;
Console.WriteLine(await kernel.InvokePromptAsync(chatPrompt));
The code above uses the chat prompt feature and Semantic Kernel internally transforms that in a Chat History format to get an AI Chat Completion result.
6. Responsible AI Filtering
Filters is one of the most advanced features of Semantic Kernel and allow full control over how the invocations to AI and plugins are being used as well as control over template rendering.
// Create a kernel with OpenAI chat completion
var builder = Kernel.CreateBuilder()
     .AddOpenAIChatCompletion(
         modelId: TestConfiguration.OpenAI.ChatModelId,
         apiKey: TestConfiguration.OpenAI.ApiKey);

builder.Services.AddSingleton<ITestOutputHelper>(this.Output);

// Add prompt filter to the kernel
builder.Services.AddSingleton<IPromptRenderFilter, PromptFilter>();

var kernel = builder.Build();
The code above initializes a Kernel and adds both ITestOutputHelper and IPromptRenderFilter interface implementations to the services to get a dependency injection ready Kernel.
private sealed class PromptFilter(ITestOutputHelper output) : IPromptRenderFilter
{
    private readonly ITestOutputHelper _output = output;

    public async Task OnPromptRenderAsync(PromptRenderContext context, Func<PromptRenderContext, Task> next)
    {
        if (context.Arguments.ContainsName("card_number"))

        {
            context.Arguments["card_number"] = "**** **** **** ****";
        }

        await next(context);

        context.RenderedPrompt += " NO SEXISM, RACISM OR OTHER BIAS/BIGOTRY";
        this._output.WriteLine(context.RenderedPrompt);
    }
}
Every prompt rendering filter needs to implement the IPromptRenderFilter interface which exposes the method OnPromptRenderAsync with a context and a delegate for the next filter in the pipeline.
if (context.Arguments.ContainsName("card_number"))
{
    context.Arguments["card_number"] = "**** **** **** ****";
}
Code changes made before calling `await next(context);` happens before the rendering process takes place and allows you to modify the arguments that can be used by the template render engine.
await next(context);Executes the next filter in the pipeline and start the rendering process.
context.RenderedPrompt += " NO SEXISM, RACISM OR OTHER BIAS/BIGOTRY";Any modification after the `next(context)`call happens after the template was rendered and from this point forward you are able to evaluate the rendered result and change it accordingly. In the example code a suffix is appended to the rendered prompt that will be used when calling the AI Model.
7. Components Observability
This example uses a new type IFunctionInvocationFilter of filter that allows you to intercept all the function invocations triggered by the Kernel.
The lines of focus in this example are:
private class MyFunctionFilter : IFunctionInvocationFilter
{
    public async Task OnFunctionInvocationAsync(FunctionInvocationContext context, Func<FunctionInvocationContext, Task> next)
    {
        ...
    }
}
Every function invocation filter needs to implement the IFunctionInvocationFilter interface which exposes the method OnFunctionInvocationAsync with a context and a delegate for the next filter in the pipeline.
kernelBuilder.Services.AddSingleton<IFunctionInvocationFilter, MyFunctionFilter>();Adds the custom function invocation filter to the services DI container, which will be used by the kernel once it is built.
Exploring the filter implementation below:
this.output.WriteLine($"Invoking {context.Function.Name}");

await next(context);

var metadata = context.Result?.Metadata;
if (metadata is not null && metadata.ContainsKey("Usage"))
{
    this._output.WriteLine($"Token usage: {metadata["Usage"]?.AsJson()}");
}
Everything before calling `next(context);` happens before calling the function, and you are able to change, filter or abort the execution. In the code above we are using just the testOutput to display the current function name being invoked. After the function invocation (aftert the next() call) we are getting the current usage metadata returned by OpenAI to display the token usage in Json format.
8. Using Function Pipelining
In prerelease days of Semantic Kernel there was an option of providing a list of functions to be invoked in sequence where the result of a function was fed to the next limited to string results.
This example explores how you can achieve similar behavior using the latest and more powerful version of Semantic Kernel.
KernelFunction parseInt32 = KernelFunctionFactory.CreateFromMethod((string s) => double.Parse(s, CultureInfo.InvariantCulture), "parseInt32");
KernelFunction multiplyByN = KernelFunctionFactory.CreateFromMethod((double i, double n) => i * n, "multiplyByN");
KernelFunction truncate = KernelFunctionFactory.CreateFromMethod((double d) => (int)d, "truncate");
KernelFunction humanize = KernelFunctionFactory.CreateFromPrompt(new PromptTemplateConfig()
{
    Template = "Spell out this number in English: {{$number}}",
    InputVariables = [new() { Name = "number" }],
});
As a use case we create four different kernel functions that we want to pipe in sequence.
KernelFunction pipeline = KernelFunctionCombinators.Pipe([parseInt32, multiplyByN, truncate, humanize], "pipeline");Using the example `KernelFunctionCombinators` utility it creates a fifth kernel function that will be responsible for the pipelining behavior.
KernelArguments args = new()
{
    ["s"] = "123.456",
    ["n"] = (double)78.90,
};
Console.WriteLine(await pipeline.InvokeAsync(kernel, args));
Once the pipeline function is created calling it is similar to any other kernel function. The behavior of the pipeline function in the example will:
- invoke the first function parseInt32, read the string 123.456 from the arguments and parse it into (double)123.456
- The multiplyByN function will be invoked with the `i` parameter as the first function result and the `n` with the provided double 78.90 returning the double result 9740.6784
- The multiplyByN result will be passed as the first argument on truncate function which will remove the decimal digits and return 9740
- Finally, the truncated integer result will be passed to the last humanize function in the pipeline that will call the AI Model asking to spell out the number.
Dive Deeper
Please reach out if you have any questions or feedback through our Semantic Kernel GitHub Discussion Channel. We look forward to hearing from you!
 Light
Light Dark
Dark
0 comments