Introduction
XAML is going to introduce something called "Property Triggers" to components as part of their visual style definition. You can read more about XAML's property triggers on Joe Marini's blog here. What I want to introduce, instead of the XAML-like property trigger implementation, is a similar concept that I have called "Property Events". Property events have the following features:
- Wired up to an object's events.
- Therefore, triggered not just by changes to a property but by any event source.
- Has a clearly stated collection of setters that affect the state of other objects (including the object that fired the event).
- Has a clearly stated collection of conditions that qualify the execution of the setters.
- The setters are easily extended with the
IAction interface. - The conditions are easily extended with the
ICondition interface. - Property events can be applied to any object, not just visual ones.
It is pointless to compare and contrast my implementation of property events with XAML's implementation of property triggers, if for no other reason than, as Joe has stated in this blog that XAML is pre-alpha software and that "Things are going to change dramatically between now and shipping." (Please be aware, for those in the future, that this article was written on 5/1/05.) So, let's simply consider that this article presents a solution available to .NET 1.1 and 2.0 programmers and offers some advice on the declarative programming best practices. This isn't XAML property triggers, which is why I've called it "property events".
Declarative Programming
The imperative code is written in such a way as to support the declarative expression of the property events. For the purpose of this article, I'm illustrating the concept of property events using MycroXaml, a simple XML object graph instantiator that I wrote a while back. It doesn't have all the features of MyXaml, but it is sufficient to demonstrate the concept. The imperative code can be instantiated with the full MyXaml parser without modification.
One thing to consider when balancing the objectives of imperative and declarative programming is that there are many different architectures that could be implemented to express a certain concept. Because the declarative code instantiates an object graph that represents the imperative architecture, some thought needs to go into the design of the imperative architecture.
Best Practices
For example, we could create an architecture in which property events can be applied to classes derived from various .NET controls and implement an object graph similar to this:
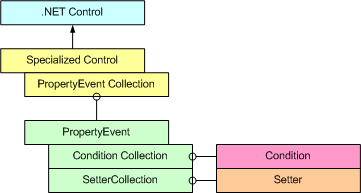
The problem with this architecture is that the XML to instantiate this object graph would look a bit like this:
<MyButton Location="10, 10" Size="80, 25" Text="Click Me!">
  <PropertyEvents>
    <PropertyEvent Event="MouseOver">
       <Conditions>
          <Condition Property="IsMouseOver" Value="True"/>
       </Conditions>
       <Setters>
          <Set Property="ForegroundColor" Value="Red"/>
       </Setters>
    </PropertyEvent>
  </PropertyEvents>
</MyButton>
The problem with this declarative markup is that it entangles:
- The visual presentation of the control
- The conditions (also known as application specific rules) that qualify the event
- The actions (also known as application specific actions) that are performed when the conditions are qualified
In my experience with declarative programming, it can easily suffer the same problems of imperative programming, making it difficult to change and extend the application's implementation. Entangling presentation, rule, and actions (or state) layers of the application is usually not a good idea, whether implementing imperative code or instantiating an object graph declaratively.
In this article, you will see what I consider to be the best practices in declarative programming--defining presentation, rules, actions, and other elements such as containers as separate object graphs and gluing them together, so to speak, with "controllers" that manage the interaction between the elements, such as is done here for property events and can be done for things like data binding. The result is a clean, readable XML document in which each object graph expresses only the concepts within its own domain. In the past, the object graphs I've put together, while "cool" and completely viable given the classes and properties that are being instantiated, are an entangled mess of cross-domain concepts. Interestingly, this also gives us a clue as to why the applications that we build slowly become calcified--difficult to change and extend.
Architecture
Rather than use the architecture illustrated above, I prefer a much looser coupling of the different "layers", as illustrated here:

I'm sure you're saying, geez, this looks a lot more complicated! Not really. The benefit of this approach is that I can vary the implementation of the different layers without adversely affecting other layers. Since interfaces are used for managing the concrete classes, I achieve further decoupling of the actual condition and action interfaces. The tradeoff to reduce the dependencies is that this architecture requires individual classes to manage the different collections plus the addition of a "controller" to glue the decoupled classes together. Also note that the controller has to reference each of the containers. Since these are simple containers, I didn't feel it was necessary to implement interfaces for them. However, the instances that the containers manage all have interfaces so that it's easy to extend the behavior of the property trigger system with your own classes.
OnEvent
Most of the real work is done in the interaction between the OnEvent, Controller, and MxController classes. The class that sources the event (here drawn as ".NET Control", but it can be any event source) references the event object--it has to, in order to use reflection to wire up the event to its own handler. OnEvent also has its own multicast event. Each Controller instance that is interested in the event handled by OnEvent adds an event handler to this multicast event.
MxController
The MxController instance is responsible for invoking all the controllers interested in the event. When the source object event fires, it gets handled by a method in OnEvent. This method, in turn, calls back to the MxController (via the IMxController interface). The MxController then requests the invocation list--all the Controllers that have subscribed to this event. The MxController provided in the download has the behavior that it stops processing the invocation list as soon as a controller's rules are qualified. The only exception is that it also processes controllers that do not have any condition set, meaning that these controllers always process their associated actions. However, since the OnEvent works through the IMxController interface, you can use different master controllers for different behaviors. The only restriction (tested for and will throw an exception if violated) is that of an OnEvent, which can be subscribed to by more than one controller, must be managed by the same MxController. You cannot have the same OnEvent being handled by two different master controller "domains", as it were.
Controller
The Controller subscribes to the events that it's interested in, using the event supplied by the OnEvent class (not the source object's event handler). When the Controller's event handler is fired (by a DynamicInvoke call from the MxController) the Controller tests to see if the condition set is qualified, and if so, it tells the action set to perform its actions. The Controller also returns a status, as part of the ControllerEventArgs, indicating whether or not its particular condition set was qualified.
Demonstrations
There are three demonstrations:
- A simple mouse-over event capture demonstrating affecting the property of the object sourcing the event.
- A simple
checkbox state event capture demonstrating affecting the property of another object. - A more complex traffic light example, in which a
checkbox and a timer source the events.
In each example, you will see markup defines five specific application layers:
- Presentation Layer
- Event Definitions
- Rule Definitions
- Action Definitions
- Control Logic
You should find yourself quickly becoming comfortable with the syntax in each of the layers. If you are unfamiliar with how XML is used to declaratively instantiate an object graph and the various syntactical elements, such as XML namespaces and prefixes, I suggest you first read my article on MycroXaml.
Button Mouse Over
Let's start with a simple demonstration. In this example, we're going to change the color of the button text to red when the mouse pointer is over the button but it is does not have focus, and green when the mouse is over the button and it does have focus. Finally, when the mouse leaves the control, we'll explicitly set the text color to black.
Presentation Layer
Besides the usual riffraff of XML namespace mapping and form definition, we need a line of declarative code to instantiate the button:
<wf:Button Name="btnMouseOver" Location="10, 15" Size="120, 25"
           Text="Mouse Over Me"/>
Event Definitions
We need to capture two events: MouseEnter and MouseLeave. We declaratively establish that we are interested in these two events:
<mxh:MxEvents>
  <mxh:Events>
    <mxh:OnEvent Name="OnMouseEnter"
                 Object="{btnMouseOver}"
                 EventName="MouseEnter"/>
    <mxh:OnEvent Name="OnMouseLeave"
                 Object="{btnMouseOver}"
                 EventName="MouseLeave"/>
  </mxh:Events>
</mxh:MxEvents>
Conditions
We're also interested in two conditions: the button is focused, or it is not focused. We declaratively describe these two conditions:
<mxh:MxConditions>
  <mxh:ConditionSets>

    <mxh:ConditionSet Name="MouseFocused">
      <mxh:Conditions>
        <mxh:OnCondition Property="Focused" Value="true"/>
      </mxh:Conditions>
    </mxh:ConditionSet>

  </mxh:ConditionSets>
</mxh:MxConditions>
Since "not focused" is the opposite of "focused", we actually only need to define the condition for focused, and let the control logic handle the "else" condition.
Also note that we're not specifying the object on which to test the condition. By default, the condition is tested on the object that sourced the event. Since this is the button, we don't need to explicitly state the object.
Actions
Next, we're going to describe, declaratively, the actions that are taken when the different conditions are qualified. Note that we have one action that simply happens when the event is fired--the MouseLeave event does not have any qualifying conditions. The actions describe what we want the button to look like when the mouse enters the button and is focused, not focused, and when the mouse leaves the button:
<mxh:MxActions>
  <mxh:ActionSets>
    <mxh:ActionSet Name="MouseEnterFocused">
      <mxh:Actions>
        <mxh:Set Property="ForeColor" Value="Green"/>
      </mxh:Actions>
    </mxh:ActionSet>

    <mxh:ActionSet Name="MouseEnterNotFocused">
      <mxh:Actions>
        <mxh:Set Property="ForeColor" Value="Red"/>
      </mxh:Actions>
    </mxh:ActionSet>

    <mxh:ActionSet Name="MouseLeave">
      <mxh:Actions>
        <mxh:Set Property="ForeColor" Value="Black"/>
      </mxh:Actions>
    </mxh:ActionSet>

  </mxh:ActionSets>
</mxh:MxActions>
As with the conditions, note that the object whose property value we are setting is not specified. The default is the event sender.
Control Logic
At this point, all we've established is the UI presentation, the events we're interested in, what the rules are, and things we want to do. The control logic glues this all together by saying "when this event happens, qualified by that rule, do the things specified here." This is expressed declaratively (and remember, this is only one of many different ways you can do this, depending of course on your underlying imperative code):
<mxh:MxController>
  <mxh:Controllers>
    <mxh:Controller Description="On Mouse Enter Focused"
                    OnEvent="{OnMouseEnter}"
                    QualifiedBy="{MouseFocused}"
                    Action="{MouseEnterFocused}"
                    ElseAction="{MouseEnterNotFocused}"/>
    <mxh:Controller Description="On Mouse Leave"
                    OnEvent="{OnMouseLeave}"
                    Action="{MouseLeave}"/>
  </mxh:Controllers>
</mxh:MxController>
That's it! The result is:
on mouse leave:
on mouse enter, focused:
on mouse enter, not focused:
CheckBox State
In this example, I'm going to demonstrate hooking the CheckedChanged property event of a CheckBox to change the Enabled visual style of a Button.
Presentation Layer
For this demo, we need two controls--a CheckBox and a Button:
<wf:CheckBox Name="ckEmailMe" Location="10, 105" Size="160, 15"
             Text="I want lots of junk email" Checked="true"/>
<wf:Button Name="btnCheckOut" Location="200, 100" Size="80, 25"
             Text="Check Out" Enabled="true"/>
Event Definition
The event we're interested in is the CheckedChanged event of the CheckBox:
<mxh:OnEvent Name="OnCheckedChanged" Object="{ckEmailMe}"
             EventName="CheckedChanged"/>
Conditions
There are two conditions we are interested in--whether the checkbox is checked or unchecked. As with the button focused state example above, we only need to test for whether the checkbox is checked:
<mxh:ConditionSet Name="Checked">
  <mxh:Conditions>
    <mxh:OnCondition Property="Checked" Value="true"/>
  </mxh:Conditions>
</mxh:ConditionSet>
Again, we don't need to explicitly state that the object whose property we are testing is the CheckBox, because that object is the source of the event.
Actions
The actions are straightforward--if the CheckBox is checked, the button becomes enabled, otherwise it is disabled:
<mxh:ActionSet Name="EnableCheckOut">
  <mxh:Actions>
    <mxh:Set Object="{btnCheckOut}" Property="Enabled" Value="true"/>
  </mxh:Actions>
</mxh:ActionSet>

<mxh:ActionSet Name="DisableCheckOut">
  <mxh:Actions>
    <mxh:Set Object="{btnCheckOut}" Property="Enabled" Value="false"/>
  </mxh:Actions>
</mxh:ActionSet>
Notice here that the object whose property value we are setting is specified. This is because the object whose style we are affecting is not the same object as the sender of the event.
Controller
A one line controller glues the event, rule, and actions together:
<mxh:Controller Description="Validate Check Out"
                OnEvent="{OnCheckedChanged}"
                QualifiedBy="{Checked}"
                Action="{EnableCheckOut}"
                ElseAction="{DisableCheckOut}"/>
The result is:
Traffic Light Example
In this example, the events that are being monitored are the CheckedChanged event of the CheckBox control and the Tick event of a System.Windows.Forms.Timer instance. Note that this example (as with the others) implements all the logic declaratively--the only thing written in code is the generic classes and algorithms. It is possible to write simple but complete applications completely declaratively.
I'm not going to show all of the XML here because it gets a bit tedious. However, this example illustrates using a container to hold some state information:
<mxh:MxContainer Name="stateInfo">
  <mxh:MxObjects>
    <mxh:MxObject Name="nsState" Type="System.String" Default="g"/>
    <mxh:MxObject Name="nsGo" Type="System.Boolean" Default="true"/>
  </mxh:MxObjects>
</mxh:MxContainer>
Some slightly more interesting rules, such as:
<mxh:ConditionSet Name="nsGreen">
  <mxh:Conditions>
    <mxh:OnCondition Object="{nsState}" Property="AsString" Value="g"/>
    <mxh:OnCondition Object="{nsGo}" Property="AsBool" Value="true"/>
  </mxh:Conditions>
</mxh:ConditionSet>
And some more interesting actions, such as:
<mxh:ActionSet Name="nsGreenToYellow">
  <mxh:Actions>
    <mxh:Set Object="{sg}" Property="BackColor" Value="Gray"/>
    <mxh:Set Object="{sy}" Property="BackColor" Value="Yellow"/>
    <mxh:Set Object="{nsState}" Property="Value" Value="y"/>
    <mxh:Set Object="{nsTimer}" Property="Interval" Value="1000"/>
    <mxh:Set Object="{nsTimer}" Property="Enabled" Value="true"/>
  </mxh:Actions>
</mxh:ActionSet>
This illustrates how multiple conditions are always logically AND'ed together. Also note how the actions involve many different objects--some are the UI objects, some are objects created declaratively by the container to manage state, and we're also setting the properties of the timer to change time interval and restart the timer. Nifty stuff!
Implementation
Initialization
The OnEvent wires up an event handler to the object and the event name as specified in the declarative code. It also sets the master controller so that it can callback to that controller when the event from the source object fires:
public void WireUp(IMxController masterController)
{
  if (obj==null)
  {
    throw(new EventTargetNullException("Event target is null."));
  }

  if (this.masterController==null)
  {
    this.masterController=masterController;

    EventInfo ei=obj.GetType().GetEvent(eventName, BindingFlags.Public |
        BindingFlags.NonPublic | BindingFlags.Instance | BindingFlags.Static);
    if (ei==null)
    {
      throw(new EventBindingException("Can't find event "+eventName));
    }

    Delegate dlgt=null;
    try
    {
      dlgt=Delegate.CreateDelegate(ei.EventHandlerType, this, "Fire");
    }
    catch {}

    if (dlgt==null)
    {
      throw(new EventBindingException(
        "Can't create generic delegate for event "+eventName));
    }

    ei.AddEventHandler(obj, dlgt);
  }
  else if (this.masterController != masterController)
  {
    throw(new MultipleControllerException(
        "Events cannot be managed by different MxControllers"));
  }
}
Dynamic Invoke Of The Controller's Event Handler
The MxController class implements the logic for how the controller's event handlers are invoked. You can see here that once the first controller's conditions are qualified, no other controller's event handlers are fired unless they are of the "no conditions" type.
public void Fire(IOnEvent onEvent, EventArgs e)
{
ControllerEventArgs cea=new ControllerEventArgs(e);
object[] args=new object[] {onEvent.Object, cea};
foreach(Delegate sink in onEvent.InvocationList)
{
try
{
if ( (((IController)sink.Target).QualifiedBy == null) ||
(!cea.IsQualified) )
{
sink.DynamicInvoke(args);
}
}
catch(Exception ex)
{
throw(new ControllerEventException(ex.InnerException.ToString()));
}
}
}
If you want to change the behavior of the master controller, this can be easily done by implementing the IMxController interface and specifying your own class in the XML.
Interfaces
The Action, Condition, and Controller classes implement the following interfaces:
public interface IAction
{
  void Update(object sender);
}

public interface ICondition
{
  bool IsMet(object sender, bool curState);
}

public interface IController
{
  ConditionSet QualifiedBy
  {
    get;
    set;
  }

  void Initialize(IMxController masterController);
}

public interface IOnEvent
{
  event OnEvent.ControllerEventHandler Triggered;

  Delegate[] InvocationList
  {
    get;
  }

  object Object
  {
    get;
    set;
  }

  void WireUp(IMxController masterController);
}

public interface IMxController
{
  void Fire(IOnEvent onEvent, EventArgs e);
}
By implementing these interfaces in your own classes, it is very easy to extend the functionality of the Actions, Conditions, and Controllers.
The Other Files
The MxHelpers assembly contains additional files (MxObject, MxContainer, and MxBinding) that I haven't discussed in this article--those are for a future article!
Conclusion
Property events, declaratively coded, is a flexible way of describing how events should affect the property values of objects. The examples I've provided here are fairly simplistic. Other uses include enabling/disabling/hiding controls and menus based on the user's role. The kinds of actions, conditions, and controllers can be easily extended to provide considerably more functionality--for example, the actions can be extended to execute MyXaml workflows. Hopefully, this article has given you some ideas as to what can be done with a few lines of general purpose code and some XML, rather than hard coding all the visual style logic imperatively. And don't forget that this code works not just for visual objects but for any objects that provide property change events.
And that brings up two points--one, is that we've identified a best practice with regards to imperative code--consider the appropriateness of firing an event in your property setters associated with a change in value. The second is the exploration of best practices with regards to declarative programming--specifically, in this article, preventing the entanglement of the presentation layer, rule definition, and state control.


 General
  News
News  Suggestion
  Question
  Bug
Bug  Answer
  Joke
Joke  Praise
  Rant
Rant  Admin
Admin 


