In the first part of the article, we had implemented continuous integration and development approach to some extent with Nuget public library. The approach left us with few open issues about the direct access of public packages. To address the issues we realized the need of an intermediary repository as a private Artifactory. In this article, we will optimize our continuous integration and development model with the use of JFrog Artifactory. Also, in the scope of implementing the model we will go through the steps for creating and publishing Nuget package in the Artifactory.
Reasons to use an Artifactory
Artifactory is used for the following reasons:
- Reduce network traffic and optimize builds
- Reliable access to public package library (e.g. Nuget library)
- Optimize build performance with caching mechanism. The packages are fetched from the public library for the first time and then served from the private Artifactory.
- Security and Access control
- Work as a repository for in-house packages which are not supposed to expose in the public libraries.
- Makes the Build System stable with high availability of the packages
Implementation
To implement Artifactory in our continuous development and integration model we will go through the following steps:
- Setup JFrog Artifactory.
- Access the third party library through Artifactory in our sample application
- Create and publish a Nuget package into Jfrog private Artifactory.
- Consume the package from the Jfrog private Artifactory in our sample application.
- Build the sample application in TFS
- Deploy artifacts
Artifactory Setup
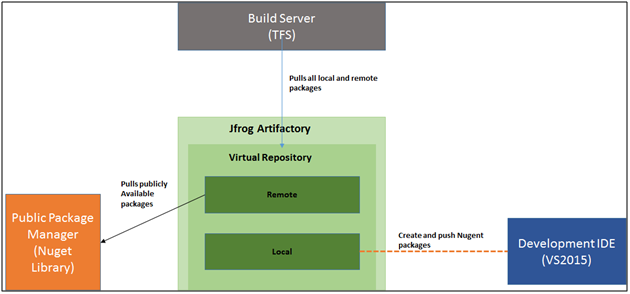
We will use Jfrog Artifactory for implementation. Jfrog Artifactory is accessed through repositories. It hosts three types of repository:
Local: This repository should contain all packages those are not supposed to expose to public library.
Remote: This repository works an intermediary between public package library and developers. The packages in the repository are pulled from the public library for the first time during build process and then served from the cache.
Virtual: This repository is a collection of local and remote repositories. It works as an interface for all repositories.
Following diagram shows the interaction between development IDE, Artifactory and the Build server through repositories. We will implement this process model.
Configure Repositories:
We will configure one Local and one Remote repository first. Then we will create a virtual repository and move both the repositories under it.
Access Jfrog interface. In the Admin module, select Repositories - Local.

Select Nuget as the package type for the repository:
Select a new repository. Provide name as repository key (e.g. Nugetlocal).
Save the repository. The newly created repository will be listed in the in the local repositories.
Follow the same approach to create a remote repository. Select Repositories – Remote.
Provide name as repository key (e.g. Nugetremote). As this is a remote repository the URL for Nuget public library (https://www.nuget.org/) is populated by default. You can test the connection with Nuget library.
Save the repository. The newly created repository will be listed in the in the list of remote repositories.
Now create a virtual repository from Repositories – Virtual menu and add the local and remote repositories into it.
Save the virtual repository.
Now select Artifacts menu to access the Artifact Repository Browser.
Select the newly created virtual repository Nugetvirtual from the list and select Set Me Up.
Jfrog will automatically configure the private Artifactory and provide URL to access the same.
The provided Artifactory URL (https://kausikn.jfrog.io/kausikn/api/nuget/Nugetvirtual) will be used to pull packages in the build process. If we require any packages from Nuget public library, under the hood Artifactory will get it through its remote repository.
Create and publish a Nuget package into Jfrog Artifactory
There are lots of tools, Visual Studio extensions are available to automatically create and publish Nuget packages. For understanding the concept, we will use simple commands to create and publish the package.
Develop a .NET library
Create a simple .NET class library project.
So, we have developed our own component. This component is not supposed to expose to the outside world through a public package library. Here comes one of the usefulness of Artifactory. We will package this library and publish it into Jfrog local repository.
Get Nuget.exe
Nuget.exe can be made available right-clicking any solution in Visual Studio and select "Enable NuGet Package Restore". This will not only enable NuGet package restore, it'll also automatically place NuGet exe in a ".nuget/" folder relative to your solution file. The option is only utilized to get the Nuget.exe. Other files and folders (.nuget, Nuget.target) can be deleted.
Place the Nuget.exe file somewhere sensible perhaps in a "tools" folder in your solution folder, or somewhere global if you want to update your Path system variable, so you can just open a command line anywhere you like and type Nuget.
As an alternative approach, you can also download command line NuGet.exe from the following link: http://nuget.codeplex.com/releases/view/58939
Create Nuspec File
You can create a .nuspec file from scratch in any text editor, or by starting with an editing file from another project. You can also have NuGet create a template manifest for your by using the following command:
nuget spec
From a Visual Studio project
Creating a .nuspec from a .csproj or .vbproj file is convenient because other packages that have been installed into those projects will be automatically referenced as dependencies. Simply use the following command in the same folder as the project file for the create library:
nuget spec
The Nuspec file for the project will be created successfully. This creates a template <project_name>.nuspec file as usual, but includes tokens that will be replaced at packaging time with values from the project. This means you do not need to update crucial values like the version number in the .nuspec as you update the project (but you can always replace the tokens with literal values, if desired.
Open the file .nuspec file in VS IDE and check the contents of the packages and modify details like author, description etc.
Nuspec Reference details available at http://docs.nuget.org/docs/reference/nuspec-reference
Create .Nupkg Package File
From a Visual Studio project, run nuget pack with your project file, which will automatically load the project's .nuspec file and replace any tokens within it using values in the project file:
nuget pack <project_name>.csproj
The nuget package will be successfully created. If a few tags are not modified with the relevant values, warning(s) will be displayed. You can view the package from the project folder:
Adding package to Artifactory
You can add your package to the configured local repository of Jfrog Artifactory. Use the following command to publish the package:
nuget push <package.nupkg> <username:password> -Source <Artifactory URL>
You can get the URL of the local Artifactory from the Jfrog interface. Select the local repository Nugetlocal from the Artifacts list and select Set Me Up. The URL for the local artifactory will be provided. You are also required to provide user account (i.e usename/password) for adding package in the Artifactory.
e.g:
nuget push CILibrary.1.0.0.0.nupkg myusername:mypassword -Source https://kausikn.jfrog.io/kausikn/api/nuget/Nugetlocal
The package is successfully pushed into the Jfrog local repository.
The published package can be viewed from Jfrog local repository as below:
Install the published package from VS2015
Now it’s time to pull the published library from the Artifactory. First, we will consume the package in Visual Studio from the sample application used in the first part of the article.
The following are the steps to consume the library from Visual Studio:
Add the Jfrog virtual repository as the package source. Use the configured virtual repository URL. Under the hood Jfrog will pull the package from its local repository.
Search for the published package in the Nuget Package Manger. Use the package id CILibrary for searching. The package will be shown along with version no, Authors and description.
Install the package into the solution.
The package will be successfully installed and added to the project reference.
Finally, the sample application is using one publicly available package (Elmah) from Nuget public library and another private package (CILibrary) from private library. Both the packages are being pulled through a common interface of my Artifactory.
Now, it’s time to build the project in TFS. Modify the Nuget.config file to use Artifactory URL as below:
="1.0"="utf-8"
<configuration>
<solution>
<add key="disableSourceControlIntegration" value="true" />
</solution>
<config>
<add key="repositoryPath" value=".\packages" />
</config>
<packageSources>
<add key="Artifactory" value="https://kausikn.jfrog.io/kausikn/api/nuget/Nugetvirtual" />
</packageSources>
</configuration>
Build the code in Visual Studio.
Commit and push the changes in the Git repository.
Access the TFS interface. Select the Build that had been created in the first part of the article. Queue a new build.
Observe the log for Nuget Restore build step. The Nuget package Elmah and newly published package CILibrary both are pulled from the Artifactory address: (https://kausikn.jfrog.io/kausikn/api/nuget/Nugetvirtual).
Note:
TFS build can fail in time of Nuget restore due to Jfrog security configuration setup. You might experience a credential related error while the build process tries to pull packages from your Jfrog Artifactory URL. The error means that Allow Anonymous Access is disabled for the Artifactory and users are required to enter their user name and password when using their NuGet clients. To resolve the error modify your Nuget.config file to define username and encrypted password for the Artifactory:
<packageSourceCredentials>
    <Artifactory>
        <add key="Username" value="admin" />
        <add key="Password" value="...encrypted password..." />
    </Artifactory>
</packageSourceCredentials>
I have tried to implement continuous development and integration approach in two parts of the article. The primary objective of the article is to explain the processes to the beginners. I have gone through the detail steps for most of the processes in Git, TFS, Nuget and JFrog Artifactory. Hope, the article will help developers to understand the concepts before adopting a fully automated continuous development and integration model.
References
This member has not yet provided a Biography. Assume it's interesting and varied, and probably something to do with programming.


