Introduction
In this article, we are going to develop our first web application for Smartphones using jQTouch.
The approach for developing applications in jQTouch is very simple. The steps are:
- For every screen of our web app, create a separate
div element and assign it a unique id. A div element is a popular HTML element heavily used for laying out web pages. A div also helps in defining a division or section of an HTML document. - Create an unordered list in the home screen
div element. Then, in each list item, place an anchor tag with an href that links to other divs (screens) of the application.
jQTouch will hide all the divs except the home screen, and render our Home Screen list items with attractive gradients. Tapping a list item causes the home screen to slide off and the linked div element to slide on. Hence, by using jQTouch, we can easily create and format the various screens of our web app and apply animated transitions between them.
Note: jQTouch takes any direct descendent in the <body> section and converts it into a full-screen panel that can be animated in either direction.
We will make three screens for our Book Store: a Home page, a Books page, and a Contact Us page. The three pages are represented by three div elements that are assigned the unique ids home, books and contactus respectively. Each div element that is a direct descendant of the body section will become a panel in the application. The two panels, books and contactus, additionally contain paragraph elements for displaying information on their respective pages.
Our three screens are shown in Figures 1(a), 1(b), and 1(c). And we will be calling these three main div elements as panels from now on. Each panel will also contain a toolbar for displaying the panel title and navigation buttons. The complete code of the application is shown in Listing 1.
Note: To try the examples of this book, create them in /Library/WebServer/Documents folder. If the following application is created and saved by name say a1.html, then to test it, open the browser and point it at the address http://localhost/a1.html.
Listing 1. Initial Application Code
<html>
    <head>
       <title>Books Store</title>
       <link type="text/css" rel="stylesheet" media="screen" href="jqtouch/jqtouch.css">
       <link type="text/css" rel="stylesheet" media="screen" href="themes/jqt/theme.css">
       <script type="text/javascript" src="jqtouch/jquery.1.3.2.min.js"></script>
       <script type="text/javascript" src="jqtouch/jqtouch.js"></script>
       <script type="text/javascript">
           var jQT = new $.jQTouch();
       </script>
    </head>
    <body>
        <div id="home">
           <div class="toolbar">
                <h1>Book Store</h1>
           </div>
           <ul class="edgetoedge">
               <li class="arrow"><a href="#books">Books</a></li>
               <li class="arrow"><a href="#contactus">Contact Us</a></li>
           </ul>
        </div>
        <div id="books">
            <div class="toolbar">
               <h1>Books</h1>
               <a class="button back" href="#">Back</a>
            </div>
            <p>We are a US-based organization providing a wide variety of books at a
               reasonable price</p>
        </div>
        <div id="contactus">
            <div class="toolbar">
               <h1>Contact Us</h1>
               <a class="button back" href="#">Back</a>
            </div>
            <p>XYZ Book Company</p>
            <p>11 Books Street, NY, NY 10012 </p>
            <p>USA</p>
        </div>
    </body>
</html>
The first thing we do in Listing 1 is link the CSS and JavaScript files by adding references to the jQTouch stylesheet and themes. The style rules in the jqtouch.css file are used for handling animations, orientations, and so on. Also, we add references to the appropriate JavaScript files—jquery.1.3.2.min.js and jqtouch.js. Remember that jQTouch requires, and is bundled with, its own copy of jQuery (though we can link another copy if desired). For the application to work, the reference to jQuery must be added before the reference to jQTouch.
As far as themes are concerned, jQTouch requires one basic theme to make page transitions work and provide iPhone native screens. jQTouch provides two themes:
- apple, which mimics the default iPhone look
- jqt, which is based on apple but is darker and more universal
We can also create our own custom themes either by building them from scratch or by modifying existing jQTouch themes.
After linking the CSS and JavaScript files, we need to initialize the jQTouch object, as shown here:
<script>
      var jQT = new $.jQTouch();
</script>
This function initializes a jQTouch object and assigns it to variable jQT. The variable jQT is then used to manipulate jQTouch with JavaScript through its functions. We can also specify certain optional property values while initializing the jQTouch object, enabling us to customize the behavior of our web application. We will examine these properties later in this chapter.
As we said earlier, all the screens of a web application are represented by individual div elements. All panels have toolbars, which are divs of class toolbar. The toolbar is displayed at the top of the every panel and appears as in the traditional iPhone format. A toolbar always contains an h1 element that represents the title of the panel and two optional buttons, one of which can be a back button. The back button appears on the left side of the toolbar and is used for navigating to the previous page.
We have added buttons with button and back class names in the toolbar of both the Books and Contact Us pages. The href on the back button is set to #, which will navigate to the previous panel. We can, of course, navigate to a panel with a specific id instead, by setting the href to point at it. For example, if the href of the back button is set to #home, we will always be sent to home. The two list items (li) in the home panel have hyperlinks pointing to books and contactus, which means that when these list items are selected, we will jump to the panel of the respective id.
We want the home page to display navigation links to the Book and Contact Us pages. To display such navigation links, we use an unordered list. We can add simple classes to the <ul> elements to change their style, for example, edgetoedge or rounded:
- The
edgetoedge class makes the unordered list appear in the iPhone’ s edge-to-edge navigation list design. Each of the items in <ul> element of class edgetoedge is stretched from left to right in the viewable area for easy touch input, as shown in Figure 2 (a). - The
rounded class is usually used for destination pages to show an information list. The items in a rounded class <ul> element are surrounded by a rounded rectangle box.
Each item within an unordered list contains a hyperlink that navigates to the designated application panel. We may optionally apply the arrow class to the list items, which will display an arrow to the right of the item. The icon tells the user that there is an additional web page (screen) to be viewed.
Whenever we navigate to a new page, two animations occur: The new page animates in and the old page animates out. When we select a back button, reverse animation takes place. When a list item is selected, the default animation makes it appear as if the new page is sliding in from the right side of the screen. We can move to another web page by applying any of the eight different animation effects: slide, slideup, dissolve, fade, flip, pop, swap, and cube.
Note: The toolbar button may be of any class—back, button or cancel—but may have any animation style.
Each visited screen is inserted into the page history, and we can navigate back to any previous page of the history by using the back button.
When the code in Listing 1 is executed, the first panel, home, appears, as shown in Figure 1(a). The panel title is Book Store, which is followed by two list items, Books and Contact Us. When the Books list item is clicked, we jump to the books panel, as shown in Figure 1(b). The title of the target panel is Books and there’s a Back button on the toolbar. The books panel information appears below the toolbar. If we select the Back button, we will return to the home panel.
Similarly, when Contact Us is selected, we jump to the contactus panel, as shown in Figure 1(c).
Note: Since we have not yet specified the type of animation in the anchor tags, the default animation, slide, is applied.
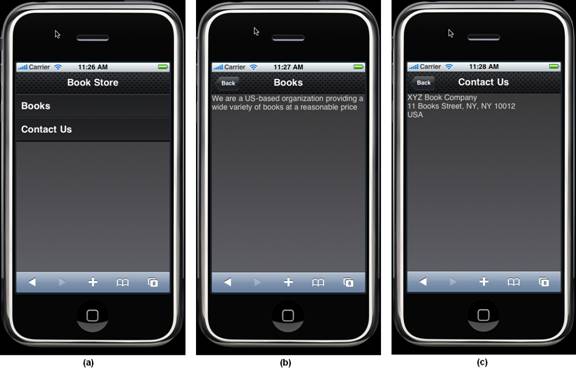
Figure 1 (a) Home panel with two list items (b) Books panel with back button (c) Contact Us panel with back button
Applying the Apple Theme
Our first round of coding used the jqt theme, which is fairly dark. Let’s see how our page looks when the theme is changed to apple. This is simple to do—we just need to replace the word jqt with apple in the line that adds reference to the jQTouch theme. Thus:
<link
type="text/css" rel="stylesheet" media="screen" href="themes/jqt/theme.css">
is replaced by:
<link type="text/css" rel="stylesheet"
media="screen" href="themes/apple/theme.css">
Now our application will appear in the apple theme, as shown in Figures 2(a), 2(b), and 2 (c).

Figure 2 (a) Home panel with two list items (b) Books panel with back button (c) Contact Us panel with back button
B.M.Harwani is founder and owner of Microchip Computer Education (MCE), based in Ajmer, India that provides computer education in all programming and web developing platforms. He graduated with a BE in computer engineering from the University of Pune, and also has a 'C' Level (master's diploma in computer technology) from DOEACC, Government Of India. Being involved in teaching field for over 16 years, he has developed the art of explaining even the most complicated topics in a straight forward and easily understandable fashion. He has written several books on various subjects that includes JSP, JSF, EJB, PHP, .Net, Joomla, jQuery and Smartphones. To know more, visit http://bmharwani.com/blog


 General
  News
News  Suggestion
  Question
  Bug
Bug  Answer
  Joke
Joke  Praise
  Rant
Rant  Admin
Admin 


