Introduction
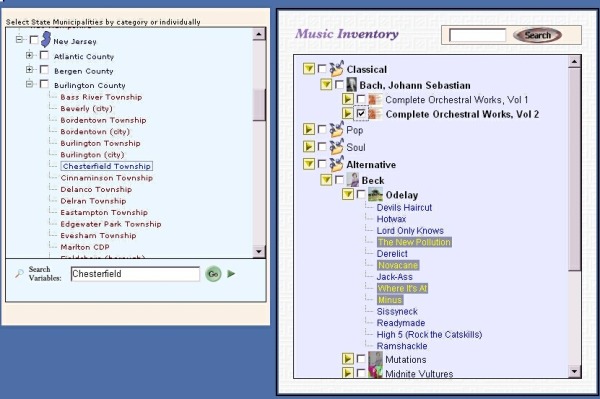
The TreeCheckList web control is simple, yet effective code for supporting display, search, and selection of hierarchical data either individually, or by category. The look of the tree is very customizable because everything is supported by CSS styles. The control is completely cross-browser compatible, and very easy to implement. Data elements can be loaded individually, or by assigning an XML document to the control. A client-side JavaScript object class supports all the UI interaction, as well as provides a search function that aids in locating a particular element in larger data sets.
I developed this control because I wanted a way to easily select categories of data, but also have a way to individually select items within the category as well, while still maintaining a selection state of the category. This was previously handled usually with multiple listboxes, as most tree controls do not provide the selection relationships through the levels of parents to children. I didn't want to over-complicate the design, or hack a standard tree control, so I put this control together for this specific type of selection.
Demo Quick Start
To run the demo, simply download the zip file and follow these steps:
- Create a new Web Application called TreeCheck.
- Unzip the demo files into the TreeCheck directory (and include in project if desired).
- Access the TreeDemo.aspx file from your local web (i.e., http://localhost/TreeCheck/TreeDemo.aspx).
The demo provides two examples of tree lists showing how XML data sources and CSS are used to create the displays. All source code is included in the demo.
Tree Design Architecture
TreeCheckList is a very straightforward layout where the HTML output is simply nested div elements to represent the levels of the tree structure. The tree control itself is a div element, and each node is a div element represented by either a "p" or "c" designation to indicate that it is a parent or child node. The HTML output structure of the tree will look as follows:
<div id="treeList" style="margin:0; padding:0;">
<div id="pNode1_0"><input id="pNode1_0_chk" type="checkbox"/>
<span>First Level Node 0</span>
<div id="i_pNode1_0" style="display:none; visibility:hidden;">
<div id="cNode2_0"><span>Second Level Node 0</span></div>
<div id="cNode2_1"><span>Second Level Node 1</span></div>
</div>
</div>
<div id="pNode1_1"><input id="pNode1_1_chk" type="checkbox"/>
<span>First Level Node 1</span>
<div id="i_pNode1_1" style="display:none; visibility:hidden;">
<div id="cNode3_0"><span>Second Level Node 0</span></div>
<div id="pNode3_1"><input id="pNode3_1_chk" type="checkbox"/>
<span>Second Level Node 1</span>
<div id="i_pNode3_1" style="display:none; visibility:hidden;">
<div id="cNode4_0"><span>Third Level Node 0</span></div>
</div>
</div>
<div id="cNode3_2"><span>Second Level Node 2</span></div>
</div>
</div>
<div id="pNode1_2"><input id="pNode1_2_chk" type="checkbox"/>
<span>First Level Node 2</span>
<div id="i_pNode1_2" style="display:none; visibility:hidden;">
<div id="cNode5_0"><span>Second Level Node 0</span></div>
</div>
</div>
</div>
(Note: The word "Node" was removed from the IDs in the current version of the code to reduce the HTML size of the tree.)
Notice that within each pNode, there is a div element "i_pNode". This is the group index element of child nodes that is hidden or visible based on the tree level being expanded or collapsed by the user. The text of each node is represented by the span element, and all parent nodes include a checkbox input element.
As the tree is merely a group of div and span elements, all elements can be easily controlled by styles. Most of the style information is applied by the JavaScript code so that there is less text to download per tree. As the demo shows, each tree can have its own styles, so that multiple trees on a single page can look completely different.
Overview of the Server Code
The base class of the tree control is TreeCheckList (TreeCheckList.cs). This is the code that renders the div element structure of the tree and creates the client JavaScript object reference and all CSS and image parameters. The public properties of the TreeCheckList class are used to setup all the display parameters and styles:
TreeListCssClass
| CSS class for main tree div element.
|
TreeListCssStyle
| CSS style for main tree div element.
|
TreeLevelCssClass
| CSS class prefix for each tree level (level number is appended).
|
TreeLevelClassOn
| true if using TreeLevelCssClass. Default is true.
|
| | |
ImageCollapseURL
| Image URL for open parent nodes (i.e., minus sign).
|
ImageExpandURL
| Image URL for closed parent nodes (i.e., plus sign).
|
ImageJoinURL
| Image URL for child node.
|
ImageTeeURL
| Image URL for level one node with no children.
|
ImageTopCollapseURL
| Image URL for level one topmost open parent node.
|
ImageTopExpandURL
| Image URL for level one topmost closed parent node.
|
ImageTopNoExpandURL
| Image URL for level one topmost child node.
|
| | |
ExpandTreeList
| true if tree is initially shown expanded. Default is false.
|
NodeImagePosition
| TreeCheckListImagePosition enum setting to position node image.
|
IndentOn
| Not currently implemented.
|
| | |
ParentNodeLabelCssClass
| CSS class for normal parent label.
|
ParentNodeLabelCssStyle
| CSS style for normal parent label.
|
ParentNodeSelectedCssClass
| CSS class for selected parent label.
|
ParentNodeMouseOverNormalCssClass
| CSS class for mouse over normal parent label.
|
ParentNodeMouseOverSelectedCssClass
| CSS class for mouse over selected parent label.
|
ParentNodeSearchMouseOverNormalCssClass
| CSS class for mouse over search result normal parent label.
|
ParentNodeSearchMouseOverSelectedCssClass
| CSS class for mouse over search result selected parent label.
|
ParentNodeSearchNormalCssClass
| CSS class for search result normal parent label.
|
ParentNodeSearchSelectedCssClass
| CSS class for search result selected parent label.
|
| | |
ChildLeftIndent
| Specifies the child level indent margin in pixels.
|
ChildNodeLabelCssClass
| CSS class for normal child label.
|
ChildNodeLabelCssStyle
| CSS style(s) for normal child label.
|
ChildNodeSelectedCssClass
| CSS class for selected child label.
|
ChildNodeMouseOverNormalCssClass
| CSS class for mouse over normal child label.
|
ChildNodeMouseOverSelectedCssClass
| CSS class for mouse over selected child label.
|
ChildNodeSearchMouseOverNormalCssClass
| CSS class for mouse over search result normal child label.
|
ChildNodeSearchMouseOverSelectedCssClass
| CSS class for mouse over search result selected child label.
|
ChildNodeSearchNormalCssClass
| CSS class for search result normal child label.
|
ChildNodeSearchSelectedCssClass
| CSS class for search result selected child label.
|
The following property functions allow for custom mouse handling on the node level. The MouseClick function can be used to provide a postback event for each node if desired.
ParentNodeMouseClickFunction
| Script function command to execute on parent node mouse click.
|
ParentNodeMouseOutFunction
| Script function command to execute on parent mouse out.
|
ParentNodeMouseOverFunction
| Script function command to execute on parent mouse over.
|
ChildNodeMouseClickFunction
| Script function command to execute on child node mouse click.
|
ChildNodeMouseOutFunction
| Script function command to execute on child mouse out.
|
ChildNodeMouseOverFunction
| Script function command to execute on child mouse over.
|
To assign data to the tree control, there are currently three public methods:
public int AddNode(string pID, string pLabel, string pParent, string imageUrl)
This method is used to add one node at a time. The pID parameter indicates a unique node ID; pLabel is the displayed text; the parent node ID is indicated by pParent, or an empty string if node is on level one; and the imageUrl parameter indicates the image to display for this node. The return value is the node position, or -1 if the node ID is not unique.
public void AddNodes(DataTable Nodes, string FieldID,
                     string FieldLabel, string pParent)
This method uses a DataTable to populate a group of nodes with a single parent. The FieldID and FieldLabel parameters specify the name of the column in the DataTable that contains these values. The pParent parameter indicates the node ID of the parent. This method does not yet support images for the nodes as I wrote this for a specific implementation, but a column to accommodate the image URL could easily be added.
public int LoadXml(XmlDocument xmlDoc, string attributeName)
This method will most likely be the most used and easiest way to populate the tree. The XML file passed in as the XmlDocument can represent the entire tree and all data associated. The attributeName parameter is used to indicate the attribute on each level of the XML that represents the node display text. Therefore, the same XML file could be used to represent two different views of the data. When using this method to load the tree, the ID of each node is automatically assigned by position.
Internally to the TreeCheckList class, the nodes of the tree are represented in ArrayLists. The ArrayList _nodeIDs contains the unique identifier of each node. Another ArrayList, _nodeParent, contains the relationship between parent and child. The other ArrayLists contain the display text and image for each node. When the tree is rendered, the ArrayLists are traversed to build the div elements. The main functionality of this rendering is done in the recursive WriteNode method.
protected int WriteNode(HtmlTextWriter output, string nodeID, object node,
                        int level, int pos, bool bHasChildren, string pDivID)
{
    int nChildCount = 1;
    string divID = this.ClientID + "_";
    divID += (bHasChildren) ? "p" : "c";
    divID += level.ToString() + "_" + pos.ToString();
    output.Write("<div");
    if (_childLeftIndent != 0)
    {
        string indent = "margin-left: " + (_childLeftIndent*(level-1)).ToString() + "px; ";
        output.WriteAttribute("style", indent);
    }
    if (bHasChildren)
    {
        output.WriteAttribute("id", divID);
        output.WriteAttribute("value", nodeID);
        if (_useTreeLevelClass && (_treeLevelCssClass != ""))
            output.WriteAttribute("class", _treeLevelCssClass + level.ToString());
        output.Write(">");
        if ((level==1) && (pos==0))
            RenderExpandImage(output, divID, _imageTopExpand);
        else
            RenderExpandImage(output, divID, _imageExpand);
        if (_imagePosition == TreeCheckListImagePosition.ImageBeforeCheck)
            RenderNodeImage(output, (string)_nodeImages[pos]);
        RenderCheckBox(output, divID);
    }
    else
    {
        output.WriteAttribute("id", divID);
        output.WriteAttribute("value", nodeID);
        if (_useTreeLevelClass && (_treeLevelCssClass != ""))
            output.WriteAttribute("class", _treeLevelCssClass + level.ToString());
        output.Write(">");
        if (level==1)
        {
            string img = (pos==0) ? _imageTopTee : _imageTee;
            if (img != "")
            {
                output.Write("<img");
                output.WriteAttribute("align", "absmiddle");
                output.WriteAttribute("src", img);
                output.Write("/>");
            }
        }
        else if (_imageJoin != "")
        {
            output.Write("<img");
            output.WriteAttribute("align", "absmiddle");
            output.WriteAttribute("src", _imageJoin);
            output.WriteAttribute("border", "0");
            output.Write("/>");
        }
    }
    if (_imagePosition == TreeCheckListImagePosition.ImageAfterCheck)
        RenderNodeImage(output, (string)_nodeImages[pos]);
    output.Write("<span");
    output.WriteAttribute("id", divID + "_lbl");
    if (bHasChildren)
    {
        if (_pnodeLabelStyle != "")
            output.WriteAttribute("style", _pnodeLabelStyle);
        if (_pnodeMouseOverFn != "")
            output.WriteAttribute("onmouseover", _pnodeMouseOverFn);
        if (_pnodeMouseOutFn != "")
            output.WriteAttribute("onmouseout", _pnodeMouseOutFn);
        if (_pnodeMouseClickFn != "")
            output.WriteAttribute("onclick", _pnodeMouseClickFn);
    }
    else
    {
        if (_cnodeLabelStyle != "")
            output.WriteAttribute("style", _cnodeLabelStyle);
        if (_cnodeMouseOverFn != "")
            output.WriteAttribute("onmouseover", _cnodeMouseOverFn);
        if (_cnodeMouseOutFn != "")
            output.WriteAttribute("onmouseout", _cnodeMouseOutFn);
        if (_cnodeMouseClickFn != "")
            output.WriteAttribute("onclick", _cnodeMouseClickFn);
    }
    output.Write(">");
    output.Write((string)node);
    output.Write("</span>");
    if (_imagePosition == TreeCheckListImagePosition.ImageAfterLabel)
        RenderNodeImage(output, (string)_nodeImages[pos]);
    if (bHasChildren)
    {
        output.Write("<div");
        output.WriteAttribute("id", divID + "_i");
        if (!_expandTreeList)
            output.WriteAttribute("style", "display:none; visibility:hidden;");
        output.Write(">");
        for (int i=pos+1; i<_nodeIDs.Count; i++)
        {
            if ((string)_nodeParent[i] == nodeID)
            {
                nChildCount += WriteNode(output, (string)_nodeIDs[i],
                  _nodeLabels[i], level+1, i,
                  _nodeParent.Contains(_nodeIDs[i]), divID);
            }
        }
        output.Write("</div>");
    }

    output.Write("</div>");
    return nChildCount;
}
The TreeCheckList class also writes the necessary JavaScript script blocks, and creates the client object class for the specific tree in the PreRender method. All of the CSS class settings are passed to the child object class.
protected string ClientInitializeScript()
{
    string sId = this.ClientID;
    string sConstruct = string.Format(
        "var tree_obj_{0} = new CheckTree('{0}', '{1}', '{2}', '{3}', " +
        "'{4}', '{5}', '{6}', '{7}', '{8}', '{9}', '{10}', '{11}', " +
        "'{12}', '{13}', '{14}', '{15}', '{16}', '{17}', '{18}', '{19}', '{20}');"
        , sId
        , _imageTopExpand
        , _imageTopCollapse
        , _imageExpand
        , _imageCollapse
        , _pnodeLabelClass
        , _pnodeSelectedClass
        , _pnodeNormalOverClass
        , _pnodeSelectOverClass
        , _pnodeSearchNormalClass
        , _pnodeSearchSelectClass
        , _pnodeSearchNormalOver
        , _pnodeSearchSelectOver
        , _cnodeLabelClass
        , _cnodeSelectedClass
        , _cnodeOverNormalClass
        , _cnodeOverSelectClass
        , _cnodeSearchNormalClass
        , _cnodeSearchSelectClass
        , _cnodeSearchNormalOver
        , _cnodeSearchSelectOver
        );
    return string.Format(GetScriptTemplate(), sConstruct);
}
Using the TreeCheckList Class
In my demo code, I create two examples of the tree control. I use the TreeCheckList control class within other WebControl objects to provide more insulation and abstraction, and also show how you can create custom, reusable controls that have the tree embedded within.
TreeListControl1.ascx and TreeListControl2.ascx are the two user controls that embed the TreeCheckList control. Examining the basic HTML of these controls reveals that they are very simple containers:
<%@ Control Language="c#" AutoEventWireup="false"
   Codebehind="TreeListControl2.ascx.cs" Inherits="TreeCheck.TreeListControl2"
   TargetSchema="http://schemas.microsoft.com/intellisense/ie5" %>
<div id="Tree2">
<div id="TreeList2">
<div id="TreeCtrl2">
<div id="Tree2Top">
<div id="Tree2Header"></div>
<div class="treeSearch2" id="TreeSearch2" runat="server"></div>
</div>
<div id="TreeArea2" runat="server" class="TreeArea2">
</div>
<div class="treeInfo2" id="TreeInfo2" runat="server"></div>
</div>
</div>
</div>
The simplicity of the code-behind is apparent, as the only thing happening here is that the tree control is added, and a few controls to provide a search interface are positioned within this outer control:
private void Page_Load(object sender, System.EventArgs e)
{
TreeCheckList tcl = new TreeCheckList();
tcl.ImageTopExpandURL = "tree_arrow_expand2.gif";
tcl.ImageTopCollapseURL = "tree_arrow_collapse2.gif";
tcl.ImageExpandURL = "tree_arrow_expand2.gif";
tcl.ImageCollapseURL = "tree_arrow_collapse2.gif";
tcl.ImageJoinURL = "tree_join.gif";
tcl.ImageTopNoExpandURL = "";
tcl.ImageTeeURL = "";
tcl.NodeImagePosition = TreeCheckListImagePosition.ImageAfterCheck;
tcl.TreeListCssClass = "T2_tree";
tcl.TreeLevelCssClass = "T2_level";
tcl.ParentNodeLabelCssClass = "T2_treeParentLabel";
tcl.ParentNodeSelectedCssClass = "T2_treeParentSel";
tcl.ParentNodeMouseOverNormalCssClass = "T2_treeParentNormalOver";
tcl.ParentNodeMouseOverSelectedCssClass = "T2_treeParentSelectOver";
tcl.ParentNodeSearchNormalCssClass = "T2_treeParentSearchNormal";
tcl.ParentNodeSearchSelectedCssClass = "T2_treeParentSearchSelect";
tcl.ParentNodeSearchMouseOverNormalCssClass = "T2_treeParentSearchNormalOver";
tcl.ParentNodeSearchMouseOverSelectedCssClass = "T2_treeParentSearchSelectOver";
tcl.ChildNodeLabelCssClass = "T2_treeChildLabel";
tcl.ChildNodeSelectedCssClass = "T2_treeChildSel";
tcl.ChildNodeMouseOverNormalCssClass = "T2_treeChildMouseOverNormal";
tcl.ChildNodeMouseOverSelectedCssClass = "T2_treeChildMouseOverSelect";
tcl.ChildNodeSearchNormalCssClass = "T2_treeChildSearchNormal";
tcl.ChildNodeSearchSelectedCssClass = "T2_treeChildSearchSelect";
tcl.ChildNodeSearchMouseOverNormalCssClass = "T2_treeChildSearchNormalOver";
tcl.ChildNodeSearchMouseOverSelectedCssClass = "T2_treeChildSearchSelectOver";
tcl.ChildLeftIndent = 0;
tcl.LoadXml(xmlDoc, xmlAttribute);
string msg = "";
try
{
TreeArea2.Controls.Add(tcl);
}
catch(Exception ex)
{
msg = ex.Message;
}
string jsTemp =
"<script language="'javascript'"> tmpSelectionDisplayDivs.put('" +
tcl.ClientID + "', 'TreeSelections2'); </script>";
Page.RegisterClientScriptBlock("TreeListC2", jsTemp);
TextBox txtSearch = new TextBox();
txtSearch.ID = tcl.ClientID + "txtSearch";
txtSearch.CssClass = "T2_searchText";
txtSearch.EnableViewState = false;
txtSearch.MaxLength = 50;
txtSearch.AutoPostBack = false;
TreeSearch2.Controls.Add(txtSearch);
string btnImageGo = "btn_small_search.gif";
string btnImageHv = "btn_small_search_hvr.gif";
System.Web.UI.WebControls.Image btnImage =
new System.Web.UI.WebControls.Image();
btnImage.CssClass = "searchButton";
btnImage.ImageUrl = btnImageGo;
btnImage.ImageAlign = ImageAlign.AbsMiddle;
btnImage.Attributes.Add("onmouseover", "this.src='" +
btnImageHv + "'; style.cursor='pointer'; ");
btnImage.Attributes.Add("onmouseout", "this.src='" +
btnImageGo + "'; style.cursor='default'; ");
HtmlAnchor btnSearch = new HtmlAnchor();
btnSearch.ID = tcl.ClientID + "btnSearch";
btnSearch.Controls.Add(btnImage);
TreeSearch2.Controls.Add(btnSearch);
string imgNext = "btn_rightarrow_search.gif";
string imgNextHvr = "btn_rightarrow_search.gif";
System.Web.UI.WebControls.Image btnImgNext =
new System.Web.UI.WebControls.Image();
btnImgNext.CssClass = "searchNext";
btnImgNext.ImageUrl = imgNext;
btnImgNext.ToolTip = "Find Next";
btnImgNext.ImageAlign = ImageAlign.AbsMiddle;
btnImgNext.Attributes.Add("onmouseover", "this.src='" +
imgNextHvr + "'; style.cursor='pointer'; ");
btnImgNext.Attributes.Add("onmouseout", "this.src='" +
imgNext + "'; style.cursor='default'; ");
HtmlAnchor btnNext = new HtmlAnchor();
btnNext.ID = tcl.ClientID + "btnNext";
btnNext.Attributes.CssStyle.Add("visibility", "hidden");
btnNext.Controls.Add(btnImgNext);
TreeSearch2.Controls.Add(btnNext);
btnSearch.Attributes.Add("onclick",
"event.cancelBubble = true; variableSearch(event, '" +
tcl.ClientID + "', '" + txtSearch.ClientID + "', '" +
btnSearch.ClientID + "', '" + btnNext.ClientID + "', '" +
TreeInfo2.ClientID + "');");
btnNext.Attributes.Add("onclick",
"event.cancelBubble = true; variableNext(event, '" +
tcl.ClientID + "', '" + txtSearch.ClientID + "', '" +
btnSearch.ClientID + "', '" + btnNext.ClientID +
"', '" + TreeInfo2.ClientID + "');");
}
The only interesting thing to note is the last two lines of the Page_Load method. These are the JavaScript functions called to perform a search against the tree control data on the client. The functions variableSearch and variableNext are contained in the JavaScript file TreeSearch.js, which was added to the head section of the main TreeDemo.aspx file. The TreeSearch.js file could also have been registered in the TreeListControl1 or TreeListControl2 code.
Overview of the Client JavaScript Code and CSS
Important note: This demo includes references to browser_detect.js and utility.js. These are global files that I always include in every project that uses JavaScript. If you transport the TreeCheck.js file to your project, don't forget to bring these files along and include them in the page head, or register them in your code.
Once the TreeCheckList control has been rendered, it will be displayed in the client browser where the CheckTree JavaScript object class takes over. The CheckTree class supports various functionalities for manipulating the display of the tree, capturing selection changes, and providing the ability to search the contents of the tree. When the tree is initially instantiated, CheckTree adds event listeners to each node to provide mouse and checkbox click handling.
Handling the parent checkbox click:
var chks = this.obj.getElementsByTagName("input");
for (var i=0; i<chks.length; i++)
{
    chks[i].checked = false;
    if (this.IsParentNode(chks[i].id))
    {
        if (chks[i].attachEvent)
        {
            chks[i].attachEvent('onclick',
                    function(e) { eval("NodeChecked(e,'" + id + "',true);") });
            chks[i].attachEvent('onmouseover',
                    function(e) { eval("ChkMouseOver(e,'" + id + "');") });
            chks[i].attachEvent('onmouseout',
                    function(e) { eval("ChkMouseOut(e,'" + id + "');") });
        }
        else if (chks[i].addEventListener)
        {
            chks[i].addEventListener('click',
                    function(e) { eval("NodeChecked(e,'" + id + "',true);") }, false);
            chks[i].addEventListener('mouseover',
                    function(e) { eval("ChkMouseOver(e,'" + id + "');") }, false);
            chks[i].addEventListener('mouseout',
                    function(e) { eval("ChkMouseOut(e,'" + id + "');") }, false);
        }
    }
}
When the tree is instantiated, the CheckTree object is added to a global hashtable of trees so that more than one tree can be used per page.
TREECHECK_Trees.put(this.id, this);
As selections are changed on the tree, the CheckTree functions handle the events and update the node(s) with the required CSS class assignment. This assignment of CSS classes is done in the single function SetNodeClass:
function CheckTree_SetNodeClass(nodeID, bMouseOver)
{
    var nodeObj = getObject(nodeID);
    if (!nodeObj)
        return;

    if (this.IsParentNode(nodeID))
    {
        if (this.IsNodeSelected(nodeID) || this.HasSelections(nodeID))
        {
            if (this.searchID == nodeID)
                this.SetNodeTextClass(nodeID,
                  (bMouseOver) ? this.parentSearchSelectedOverCss :
                   this.parentSearchSelectedCss);
            else
                this.SetNodeTextClass(nodeID, (bMouseOver) ?
                  this.parentSelectedOverCss : this.parentSelectedCss);
        }
        else
        {
            if (this.searchID == nodeID)
                this.SetNodeTextClass(nodeID,
                  (bMouseOver) ? this.parentSearchNormalOverCss :
                   this.parentSearchNormalCss);
            else
                this.SetNodeTextClass(nodeID, (bMouseOver) ?
                  this.parentNormalOverCss : this.parentNormalCss);
        }
    }
    else if (this.IsChildNode(nodeID))
    {
        if (this.IsNodeSelected(nodeID))
        {
            if (this.searchID == nodeID)
                this.SetNodeTextClass(nodeID,
                  (bMouseOver) ? this.childSearchSelectedOverCss :
                   this.childSearchSelectedCss);
            else
                this.SetNodeTextClass(nodeID, (bMouseOver) ?
                  this.childSelectedOverCss : this.childSelectedCss);
        }
        else
        {
            if (this.searchID == nodeID)
                this.SetNodeTextClass(nodeID,
                  (bMouseOver) ? this.childSearchNormalOverCss :
                   this.childSearchNormalCss);
            else
                this.SetNodeTextClass(nodeID, (bMouseOver) ?
                  this.childNormalOverCss : this.childNormalCss);
        }
    }
}
When a parent checkbox is clicked, or individual children are selected, the parent-child chain is traversed and all related nodes are updated to reflect the new selection. Each selected node is captured in the nodesSelected hashtable, which can also be used to provide updated information back to the server.
The CheckTree JavaScript object class provides basic search functions for locating node text within the tree, and then scrolling the found node into view. In order to manipulate these search functions and provide feedback to the user, you may need to add other JavaScript functions to call the search features. I have provided a set of functions in TreeSearch.js that do just this. The function variableSearch starts an initial search, and uses a timeout call to provide a nice wait cursor to the user, and then some feedback when the search is complete. The function variableNext does the same task for a search that is continued to the next item that meets the search criteria. These functions were assigned to buttons in the TreeListControl1 and TreeListControl2 classes.
One important feature of the JavaScript code that should be highlighted is the event function that is triggered when a checkbox is checked on or off. Because a parent node in a large tree may have hundreds of children, there could be a significant user wait period while all these nodes are updated. I wanted to show the user that the tree was busy, so I divided the NodeChecked function into two parts. The first part of the function validates the parameters and sets the checked node's state. The function then disables the parent node and calls setTimeout to handle the rest of the child nodes. This call to setTimeout ensures that the wait cursor is displayed and the node is visibly active to the user.
function CheckTree_NodeChecked(nodeID, bUpdate)
{
    if (!this.IsParentNode(nodeID))
        return;

    var nodeObj = getObject(nodeID);
    if (!nodeObj)
        return;
    var inodeID = nodeID + "_i";
    var inodeObj = getObject(inodeID);
    if (!inodeObj)
    {
        alert('no object: ' + inodeID);
        return;
    }
    var chkObj = getObject(nodeID + "_chk");
    if (chkObj)
    {
        this.SetNode(nodeID, chkObj.checked);
        cursor_wait();
        nodeObj.disabled = true;
        setTimeout("CheckTree_NodeChecked_OnTimer('" + this.id + "', '" +
                   nodeID + "', " + chkObj.checked + ", " + bUpdate + ")", 5);
    }
}
When the timer fires, the second half of the NodeChecked function is called. This part of the function actually walks through all the levels of child and parent nodes setting the selection state. As the function ends, it restores the parent node to enabled and clears the wait cursor.
Note: If your tree is known to only contain small amounts of data, the NodeChecked function can be combined into one function without the setTimeout. This will provide much faster selections and better user interaction.
All of the styles for this demo are included in the file TreeCheck.css. I tried to keep the settings fairly simple, but different enough to create two different tree displays. The settings in the top portion of the file are for the TreeDemo page layout. The individual tree settings are found after that. Looking at the Tree2 settings, you can see that this tree uses the tree level classes to provide specific styles for each child level in the tree. In the server code, the tree level class was specified as "T2_level". The level numbers are then appended to the class name, and in the CSS file, you must provide each class level - T2_level1, T2_level2, etc. Using these specific level classes, you can provide custom margins, fonts, etc., that can dramatically change the look of the tree.
The text label classes for each state of the tree nodes are provided in the CSS file. These different states could be as simple as one style, or change dramatically with each node state. In the demo, Tree2 child nodes are given a text color change from Blue to Yellow when selected, with the background also changing color.
.T2_treeChildLabel
{
    color: Blue;
    font-weight: normal;
    margin-left: 5px;
}
.T2_treeChildSel
{
    color: Yellow;
    font-weight: normal;
    background-color: #8F8FAF;
    margin-left: 5px;
    padding-left: 2px;
    padding-right: 2px;
}
When the mouse is over a child node, notice how the left margin is increased slightly to give the "float" effect.
.T2_treeChildMouseOverNormal
{
    color: #303082;
    font-weight: normal;
    cursor: pointer;
    background-color: #ACDEFF;
    margin-left: 8px;
}
Also, when a child node is found as the result of a search, a border is added to give the user a very nice visual clue as to where the item is located.
.T2_treeChildSearchNormalOver{
    background-color: #EFEFBF;
    color: Blue;
    font-weight: normal;
    border: solid 1px #8F8FAF;
    margin-left: 8px;
    padding-left: 2px;
    padding-right: 2px;
    cursor: pointer;
}
Using unlimited combinations of styles against the tree can give some very impressive and different looks to an otherwise common control.
Limitations and Future Enhancements
The most important limitation to acknowledge here is the way selections are returned to the server. My personal implementation of this control uses specific AJAX calls back to the server so that I can update other controls on the page without a postback. I did not want to weigh down this example with a lot of AJAX code that is only specific to my needs, so I left the JavaScript SelectionsChanged function open for any type of use. To say this another way, there is no postback handling in this version of the control. You will have to implement something to accommodate your needs. I have shown in the demo how another text control on the page can be updated with the tree control selections. As there are also values assigned to each node, they could be retrieved and sent back to the server, or used to update the page through JavaScript. I hope to add a postback event handler sometime in the future, but as I don't really need this, it is not a high priority. If you decide to implement something, please share.
Additionally, I did not add a viewstate to this control. I did not have any reason to save full state back and forth, as I did not wish to post back the page to the server, and did updates via AJAX. The state of the tree can be restored using the JavaScript function LoadSelectionState. This function takes an array of nodeIDs and restores the selection state of the tree from this array. If you incorporate a postback in the tree, use this function to restore the selections by registering a JavaScript call in your server code. I will be working on adding viewstate sometime as well.
One thing I must apologize for is the lack of comments in the JavaScript. I promise I will get around to providing more information about parameters and code. :)
Acknowledgements
I would like to thank Mike Ellison for his DropDownCheckList control (DropDownCheckList.aspx). I came up with the idea for the TreeCheckList after I looked at his control. Mike's control and code are top-notch, and I did my best to emulate this type of development.
Software architect and developer with over 20 years of experience, specializing in GUI designs and intranet systems in MFC/C++ and ASP.Net using C#.


 General
  News
News  Suggestion
  Question
  Bug
Bug  Answer
  Joke
Joke  Praise
  Rant
Rant  Admin
Admin 


