Introduction
In this article I will show how to use a GridView control with another GridView inside it, each one using different skins. The article addresses two common needs: nested grids and skins. It is often hard to find documentation on these issues, so this article will hopefully allow developers to get up to speed with the powerful GridView control.
Background
The GridView control was introduced with ASP.NET 2.0. It replaces the DataGrid control and is extremely flexible, as it allows to use themes, CSS (mixed together) and basically whatever you can imagine, and still keep everything manageable.
Using the code
To try out the code, simply download and unzip the files and then start Visual Studio 2005. Choose "Open:Web Site" from the menu and select the directory (SkinSampleWebRoot). I already included a simple Access database in the App_Data folder of the application.
The Outer GridView
To create the first (outer) grid, insert a GridView control and specify the data source (Access Database in our example). Select the columns you want to show. I selected carmaker_id and carmaker_name but the second would suffice; you have to select the primary key though, if you want to allow for update and delete operations. Name the GridView gvCars. You should already have the columns you selected as BoundFields, (select "Edit Columns"). Configure the column and set the header to "Car Maker". Up until now there was no coding required.
The Nested GridView
Because the database has two tables with a one-to-many relationship, we naturally want to show the data accordingly. This can be achieved by inserting a second GridView inside the outer one.
Using the GridView's smart tag, add a new column to the first grid and set its type to "TemplateField". Then, again using the smart tag, select "Edit Templates" to edit the item template you just created. Insert a new GridView control into it and name it gvModels. Set the "Show header" property of this grid to False so that you don't get repeated headers in every row of the outer grid. Exit the template editing by selecting "End template editing" in the smart tag.
Unfortunately there is no way of visually binding both GridViews, even in a simple one-to-many relationship. However, it is straightforward to do it through code. Start by creating an event handler for the RowDataBound event of the first GridView (gvCars). All you have to do is type a function name (I named it gvCars_rowDataBound) in the Properties window (select the lightning bolt to see the events). Visual Studio automatically creates the event handler at the Default.aspx.cs file.
Now all you have to do is associate the data you want to show in the inner grid for each row of the outer grid, like this:
    protected void gvCars_rowDataBound(object sender, GridViewRowEventArgs e)
    {
        if (e.Row.RowType == DataControlRowType.DataRow)
        {
            GridView gv =
             (GridView)e.Row.FindControl("gvModels");

            AccessDataSource asd = new AccessDataSource(@"App_Data\SkinSample.mdb",
"SELECT carmodel_name,carmodel_engine,carmodel_color FROM carmodel
WHERE carmaker_id=" + ((DataRowView)e.Row.DataItem)["carmaker_id"].ToString());
            gv.DataSource = asd;
            gv.AutoGenerateColumns = false;
            BoundField bfModelName = new BoundField();
            bfModelName.DataField = "carmodel_name";
            BoundField bfEngine = new BoundField();
            bfEngine.DataField = "carmodel_engine";
            BoundField bfColor = new BoundField();
            bfColor.DataField = "carmodel_color";
            gv.Columns.Add(bfModelName);
            gv.Columns.Add(bfEngine);
            gv.Columns.Add(bfColor);

            gv.DataBind();
        }
    }
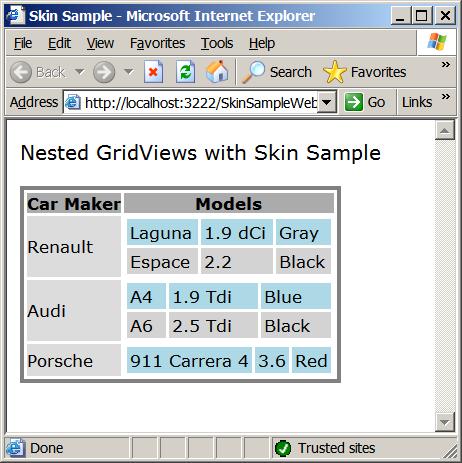
As you can see, all we're doing is finding the control that the framework already created for us and then dynamically configuring the columns. The GridViewRowEventArgs class alredy gives us all the information we need about the row (Row field). The sender parameter is set to the first GridView, so we can safely cast it to this class if we need to and access the grid's properties. Test the code. You should see a very simple table with all the data in it:

Show us some skin
Now that we have the data, let's make it look a little better. That shouldn't be too hard; the HTML defaults must have been defined by a very good software developer. He will never make it as a designer, though.
The GridView can use skins to set its appearance. There are a few predefined skins, from which you can choose by selecting "Auto-Format" in the grid's smart tag. No fun in that, though.
Skins are organized in themes, which are found in the App_Themes directory of your project. So, to start, create a new skin file. Just right-click the solution node in Solution Explorer, and select "Add New Item". Choose a "Skin File" and name it SimpleGray.skin. You see that it already has some tips over there. It's very easy to create the skin. Just add XML tags with the properties names as attributes (like you see them on the Properties pane in Visual Studio. Here is my skin file:
<asp:GridView runat="server" SkinId="SimpleGrayGridView" CssClass="SimpleGrayTable" CellPadding="0" CellSpacing="2" GridLines="0">
    <AlternatingRowStyle CssClass="SimpleGrayTableRow"/>
    <RowStyle CssClass="SimpleGrayTableRow"/>
    <HeaderStyle CssClass="SimpleGrayTable"/>
</asp:GridView>

<asp:GridView runat="server" SkinId="InnerGridView" CellPadding="2" CellSpacing="2" GridLines="0" Width="100%" BackColor="White">
    <AlternatingRowStyle BackColor="LightGray"/>
    <RowStyle BackColor="LightBlue"/>
</asp:GridView>
I defined two skins, one for the outer grid and another for the inner one. The outer one uses a CSS class, and the other one deliberately doesn't, just to show that a lot can be done without CSS. However, in my opinion it's better to use CSS because then we can reuse the styles we create.
It's important to keep in mind that skin values override CSS values. Just to make life a little bit annoying for us, the CellPadding and CellSpacing attributes are always defined in the GridView - you can't set it to "Not set" and allow the CSS to specify the values. Fortunately, the skin value also overrides whatever is in the aspx file, so all you really have to do is set the values in the skin file and then apply the skin to every grid you want. Of course, if you set the values in the CSS too, you can also use it for other tables, as will be shown soon.
Here is the CSS file:
.SimpleGrayTableRow
{
    color: #000000;
    background-color: #DCDCDC;
    font-family: Verdana;
    font-size: 10pt;
}

.SimpleGrayTable th
{
    color: #000000;
    background-color: #ABABAB;
    font-family: Verdana;
    font-size: 10pt;
    font-weight: bold;
}

.SimpleGrayTable
{
    font-family: Verdana;
    font-size: 10pt;
    border-right: gray 2pt solid;
    border-top: gray 2pt solid;
    border-left: gray 2pt solid;
    border-bottom: gray 2pt solid;
    border-collapse: separate;
    background-color: white;
    margin: 2pt;
}
The only reason I didn't apply the CSS SimpleGrayTable to tr and td like I did to th was the fact that if I did, the inner table would be affected by the outer table styles. It's a strange behaviour but it's the way it is. By the way, both Internet Explorer and Firefox show the same result. If I didn't have the inner grid, there would be no problem in defining the row and cell styles like that, and it would allow us to define the complete style for the grid just with one class. Anyway, all we have to do is set the SimpleGrayTableRow class to RowStyle and AlternatingRowStyle in the skin file and we're ready to go.
To apply the skin we have to add the theme to the Page definition on the first line of Default.aspx:
<%@ Page Language="C#" AutoEventWireup="true" CodeFile="Default.aspx.cs" Inherits="_Default" Theme="SimpleGray"%>
Instead of doing this, you can apply the theme to the entire application, by registering it in the web.config file:
<configuration>
    <appSettings/>
    <connectionStrings/>
    <system.web>
        <pages theme="SimpleGray"/>
Also, we mustn't forget to load the CSS file:
<head runat="server">
    <title>Skin Sample</title>
    <link href="SimpleGray.css" rel="stylesheet" type="text/css" />
</head>
That's all there's to it. Now, why not reuse our table class in plain HTML tables? There's nothing that forces us to use it only in grids. Here is a sample:
This member has not yet provided a Biography. Assume it's interesting and varied, and probably something to do with programming.


 General
  News
News  Suggestion
  Question
  Bug
Bug  Answer
  Joke
Joke  Praise
  Rant
Rant  Admin
Admin 


