Introduction
Recently, I had read an article on MSDN by Peter Bernhardt regarding exposing the personal iTunes music library on the web. This article piqued my interest and also gave me the blueprint for a small “investigation” project. When I say “investigation”, I mean a project in which I get a chance to get dirty with some new techniques. I always think those “Hello World” samples are never realistic and hence make investigating new techniques boring. As a result, I am always looking for small projects in which I can try new techniques while also affording me the opportunity to build something interesting and useful. This article is meant to describe such a project, namely creating a small and interesting (at least for a self proclaimed music nut) web site that exposes my iTunes library on the web. Note, I do realize iTunes has some built-in functionality to do this but that would negate the whole benefit of my “investigation”.
If you are anything like me, you may have a ton of music that simply won’t fit onto your iPod. What’s one to do when they are at work craving a certain song but it is not on their iPod...download from their personal library. At the bottom, you will find the complete source code for the web site.
A few techniques and technologies that I wanted to work with and likewise the ones you will see described in this article are:
- Atlas and specifically the
AutoCompleteExtender. This was my main goal. Start investigating Atlas; I know I may be late to the game, but hey I am at least checking this stuff out.
- Datasets and loading from translated XML files. Not something new to me per se, but still interesting trying to translate the iTunes music library file.
- ASP.NET Membership Controls and Providers.
I should mention a few items before I get into the code. First, this web site is meant to expose my music library to myself. Obviously, copyright laws were in my mind, and this is what drove me to investigate membership services. In this case, the member would be me. Next, I used Bill Evjen’s Personal Web Site Starter Kit as the framework for the website. I used a SQL Server 2005 as my data source for membership related tables. Last, I used this freeware exception logging module called ELMAH (very nice tool!). So all that said, let's get into the code.
Using the code
ASP.NET Membership Service
The first topic to cover is the ASP.NET membership provider. The first thing I did was run the aspnet_regsql.exe tool to create all the pertinent tables and stored procedures required to handle my membership to the web site. Once I did that, I defined the fields I wanted to track related to a user within the web.config. Likewise, I pointed my site to the to the SQL Server database so the Membership Controls could do their magic. Below is a snap shot from my web.config:
<membership>
    <providers>
       <remove name="AspNetSqlMembershipProvider"/>
       <add name="AspNetSqlMembershipProvider"
           type="System.Web.Security.SqlMembershipProvider,
System.Web,
                 Version=2.0.0.0, Culture=neutral,
                 PublicKeyToken=b03f5f7f11d50a3a"
           connectionStringName="LocalSqlServer"
           enablePasswordRetrieval="true"
           enablePasswordReset="true"
           requiresQuestionAndAnswer="false"
           applicationName="/" requiresUniqueEmail="false"
           minRequiredPasswordLength="1"
           minRequiredNonalphanumericCharacters="0"
           passwordFormat="Clear" maxInvalidPasswordAttempts="5"
           passwordAttemptWindow="10"
           passwordStrengthRegularExpression=""/>
    </providers>
</membership>
     <profile>
      <properties>
       <add name="FullName"/>
       <add name="email"/>
       <add name="Street"/>
       <add name="City"/>
       <add name="State"/>
      </properties>
     </profile>
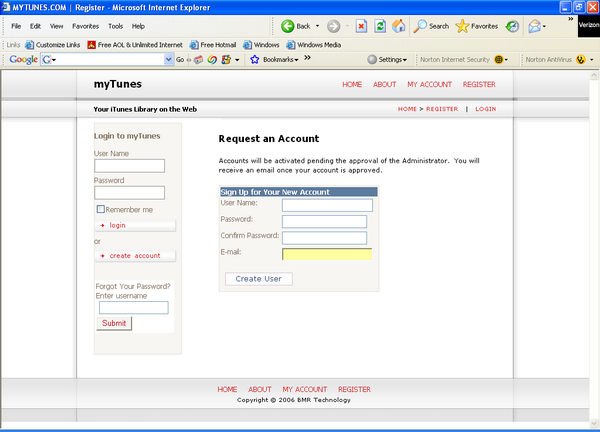
Next, I created the Register.aspx page and inserted a CreateUserWizard control onto the page. This control handles all the heavy lifting to register a user in the SQL Server database. The heavy lifting includes things like checking to see if a username already exists in the database, ensuring passwords adhere to custom policies, inserting the records into the SQL server tables etc. The control is very handy to the point it makes me wish this was around for a lot of the older sites I have written. Next, I created the MyAccount.aspx page to track additional profile information related to a registered user. The MyAccount.aspx page exposes textbox controls that display a user’s stored profile information. This is the same information defined in the web.config from above. Take note of the method below which takes the data entered by a user and saves it to the database.
Sub btnUpdateAccount_Click(ByVal sender As Object, _
                      ByVal e As System.EventArgs)
    Try
         Profile.FullName = txtName.Text
         Profile.Street = txtAddress.Text
         Profile.City = txtCity.Text
         Profile.State = txtState.Text
         Profile.email = txtEmail.Text
    Catch ex As Exception
    End Try
End Sub
This personal profile information is stored in the PropertyName and PropertyValue columns of the aspnet_Profile table. Last, I used the LoginView control in the Default.aspx and Default.Master pages to handle displaying information based on whether a user is logged in or not. This is achieved via the <anonymoustemplate> and <loggedintemplate> sections. This control allows for configuring content areas that display information based on whether a user is logged in or not. The magic of all this is that I had to write very little code to have a fully functioning user login/profile module. ASP.NET 2.0, coupled with the Membership Services, provide all the plumbing required to make this a snap. Once this was all complete, I wound up with the following:
Login, LoginView, CreateUserWizard Controls:
Use of the Profile object:

Datasets/ XMLDataSources / XSLT
The next topic to cover, now that we have a login module, is to get a handle to the iTunes music library for display purposes. If you don’t already know, iTunes stores all the information related to your music library in an XML file. The goal was to load this XML file so I could display my music information in a GridView for searching/sorting/filtering etc. The first step was to create a class called iTunesLibrary that exposed a method called GetMusicFileAsXML. The key thing about this method is that it translates the XML file via XSLT so that it can be easily loaded into a DataView and GridView. One other item to mention is that the location of my XML music library is stored in the web.config for quick reference.
Public Shared Function GetMusicFileAsXML() As XmlDocument
    Dim myMusicFile As String
    Dim myXMLDocument As New XmlDocument
    Dim translatedMusicFile As New XmlDocument
    Dim myMusicTranslator As String
    Try
        If _iTunesLibrary Is Nothing Then
            myMusicFile = _
              System.Configuration.ConfigurationManager.AppSettings(_
              "MusicLibrary")
            myMusicTranslator = _
              System.Configuration.ConfigurationManager.AppSettings(_
              "MusicTranslator")
            myXMLDocument.Load(myMusicFile)
            translatedMusicFile = _
              BMR.Common.Framework.XMLTools.XSLTranslator.TransormXML(_
              myXMLDocument, myMusicTranslator)
            Return translatedMusicFile
        Else
            Return _iTunesLibrary
        End If
    Catch ex As Exception
        Throw New GotDotNet.Elmah.ApplicationException(ex.ToString)
    Finally
        myMusicTranslator = Nothing
        myXMLDocument = Nothing
    End Try
        Return Nothing
    End Function
The XSL required to translate the iTunes music library is as follows:
="1.0"="UTF-8"
<xsl:stylesheet version="1.0"
xmlns:xsl="http://www.w3.org/1999/XSL/Transform">
<xsl:output method="xml" version="1.0"
encoding="UTF-8" indent="yes"/>
<xsl:template match="/">
<iTunesLibrary
xmlns:xsi="http://www.w3.org/2001/XMLSchema-instance">
<xsl:apply-templates select="plist/dict/dict/dict"/>
</iTunesLibrary>
</xsl:template>
<xsl:template match="dict">
<track>
<xsl:apply-templates select="key"/>
</track>
</xsl:template>
<xsl:template match="key">
<xsl:attribute name="{translate(text(), ' ', '_')}">
<xsl:value-of select="following-sibling::node()[1]"/>
</xsl:attribute>
</xsl:template>
</xsl:stylesheet>
This produces an XML file that looks like the following:
<iTunesLibrary xmlns:xsi="http://www.w3.org/2001/XMLSchema-instance">
   <track Track_ID="64" Name="Like Humans Do (radio edit)"
        Artist="David Byrne"
        Album="Look Into The Eyeball"
        Genre="Rock" Kind="AAC audio file"
        Size="3454661" Total_Time="213623"
        Track_Number="1"
        Date_Modified="2006-10-14T16:35:04Z"
        Date_Added="2006-10-14T16:34:49Z"
        Bit_Rate="128" Sample_Rate="44100"
        Persistent_ID="5D99F4DC1D75F0B4"
        Track_Type="File"
        Location="file://localhost/C:/Documents%20and%20Settings
                  /Brian%20Rush/My%20Documents/My%20Music/iTunes/
                  iTunes%20Music/David%20Byrne/Look%20Into%20The%20Eyeball
                  /01%20Like%20Humans%20Do%20(radio%20edit).m4a"
        File_Folder_Count="-1"
        Library_Folder_Count="-1" />
</iTunesLibrary>
Last, in the Default.aspx page, I get a handle to my translated music library and display the results in a GridView. I achieve this by calling the method below:
Protected Sub LoadMusicFile(ByVal sortColumn As String, _
              ByVal sortDirection As String)
    Dim myMusicFile As XmlDocument
    Dim aDataSet As New DataSet()
    Dim aFilterCriteria As String
    Try
        myMusicFile = Cache("myMusicLibrary")
        Dim sReader As New StringReader(myMusicFile.OuterXml)
        aDataSet.ReadXml(sReader)
        Dim aDataView As New DataView(aDataSet.Tables(0))
        Dim aControl As System.Web.UI.WebControls.GridView
        aControl = Me.MyTuneView.FindControl("LibraryGrid")
        aControl.DataSource = aDataView
        aFilterCriteria = Me.getSearchFilterCriteria
        If Len(aFilterCriteria) > 0 Then
            aDataView.RowFilter = Me.getSearchFilterCriteria
        End If
        aDataView.Sort = sortColumn + " " + sortDirection
        aControl.DataBind()
    Catch ex As Exception
        Throw New GotDotNet.Elmah.ApplicationException(ex.ToString)
    Finally
        aDataSet = Nothing
    End Try
End Sub
ATLAS and AutoCompleteExtender
The next topic to cover now that we have our iTunes music library translated and loaded into a GridView is how to enable searching and sorting of the library. What I did was expose a few textboxes in which I could enter the search criteria. The key technique that I wanted to use was auto completion of textboxes based on the bands and songs currently available in my library. Once these textboxes are filled out, I wanted to be able to filter the GridView based on these criteria. In order to do this, I used the <atlas:AutoCompleteExtender> control. This control allows for functionality like you see in Google when you enter a search string, namely auto completing the potential search values. This control is really cool and very easy to use. Here is how I implemented it:
First, I imported a <atlas:AutoCompleteExtender> control into my Default.aspx page, and configured the control to target each respective search textbox control.
Band <asp:TextBox ID="txtSearchBand" runat="server" Width="170px">
     </asp:TextBox>
<asp:Button ID="searchButton" runat="server" CssClass="button"
      Text="Go" OnClick="searchLibrary" /><br /> <br />
<atlas:AutoCompleteExtender ID="AvailableBandsExtender" runat="server"
        ServiceMethod="GetAvailableBands"
        ServicePath="AutoCompleteServices.asmx"
        MinimumPrefixLength="1">

<atlas:AutoCompleteProperties Enabled="true"
              ServiceMethod="GetAvailableBands"
              ServicePath="AutoCompleteServices.asmx"
              TargetControlID="txtSearchBand"
              MinimumPrefixLength="1" />
</atlas:AutoCompleteExtender>
A couple of key items to highlight; the first item is the ServiceMethod attribute. This is the name of the method within the web service that gets called when a user enters text in the target textbox. In the example above, the target control is the txtSearchBand textbox. Once I enter a character, the Atlas framework handles firing the GetAvailableBands method and displaying the information below the txtSearchBand textbox in a list.
Second, I created a web service called AutocompleteServices.vb in which I exposed a public method GetAvailableBands. This method is responsible for loading the iTunes XML file into a DataView, filtering the DataView by the entered text value and then returning a String array of the matching Bands. Here is the code for the GetAvailableBands method:
<WebMethod()> _
Public Function GetAvailableBands(ByVal prefixText _
                As String, ByVal count As Integer) As String()
    Dim aBandList As New _
        System.Collections.Specialized.StringCollection
    Dim myMusicFile As System.Xml.XmlDocument
    Dim i As Integer
    Dim ht As New System.Collections.Hashtable
    Try
        myMusicFile = iTunesLibrary.GetMusicFileAsXML()
        Dim aDataSet As New System.Data.DataSet
        Dim sReader As New _
            System.IO.StringReader(myMusicFile.OuterXml)
        aDataSet.ReadXml(sReader)
        Dim myDataView As System.Data.DataView
        myDataView = New System.Data.DataView(aDataSet.Tables(0))
        myDataView.RowFilter = "Artist like '" + prefixText + "%'"

        For i = 0 To myDataView.Count - 1
            If ht.Contains(myDataView.Item(i).Item(_
                      "Artist").ToString.Trim) = False Then
                  ht.Add(myDataView.Item(i).Item(_
                         "Artist").ToString.Trim, _
                         myDataView.Item(i).Item(_
                         "Artist").ToString.Trim)
            End If

        Next
        Dim myList As ArrayList
        myList = New ArrayList(ht)
        Dim anArray(myList.Count - 1) As String
        For i = 0 To myList.Count - 1
            anArray(i) = myList.Item(i).Value
        Next
        Return anArray
    Catch ex As Exception

    End Try
    Return Nothing
End Function
In order to get the AutoCompleteExtender control to work, you will obviously need to have the Atlas framework installed on your web server. In addition, you will have to add a few special nodes into the web.config to get this to work properly. These nodes are:
<httpHandlers>
      <remove verb="*" path="*.asmx"/>
      <add verb="*" path="*.asmx"
              type="Microsoft.Web.Services.ScriptHandlerFactory"
              validate="false"/>
      <add verb="*" path="atlasbatchcall.axd"
              type="Microsoft.Web.Services.MultiRequestHandler"
              validate="false"/>
      <add verb="*" path="atlasglob.axd"
              type="Microsoft.Web.Globalization.GlobalizationHandler"
              validate="false"/>
      <add verb="*" path="*.asbx"
              type="Microsoft.Web.Services.ScriptHandlerFactory"
              validate="false"/>
    </httpHandlers>
    <httpModules>
      <add name="ScriptModule" type="Microsoft.Web.Services.ScriptModule"/>
      <add name="BridgeModule" type="Microsoft.Web.Services.BridgeModule"/>
      <add name="WebResourceCompression"
           type="Microsoft.Web.Services.WebResourceCompressionModule"/>
</httpModules>
Some other items that you will need to add to your web pages that use Atlas controls:
<atlas:ScriptManager runat="server"
   id="scriptManager" EnablePartialRendering="true" />
After all of this had been created and configured, I wound up with something that looks like:
To summarize, I hope this small project pieces together a few controls and techniques in the sense it provides a realistic bite size example. In particular, providing a working example of the following:
- Atlas Framework and the
AutoCompleteExtender control.
- Membership Services and the related
CreateUserWizard, LoginView controls as well as the Profile object.
- Load XML data sources into
DataViews and GridViews.
My next item to implement in this site is to add a streaming component so I could stream my music at work.
I hope you found this article interesting. Feel free to grab the code and use it as you see fit.
This member has not yet provided a Biography. Assume it's interesting and varied, and probably something to do with programming.


 General
  News
News  Suggestion
  Question
  Bug
Bug  Answer
  Joke
Joke  Praise
  Rant
Rant  Admin
Admin 


