Introduction
The GridViewDetailsView control is an ASP.NET user control that displays a fully-featured GridView-DetailsView (Master/Detail) Control with the capability to edit existing records, insert new records, and delete records, along with sorting, filtering, and paging. The control can be easily configured to allow record inserting/editing in the GridView control or in the DetailsView control after a record is selected.
This control demonstrates some of the clearer ways of editing, inserting, and deleting records with a Master/Detail control in an N-Tier environment, in which data objects and business objects are used with a GridView-DetailsView to load and store data.
Background
I recently had a project in which I needed to manage some datatables via gridviews, but the number of columns in the table was too large to be handled nicely with in-grid editing. After looking into the new DetailsView control, I found that it would meet the requirements, except that it provided no decent mechanism to navigate to other records, other than by paging. Coupling the GridView together with a DetailsView control presented a good solution to the problem.
When I Googled around for samples on having a GridView work together with a DetailsView control, I would find a code snippet here and there that did part of what I needed, but few real-world examples of the two controls together. This article/control is an attempt in providing such a solution.
Using the GridViewDetailsView UserControl
To use the GridViewDetailsView UserControl in a web project, drop a copy of the control (both the HTML and code file) into your web project and change the name/class of the control to meet your needs. The columns and handling of the GridViewDetailsView's controls in the sample source are intentionally left in for the coder to easily copy/remove/modify the fields as quickly as possible, without having to start from scratch. The columns and controls demonstrate the handling of different field types and controls, most of which are common when working with database tables and stored-procs.
In the code file, substitute your own business/data layer to load and save the GridViewDetailsView fields/records. Many of the supporting functions in the class can be used with any business/data object, and just a specific handful of lines of code need to be modified/removed.
To reference the control from another UserControl or a Page, don't forget to call the class's Initialize() function to set the properties for the control. You can also set the various properties in the HTML and code file to enable or disable record-editing, record-inserting, sorting, paging, etc. along with whether you want the record-editing to be performed in the DetailsView or the GridView control.
NOTE: This control is not meant to be a stand-alone, snap-in UserControl - the intention of it is to be used as almost a "starter kit" when working with a GridViewDetailsView. Enhance the sections you need to use, and throw away the parts you don't need.
Before running the sample demonstration, run the Orders_SPs.sql file against the Northwind database.
NOTE #2: Due to the foreign key constraint between the Orders table and the Order Details table in the Northwind database, the Delete command throws an exception from the data layer. Otherwise, the delete command works as expected.
Below is a demonstration of several of the different views in the GridViewDetailsView sample:
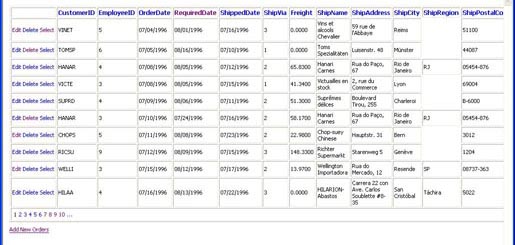
Basic View of the GridView Control

Editing a Record in the GridView Control
Inserting a Record in the GridView Control
Basic View of the DetailsView Control
Editing a Record in the DetailsView Control
Inserting a Record in the DetailsView Control
How the GridViewDetailsView Control Works
The GridViewDetailsView control is basically just an instance of a GridView control and the DetailsView control wrapped within a single user control, which exposes a number of properties that can be used to enable/disable various features. The GridView control and the DetailsView control are both on separate panels, only one of which is visible at any given time.
The DetailsView panel is hidden by default, and when a record is selected in the GridView, the record is bound to the DetailsView control and the views are swapped, so the GridView panel is hidden while the DetailsView panel is made visible. The user can return to the GridView display at any time by clicking the "Return to OrdersList" link button.
Below are some of the more useful code-snippets used in the control to read/write data between the business objects and the GridView control and the DetailsView control.
public void Initialize()
{
AllowRecordSorting = true;
AllowRecordDeleting = true;
AllowRecordEditing = true;
AllowRecordInserting = true;
AllowRecordSelection = true;
AllowEditInDetailsView = true;
ClearDataViews();
BindDataViews();
ShowFooterInsertControls(false);
}
...
...
...
protected void SetBehavior(ViewMode vmNewViewMode)
{
m_ViewMode = vmNewViewMode;
SetBehavior();
}
protected void SetBehavior()
{
bool bHasGridRows = (gvOrders.Rows.Count > 0);
if ((bHasGridRows == false) && (AllowRecordInserting == true))
{
m_ViewMode = ViewMode.DetailsView;
}
switch (m_ViewMode)
{
case ViewMode.Unknown:
pnlGridView.Visible = bHasGridRows;
pnlDetailsView.Visible = !bHasGridRows;
break;
case ViewMode.GridView:
pnlGridView.Visible = true;
pnlDetailsView.Visible = false;
break;
case ViewMode.DetailsView:
pnlGridView.Visible = false;
pnlDetailsView.Visible = true;
break;
}
lbtnReturnToOrdersList.Visible = bHasGridRows;
}
protected void ClearDataViews()
{
gvOrders.DataSource = null;
gvOrders.DataBind();
dvOrders.DataSource = null;
dvOrders.DataBind();
}
protected void BindDataViews()
{
BindDataViews(0);
}
protected void BindDataViews(int _OrderID)
{
CIF.Business.Northwind.Orders _Orders = new CIF.Business.Northwind.Orders();
DataTable dtOrders = null;
if (_OrderID > 0)
{
dtOrders = _Orders.GetDataTable("OrderID", _OrderID.ToString());
dvOrders.DataSource = dtOrders;
dvOrders.DataBind();
SetBehavior(ViewMode.DetailsView);
}
else
{
dtOrders = _Orders.GetDataTable();
if (dtOrders.Rows.Count > 0)
{
DataView dv = dtOrders.DefaultView;
if ((SortExpression != string.Empty) && (SortDirection != string.Empty))
dv.Sort = SortExpression + " " + SortDirection;
gvOrders.DataSource = dv;
gvOrders.DataBind();
}
else
{
if (AllowRecordInserting == true)
{
dvOrders.DataSource = dtOrders;
dvOrders.DataBind();
}
else
{
gvOrders.DataSource = null;
gvOrders.DataBind();
}
}
SetBehavior();
}
}
protected void ShowFooterInsertControls(bool bShowControls)
{
lbtnInsertOrders.Visible = bShowControls;
lbtnCancelInsertOrders.Visible = bShowControls;
gvOrders.ShowFooter = bShowControls;
lbtnAddNewOrders.Visible = (bShowControls == false);
BindDataViews();
}
Conclusion
I hope you find this article and control useful - it's saved me a lot of time when working with several different types of tables and datasets, and quickly getting a full-featured GridView-DetailsView (Master/Detail) control up and running. Enjoy!


 General
  News
News  Suggestion
  Question
  Bug
Bug  Answer
  Joke
Joke  Praise
  Rant
Rant  Admin
Admin 


