Validation application block has been added to enterprise library 2007 CTP release. You can download it from here.
Introduction
Any application that takes input from a user or other system must ensure that the information is in the correct format, in terms of some rules that specify in several ways, like a registration form has lots of field like social security number, credit card, email has some specific format demand validation check before inserting to database. In addition, if the validation fails, usually send an error message that explains what is wrong.
The Enterprise Library Validation Application Block provides a library of classes, called validators, that supplies the code for validating .NET Framework data types. For example, one validator checks that strings are not null and another validator ensures that a number falls within a specified range. You can use a Boolean AND or OR to create composite validators. You can also create groups of validators. A group of validators is called a rule set, although a rule set may contain as few as a single validator. A rule set is a way to validate a complex object or graph by composing different validators of different types and applying them to elements in the object graph. Examples of these elements include fields, properties, and nested objects.
The Validation Application Block includes adapters that allow you to use the application block with the following technologies:
- ASP.NET
- Windows Forms
- AJAX
- Windows Communications Framework (WCF)
- Windows Presentation Framework (WPF)
To get more detailed information, check Validation Application Block documentation that comes with this release.
How to Use Validation Application Block in your Application
Open application configuration file app.config or web.config by Enterprise Library Configuration tools.
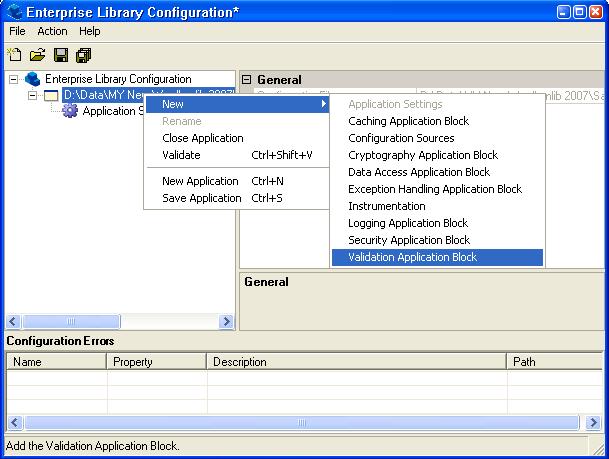
Follow the below steps to add the Validation Application Block:
- Start the Enterprise Library Configuration Console. To use the configuration console, click Start, point to All Programs, point to Microsoft patterns & practices, point to Enterprise Library 3.0 – January 2007 CTP, and then click Enterprise Library Configuration.
- Click the Open Existing Application icon and located your config file... Open application configuration file app.config or eb.config by Enterprise Library Configuration tools.
Right-click Application Configuration, point to New, and then click Validation Application Block.
Applying Validators at the Type Level
The following procedure shows how to apply validators at the type level.
To apply validators at the type level:
- Right-click on Validation Application Block, point to New and click Type.

- The Type Selector — System.Object dialog box opens.
- Double-click on the assembly you want to use. If the assembly is not in the dialog box, click Load Assembly and navigate to it.
- Double-click on the type you want to validate.
- (Optional) If there is an existing rule set you want to specify as the default, click on DefaultRule in the right pane and select it from the dropdown box.
- To define a rule set, right-click on the type node, point to New and click Rule Set.
- Right-click on Self, point to New, and click the validator you want to use. Typically this is either Custom Validator or Not Null Validator.
Defining a Rule Set for a Specific Type
The following procedure shows how to define a rule set for a specific type. Note that it is possible for an object to have multiple rule sets associated with it.
To define a rule set for a specific type:
- Right-click on Validation Application Block, point to New and click Type.
- The Type Selector — System.Object dialog box opens.
- Double-click on the assembly you want to use. If the assembly is not in the dialog box, click Load Assembly and navigate to it.
- Double-click on the type you want to validate.
- (Optional) If there is an existing rule set, you want to specify as the default, click on DefaultRule in the right pane and select it from the dropdown box.
- To define a rule set, right-click on the type node, point to New and click Rule Set. Note that a rule set can contain as few as one validator.
- (Optional) Enter the name of the rule set in the right pane.
- To select what you want to validate, right-click on Rule Set, point to New, and select Field, Method or Property.
- (Optional) Enter the name of the field, method or property in the right pane.
- Right-click on the field, method or property and select the validator you want to apply to it.
- (Optional) Fill in the Tag, MessageTemplate, and MessageTemplateResource fields, as appropriate. You can either enter the MessageTemplateResourceTypeName field or click on the ellipsis and use the Type Selector — System.Object dialog box to select it. Many validators also have fields that are specific to them. Fill these out as well.
- Repeat steps 10 and 11 for each validator you add. Applying Validators to Type Members. The following procedure explains how to apply validators to type members. Type members include properties, methods and fields.
To apply validators to type members:
- Right-click on Validation Application Block, point to New and click Type.
- The Type Selector —
System.Object dialog box opens. - Double-click on the assembly you want to use. If the assembly is not in the dialog box, click Load Assembly and navigate to it.
- Double-click on the type you want to validate.
- (Optional) If there is an existing rule set you want to specify as the default, click on DefaultRule in the right pane and select it from the dropdown box.
- To define a rule set, right-click on the type node, point to New and click Rule Set.
- (Optional) Enter the name of the rule set in the right pane.
- Right-click on Rule Set, point to New, and select Choose Members.
- The Member Selector dialog box appears.
- Click Properties, Methods and/or Fields, depending on what you want to validate. This selects all the entries.
- Deselect the properties, methods and/or fields you do not want to validate. Click OK. The desired validators appear in the configuration hierarchy.
- Right-click on the field, method or property and select the validator you want to apply to it.
- For each validator, fill in the Tag, MessageTemplate, and MessageTemplateResource fields, as appropriate. You can either enter the
MessageTemplateResourceTypeName field or click on the ellipsis and use the Type Selector — System.Object dialog box to select it. Many validators also have fields that are specific to them. Fill these out as well. - Repeat Steps 10 through 14 for each member and validator you add.
Defining Composite Validators
The following procedure explains how to define composite validators. Composite validators are built from individual validators that are combined with a Boolean AND or OR.
To define composite validators:
- Right-click on the type or type member you want to validate.
- Select either
AndCompositeValidator or OrCompositeValidator. - Right-click on
AndCompositeValidator or on OrCompositeValidator and select one of the validators that will be a part of the composite validator. Fill out the fields in the right pane. Repeat this step for each validator you add.
See more in the release documentation.
Now have a look at some simple code:
using System;
using System.Collections.Generic;
using System.Text;
using Microsoft.Practices.EnterpriseLibrary.Validation;
using Microsoft.Practices.EnterpriseLibrary.Validation.Validators;
namespace ValidationApplicationBlock
{
public class StringValidator
{
public StringValidator()
{
}
[NotNullValidator]
[StringLengthValidator(1, 50)]
public string Name;
}
}
StringValidator oStringValidator = new StringValidator();
oStringValidator.Name = txtName.Text;
ValidationResults r = Validation.Validate(oStringValidator);
if (!r.IsValid)
{
errorProvider1.SetError(txtEmail,
"Input Not Vail");
}
Really cool and simple.
Using the Validation Façade
In most situations, you can take advantage of the Validation façade. This class allows you to create a Validatorinstance and validate an object with a single line of code. This is shown in the following code example:
Customer myCustomer = new Customer( );
ValidationResults r = Validation.Validate(myCustomer);
This code is equivalent to the following code example:
Customer myCustomer = new Customer( );
Validator<customer> v = ValidationFactory.CreateValidator<customer>();
ValidationResults r = v.Validate(myCustomer);
You will find more details about Façade pattern here.
Using Self Validation
[HasSelfValidation]
public class MaXMin
{
private int min;
private int max;
[SelfValidation]
public void Check (ValidationResults results)
{
if (max < min)
results.AddResult(new ValidationResult
("Max less than min", this, null, null, null));
}
}
Ruleset
Sometimes, you need to only care for some specific property then create a Ruleset that distinguishes the null rules separate from the others farther. This can be checked by using Validation.Validate(subscriber, "UserInfo");
public class UserInfo
{
    private string name;

    [NotNullValidator(Ruleset="UserInfo")]
    [StringLengthValidator(1,200)]
    public string Name
    {
        get { return name; }
        set { name = value; }
    }

    private string emailAddress;

    [NotNullValidator(Ruleset="UserInfo")]
    [EmailAddressValidator]
    public string EmailAddress
    {
        get { return emailAddress; }
        set { emailAddress = value; }
    }

    public UserInfo () {}
}
Conclusion
I hope this gives some idea about what is coming within this block. It's not fully decided how Microsoft is going to design this block in case off Ajax and WCF I found in some blogs about this issue. Let's see and wait how it will come…hope this block will also be widely used like data access application block.
Related blogs about validation application block can be found here and here.
History
- 2nd February, 2007: Initial post


 General
  News
News  Suggestion
  Question
  Bug
Bug  Answer
  Joke
Joke  Praise
  Rant
Rant  Admin
Admin 


 Thanks. your article is very helpful to me.