As the web has evolved, demand for more interactive and usable web applications has increased. Users are demanding that the tools they use on the Internet behave more like desktop applications and less like web pages with functional bits.
The term Rich Internet Applications (RIA) refers to a design pattern that leverages existing web standards to provide a richer experience to the user. There are a number of platforms and technologies to choose from when developing RIAs, and finding the right combination can be challenging. As with most multitechnology applications, maintaining clean integration between platforms can become immensely complicated if it is not carefully planned and tended to regularly.
In this tutorial I demonstrate a particularly easy-to-use combination of technologies that do a very good job at allowing you to focus on developing your features rather than maintaining plumbing. Modern development tools coupled with WebORB for .NET and NHibernate make it easier to maintain integration points. Development frameworks for data access such a NHibernate eliminate much of the glue code that developers often need to write and maintain. This decreases complexity and creates a solid environment for rapid development of RIAs.
In this tutorial you will learn how set up the environment and develop an Adobe Flex based RIA that connects to a Microsoft .NET back end via WebORB and NHibernate, enabling clean development and simultaneous debugging of both the Flex and .NET projects.
Project overview
To illustrate the concepts covered in this article more clearly, the sample project has been kept intentionally simple, with a code structure that foregoes some common features included in a production application. The goal is to show how to wire up the various components in the application architecture.
Application use case
A retail product manufacturer launches a promotion for customers who order certain products to receive a free adventure vacation. The company requires a simple interface that customers can use to enter their information and request a specific adventure and booking date. The company also requires a back-office interface for company staff to review the requests and access customer contact information.
For this tutorial a simple user interface (see Figure 1) will be constructed in Flash Builder. For simplicity, both the end user submission form and the back office data review form are displayed at the same time, although in production they would obviously be separated.
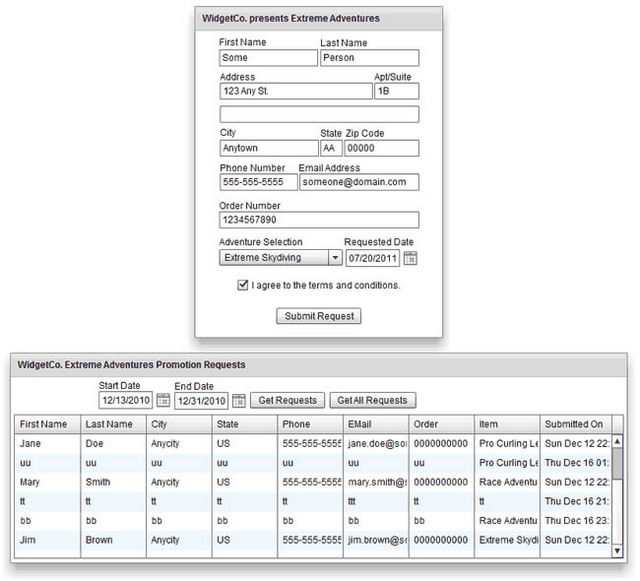
Figure 1. The completed Flex application including the end-user submission form (top) and back- office data review form (bottom),which retrieves data through WebORB and NHibernate.
Application architecture
The application for this project is based on a basic 3-tier distributed systems architecture that scales well both horizontally and vertically.
This application architecture (see Figure 2) relies on both WebORB and NHibernate to provide the glue between each tier. Not only does this free you, as the developer, from worrying about the implementation details of integrating these tiers, it also reduces the amount of code that you need to write. All developer code for this type of project falls into just two categories:
- Data models – Plain Old Class Objects (POCOs) – These are .NET classes that represent the data objects you are exposing. These are coded as encapsulated classes that have no knowledge of the frameworks that use them.

Figure 2. The archictecture for the sample application, which is compatible with virtaully any kind of UI or project framework.
Project setup
It is important to set up RIA projects carefully to avoid extra work when doing common tasks such as debugging. The instructions will enable you to develop and debug in both Flash Builder and Visual Studio at the same time.
Visual Studio project setup
Most of the detailed setup steps are on the Visual Studio side of things, because the application configuration and the platform for the WebORB and NHibernate frameworks are .NET based.
- Create a new folder on your system named Redeem, which will contain the files for both the .NET and Flex projects.
- Start Visual Studio as an Administrator.
- Create a new ASP.NET Empty Web Application (see Figure 3) named RedeemSite in the Redeem folder. Make sure the option Create Directory For Solution is deselected.
Figure 3. Creating a new ASP.NET empty web application.
- Right-click the RedeemSite project in the Solution Explorer and open the project Properties page.
- Click the Web tab on the project properties page (see Figure 4).
- Select Use Local IIS Web Server.
- Type http://localhost/Redeem for the Project URL.
- Select Override Application Root URL
- Type http://localhost/Redeem for the override root
- Click Create Virtual Directory
- Type http://localhost/Redeem for the Start URL
Figure 4. Configuring the project properties.
Note: To successfully debug both the Flex and .NET applications at the same time, the .NET project must be deployed to IIS.
- Add a new Class Library project named RedeemModel to the solution located under the Redeem folder you created in Step 1.
- Delete the Class1.cs file generated by Visual Studio.
- Right-click the RedeemModel project in the Solution Explorer and open the project Properties page.
- Under the Application tab, change the default namespace to RedeemSite.Models.
- On the RedeemSite web project add the following references (see Figure 5), substituting the location of your NHibernate installation for "NHibernate-2.1.2.GA-bin".
- NHibernate-2.1.2.GA-bin\Required_Bins\NHibernate.dll
- NHibernate-2.1.2.GA-bin\Required_For_LazyLoading\LinFu\NHibernate.LinFu.ByteCode.dll
- NHibernate-2.1.2.GA-bin\Required_For_LazyLoading\Spring\NHibernate.ByteCode.Spring.dll
Figure 5. Add references to the RedeemSite project by right-clicking the references folder under the project.
- Also on the RedeemSite web project add a project reference to the RedeemModel project.
Select the references for the NHibernate assemblies and make sure the Copy Local property is set to True (see Figure 6). A local copy of NHibernate is required for WebORB to read mappings and locate model classes.
Figure 6. Setting the Copy Local option on the references for NHibernate libraries to True.
- Edit the web.config file and replace the contents with the following:
="1.0"
<configuration>
<system.web>
<compilation debug="true" targetFramework="4.0" />
<httpHandlers>
<add verb="*" path="weborb.aspx" type="Weborb.ORBHttpHandler" />
<add verb="*" path="codegen.aspx"
type="Weborb.Management.CodeGen.CodegeneratorHttpHandler" />
<add verb="*" path="dcd.aspx" type="Weborb.RDS.Handler.FrontEndHttpHandler"/>
</httpHandlers>
</system.web>
<system.webServer>
<handlers>
<add name="codegen.aspx_*" path="codegen.aspx" verb="*"
type="Weborb.Management.CodeGen.CodegeneratorHttpHandler"
preCondition="integratedMode,runtimeVersionv4.0" />
<add name="weborb.aspx_*" path="weborb.aspx" verb="*"
type="Weborb.ORBHttpHandler" preCondition="integratedMode,runtimeVersionv4.0" />
<add name="dcd.aspx_*" path="dcd.aspx" verb="*"
type="Weborb.RDS.Handler.FrontEndHttpHandler"
preCondition="integratedMode,runtimeVersionv4.0" />
</handlers>
<validation validateIntegratedModeConfiguration="false" />
</system.webServer>
</configuration>
- Copy the following WebORB files from your WebORB installation to the RedeemSite project folder (Note: Do not include these files into the .NET project):
/weborb.config
/bin/weborb.dll
/bin/MySql.Data.dll
/bin/Mono.Security.dll
/bin/Npgsql.dll
/diagnostics.aspx
/WEB-INF
/weborbconsole.html
/console
/weborbassets
/logs
- Create a new XML file in the bin folder of the RedeemSite project named hibernate.cfg.xml.
- Save the following content into the file:
="1.0"="utf-8"
<hibernate-configuration xmlns="urn:nhibernate-configuration-2.2">
<session-factory>
<property name="connection.provider">
NHibernate.Connection.DriverConnectionProvider
</property>
<property name="dialect">
NHibernate.Dialect.MsSql2008Dialect
</property>
<property name="connection.driver_class">
NHibernate.Driver.SqlClientDriver
</property>
<property name="connection.connection_string">
<PUT YOUR CONNECTION STRING HERE>
</property>
<property name="show_sql">
True
</property>
<property name='proxyfactory.factory_class'>
NHibernate.ByteCode.LinFu.ProxyFactoryFactory, NHibernate.ByteCode.LinFu
</property>
</session-factory>
</hibernate-configuration>
- Replace the connection string (
<PUT YOUR CONNECTION STRING HERE> ) with one appropriate for your environment. You may also change the dialect and driver based on the type of RDBMS you are running. All NHibernate drivers and dialects can be located in the NHibernate.Dialect and NHibernate.Driver namespaces respectively. For a list of currently available drivers and dialects, see the NHibernate documentation.
Note: This tutorial does not cover the steps required to deploy the application's schema to your database. This tutorial was built using SQL Server 2008 R2 and a script is provided for that server. You may have to adapt the provided scripts to your particular server.
Flex project setup
The Flex project is the client-side consumer of the services exposed through WebORB. Very little needs to be done to get Flex working with the .NET back end, because WebORB handles the details of the service implementation and the details of setting up and calling services from a Flex application.
Follow these steps to set it up:
- Start Flash Builder.
- Create a new Workspace using the Redeem folder as its location (choose File > Switch Workspace > Other).
Choose File > New > Flex Project to create a new Flex Project.
- Type RedeemApp for the project name (see Figure 7) and click Next.
Figure 7. Creating a new Flex project.
- For the Output Folder, type the path of the RedeemSite project (…/Redeem/RedeemSite) (see Figure 8).
- Click Next.
Figure 8. Setting the Flex project's output folder to the path of the ASP.NET project.
- Type index.mxml as the Main Application File.
- For the Output Folder URL, type http://localhost/Redeem (see Figure 9).
- Click Finish.
Figure 9. Setting the output folder URL to match the URL of the ASP.NET site in IIS.
- Right-click the new project and select Properties.
- Click the Flex Compiler section of the Properties dialog box and add the following compiler argument:
–services "x:[path to Redeem site]/WEB-INF/flex/services-config.xml" . Replace x:[path to Redeem site] with the path to your site. - Ensure that the new Flex project builds and that the built files are copied to the RedeemSite project folder. Note: Do not include these files in the .NET project.
At this point you should be able to run and debug both projects. Upon launch, each project should launch the IIS site and show the empty Flex application contained in the automatically generated index.html file.
WebORB configuration
Next, validate the setup by testing the WebORB deployment in your application to ensure it is working as expected:
- Save all files for the Flex and .NET application, and then run the .NET application. The empty Flex project should open in the browser by default.
- Change the browser URL to http://localhost/Redeem/diagnostics.aspx. If you encounter any errors or failures, troubleshoot the configuration to resolve the issues.
- Change the browser URL to http://localhost/Redeem/weborbconsole.html and ensure that the console loads without any errors or missing UI elements.
.NET development
So far, much of this tutorial has focused on setting up the .NET environment. This effort will now pay off in the form of less code to write for the back end. With a database already in place and NHibernate providing connectivity to that database along with WebORB 4.2's new NHibernate integration, you need to write just a single class.
- Return to the RedeemModel Class Library project that you created earlier in Visual Studio.
- Create a new class in the project and name it RedemptionModel.cs.
This single POCO will contain no references to either of the higher level frameworks being leveraged. This class only contains properties that will act as the containers for field data in the database. To simplify configuration, property names match the names used for the fields in the database.
Keep in mind that POCOs created to be consumed by NHibernate must follow two rules:
- All properties must be declared with the virtual keyword
- All properties must provide both getters and setters
- Add the following code to RedemptionModel.cs:
public class RedemptionModel
    {
        public virtual Guid PrimaryKey { get; set; }
        public virtual string FirstName { get; set; }
        public virtual string LastName { get; set; }
        public virtual string AddressLine1 { get; set; }
        public virtual string AddressLine2 { get; set; }
        public virtual string Apartment { get; set; }
        public virtual string City { get; set; }
        public virtual string State { get; set; }
        public virtual string ZipCode { get; set; }
        public virtual string PhoneNumber { get; set; }
        public virtual string EmailAddress { get; set; }
        public virtual string OrderNumber { get; set; }
        public virtual string ItemSelection { get; set; }
        public virtual DateTime RequestedBookingDate { get; set; }
        public virtual bool TermsAgreed { get; set; }
        public virtual DateTime AgreementDate { get; set; }
        public virtual DateTime SubmissionDate { get; set; }
        public virtual string IPAddress { get; set; }
    }
Next, you need to create a mapping file. This file maps the POCO written in the previous step to the database table and fields. The file also serves as the locator for both NHibernate and WebORB's NHibernate integration.
- You may copy the complete implementation of RedemptionModel.cs from the sample files.
- Create a folder within the RedeemModel project named Mappings.
- Within that folder create a new XML file named RedemptionModel.hbm.xml.
The name of the file must match the name of the class being mapped as well as include the ".hbm" component.
- Insert and save the following mapping definition in the newly created XML file:
="1.0"="utf-8"
<hibernate-mapping xmlns="urn:nhibernate-mapping-2.2"
assembly="RedeemModel"
namespace="RedeemSite.Models">
<class name="RedemptionModel" table="RedemptionRequests">
<id name="PrimaryKey">
<generator class="guid" />
</id>
<property name="FirstName" />
<property name="LastName" />
<property name="AddressLine1" />
<property name="AddressLine2" />
<property name="Apartment" />
<property name="City" />
<property name="State" />
<property name="ZipCode" />
<property name="PhoneNumber" />
<property name="EmailAddress" />
<property name="OrderNumber" />
<property name="ItemSelection" />
<property name="RequestedBookingDate" />
<property name="TermsAgreed" />
<property name="AgreementDate" />
<property name="SubmissionDate" />
<property name="IPAddress" />
</class>
</hibernate-mapping>
Finally, the mapping file must be set as an embedded resource of the RedeemModel project in order for it to be located by NHibernate and WebORB.
Select the file, and in the file properties change the Build Action to Embedded Resource (see Figure 10).
Figure 10. Changing the Build Action on the NHibernate mapping file to Embedded Resource.
The back-end portion of the application is now complete. WebORB and NHibernate will use the provided class and mapping file to integrate with the other tiers of the application.
WebORB code generation
Before you build the Flex application, you need to create the code that the Flex application will need to work with WebORB. WebORB provides a toolset within the management console to locate back-end classes and generate code for consumer applications to use.
- Launch a browser and navigate to the URL of the WebORB console: http://localhost/Redeem/weborbconsole.html.
Click the Services tab. The WebORB Console's Services tab provides easy access to all your public classes and methods. WebORB automatically provides NHibernate integration when NHibernate libraries and configuration is detected.
- Expand the NHibernate Objects Service (see Figure 11)
Figure 11. The WebORB Console's Services tab.
- Expand the RedeemSite namespace.
- Select NHibernateSession.
- Click Download Code (leave Generate Project Files deselected). A ZIP archive will be downloaded; its contents are the source files needed for integration.
The generated code represents the WebORB Generated Service Abstraction component shown in Figure 2. The code contains a View Object (vo) that is a Flex representation of the RedemptionModel class in the .NET project. There are also classes generated to support the abstraction of service calls in Flex and an NHibernateSession class that supports all major CRUD operations along with support for direct HQL and SQL queries.
Flex development
With the back end completed and the generated code from the WebORB console in hand, you're ready to integrate the Flex application with the back end and develop the user experience.
Complete the following steps in Flash Builder for the RedeemApp project you created earlier:
- Extract the generated code files from the ZIP archive downloaded from the WebORB console including the folder structure.
- Copy the RedeemSite and weborb folders to the src folder of the RedeemApp project. (You can drag and drop the files directly into Flash Builder.)
- Edit the index.mxml file.
- Add the following code for the visual elements:
<!-- Top Panel containing submission form. -->
<s:Panel width="322" height="430" id="submissionForm" x="255" y="10"
   title="WidgetCo. presents Extreme Adventures">
 <s:Label x="31" y="10" text="First Name"/>
 <s:TextInput id="firstNameInput" x="31" y="24"/>
 <s:Label x="162" y="11" text="Last Name"/>
 <s:TextInput x="162" y="24" id="lastNameInput"/>
 <s:Label x="32" y="55" text="Address"/>
 <s:TextInput x="32" y="67" width="198" id="addressLine1Input"/>
 <s:Label x="232" y="55" text="Apt/Suite"/>
 <s:TextInput x="232" y="67" width="58" id="apartmentInput"/>
 <s:TextInput x="32" y="97" width="258" id="addressLine2Input"/>
 <s:Label x="32" y="127" text="City"/>
 <s:TextInput x="32" y="141" width="128" id="cityInput"/>
 <s:Label x="162" y="128" text="State"/>
 <s:TextInput x="162" y="141" width="29" id="stateInput"/>
 <s:Label x="195" y="128" text="Zip Code" height="16"/>
 <s:TextInput x="193" y="141" width="97" id="zipCodeInput"/>
 <s:Label x="32" y="173" text="Phone Number"/>
 <s:TextInput x="32" y="185" width="101" id="phoneNumberInput"/>
 <s:Label x="134" y="173" text="Email Address"/>
 <s:TextInput x="135" y="185" width="155" id="emailAddressInput"/>
 <s:Label x="31" y="222" text="Order Number"/>
 <s:Label text="Adventure Selection" x="31" y="269"/>
 <s:TextInput x="31" y="234" width="259" id="orderNumberInput"/>
 <s:DropDownList x="31" y="283" width="160" id="adventureSelectionInput"
    prompt="Select an adventure" dataProvider="{adventureOptions}" labelField="value" />
<s:Label text="Requested Date" x="193" y="269"/>
<mx:DateField x="195" y="283" id="requestedDateInput"/>
<s:CheckBox x="55" y="320" label="I agree to the terms and conditions."
    id="termsAgreementInput"/>
 <s:Button x="105" y="359" label="Submit Request" id="submitButton" enabled="true"
    click="submitButton_clickHandler(event)"/>
</s:Panel>

<!-- Bottom Panel containing data grid and controls for getting data and filtering by date -->
<s:Panel width="800" height="273" x="16" y="459" id="DataReview"
    title="WidgetCo. Extreme Adventures Promotion Requests">
 <mx:DataGrid id="submissionDataGrid" dataProvider="{reviewRequestsData}" width="790"
    selectable="true"  x="4" y="48" height="187">
  <mx:columns>
   <mx:DataGridColumn headerText="First Name" dataField="FirstName"/>
   <mx:DataGridColumn headerText="Last Name" dataField="LastName"/>
   <mx:DataGridColumn headerText="City " dataField="City"/>
   <mx:DataGridColumn headerText="State" dataField="State"/>
   <mx:DataGridColumn headerText="Phone" dataField="PhoneNumber"/>
   <mx:DataGridColumn headerText="EMail" dataField="EmailAddress"/>
   <mx:DataGridColumn headerText="Order" dataField="OrderNumber"/>
   <mx:DataGridColumn headerText="Item" dataField="ItemSelection"/>
   <mx:DataGridColumn headerText="Submitted On" dataField="SubmissionDate"/>
  </mx:columns>
 </mx:DataGrid>
 <s:Label text="Start Date" x="114" y="6"/>
 <mx:DateField id="startDateInput" x="114" y="18"/>
 <s:Label text="End Date" x="212" y="7"/>
 <mx:DateField id="endDateInput" x="212" y="19"/>
 <s:Button label="Get Requests" id="getRequestsByDateButton"
    click="getRequestsByDateButton_clickHandler(event)" x="310" y="19"/>
 <s:Button label="Get All Requests" id="getRequestsButton"
    click="getRequestsButton_clickHandler(event)" x="413" y="19"/>
</s:Panel>
- Now add a simple array in the declarations section. This provides the data for the drop down selection of available adventures.
<s:ArrayList id="adventureOptions">
 <fx:Object value="Pro Curling Lessons" />
 <fx:Object value="Race Adventure" />
 <fx:Object value="Extreme Skydiving" />
</s:ArrayList>
- To handle the user interaction and wire up the data with the abstraction code place a script block directly in the MXML. Add in the necessary imports and set up some local variables for the front end to use:
<fx:Script>
<![CDATA[
import mx.binding.utils.BindingUtils;
import mx.controls.Alert;
import mx.rpc.Responder;
import mx.rpc.events.FaultEvent;
import mx.rpc.events.ResultEvent;
import mx.utils.UIDUtil;
import RedeemSite.DataTypeInitializer;
import RedeemSite.Models.vo.RedemptionModel;
import weborb.nhibernate.NHibernateSession;
import weborb.nhibernate.QueryDescriptor;
private var formResponder:mx.rpc.Responder = new mx.rpc.Responder(requestResult, requestFault);
private var gridResponder:mx.rpc.Responder = new mx.rpc.Responder(getDataResult, requestFault);
private var redemptionRequest:RedemptionModel = new RedemptionModel();
private var nhibernateSession:NHibernateSession = new NHibernateSession();
[Bindable]
public var reviewRequestsData:Array;
]]>
</fx:Script>
- Next add bindings between the
redemptionRequest object's properties and the fields on the submission form.
<fx:Binding source="firstNameInput.text" destination="redemptionRequest.FirstName" />
<fx:Binding source="lastNameInput.text" destination="redemptionRequest.LastName" />
<fx:Binding source="addressLine1Input.text" destination="redemptionRequest.AddressLine1" />
<fx:Binding source="addressLine2Input.text" destination="redemptionRequest.AddressLine2" />
<fx:Binding source="apartmentInput.text" destination="redemptionRequest.Apartment" />
<fx:Binding source="cityInput.text" destination="redemptionRequest.City" />
<fx:Binding source="stateInput.text" destination="redemptionRequest.State" />
<fx:Binding source="zipCodeInput.text" destination="redemptionRequest.ZipCode" />
<fx:Binding source="phoneNumberInput.text" destination="redemptionRequest.PhoneNumber" />
<fx:Binding source="emailAddressInput.text" destination="redemptionRequest.EmailAddress" />
<fx:Binding source="orderNumberInput.text" destination="redemptionRequest.OrderNumber" />
<fx:Binding source="adventureSelectionInput.selectedItem.value"
    destination="redemptionRequest.ItemSelection" />
<fx:Binding source="requestedDateInput.selectedDate"
    destination="redemptionRequest.RequestedBookingDate" />
<fx:Binding source="termsAgreementInput.selected"
    destination="redemptionRequest.TermsAgreed" />
- In the script block, add an
onLoad() event function and a function for any service request faults:
public function onLoad():void
{
new DataTypeInitializer();
}
public function requestFault(e:FaultEvent):void
{
Alert.show("There has been an error with the data transaction", "Submission Failure");
}
- Edit the main
<s:Application> tag and add initialize="onLoad()" . - Add functions for the submission form. First, add a
requestResult function for capturing successful submission requests and an event handler function for the submit button:
public function requestResult(e:ResultEvent):void
{
Alert.show("Your submission has been recieved.", "Submission Success");
redemptionRequest.PrimaryKey = null;
}
protected function submitButton_clickHandler(event:MouseEvent):void
{
redemptionRequest.SubmissionDate = new Date();
redemptionRequest.AgreementDate = new Date();
redemptionRequest.PrimaryKey = UIDUtil.createUID();
nhibernateSession.Save(redemptionRequest, formResponder);
}
- Finally, add the methods for the data review controls. Add a
getDataResult() function for successful data requests that populate the grid control. Add two click event handler functions, one for each "Get Requests" button.
public function getDataResult(e:ResultEvent):void
{
submissionDataGrid.rowCount = e.result.length;
reviewRequestsData = e.result as Array;
}
protected function getRequestsButton_clickHandler(event:MouseEvent):void
{
nhibernateSession.Find("from RedemptionModel", gridResponder)
}
protected function getRequestsByDateButton_clickHandler(event:MouseEvent):void
{
var query:QueryDescriptor = nhibernateSession.CreateQuery(
"from RedemptionModel r where r.SubmissionDate >= :startDate and r.SubmissionDate <= :endDate");
query.SetNamedDateTime("startDate", startDateInput.selectedDate);
query.SetNamedDateTime("endDate", endDateInput.selectedDate + 86400000);
query.List(gridResponder);
}
With this last piece of code, the application should be ready to run for submitting and retrieving data. Launch the project and try it out.
Where to go from here
Using the sample application as a starting point, you can easily enhance its functionality by adding new data (and models) to the back end and generating new code using the WebORB console. You may want to explore the powerful HQL features of NHibernate to use the existing data in other ways.
With your project set up as outlined above you are now well positioned to develop RIA applications that can leverage the power of Microsoft back-end technologies coupled with the cross-platform/cross-browser capabilities provided by Adobe Flash Player and Flex technologies—all without needing anything but the most basic code and configuration to tie everything together.
WebORB's new NHibernate integration will work for the most common technical scenarios. For more complex scenarios you may require more control of the back end, which can be achieved by writing your own repository classes and using WebORB to generate code against those custom classes. Either way, WebORB's integration stack saves quite a bit of time and effort.
The sample files for this tutorial include an IIS 7.5 deployment package with SQL that allows for quick and easy deployment of the working application to see it in action. I have also included deployment files for Microsoft's Azure cloud services should you wish to use this type of application in the cloud. Finally you will find in the code a second set of classes and tests using a hand written repository interface to NHibernate instead of the auto-generated code (for more back end control). Depending on your use case you may prefer one method over the other. Using WebORB to provide the classes for NHibernate is usually preferable as fewer tests and less code maintenance are needed.
This member has not yet provided a Biography. Assume it's interesting and varied, and probably something to do with programming.


 General
  News
News  Suggestion
  Question
  Bug
Bug  Answer
  Joke
Joke  Praise
  Rant
Rant  Admin
Admin 


