Introduction
The purpose of this document is to give an overview of Form Management in Microsoft Office SharePoint Server 2007. This article explains how to create and publish forms using Microsoft Office InfoPath 2007 in to SharePoint site.
Creating and managing the forms in SharePoint is become very easy with the help of InfoPath 2007. As we seen in many web sites such as feedback forms, online registration forms and more, developing these forms may consume more time. So Microsoft provided tool/ software called Microsoft Office InfoPath 2007 to develop the forms in lesser time period. This tool / software also provides feature to publish the developed forms in to any shared locations, sharepoint sites and list of e-mail recipients. Also we can publish the forms as an installable form template like .js or .msi file. After successful publishing of forms in to sharepoint site, user can see / view the forms without having InfoPath 2007 installable at client machine.
Below section explains an overview of InfoPath 2007 and how to create and publish forms in to sharepoint site.
Microsoft Office InfoPath 2007 allows us to create rich, dynamic forms that teams and organization can use to share, reuse and manage information. It also provides an efficient way to deploy and manage rich interactive forms. It provides user-friendly interface to the user for entering information. It also provides a ready-to-use sample forms which can be used for common usage scenarios. As InfoPath 2007 uses XML, information can be easily reused throughout the organizations and across the business processes.
In Office SharePoint Server 2007, there is a services related to InfoPath called as InfoPath Forms Services which allow us to centralize the form management and deployment of electronic forms across the organizations. InfoPath Forms Services also adds the powerful new capability to render InfoPath forms to Web browsers and mobile devices, so that people can fill out forms without having InfoPath installed. Office InfoPath 2007 and InfoPath Form Services are designed to work together enabling teams and organizations to collect and use information easier.
One of the main advantage of Office InfoPath 2007 is form creator need not be a technical person. Any lay man can create and publish the forms using Office InfoPath 2007.
Office InfoPath 2007 helps us in collecting information through forms in timely manner which can help us to make informed and effective decisions. You can use Office InfoPath 2007 to:
- Gather information so that it can be reused and shared across business processes and throughout your organization.
- Collect information quickly and validate it against your organization's business criteria. This helps reduce errors, prevents you from having to re-work, and can help you get the information you need more quickly and accurately.
- Structure information gathering processes that are difficult to manage or require excessive manual review and validation.
- Take advantage of existing IT investments and knowledge to ease deployment costs.
- Provide you with a flexible way to collect information so you can adjust to changing business conditions.
In forms platform, Office InfoPath 2007and InfoPath Forms Services provide an end-to-end solution for organizations that seek to streamline forms-driven processes using electronic forms.
- Office InfoPath 2007 is used for designing and deploying forms, as well as enabling rich client fill in. Office InfoPath 2007 is used to deploy InfoPath forms as Microsoft Outlook e-mail messages.
- Office InfoPath 2007 is also used to collect information and update Microsoft Access databases automatically.
- InfoPath Forms Services is used to centralize the management of forms throughout the entire organization. InfoPath Forms Services is used to extend InfoPath forms to Web browsers and mobile devices.
As Office InfoPath 2007 uses XML file format, XML helps people create common languages for organizing, exchanging, and storing data. Having data in XML means that the information is transportable and can be easily shared and reused. Office InfoPath 2007 provides powerful functionality such as business logic validation, rich text formatting, AutoCorrect, and spelling checker. Office InfoPath 2007 also enables integration with other applications within the 2007 Microsoft Office system, including embedding InfoPath forms as Office Outlook e-mail messages, and using a custom Document Information Panel within Office Word 2007, Office Excel 2007, and Office PowerPoint 2007 to help structure and gather information about the documents within the programs.
Here are the top 10 ways Office InfoPath 2007 can help you extend the effectiveness of your business processes.
- Office InfoPath 2007 provides simple drag-and-drop interface to build forms and also provides a support for built-in template parts and shared data connections.
- Office InfoPath 2007 provides design checker to ensure consistency for forms deployed to InfoPath Forms Services.
- With Office InfoPath 2007, we can deploy forms as Outlook e-mail messages, so teammates / colleagues can complete forms without leaving the familiar Outlook environment. After you've collected the information in Office Outlook 2007, you can export it to a Microsoft Office Excel spreadsheet or merge the data back to a single InfoPath form.
- By converting Word documents and Excel spreadsheets to InfoPath form templates, you can build data integrity, improve version control, and add structure to information gathering by converting legacy documents to rich InfoPath form templates.
- InfoPath Forms Services of Office SharePoint Server 2007 enables organizations to centrally manage electronic forms by providing access to only those users who have a secure connection.
- With the addition of a free plug-in, you can create a Portable Document Format file (PDF) or XML Paper Specification (XPS) version of your completed InfoPath form for archival and records management.
- Build InfoPath forms solutions by creating InfoPath projects hosted within Visual Studio 2005, so developers can build solutions using managed code and the Microsoft .NET Framework.
- Office InfoPath 2007 and InfoPath Forms Services make it easy to extend forms solutions beyond your firewall because you can complete forms using many different Web browsers and mobile devices.
- Office InfoPath 2007 includes support for information rights management to help protect forms from inappropriate usage and distribution.
- Use the integrated workflow management tools in Office SharePoint Server 2007 to drive information-gathering processes efficiently.
Create electronic forms for gathering information efficiently and reliably. InfoPath 2007 provides a variety of controls, such as drop-down lists, check boxes, and buttons that ensure that the information you collect is consistent and accurate.
In InfoPath 2007, all published forms are based on form templates. Your first task is to create a form template. Once you've created the template, you can publish it to make the forms available to your users.
There are several ways to create form templates:
- Use a sample form template and customize it to your needs.
- Design your own form template.
- Import a document that you currently use as the source for your paper forms.
There is several sample form templates included with InfoPath 2007. You may be able to use these forms as they are, without making any customizations. This is the simplest way to get a robust form ready for distribution quickly.
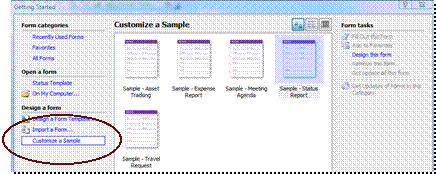
- Start InfoPath 2007. On the Getting Started dialog box, select a sample (for example, Status Report). If the samples are not visible, on the left under Design a form, click Customize a Sample. <wrap type="none"><anchorlock>
- On the right, on the Form tasks pane, click Design this form.
<wrap type="none"><anchorlock>
- You have the option of customizing the form or using it as it is. To use it as it is, on the File menu, click Save, and then give the template a name and click Save again.
- On the right, on the Design Tasks pane, click Design Checker. This checks the template to make sure there are no design and compatibility problems.
<shape id="Group_x0020_3" style="VISIBILITY: visible; WIDTH: 94.1pt; HEIGHT: 160.9pt" type="#_x0000_t75" o:spid="_x0000_s1026"><imagedata src="file:///C:\DOCUME~1\nagendg\LOCALS~1\Temp\msohtml1\01\clip_image005.png"><lock v:ext="edit" aspectratio="f"><wrap type="none"><anchorlock>
- Click the Save button. The template is now ready for publishing.
If you do not want to use the sample templates and you do not have a template to import, you can design your own form template. Follow the below steps to create your own Form Template. Below example is creating simple "Feedback" form by adding controls to the form designer.
- Start InfoPath, and on the File menu, click Design a Form Template.
"Design a Form Template" form will pop up. See the image below:
Select "Blank" template under "Based On" list and select the check box related to "Enable browser-compatible features only". Click on "OK" button which will display Form Designer page.
Note: I have selected "Blank" data source in the example because it has an internal data source that is defined for you as you design the form. Drag controls from the Controls task pane onto your template, and InfoPath 2007 adds fields to the data source. Like that other types of data source are available in the "Based on" list.
Web Service: The form template queries and submits data to a Web Service. Fields and groups in the template map to the schema supplied by the Web Service.
Database: The form template queries and submits data to a Microsoft® Office Access 2007 or SQL Server database. Fields and groups are added based on the way the database stores data.
XML or Schema: An existing XML document or schema is the main data source. Fields and groups map to the XML elements in the document or schema.
Connection Library: Creates connection to external data source such as database or Web Service.
- A blank form designer page is displayed to design the form which contains "Designer Tasks" on the right side. See the below image.
<shape id="_x0000_i1030" style="WIDTH: 396pt; HEIGHT: 252pt" type="#_x0000_t75" o:bordertopcolor="this" o:borderleftcolor="this" o:borderbottomcolor="this" o:borderrightcolor="this"><imagedata src="file:///C:\DOCUME~1\nagendg\LOCALS~1\Temp\msohtml1\01\clip_image003.jpg" o:title="2"><bordertop type="single" width="4"><borderleft type="single" width="4"><borderbottom type="single" width="4"><borderright type="single" width="4">
- I created simple "Feedback Forms" by adding 2-3 controls on the designer. See the image below.

<shape id="_x0000_i1026" style="WIDTH: 395.25pt; HEIGHT: 271.5pt" type="#_x0000_t75" o:bordertopcolor="this" o:borderleftcolor="this" o:borderbottomcolor="this" o:borderrightcolor="this"><imagedata src="file:///C:\DOCUME~1\nagendg\LOCALS~1\Temp\msohtml1\01\clip_image005.jpg" o:title="3"><bordertop type="single" width="4"><borderleft type="single" width="4"><borderbottom type="single" width="4"><borderright type="single" width="4">
- After designing the form, "Save" the template. See the Image below.
<shape id="_x0000_i1027" style="WIDTH: 395.25pt; HEIGHT: 276.75pt" type="#_x0000_t75" o:bordertopcolor="this" o:borderleftcolor="this" o:borderbottomcolor="this" o:borderrightcolor="this"><imagedata src="file:///C:\DOCUME~1\nagendg\LOCALS~1\Temp\msohtml1\01\clip_image007.jpg" o:title="4"><bordertop type="single" width="4"><borderleft type="single" width="4"><borderbottom type="single" width="4"><borderright type="single" width="4">
I have saved the form template as "Feedback_Template". Form template is saved successfully with an extension as .xsn. You can verify the file which you have saved to confirm.
- After saving the template, Click on "Designer Checker" link available in the "Design Task" panel at the right side. Design checker will review and correct the design and compatibility problems in the form template. See the image below.
<shape id="_x0000_i1028" style="WIDTH: 194.25pt; HEIGHT: 299.25pt" type="#_x0000_t75"><imagedata src="file:///C:\DOCUME~1\nagendg\LOCALS~1\Temp\msohtml1\01\clip_image009.jpg" o:title="5">
- "Design Checker" will show the error message if found in the form template. See the image below.
<shape id="_x0000_i1029" style="WIDTH: 195pt; HEIGHT: 176.25pt" type="#_x0000_t75" o:bordertopcolor="this" o:borderleftcolor="this" o:borderbottomcolor="this" o:borderrightcolor="this"><imagedata src="file:///C:\DOCUME~1\nagendg\LOCALS~1\Temp\msohtml1\01\clip_image010.jpg" o:title="6"><bordertop type="single" width="4"><borderleft type="single" width="4"><borderbottom type="single" width="4"><borderright type="single" width="4">
If "Design Checker" is showing error(s), then minimize the error(s) and verify with "Design Checker" again. Now Form Template is ready for publishing.
Use the import wizard to convert Word 2007 documents to form templates. InfoPath 2007 intelligently converts fields and tables into a structured form, and Word 2007 form fields are converted to the equivalent InfoPath 2007 controls. After the conversion, the Design Checker helps you identify elements that may need additional adjusting.
In this process, we convert the sample Word 2007 form shown below:
<shapetype id="_x0000_t75" coordsize="21600,21600" o:spt="75" o:preferrelative="t" path="m@4@5l@4@11@9@11@9@5xe" filled="f" stroked="f"><stroke joinstyle="miter"><path o:extrusionok="f" gradientshapeok="t" o:connecttype="rect"><lock v:ext="edit" aspectratio="t"><shape id="_x0000_i1025" style="WIDTH: 6in; HEIGHT: 153pt" type="#_x0000_t75" o:bordertopcolor="this" o:borderleftcolor="this" o:borderbottomcolor="this" o:borderrightcolor="this"><imagedata src="file:///C:\DOCUME~1\nagendg\LOCALS~1\Temp\msohtml1\01\clip_image001.jpg" o:title="12"><bordertop type="single" width="4"><borderleft type="single" width="4"><borderbottom type="single" width="4"><borderright type="single" width="4">
Above is the content present in the word document. This form consists of a table with no special fields or form controls. Typically, this form would be printed and distributed to the appropriate personnel. Each respondent would then complete the hard copy form and return it to the person who distributed it. With InfoPath 2007, this form can be converted to a form template, and then forms based on this template are distributed electronically. The recipients complete the form and return it electronically, without a single paper form ever being printed.
Below are the steps to import the word document.
- Start InfoPath 2007, and then on the Getting Started window click "Import a Form" link available in the left panel. See the image below.
<shape id="_x0000_i1026" style="WIDTH: 418.5pt; HEIGHT: 291.75pt" type="#_x0000_t75"><imagedata src="file:///C:\DOCUME~1\nagendg\LOCALS~1\Temp\msohtml1\01\clip_image003.jpg" o:title="8">
- In the Import Wizard, click InfoPath importer for Word documents, and then click Next. See the image below.
<shape id="_x0000_i1027" style="WIDTH: 373.5pt; HEIGHT: 240.75pt" type="#_x0000_t75"><imagedata src="file:///C:\DOCUME~1\nagendg\LOCALS~1\Temp\msohtml1\01\clip_image005.jpg" o:title="9">
- Browse to the Word document you want to import, click Open, and then click Finish. See the image below.
<
<shape id="_x0000_i1028" style="WIDTH: 374.25pt; HEIGHT: 240.75pt" type="#_x0000_t75"><imagedata src="file:///C:\DOCUME~1\nagendg\LOCALS~1\Temp\msohtml1\01\clip_image006.jpg" o:title="10">
Note: If the document you are importing has restricted permission, you must have Full Control access to the document. If you have only Read or Change access, an error message will appear when you attempt to import the document.
- When you see the note that the form was successfully imported, click OK. The form template opens in InfoPath 2007, where you can customize it if you choose. See the image below.
<shape id="_x0000_i1029" style="WIDTH: 402.75pt; HEIGHT: 258.75pt" type="#_x0000_t75" o:bordertopcolor="this" o:borderleftcolor="this" o:borderbottomcolor="this" o:borderrightcolor="this"><imagedata src="file:///C:\DOCUME~1\nagendg\LOCALS~1\Temp\msohtml1\01\clip_image007.jpg" o:title="13"><bordertop type="single" width="4"><borderleft type="single" width="4"><borderbottom type="single" width="4"><borderright type="single" width="4">
- After importing the word document in to InfoPath, either you can customize the template or Save the template. I am not doing any customization. I just checked the "Design Checker" and saved the template. Now this new imported template is ready for publishing.
Publish InfoPath 2007 form templates to a SharePoint Server 2007 Document Library to make your forms available to users. Users fill out forms in the browser and save them to the Document Library. The completed forms are then available to you for reporting and analysis.
There are two ways to publish a form template on SharePoint Server 2007. They are given below:
Publish the form template to a Document Library. This option makes forms based on your template available in a specific Document Library. To publish a form template to a Document Library, you must have permission to create libraries and lists on the site.
Publish the form template to a SharePoint Server 2007 site as a content type. This option makes that template available across a site collection. You don't have to create multiple templates to publish them in multiple libraries. To publish a form template as a content type, you must have permission to manage the site.
In this example, I have published a "Feedback_Template" form template to a SharePoint Server 2007 site as a content type.
- Start InfoPath 2007 and open your form template.
- Click on "Publish Form Template" link available in the "Design Tasks" at right side panel. See the image below.
<shapetype id="_x0000_t75" coordsize="21600,21600" o:spt="75" o:preferrelative="t" path="m@4@5l@4@11@9@11@9@5xe" filled="f" stroked="f"><stroke joinstyle="miter">
- On the Publishing Wizard, click To a SharePoint Server with or without InfoPath Forms Services, and then click Next. See the image below.
<shape id="_x0000_i1029" style="WIDTH: 405pt; HEIGHT: 3in" type="#_x0000_t75"><imagedata src="file:///C:\DOCUME~1\nagendg\LOCALS~1\Temp\msohtml1\01\clip_image002.jpg" o:title="14">
- Type the address of the site you want to publish to, and then click Next. See the image below.
<shape id="_x0000_i1025" style="WIDTH: 405pt; HEIGHT: 282pt" type="#_x0000_t75"><imagedata src="file:///C:\DOCUME~1\nagendg\LOCALS~1\Temp\msohtml1\01\clip_image004.jpg" o:title="15">
- Select the Enable this form to be filled out by using a browser check box if it is not selected, click the Site Content Type option, and then click Next. See the image below.
<
<shape id="_x0000_i1026" style="WIDTH: 378.75pt; HEIGHT: 187.5pt" type="#_x0000_t75"><imagedata src="file:///C:\DOCUME~1\nagendg\LOCALS~1\Temp\msohtml1\01\clip_image006.jpg" o:title="16">
- Click Create a new content type, and then in the Base the content type on list, click Form. Click Next.
- Type the name and description for this content type, and then click Next (for example, Feedback Form.)
- Browse to a location on the site where you want to store the form template, and then click Next.
- If you want fields in your form to appear as columns in the Document Library, click Add, select the field name, edit the column name if you choose, and click Ok. I have added the 2 columns called "Prepared By" and "Report Date". See the image below.
<shape id="_x0000_i1027" style="WIDTH: 293.25pt; HEIGHT: 69pt" type="#_x0000_t75"><imagedata src="file:///C:\DOCUME~1\nagendg\LOCALS~1\Temp\msohtml1\01\clip_image007.jpg" o:title="17">
- Click Next, click Publish, and then click Close. Form Template is published successfully.
Enable the content type on the site to make it available for use after publishing the form template as content type successfully.
- Open the SharePoint site.
- Access the Document Library where you want to make your forms available.
- On the Settings menu, click Document Library Settings.
- On the Customize [library name] page, under General Settings, click Advanced Settings.
- On the Document Library Advanced Settings page, under Allow management of content types, click Yes.
- Under Opening browser-enabled documents, click Display as a Web page, and then click OK.
- On the Customize[library name] page, under Content Types, click Add from existing site content types.
- On the Add Content Types page, on the Available Site Content Types list, click the name of the content type you just added.
- Click Add, and then click OK.
<shapetype id="_x0000_t75" coordsize="21600,21600" o:spt="75" o:preferrelative="t" path="m@4@5l@4@11@9@11@9@5xe" filled="f" stroked="f"><stroke joinstyle="miter">
Display the columns which we added during the publishing process, by creating view that includes your form template columns.
- In section 6.1, we have enabled the content type. From the same Document Library, on the "Settings" menu, click "Create View" link.
- On the "Create View" page click on "Standard View" link.
- In the "Columns" section, select the check box for the new columns.
- On the right, from the Position from Left column list, click the number representing the position you want each column to occupy.
- In the Name section, type a name for the view, select the "Make this the default view" check box, and then click OK.
Nagendra Gunaga is having 5.5 years of experience in IT industry. His experience is in .Net Framework, C#.Net, ADO.Net, ASP.Net, SQL Server and Microsoft Office SharePoint Server.
I have about 10 plus years of experience in professional software development with extensive involvement in Web based Object-Oriented, Multi-Tiered application design and development. I have experience in working with Content Management System and Portal Management System tools like SharePoint and also had experience in Integration of SharePoint with Commerce Server, Exchange Server.
Currently I am working in a Software firm Hewlett Packard Global Soft Private Limited as SharePoint Solution Architect located in Bangalore, India. My main responsibilities include designing SharePoint solution for a large enterprise product, automating SharePoint Deployment, Developing WebParts, Managing SharePoint Authentications. You can contact by emailing me at nagendragunaga@gmail.com


 General
  News
News  Suggestion
  Question
  Bug
Bug  Answer
  Joke
Joke  Praise
  Rant
Rant  Admin
Admin 


