Introduction
This is Sample Pamper Part 2: 3D-Light Reflections. This article will proceed from where Part 1 left us, and will then add the light reflection. It will exclude the graphical signs in Greek to make it easier to understand the connections between values and formulas. The sample codes will not be embedded in confusing fancy code with objects and interfaces either.
So... this article will describe:
You will need a computer with either Visual Studio or Macromedia Flash 8 installed to be able to run and experiment with the downloadable source codes. Pen, paper and a calculator would be good to fight those numbers on your own.
When you're drawing in a 3D-environment and want to calculate how the light should reflect against a surface, we can use the reflection vector formula to see where the reflection will go.
Back to top?
This example is a "Flat-shade" as in the previous article (Part 1). Pretend that we are going to calculate the reflection vector in the following example.
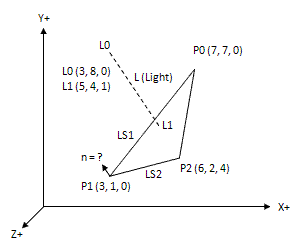
Here the points P (0-2) are known to us:
P0 (7, 7, 0)
P1 (3, 1, 0)
P2 (6, 2, 4)
And the points L (0-1) are also known to us:
L0 (3, 8, 0) = light source
L1 (5, 4, 2) = light target
From here, we will calculate the vectors L, LS1 and LS2 that will be needed for further investigations.
L = (L1 – L0)
Lx = L1x – L0x = 5 – 3 = 2
Ly = L1y – L0y = 4 – 8 = -4
Lz = L1z – L0z = 1 – 0 = 1

LS1 = (P0 – P1)
LS1x = (P0x – P1x) = 7 - 3 = 4
LS1y = (P0y – P1y) = 7 – 1 = 6
LS2z = (P0z – P1z) = 0 – 0 = 0

LS2 = (P2 – P1)
LS2x = (P2x – P1x) = 6 – 3 = 3
LS2y = (P2y – P1y) = 2 – 1 = 1
LS2z = (P2z – P1z) = 4 – 0 = 4
Back to top?
Now it's time to find the Normal vector on the surface. We will set up our two chosen ones in a matrix.

And apply the Cross product on them to retrieve the Normal (N). If you don't know or remember how to do the cross product, go back to the previous article Part 1: Crossing the Matrix.
Nx = LS2y * LS1z – LS2z * LS1y = 1 * 0 – 4 * 6 = -24
Ny = LS2z * LS1x – LS2x * LS1z = 4 * 4 – 3 * 0 = 16
Nz = LS2x * LS1y – LS2y * LS1x = 3 * 6 – 1 *4 = 14
Now we must make the Normal vector a unit vector, for it to make sense to us. So we will normalize it like the following:
nX = Nx / |N| = -24 / sqrt(24^2+16^2+14^2) = -0.75
nY = Ny / |N| = 16 / sqrt(24^2+16^2+14^2) = 0.50
nZ = Nz / |N| = 14 / sqrt(24^2+16^2+14^2) = 0.44
Back to top?
Finally! We have everything we need for retrieving the Reflection vector.
R = 2N + L
Where R will be the reflection vector, N is the projection of the light vector along the n. And yes, the L is the light vector. How do we solve this then? We must get another Dot product going between L and n, but this time L must be negative to get the reflection vector. If you want to know more about the Dot product, go to the previous article Part 1: The Dot Product.
R = 2*(-L . n ) * n + L
And we will solve things out.
R = 2 * (-Lx * nx + -Ly * ny + -Lz * nz) * n + L
R = 2 * (-2 * -0.75 + 4 * 0.50 +  -1 * 0.44) * n + L
R = 6,12 * <-0.75, 0.50, 0.44> + <2, -4, 1>
R = <-2.59, -0.94, 3.70>
There it is! Now we have the R vector, the reflection vector. And we will graphically display this in the following coordinate system.
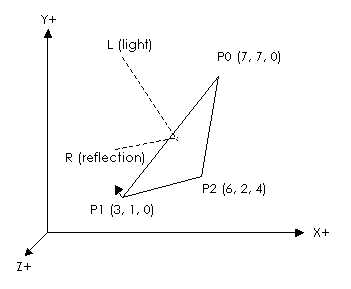
From the light target point L1, the reflection will have a negative x path by -2.59 and a negative y path by -0.94 and a positive z path by 3.70 as the figure is showing us here. Now you can use the Reflection vector to add reflections to objects in the surroundings.
Back to top?
There are two samples to play around with, one in C# and the other for Macromedia Flash 8. If you want to step even further, you can hold your eyes wide open for Part Three in this series.
Back to top?
- Version 1.0, uploaded 12 September, 2007
Three versions included for this article, one for C# and the other two are for Macromedia Flash 8 and MX.
Back to top?
Books
- "Tricks of the Windows Game programming gurus – Fundamentals of 2d and 3D game programming". Vol1 - (SAMS) by André Lamothe ISBN: 0-672-31361-8
Links
Back to top?
This software is provided 'as-is' without any express or implied warranty. In no event will the authors be held liable for any damages arising from the use of this software. Permission is granted to anyone to use this software for any purpose including commercial applications. If you use this software in a product, an acknowledgment in the product documentation would be appreciated but is not required. And never could you claim that it is yours.
Back to top?
Professional programmer, degree in Informatics and Applied Systems Science.


 General
  News
News  Suggestion
  Question
  Bug
Bug  Answer
  Joke
Joke  Praise
  Rant
Rant  Admin
Admin 


