- Get the latest build here
Introduction
R2build system is a tool/Framework to establish your daily build (or nightly build, or build automation, or continuous integration system) in a very easy manner. It includes, but is not limited to, plug-ins for email notification, FTP, various Installer packaging tools, Ant/Nant/.NET/Delphi/C++ Builder, and various source control tools.
R2Build is licensed under the terms of the GNU General Public License. It adheres to the open source model and therefore makes the source code freely available.
First Glance
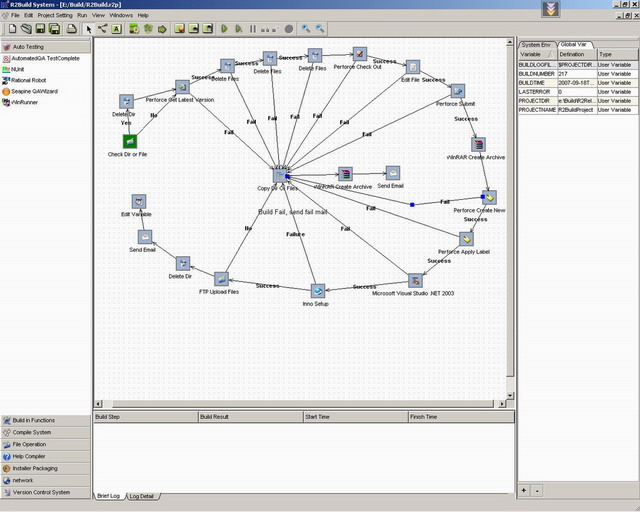
The main application includes the following sub windows:
Tool Box Window
This contains most of the tools that are useful for building your product. It is populated by a plug-in config XML file. You can also create your own plugin XML to enable a new tool. By dragging an icon from the tool box, you can create a new node in the flow graph view.
Build Setting Flowgraph View
This is a canvas to hold the build setting node and link. Build setting node is a one build step, you can add a node by dragging a node from the toolbox onto this canvas. You can double click to change the node parameters. You can also link a node to indicate the transition after performing one step. A link is a directional line with an arrow, which means the direction of transition. Using nodes and links, you can draw an automation flow graph (Build Settings). You can set the start node for this graph.
Log Window
When you run the automation flow graph, the log will be displayed here.
Variable Window
You can define a variable which can be used in node setting parameters. All the variables are displayed in the variable windows. You can add/delete using "+" or "-" buttons.
Application Tool Bar
It includes almost all the functions, File operations (Save/Open), Flow graph drawing tool (connect node, add comment text), and Debug/Run tools.
Configuration after Installation
The most important configuration is setting up all the software tools you need in R2Build. Select menu: Project Settings->Setup Application Paths (or Setup Application Paths button in Application tool bar).
After you install R2Build, it ships with a default setting for all the required software tools, but these settings are the default installation location of the tool. You should check and point to your installed location. For example, for visual source safe, the default installation location is C:\program files\Microsoft visual studio\common\vss\win32\ss.exe, but if on your build server, you installed to D:\VSS\..., then you should select visual source safe: ss.exe item in the dialog, double click or click "set path.." button to choose your dir of ss.exe.
NOTE: R2Build's search rule for tools: first search the dir you configured, if you cannot find it, then use the system PATH env to search it again, if you still cannot find the tool, it will popup a dialog to let you input the correct path to the tool when you add the node.
Create a New Build Project
- Click the "Create new file" button in the "Application tool bar" to create a new build flow graph.
- Setup required global variable: In the Variable window, double click
BUILDLOGFILENAME to setup your log file (log file will store all the output generated by all the plug-in tools when running the build).
You can also add other global variables for this build, to avoid inputting it many times. For example, you can add a PROJECTDIR global variable to indicate the project's root dir. The next time you use this parameter, the correct format will be $PROJECTDIR. To use a variable, you should add a $ before the variable. In order to add a variable in the variable edit dialog, you only need the real variable name. - Add Node: Drag and drop an icon from the toolbox onto the build flow graph view, then double click to set up the parameter of this node. Usually, the first step is getting the latest code from the source control software.
- Add Link: Add other nodes, then add the transition link. First click "Add Connection" button, then select the first node, and then drag to draw a line to the second node, then release the mouse (just like you draw a line in Microsoft Paint), the arrow means that after performing the first node, it will go on to perform the second node. You can also setup the transition condition, by double-clicking the line, a dialog will popup to let you input the condition.
For example: If there is a line from "Perforce get latest code" to "Delete files", then the transition condition is "return value equal to Success". This means that when Perforce gets the latest code finished without any error, then do the next step, "Delete file". - Setup start node: Start node is the first node to be executed while you run the build flow graph. Select a node, then click "Set Start Node" button.
- Save build flow graph: Click "Save" button, to save your build flow graph
Run Build Project
- Run without debug: Click "Run" button in the application toolbar, the current build project will start from "Start Node", all the log will be displayed in the log window (at the same time, save to
$ BUILDLOGFILENAME) - Run with debug: Click "Run Debug" button in the application toolbar, the current build project will be run in debug mode, it will break at the breakpoint
- Set/remove breakpoints: Select the node, click the "Add breakpoint" button in the application toolbar. To remove, select the node with breakpoint, click "Remove breakpoint", or click "Remove all breakpoints" to remove all the breakpoints from the current build project.
Setup Nightly Build
- Command line options:
R2build supports command line options, the format is:
R2Build.exe [-r][-q] <buildfilename>
-r means run the build project file
-q means quit R2Build application after the build is completed
Buildfilename means the full path name of the .r2p file(build project file)
You can set up the nightly build using these two command line options. - Setup Scheduled Tasks in Windows
In Control panel->Scheduled tasks->Add scheduled task, in the wizard, select the R2Build.exe, and input the parameter you want. After the wizard is closed, double click the newly created tasks called R2build, change the run parameter to "C:\Program Files\R2Build\R2Build.exe" -r E:\Build\R2Build.r2p
Change the italic part according to your settings.
This member has not yet provided a Biography. Assume it's interesting and varied, and probably something to do with programming.


 General
  News
News  Suggestion
  Question
  Bug
Bug  Answer
  Joke
Joke  Praise
  Rant
Rant  Admin
Admin 


