Introduction
This is the third part in the Sample Pamper series, and this time, we will turn to those of you who want to know about creating a surface for your 3D objects. In this case, we will focus on polygon surfaces, z-buffer, light and reflection, and drawing a 3D-line. The focus will not lie on cute encapsulations within code objects. We are going to focus on this in the fourth and the final part of this series when we are going to create a game out of what we have learnt this far.
This article will describe…
Requirement
You will need Visual Studio .NET installed to be able to run and try the source code for this article.
Back to top?
The example
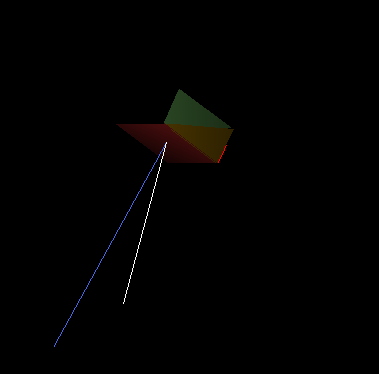
This example will paint some polygons, like the ones in the picture, and rotate them. It will also display the light and reflection with two lines, this to more visually describe to you how the light will fall and reflect against the surface (if you want to read more about light and reflections, you can read: Part 1: 3D-Light, Flat-shading, and Rotations, and Part 2: 3D-Light Reflections of the Sample Pamper series). The light vector will follow the mouse pointer so that you easily change it and see the new effect. To paint a surface like this one in the picture, you will need to know the corners points, these corners are the ones creating the surface. You should then place polygons between these points to build the surface. The polygons should also be kept as small as possible, which we can do by adding points to the mesh (Polygon mesh) so that we can add several smaller polygons to it, and it would end up looking something like this:
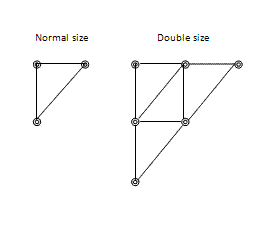
But, how many points should we have then? It depends on many things, and one of them is how near the object is in the Z-order; the further away, the less number of points is needed, and contrary. But in our case, it will not be considered because it will be too much to handle in this article, so we will stick with some points for the surface in every case. But, how do we draw a polygon that will know every point in the z order so that we will know if a point is behind another? The polygon we drew in articles one and two was the one built in within the Graphics library, and this one can only handle x and y coordinates; we need the z coordinate to make it happen also. We must consider drawing a new one, handling x, y, and z coordinates by our selves.
The J.E. Bresenham line algorithm
A polygon is based on several lines, and to draw a line, we can use the line formula as this famous one:
p = pStart + t * L
where p is the point in the line segment and pStart is the starting point from where the segment is supposed to be drawn. The t goes from 0 to 1, and L is the length of the segment.
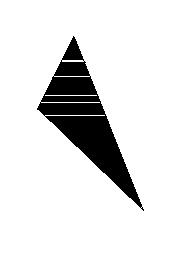
But, this line formula has its flaws, and will display cracks in the surface in some angles, if being used for this purpose. To solve this problem, you will need something that will follow the pixels on the screen much better, and I will therefore introduce the Bresenham line algorithm to you as it is made for plotters (Bresenham). This line will be rasterized so that it can't jump pixels like the line formula could.
private void SpeedLine2D(int x, int y, int xx, int yy)
{
int dx = (xx-x);
int dy = (yy-y);
int step_x = 0;
int step_y = 0;
if(dx>=0)
step_x = 1;
else
{
step_x = -1;
dx = -dx;
}
if(dy>=0)
step_y = 1;
else
{
step_y = -1;
dy = -dy;
}
int dx2 = dx*2;
int dy2 = dy*2;
err_termXY = dy2 - dx;
for(int i=0;i<=dx;i++)
{
bm.SetPixel(x,y,color);
if(err_termXY>=0)
{
err_termXY -= dx2;
y += step_y;
}
err_termXY += dy2;
x += step_x;
}
}
}
This function above is only displaying the part when x is dominating; you'll need the part when it's y dominating too, but you can see what it does here.
Back to top?
The algorithm with the z axis
But still, what about the z axis we where talking about? We must implement this to the algorithm too, and then it could look something like the following:
private void SpeedLine3D(int x, int y, int z, int xx, int yy, int zz)
{
int dx = (xx-x);
int dy = (yy-y);
int dz = (zz-z);
int step_x = 0;
int step_y = 0;
int step_z = 0;
if(dx>=0)
step_x = 1;
else
{
step_x = -1;
dx = -dx;
}
if(dy>=0)
step_y = 1;
else
{
step_y = -1;
dy = -dy;
}
if(dz>=0)
step_z = 1;
else
{
step_z = -1;
dz = -dz;
}
int dx2 = dx*2;
int dy2 = dy*2;
int dz2 = dz*2;
int err_termXY = 0;
int err_termXZ = 0;
if(dx>=dy&&dx>=dz)
{
err_termXY = dy2 - dx;
err_termXZ = dz2 - dx;
for(int i=0;i<=dx;i++)
{
bm.SetPixel(x,y,color);
if(err_termXY>=0)
{
err_termXY -= dx2;
y += step_y;
}
if(err_termXZ>=0)
{
err_termXZ -= dx2;
z += step_z;
}
err_termXY += dy2;
err_termXZ += dz2;
x += step_x;
}
}
else if(dy>dx&&dy>dz)
{
err_termXY = dx2 - dy;
err_termXZ = dz2 - dy;
for(int i=0;i<=dy;i++)
{
bm.SetPixel(x,y,color);
if(err_termXY>=0)
{
err_termXY -= dy2;
x += step_x;
}
if(err_termXZ>=0)
{
err_termXZ -= dy2;
z += step_z;
}
err_termXY += dx2;
err_termXZ += dz2;
y += step_y;
}
}
else if(dz>dx&&dz>dy)
{
err_termXY = dx2 - dz;
err_termXZ = dy2 - dz;
for(int i=0;i<=dz;i++)
{
bm.SetPixel(x,y,color);
if(err_termXY>=0)
{
err_termXY -= dz2;
y += step_y;
}
if(err_termXZ>=0)
{
err_termXZ -= dz2;
x += step_x;
}
err_termXY += dy2;
err_termXZ += dx2;
z += step_z;
}
}
}
Back to top?
The 3D polygon
Now that we have our new way of painting a 3D line, we can go on with the polygon. The best way of filling a polygon is to draw a horizontal line from the points in the left side line segment to the right side line segment of the polygon. What we need is to use the algorithm we made based on the Bresenham algorithm to first calculate every single unique y point, and that unique y positions the x coordinate in LS1, LS2, and LS3, and then we draw lines from left to right between these points.
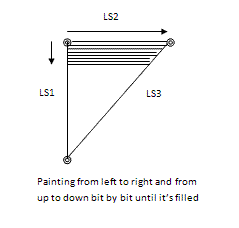
We are going to fill these line segment points into an array first and then paint horizontal lines from this information. To manage this, I've developed the line algorithm a bit so that it handles three lines with x, y, and z in one single loop.
private void CalculatePolygon(uint[][] zbuffer, Poinx3D p1,
Poinx3D p2, Poinx3D p3, double intencity, int red, int green, int blue)
{
ArrayList aR1 = new ArrayList();
ArrayList aR2 = new ArrayList();
ArrayList aR3 = new ArrayList();
int LS1x = p2.X-p1.X;
int LS1y = p2.Y-p1.Y;
int LS1z = p2.Z-p1.Z;
int LS2x = p3.X-p2.X;
int LS2y = p3.Y-p2.Y;
int LS2z = p3.Z-p2.Z;
int LS3x = p3.X-p1.X;
int LS3y = p3.Y-p1.Y;
int LS3z = p3.Z-p1.Z;
if(LS1x>=0)
step_LS1x = 1;
else
{
step_LS1x = -1;
LS1x = -LS1x;
}
if(LS1z>=0)
step_LS1z = 1;
else
{
step_LS1z = -1;
LS1z = -LS1z;
}
if(LS2x>=0)
step_LS2x = 1;
else
{
step_LS2x = -1;
LS2x = -LS2x;
}
if(LS2z>=0)
step_LS2z = 1;
else
{
step_LS2z = -1;
LS2z = -LS2z;
}
if(LS3x>=0)
step_LS3x = 1;
else
{
step_LS3x = -1;
LS3x = -LS3x;
}
if(LS3z>=0)
step_LS3z = 1;
else
{
step_LS3z = -1;
LS3z = -LS3z;
}
int L2S1x = LS1x*2;
int L2S1y = LS1y*2;
int L2S1z = LS1z*2;
int L2S2x = LS2x*2;
int L2S2y = LS2y*2;
int L2S2z = LS2z*2;
int L2S3x = LS3x*2;
int L2S3y = LS3y*2;
int L2S3z = LS3z*2;
if(LS3x>=LS3y&&LS3x>=LS3z)
{
err_LS3x = L2S3x-LS3x;
err_LS3y = L2S3y-LS3x;
err_LS3z = L2S3z-LS3x;
}
else if(LS3y>LS3x&&LS3y>LS3z)
{
err_LS3x = L2S3x-LS3y;
err_LS3y = L2S3y-LS3y;
err_LS3z = L2S3z-LS3y;
}
else
{
err_LS3x = L2S3x-LS3z;
err_LS3y = L2S3y-LS3z;
err_LS3z = L2S3z-LS3z;
}
if(LS2x>=LS2y&&LS2x>=LS2z)
{
err_LS2x = L2S2x-LS2x;
err_LS2y = L2S2y-LS2x;
err_LS2z = L2S2z-LS2x;
}
else if(LS2y>LS2x&&LS2y>LS2z)
{
err_LS2x = L2S2x-LS2y;
err_LS2y = L2S2y-LS2y;
err_LS2z = L2S2z-LS2y;
}
else
{
err_LS2x = L2S2x-LS2z;
err_LS2y = L2S2y-LS2z;
err_LS2z = L2S2z-LS2z;
}
if(LS1x>=LS1y&&LS1x>=LS1z)
{
err_LS1x = L2S1x-LS1x;
err_LS1y = L2S1y-LS1x;
err_LS1z = L2S1z-LS1x;
}
else if(LS1y>LS1x&&LS1y>LS1z)
{
err_LS1x = L2S1x-LS1y;
err_LS1y = L2S1y-LS1y;
err_LS1z = L2S1z-LS1y;
}
else
{
err_LS1x = L2S1x-LS1z;
err_LS1y = L2S1y-LS1z;
err_LS1z = L2S1z-LS1z;
}
for(int i=0;i<(storXY>storZ?storXY:storZ);i++)
{
if(err_LS1y>=0&&i<=LS1x&&LS1x>=LS1y
&&LS1x>=LS1z)
{
Poinx3D pp1 = new Poinx3D();
pp1.X = x1+p1.X;
pp1.Y = y1+p1.Y;
pp1.Z = z1+p1.Z;
aR1.Add(pp1);
err_LS1y -= L2S1x;
y1 += step_LS1y;
}
if(err_LS1x>=0&&i<=LS1x&&LS1x>=LS1y
&&LS1x>=LS1z)
{
err_LS1x -= L2S1x;
x1 += step_LS1x;
}
if(err_LS1z>=0&&LS1x>=LS1y&&LS1x
>=LS1z&&(z1>=0?z1:-z1)<LS1z)
{
err_LS1z -= L2S1x;
z1 += step_LS1z;
}
if(err_LS1x>=0&&i<LS1y&&LS1y>LS1x
&&LS1y>LS1z)
{
err_LS1x -= L2S1y;
x1 += step_LS1x;
}
if(err_LS1y>=0&&i<=LS1y&&LS1y
>LS1x&&LS1y>LS1z)
{
Poinx3D pp1 = new Poinx3D();
pp1.X = x1+p1.X;
pp1.Y = y1+p1.Y;
pp1.Z = z1+p1.Z;
aR1.Add(pp1);
err_LS1y -= L2S1y;
y1 += step_LS1y;
}
if(err_LS1z>=0&&LS1y>LS1x&&
LS1y>LS1z&&(z1>=0?z1:-z1)<LS1z)
{
err_LS1z -= L2S1y;
z1 += step_LS1z;
}
if(err_LS1y>=0&&i<=LS1z&&LS1z>
LS1x&&LS1z>=LS1y)
{
Poinx3D pp1;
pp1.X = x1+p1.X;
pp1.Y = y1+p1.Y;
pp1.Z = z1+p1.Z;
aR1.Add(pp1);
err_LS1y -= L2S1z;
y1 += step_LS1y;
}
if(err_LS1x>=0&&i<=LS1z&&LS1z>LS1x
&&LS1z>=LS1y)
{
err_LS1x -= L2S1z;
x1 += step_LS1x;
}
if(err_LS1z>=0&&LS1z>LS1x&&LS1z>=
LS1y&&(z1>=0?z1:-z1)<LS1z)
{
err_LS1z -= L2S1z;
z1 += step_LS1z;
}
err_LS1x += L2S1x;
err_LS1y += L2S1y;
err_LS1z += L2S1z;
err_LS2x += L2S2x;
err_LS2y += L2S2y;
err_LS2z += L2S2z;
err_LS3x += L2S3x;
err_LS3y += L2S3y;
err_LS3z += L2S3z;
}
PolyPainter(zbuffer, aR1, aR2, aR3, intencity, red, green, blue);
}
In this algorithm, you can see that we are using three arrays, and yes, they are of the ArrayList type, which is not the fastest way to go. We are only adding the last point from the line segment once for every new row, so that we will end up having one unique point per y row, and we are doing this with LS1, LS2, and LS3.
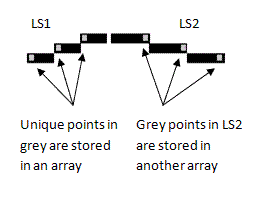
Now, when this is done, we can start to paint horizontal lines between these stored points, as you can see in the following picture:
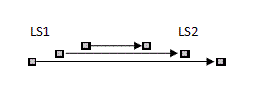
To realize this in code, you'll get the following code snippet:
private void HorizontalLine3D(uint[][] zbuffer, Poinx3D p1,
Poinx3D p2, double intencity, int red, int green, int blue)
{
int dx = (p2.X-p1.X);
int dz = (p2.Z-p1.Z);
int step_x = 0;
int step_z = 0;
if(dx>=0)
step_x = 1;
else
{
step_x = -1;
dx = -dx;
}
if(dz>=0)
step_z = 1;
else
{
step_z = -1;
dz = -dz;
}
int dx2 = dx*2;
int dz2 = dz*2;
int err_termXZ = 0;
int uni1D = 0, uni2D2 = 0;
int inc11 = 0, inc12 = 0, inc2 = 0;
int step1D2 = 0, step2D = 0;
int loopTo = 0, direction = 0;
if(dx>=dz)
{
err_termXZ = dz2 - dx;
direction = 0;
loopTo = dx;
uni1D = dx2;
inc11 = p1.Y;
step1D2 = step_z;
inc12 = p1.Z;
uni2D2 = dz2;
inc2 = p1.X;
step2D = step_x;
}
else if(dz>dx)
{
err_termXZ = dx2 - dz;
direction = 2;
loopTo = dz;
uni1D = dz2;
inc11 = p1.Y;
inc12 = p1.X;
step1D2 = step_x;
uni2D2 = dx2;
inc2 = p1.Z;
step2D = step_z;
}
for(int i=0;i<=loopTo;i++)
{
Color cl = Color.FromArgb(red,green,blue);
if(direction==0)
{
if(inc12>zbuffer[inc2][inc11])
{
bm.SetPixel(inc2,inc11,cl);
zbuffer[inc2][inc11] = Convert.ToUInt32(inc12);
}
}
if(direction==2)
{
if(inc2>zbuffer[inc12][inc11])
{
bm.SetPixel(inc12,inc11,cl);
zbuffer[inc12][inc11]=Convert.ToUInt32(inc2);
}
}
if(err_termXZ>=0)
{
err_termXZ -= uni1D;
inc12 += step1D2;
}
err_termXZ += uni2D2;
inc2 += step2D;
}
}
This function will paint a horizontal line from one line segment to another, so we have released it from the y part because it's not needed here. The int parameters to this function will be the points as we have stored in our three line segment arrays.
Back to top?
The Z buffer
In the previous code snippets, you can see that we are using a Z-buffer to prevent pixels behind others to be painted. The z buffer is just a screen buffer that has the highest z order of a x, y point stored, to compare this with a new coordinate to see if it is in front or behind the stored one. If the new coordinate is behind the stored one, it will not be shown, and if it's in front, it will be painted, and this new z position will be stored in the buffer instead.
Back to top?
Points of interest
There is one sample to play around with in C#. And, this articles code is only made for learning, so don't expect to see something in a nice package. Made it this way to be simple to follow. But, I've realized that it's not easy anyway because of the size of this project. The next article Part 4 in this series will present a 2/3D-game called SpaceBox made from the knowledge we have got this far.
Back to top?
History
- Version 1.0, uploaded 27 September, 2007 - One version included for the article, for C#.
- Version *, changed 10 October, 2007 - Made some changes to the article.
Back to top?
References
Links
Back to top?
Disclaimer
This software is provided 'as-is' without any express or implied warranty. In no event will the authors be held liable for any damages arising from the use of this software. Permission is granted to anyone to use this software for learning purpose only. And, never could you claim that it is yours.
Professional programmer, degree in Informatics and Applied Systems Science.


