Introduction
This is an article which explains briefly how to automate any device or equipment by taking a dental chair into consideration. My aim here is to give an overview of how WPF and C# can be ultimately used in the graphical designing and presentation of any automated projects.
Requirements
To run the project, you require the following:
- Visual Studio 2008 OR
- Expression Blend 4
Background
Suddenly, an idea bubbled in my mind about using WPF in the automation projects. Then, I started to think about the kind of device that can be better automated. So I thought of using Dental chair as the equipment to automate. This project requires little use of artistic skills to design the objects required for the presentation. You need to make a list of the activities that your device should perform and then proceed to design the graphic objects. So it will be appropriate for you to use it better without much modifications. The project presents how transformation objects in WPF can be used better for the presentation and the automation process.
How It Works
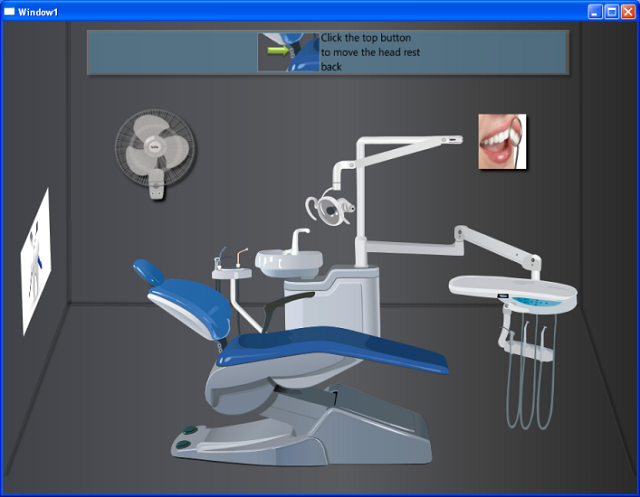
To see how the dental chair and the fan can be automated, just watch the instructions that are shown on the animation running in the project.
Objects that can be Automated
Wall Fan: Click the buttons present on the fan. To switch on (Left button) and to switch off (Right button).

Light: Click the switch present in the light container to switch the light to on and off state.
Light Handle: Press the mouse left button on the light handle and move upwards and downwards to move the handle.
Water Tap: Click the water tap for the water to flow down and vice versa to stop the water flow.
Chair: Click the buttons present at the bottom of the chair to move the chair front (Down button) and back (Up button).
Head Rest: Click the buttons present on the head rest to move the head rest front and back.
Instrument: Press the mouse left button on the instrument and move the instrument.
Design and Layout
Design of dental chair and fan is done using Microsoft expression design. The room layout and the instructions animation is done in Expression Blend. The coding part is done in Visual Studio 2008. The automation process (movements) is achieved with the help of transformation classes in WPF.
Chair Movements
The movement of the chair is achieved using Rotation transformation. The centre of rotation as shown in the screen shot is the centre of Seat base in terms of x and y axis. As the screenshot shown, the centre is not exact according to reality but we need to make the centre as that point .The rotation at that point will make the sensation of seat moving front and backwards. The code shown below will move the chair front and backwards. Each click of the mouse on the chair buttons will move the chair to the specified angle. The angle is incremented and decremented based on the button the user clicks. If the user clicks the top button, then the angle is decremented by .5 and the angle is incremented by .5 on click of down button.
if (angle > -2)
{
angle -= 0.5f;
chairRotate.Angle = angle;
chairRotate.CenterX = 0;
chairRotate.CenterY = 0;
MidStand.RenderTransform = chairRotate;
}
if (angle <= 12)
{
angle += 0.5f;
chairRotate.Angle = angle;
chairRotate.CenterX = 0;
chairRotate.CenterY = 0;
MidStand.RenderTransform = chairRotate;
}
...
Note: Same strategy is applied for head rest rotation also.
Light Handle Movement
The movement of the light handle is achieved using Rotation transformation. The point marked as centre of rotation is the one where the handle is bound. The handle rotates with that point as centre. So it produces a view of handle joint where the handle can be turned up and down. The point to be observed here is the capturing of mouse points on the handle. The mouse points are captured to decide whether the handle should be moved up or down. So for each mouse move, the angle is incremented or decremented by 1. This provides the user a view of handle moving up and down with the help of mouse. The code shown below provides the calculation of mouse movements which helps in the movement of handle.
previousheight = height;
MouseDevice d = e.MouseDevice;
Point p = d.GetPosition(this);
height = p.Y;
if (e.LeftButton == MouseButtonState.Pressed)
{
if (lightHandleangle < 25)
{
if (previousheight >= height)
{
lightHandleangle += 1;
lightHandleRotate.Angle = lightHandleangle;
lightHandleRotate.CenterX = 0;
lightHandleRotate.CenterY = 0;
LightHandle.RenderTransform = lightHandleRotate;
}
if (previousheight <= height && previousheight != 0 && lightHandleangle > -15)
{
lightHandleangle -= 1;
lightHandleRotate.Angle = lightHandleangle;
lightHandleRotate.CenterX = 0;
lightHandleRotate.CenterY = 0;
LightHandle.RenderTransform = lightHandleRotate;
return;
}
}
else
{
if (lightHandleangle > -15)
{
if (previousheight <= height && previousheight != 0)
{
lightHandleangle -= 1;
lightHandleRotate.Angle = lightHandleangle;
lightHandleRotate.CenterX = 0;
lightHandleRotate.CenterY = 0;
LightHandle.RenderTransform = lightHandleRotate;
return;
}
}
}
}
Water from the Tap
The water from the tap is simulated using the WPF animation object, i.e., Storyboard. The design part is done in the expression design. Observe the small granule black spots in the water. During the animation, the black objects in the water line are made to shift their position downwards. This produces the view of water flow from the tap. The XAML code for the animation is as below:
<Storyboard x:Key="WaterFall" RepeatBehavior="Forever">
	<DoubleAnimationUsingKeyFrames Storyboard.TargetProperty=
		"(UIElement.RenderTransform).(TransformGroup.Children)[3].
		(TranslateTransform.Y)" Storyboard.TargetName="Drop8">
		<SplineDoubleKeyFrame KeyTime="0:0:0.1" Value="1.625"/>
		<SplineDoubleKeyFrame KeyTime="0:0:0.3" Value="3.375"/>
		<SplineDoubleKeyFrame KeyTime="0:0:0.4" Value="10.75"/>
		<SplineDoubleKeyFrame KeyTime="0:0:0.5" Value="13.25"/>
	</DoubleAnimationUsingKeyFrames>
	<DoubleAnimationUsingKeyFrames Storyboard.TargetProperty=
		"(UIElement.RenderTransform).(TransformGroup.Children)[3].
		(TranslateTransform.Y)" Storyboard.TargetName="Drop3">
		<SplineDoubleKeyFrame KeyTime="0:0:0.1" Value="1.25"/>
		<SplineDoubleKeyFrame KeyTime="0:0:0.3" Value="2.75"/>
		<SplineDoubleKeyFrame KeyTime="0:0:0.4" Value="6.625"/>
		<SplineDoubleKeyFrame KeyTime="0:0:0.5" Value="9.5"/>
	</DoubleAnimationUsingKeyFrames>
	<DoubleAnimationUsingKeyFrames Storyboard.TargetProperty=
		"(UIElement.RenderTransform).(TransformGroup.Children)[3].
		(TranslateTransform.Y)" Storyboard.TargetName="Drop6">
		<SplineDoubleKeyFrame KeyTime="0:0:0.1" Value="2.5"/>
		<SplineDoubleKeyFrame KeyTime="0:0:0.3" Value="4.75"/>
		<SplineDoubleKeyFrame KeyTime="0:0:0.4" Value="8.625"/>
		<SplineDoubleKeyFrame KeyTime="0:0:0.5" Value="11.75"/>
	</DoubleAnimationUsingKeyFrames>
	<DoubleAnimationUsingKeyFrames Storyboard.TargetProperty=
		"(UIElement.RenderTransform).(TransformGroup.Children)[3].
		(TranslateTransform.Y)" Storyboard.TargetName="Drop2">
		<SplineDoubleKeyFrame KeyTime="0:0:0.1" Value="2.5"/>
		<SplineDoubleKeyFrame KeyTime="0:0:0.3" Value="4.5"/>
		<SplineDoubleKeyFrame KeyTime="0:0:0.4" Value="8.625"/>
		<SplineDoubleKeyFrame KeyTime="0:0:0.5" Value="11.375"/>
	</DoubleAnimationUsingKeyFrames>
	<DoubleAnimationUsingKeyFrames Storyboard.TargetProperty=
		"(UIElement.RenderTransform).(TransformGroup.Children)[3].
		(TranslateTransform.Y)" Storyboard.TargetName="Drop7">
		<SplineDoubleKeyFrame KeyTime="0:0:0.1" Value="2.625"/>
		<SplineDoubleKeyFrame KeyTime="0:0:0.3" Value="4.875"/>
		<SplineDoubleKeyFrame KeyTime="0:0:0.4" Value="9.375"/>
		<SplineDoubleKeyFrame KeyTime="0:0:0.5" Value="11.875"/>
	</DoubleAnimationUsingKeyFrames>
	<DoubleAnimationUsingKeyFrames Storyboard.TargetProperty=
		"(UIElement.RenderTransform).(TransformGroup.Children)[3].
		(TranslateTransform.Y)" Storyboard.TargetName="Drop1">
		<SplineDoubleKeyFrame KeyTime="0:0:0.1" Value="2"/>
		<SplineDoubleKeyFrame KeyTime="0:0:0.3" Value="5.25"/>
		<SplineDoubleKeyFrame KeyTime="0:0:0.4" Value="8.25"/>
		<SplineDoubleKeyFrame KeyTime="0:0:0.5" Value="12.375"/>
	</DoubleAnimationUsingKeyFrames>
	<DoubleAnimationUsingKeyFrames Storyboard.TargetProperty=
		"(UIElement.RenderTransform).(TransformGroup.Children)[3].
		(TranslateTransform.Y)" Storyboard.TargetName="Drop4">
		<SplineDoubleKeyFrame KeyTime="0:0:0.1" Value="3.875"/>
		<SplineDoubleKeyFrame KeyTime="0:0:0.3" Value="7.25"/>
		<SplineDoubleKeyFrame KeyTime="0:0:0.4" Value="8.625"/>
		<SplineDoubleKeyFrame KeyTime="0:0:0.5" Value="-23.25"/>
	</DoubleAnimationUsingKeyFrames>
	<DoubleAnimationUsingKeyFrames Storyboard.TargetProperty=
		"(UIElement.RenderTransform).(TransformGroup.Children)[3].
		(TranslateTransform.Y)" Storyboard.TargetName="Drop5">
		<SplineDoubleKeyFrame KeyTime="0:0:0.1" Value="3.625"/>
		<SplineDoubleKeyFrame KeyTime="0:0:0.3" Value="-28.75"/>
		<SplineDoubleKeyFrame KeyTime="0:0:0.4" Value="-22.5"/>
		<SplineDoubleKeyFrame KeyTime="0:0:0.5" Value="-21.25"/>
	</DoubleAnimationUsingKeyFrames>
	<DoubleAnimationUsingKeyFrames Storyboard.TargetProperty=
		"(UIElement.RenderTransform).(TransformGroup.Children)[3].
		(TranslateTransform.X)" Storyboard.TargetName="Drop5">
		<SplineDoubleKeyFrame KeyTime="0:0:0.3" Value="0"/>
		<SplineDoubleKeyFrame KeyTime="0:0:0.4" Value="0.125"/>
		<SplineDoubleKeyFrame KeyTime="0:0:0.5" Value="-1.25"/>
	</DoubleAnimationUsingKeyFrames>
	<DoubleAnimationUsingKeyFrames Storyboard.TargetProperty=
		"(UIElement.RenderTransform).(TransformGroup.Children)[3].
		(TranslateTransform.X)" Storyboard.TargetName="Drop4">
		<SplineDoubleKeyFrame KeyTime="0:0:0.3" Value="0"/>
		<SplineDoubleKeyFrame KeyTime="0:0:0.5" Value="0.125"/>
	</DoubleAnimationUsingKeyFrames>
</Storyboard>
Note: The fan rotation and the instructions on the board are also done using WPF animation which can be clearly seen in the code of the source file.
Points of Interest
It was very interesting developing this article as this includes design, programming, animations and more of logical stuff to design the graphic objects. The graphic objects should be picturised in mind before it has to be designed since it is a layered approach. Placing of layers in the design is a very challenging aspect. At the time of design, you need to take care of both programming aspect and presentation aspect. If any one aspect is missed, then a lot of rework has to be done. Before proceeding into the Expression design, please practice with the small objects.
Conclusion
Thanks for spending some time to read this article. This may be helpful to you in one way or the other at least to implement the strategies in some way. You can still add on many features to this project which depends on your imagination and logical brain. This is my start and I will never stop posting the articles. You will find very interesting articles from me in the future.
Indian.
He is a software developer. He loves programming. Always willing to work on new technologies.
His only passion is "Updating on technologies"
Want to know more about me?
Visit http://www.sandeepsunku.com


 General
  News
News  Suggestion
  Question
  Bug
Bug  Answer
  Joke
Joke  Praise
  Rant
Rant  Admin
Admin 


