Introduction
When developing control elements for .NET, our company KBSoft faced a task of providing the design of complex compound control elements in the designtime. Our goal was to provide the convenience of designing of a control element, containing plentiful compound parts (signatures, diagrams, images etc.), which will be displayed on its surface. And for the user's comfort, these elements should be chosen by a mouse in the designtime. So convenience of such a compound control element adjustment should be the same as adjustment of control elements on a form, when a user can choose different control elements, move them and resize with the help of a mouse, adjust features of the chosen control element with the help of Visual Studio property grid.
A standard decision comes first to mind for such a problem statement – implement all parts of a custom control element with the help of other controls. But this approach has a lot of difficulties. It is well-known how difficult it is sometimes to get a demanded behavior from a window. For example, if it is needed to make a text mark, which would have oval borders, on a control element, or to obtain non-transparency text display on a semi-transparent background, there will occur difficulties, which we mentioned in the article Non-transparent controls on a semi-transparent window. Besides, each window takes certain resources, receives messages etc., which is often not needed at all.
If you only need to draw on the surface of your control element with the help of GDI+ or OpenGL and forget about additional windows, placed on the control, but at the same time you want to be free in adjusting your control in the designtime, then it is necessary to use Visual Studio opportunities allowing to add certain logic of visual design. Designers and component model for control elements .NET with the base class Component are used for that. The only disadvantage of this approach is a high complexity of implementation of a good design support in the designtime.
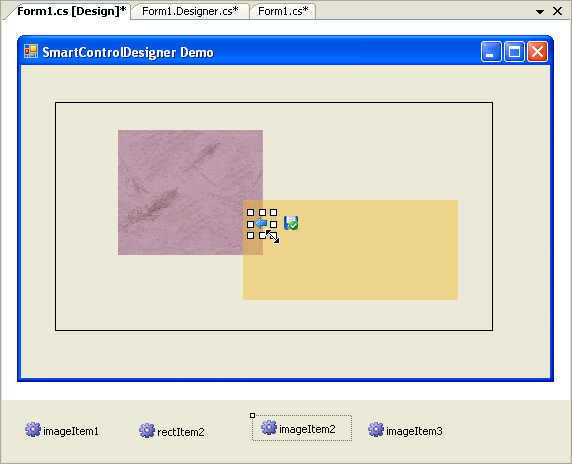
This article contains a ready designer SmartControlDesigner, which we created in KBSoft for internal needs. This designer is able to support adjustment of position of some rectangular areas on the surface of your control element. For such areas the frame is drawn in the style of a standard, drawn when you choose a control element on a form in WindowForms application. This frame allows to adjust the position and area sizes. Such an area can be chosen by a mouse and its properties will be displayed in a property grid. Thus, a user, adjusting your control, has an impression that he is working with the usual control elements on a form. In fact, this area will never be a window and can be a simple object in the memory, drawn by several GDI-functions. In the image below you will see an appearance of an area designed in IDE Visual Studio.

SmartControlDesigner is totally ready to use, and having implemented several interfaces in your element, you receive a perfectly adjustable in the designtime control element. An example of the current designer implementation can be a base for developing of a more flexible and comfortable system of component adjustment in the designtime. SmartControlDesigner source code contains detailed comments and explanations for that.
Background
To manage control element behavior in the designtime, there is a class System.Windows.Forms.Design.ControlDesigner in FCL. It contacts the control element class with the help of an attribute DesignerAttribute in the following way:
[Designer(typeof(KBSoft.Controls.SmartControlDesigner))]
public class UserControl1
{…}
Object-Designer (in this case SmartControlDesigner) is created at the moment of opening a form, where a design control UserControl1 is placed. And the control element, to which the designer is tied, will be accessible through the property of this designer. The property ControlDesigner.Control is intended for that purpose.
For the management of the element's composition in the designtime, it is necessary to have a set of commands (add element, delete element, adjust element properties etc.). The designer allows adding a set of commands, displayed in the designtime for a particular control element. For that, Verbs property should be redefined in the designer. The example is shown below.
public override DesignerVerbCollection Verbs
{
    get
    {
        return this.verbs;
    }
}
Each command is defined by its name and function-handler, which will be activated in response to a click on that command. If we fill a return by the current property collection DesignerVerbCollection with the help of the function verbs.Add(DesignerVerb value), then the command list of the designtime will look as follows:
Various facilities of the designer can be used with the help of several interfaces. IDesignerHost refers to them. It allows to control components, designed in the designtime. Interface ISelectionService allows to react to the user's change of a chosen component in the designtime. And interface IComponentChangeService presents events on deleting or changing of one of the components. References to these interfaces are usually initialized in an overridden function Initialize of Control Designer. This function is called automatically after the designer creation for initialization implementation. GetService(Type serviceType) function, to which the interface type is passed as a parameter is used to get a reference to the interface. Below you will see a fragment of Initialize function from SmartControlDesigner, demonstrating the initialization of necessary interfaces and subscription for mouse events from a control element.
…
this.selectionService = this.GetService (typeof(ISelectionService))
as ISelectionService;
this.componentChangeService = this.GetService (typeof
(IComponentChangeService))as IComponentChangeService;
this.designerHost = this.GetService (typeof(IDesignerHost))as IDesignerHost;
if (this.selectionService != null)
{
this.selectionService.SelectionChanged += new EventHandler
(SelectionServiceSelectionChanged);
}
if (this.componentChangeService != null)
{
this.componentChangeService.ComponentRemoving += new
ComponentEventHandler (ComponentChangeServiceComponentRemoving);
this.componentChangeService.ComponentChanged +=
new ComponentChangedEventHandler
(componentChangeService_ComponentChanged);
}
this.Control.MouseDown += new MouseEventHandler (Control_MouseDown);
this.Control.MouseUp += new MouseEventHandler(Control_MouseUp);
this.Control.MouseMove += new MouseEventHandler(Control_MouseMove);
…
In order to control some compound part of a control element in the designtime with the help of a designer, it is necessary that it would represent itself a class, derived from System.ComponentModel.Component. Then it will be possible to add this component into a host (design area IDE Visual Studio, after which edition of its properties with the help of PropertyGrid will be accessible) with the help of a reference to IDesignerHost received earlier in the following way:
this.designerHost.CreateComponent(Type type);
where an object of the Type type, representing itself a reference type, derived from Component will be passed as a function parameter. After adding a component it is displayed in the lower design part of Visual Studio. Its name is formed on the basis of the component type name.
After receipt of the reference to the component with the help of CreateComponent function, this reference is usually passed to the control element, because it "knows" how the created element should be drawn.
After the element creation, the user should have a chance to somehow choose the created component for its properties edition. Component adjustment in the designtime presupposes a support of two choice mechanisms.
Firstly, a user can click on the component icon, displayed in the lower part of the design area (shown in a screenshot above). The component's properties will be displayed in the property grid. In this case, the component (diagram, image, label etc.) drawn in the area should be marked as chosen (for example be in a frame). In order to receive a notification that the user has chosen a component, there is an event ISelectionService.SelectionChanged.
Secondly, the user should have an opportunity to click a mouse in the area of a component, drawn on the control element and choose it. For that, it is necessary to take two actions:
- Override the designer function
GetHitTest(Point point). This function receives a point, where a click of a mouse was fulfilled. If the function returns true, then it means that the event will be transmitted to the window of the control element (if the designer is subscribed to the messages from control, as it was shown before, it will be able to process them). If the function returns false, then the click will be processed with Visual Studio environment (which usually leads to the choice of the control element as a chosen component). - In the function of processing a mouse click in the designer, determine a component, on which the click was fulfilled and make this component chosen in the IDE Visual Studio environment. The function
ISelectionService.SetSelectedComponents(ICollection components) serves that purpose.
Description of Designer Use
- Implement the interface
IRegionContainer in your designer. This interface allows getting a collection of components, which this control element contains. With the help of this collection, the designer gets to know what components are needed to be managed in the designtime. - Implement the interface
IRegion in the components which will be present in your control element. This interface determines a rectangle area of the component. - Associate the designer
SmartControlDesigner with the control element with the help of DesignerAttribute attribute.
The interface IRegion contains Bounds property (determines a rectangle area, occupied by the component) and ZOrder (determines an order in which this area will be drawn, that is its remoteness from the observer).
The interface IRegionContainer contains two properties - Regions and VerbNames and two methods - RegionAdded and RegionRemoved. Regions property should return the collection of components (represented by the references to IRegion) which should be controlled by the designer. The designer will automatically draw the frame around the IRegion area; will provide a support of area size changes with the help of a mouse and choice of the component in the designtime when clicking in its area. The IRegion collection of elements returned by this property should also be sorted in correspondence with ZOrder values. The designer will search for an appropriate area from the end to the start of the collection. If you know this fact, you can change the designer behavior when choosing overlapping (placed on one another) areas. For that it is only needed to change the sorting logic.
That is how this feature is implemented in demo-control, which you can find in the demo project.
public RegionList Regions
{
get
{
System.Collections.Generic.List<IRegion> regions = new
System.Collections.Generic.List<IRegion>();
ImageItem[] images = new ImageItem[imagesList.Count];
this.imagesList.CopyTo(images);
regions.AddRange(images);
RectItem[] rects = new RectItem[rectList.Count];
this.rectList.CopyTo(rects);
regions.AddRange(rects);
regions.Sort(delegate(IRegion r1, IRegion r2)
{
if (r1.ZOrder == r2.ZOrder)
return 0;
if (r1.ZOrder < r2.ZOrder)
return 1;
else
return -1;
}
);
return regions;
}
set { }
}
There are two separate collections of components, displayed on the control element – imageList and rectList. The elements of these collections are united into one collection of IRegion links. The components of these two collections can be drawn in the control in any way – it won't affect their behavior in the designtime.
VerbNames property should return the collection of pairs (command_name, type_of_element_created). These commands will be automatically added to the designer with the help of Verbs property. When clicking the command command_name, a component of the type type_of_element_created will be created. After that, the RegionAdded function will be activated, to which the created element will be passed as a parameter. With the help of this function, the control gets to know that a new element was added during the process of designing. For example, this function is implemented in the following way in the demo-application:
public void RegionAdded(IRegion region)
{
    ImageItem ri = region as ImageItem;
    RectItem rect = region as RectItem;

    if (ri != null)
        this.imagesList.Add(ri);
    else
        if (rect != null)
            this.rectList.Add(rect);
}
This function determines which component was created in the designer and adds it to a corresponding collection.
The remaining function RegionRemoved is called when there happens a deletion of a component in the designtime (the user chose a component and clicked Delete). In the demo-project, this function is defined in the following way:
public void RegionRemoved( IRegion region )
{
    ImageItem ri = region as ImageItem;
    RectItem rect = region as RectItem;

    if (ri != null)
          this.imagesList.Remove(ri);
    else
        if (rect != null)
            this.rectList.Remove(rect);
}
Here a reverse procedure is produced – a type of the deleted element is defined and it is deleted from the corresponding collection.
Thus, you can create quite a complicated structure of areas, displayed on the surface of your control element. With the help of Regions feature, you can control the logic of their placement (what control elements are drawn over the rest of the elements).
In conclusion, it is necessary to note that processing of the whole control element deletion should be processed in a special way. If you delete it from the form, its function Dispose will be activated. It is absolutely necessary to activate Dispose functions in the rest of the components added by the designer; otherwise they will remain in the design area, though they won't have a control on which they could be displayed. Dispose activation for the class, derived from System.ComponentModel.Component leads to its deletion from IDE Visual Studio 2005.


 General
  News
News  Suggestion
  Question
  Bug
Bug  Answer
  Joke
Joke  Praise
  Rant
Rant  Admin
Admin 


