The source code is now on GitHub.
Contents
Introduction
Windows Presentation Foundation (aka WPF) is an outstanding graphical framework for creating modern and attractive applications in .NET. Presently it lacks decent support for mouse wheels such as horizontal, smooth and nested scrolls as well as the high-resolution mode.
The WPF Mouse Wheel Library (MWLib) I will present here aims to go beyond those limitations with a minimal effort on your behalf. It is written in C# and compiled with .NET 3.5 Service Pack 1 Client Profile (packaged with Windows 7). You’ll be able to easily integrate this library into any existing WPF application, giving your users a tremendous feeling of fluidity when using their mouse wheel. Besides improving scroll experience with horizontal, smooth and nested scrolls, the library supports any resolution mouse wheels, implements motion debouncing as well as smooth and nested zoom. It also provides support to enable mouse wheels on any range-like controls.
Roadmap
For those eager to get their hands dirty before eventually resuming reading, we’ll begin with a quick-start guide. Then after some background information and an overview of MWLib features, we’ll go through a small tutorial: you will create a WPF application, spotting out-of-box mouse wheel support limitations and using MWLib to fix them. Finally, we’ll examine in depth mouse wheel limitations and improvements by playing with the two demo applications. This will allow us to compare the behavior of the wheel in various situations before and after the integration of the library.
Quick Start
For people who want to immediately benefit from MWLib please:
- Download the library provided at the top of this article, include it in your solution and reference it in your project.
- Add the following code to your main window XAML:
<Window
  ...
  xmlns:i="clr-namespace:Lada.Windows.Input;assembly=WpfMouseWheelLib"
  i:MouseWheel.Enhanced="True">
- (Optional) If you want all your controls to scroll smoothly in any direction, add the following code:
<Window
  ...
  xmlns:i="clr-namespace:Lada.Windows.Input;assembly=WpfMouseWheelLib"
  i:MouseWheel.Enhanced="True"
  i:Mousewheel.Scrollmode="Physical">
Warning: if your application contains controls like ListBox, ListView or DataGrid, doing so can adversely affect its performance - see Logical vs Physical Scroll
...then you're done!
If you are in a hurry but still want to see MWLib in action, have a look at “After” demo application and play with it.
Background
Before going further, I suggest skimming through Handling Enhanced Mouse Wheels in your application by Tanvi Shah K & H Steve Davis. It describes a short history of the wheel, its description, the high-resolution mode, and the interfacing with native Windows.
I also advise downloading the enhanced wheel emulator application provided with the mentioned article. It will be of great value during the tutorial and the demo that will follow.
Optionally, you can go through the Attached Properties Overview and the ScrollViewer Overview articles on MSDN. I also suggest recalling WPF routed event model. Josh Smith has an excellent article on that topic.
Wheel Model in Windows
Microsoft has modeled a mouse wheel made of discrete and evenly spaced notches. When you rotate the wheel, a “wheel delta” is reported each time a notch is encountered. Originally, one notch was intended to be the base unit of wheel rotation measurement.
Its value was set to 120 by Microsoft so that vendors could build “enhanced” wheels, measuring their amount of rotation with a finer accuracy simply by reporting it with a lower ‘wheel delta’. Such wheels can be switched from standard to high resolution mode (DPI switching).
Instant native resolution can be defined as:
nativeResolution = 120 / abs(wheelDelta)
Fields Of Application
Originally the “scroll wheel” was used mainly for scrolling, hence its name. In WPF however holding a keyboard modifier down changes the field of application: if one holds the Control key while rotating the wheel text size will increase or decrease in some web browsers; on the other hand an image in an image-editing program will zoom in or out. Other applications scroll horizontally if you hold the Shift key down.
WPF Issues
In WPF implementation mouse wheel event handlers (UIElement.OnMouseWheel) are overridden in the following graphical elements:
ScrollViewerTextBoxBaseFlowDocumentScrollViewerFlowDocumentPageViewer
(1) and (2) implement vertical scroll, (3) and (4) both vertical scroll and zoom and (4) scrolls page per page. WPF doesn’t support neither the wheel horizontal nor the smooth scroll.
Below are a few other missing features:
No Out-Of-Box Support Of High Resolution Mode
All the above mouse wheel event handlers only use wheel delta sign for resolving scroll or zoom direction: resolution is not computed. As a consequence when an enhanced wheel enters high resolution mode, wheel motion cannot be adapted. The outcome is a hyper-sensitive movement (see below) instead of a finer control of the motion making it a disadvantage rather than an advantage.
Inconsistent Nested Scroll
In WPF nested scroll works only when inner elements are subtypes of TextBoxBase.
Yet it does not work for ScrollViewer or FlowDocumentScrollViewer instances. The reason is that their OnMouseWheel handler always sets RoutedEventArgs.Handled to True. But this property should be set to False when this element reaches one of its scrolling limit so that scrolling carries on.
On the other hand FlowDocumentPageViewer always sets RoutedEventArgs.Handled to False, leading to simultaneous scrolling of both the inner (moving a page forward or backward) and outer elements.
In the context of nested scroll you expect coherence in mouse wheel field of application.
For example suppose that cursor is over a ScrollViewer inner element and outer element is a FlowDocumentScrollViewer. If you hold down the Control key while rotating the wheel you expect that a zoom action will be performed (on the outer element), but instead a scroll action takes place (on the inner element). This is the consequence of bad handling of keyboard modifiers in inner element OnMouseWheel handler: ScrollViewer does not handle zoom but scrolls instead no matter what modifiers are being used.
MWLib Features
MWLib aims to overcome the WPF issues mentioned above.
Out-Of-Box Support of High Resolution Mode
Users no longer face a hyper-sensitive movement.
Instead users obtain a finer control leading to more responsiveness.
Consistent Nested Scroll
Nested scroll is now fully functional and coherent for all fields of application. Moreover transition between inner and outer scrollable elements are smooth even when inner element is item-based (e.g. a ListBox) and outer is pixel-based (e.g. an Image within a ScrollViewer).
Field Of Application Discrimination
You can now assign keyboard modifiers to desired fields of application. Mismatches between intended operation and observed outcome are fixed.
What’s more, MWLib offers:
Additional Fields Of Application
- Horizontal Scrolling (default modifier is the Shift key).
- Adaptation : mouse wheel can now act on any range-like control (e.g. move a
Slider cursor).
Tilting Scroll Wheel Support
You can now scroll horizontally with the tilting scroll wheel.
Motion Smoothing
Smooth displacement can be enabled on any UI element within any field of application.
Motion Debouncing
With an enhanced wheel a debouncing algorithm may be needed to filter out jitter produced by unintentional movements of your finger. They are likely to occur when scrolling slowly, lifting finger off the wheel...
Vendors usually implement such an algorithm to emulate standard resolution wheels when high resolution mode is off. MWLib comes with built-in debouncing for high-resolution too.
Versatile Scroll Increments
One can now adjust scroll increments absolutely or proportionally to system settings (see mouse wheel control panel).
Features Propagation
You can implicitly benefit from MWLib features anywhere in UI elements tree (thanks to WPF attached property inheritance) or override them locally. Control templates as well inherit from those features with no additional code.
Works on Several Controls
MWLib has been tested on a wide range of controls, including: Image, ItemsControl, ListBox, ListView, DataGrid, ComboBox, TextBox, RichTextBox, FlowDocumentScrollViewer and FlowDocumentPageViewer.
Your First Smooth Scrolling Application
In this section we’ll create from scratch a simple WPF application in order to:
- Spot out-of-box scrolling limitations.
- Apply MWLib to fix them.
Create a new solution in Visual Studio. Add a new WPF application project: let’s call it “SmoothScroll” for instance. In the project properties, under “Application” tab, select “NET Framework 3.5 Client Profile” as the target framework. Build and run.
We are now ready to add new functionality to the application. To begin, we’ll embed in the main window a ListBox with enough items to test vertical scrolling and with data items that are wide enough to test horizontal scrolling. Here is the corresponding XAML code:
<Window
  x:Class="SmoothScroll.MainWindow"
  xmlns="http://schemas.microsoft.com/winfx/2006/xaml/presentation"
  xmlns:x="http://schemas.microsoft.com/winfx/2006/xaml"
  Title="Native Scroll" Height="300" Width="200">
  <ListBox>
    <ListBoxItem Content="00 Test item, Test item, Test item, Test item, Test item, ..." />
    <ListBoxItem Content="01 Test item, Test item, Test item, Test item, Test item, ..." />
    <ListBoxItem Content="02 Test item, Test item, Test item, Test item, Test item, ..." />
    ...
  </ListBox>
</Window>
In bold we highlight the code that has been updated. Some repeating text has been skipped with ellipses. Let’s execute it.
Out-Of-Box Experience (without MWLib)
Vertical Scrolling
Place the mouse cursor in the list box then roll the wheel one notch toward yourself: the list box should scroll 3 items. If it’s not the case, launch the Mouse Control Panel Applet, activate the Wheel tab, modify the number of lines per notch to 3, and press 'OK'.

Horizontal Scrolling
Unfortunately, mouse wheel horizontal scrolling is still not implemented in the current version of WPF. That’s one of the problems addressed by MWLib.
High Resolution Mode
Let's test an enhanced wheel in high-resolution mode. If you do not own such a wheel or if this mode is not enabled, launch the enhanced wheel emulator application, change the Event Interval from 8 to 32 ms then press 'Apply'. Please notice that if you exit from this application, standard resolution will be restored.
Repeat the vertical scroll test : granularity has now increased from 3 to 8 x 3 = 24 items per notch... Instead of getting finer control over scrolling we end-up with a too sensitive wheel! Indeed WPF does not take into account the wheel delta value at all and raises 8 events per notch.
Improving Experience (with MWLib)
We are going to fix the above issues. Please add a reference to MWLib and then update main window XAML like this:
<Window
x:Class="SmoothScroll.MainWindow"
xmlns="http://schemas.microsoft.com/winfx/2006/xaml/presentation"
xmlns:x="http://schemas.microsoft.com/winfx/2006/xaml"
xmlns:i="clr-namespace:Lada.Windows.Input;assembly=WpfMouseWheelLib"
Title="Enhanced Scroll" Height="300" Width="200"
i:MouseWheel.Enhanced="True">
<ListBox>
...
</ListBox>
</Window>
Build, run and test the new code the same way as before.
- In standard resolution mode you will not see any difference concerning vertical scrolling. Granularity is still 3 items per notch, however horizontal scrolling is now available. To test it just tilt the wheel or press the Shift key and roll the wheel. As a bonus horizontal scroll is smooth.
- In high resolution mode notice that granularity of the vertical scroll is not 24 items per notch anymore but 3. Great! There is nevertheless a small difference with standard mode: the list scrolls a bit more smoothly, one element at a time. Eight events per notch are raised, which are converted into three events by the library.
Logical vs. Physical Scroll
By default the list box vertical scrolling is not smooth. To find out why, we have to dig a little bit deeper in MSDN.
As explained in ‘ScrollViewer Overview’ WPF implements two scrolling modes:
-
Physical scrolling mode:
Smooth scrolling is only available in physical mode where displacement can be controlled at pixel level.
-
Logical scrolling mode:
It is also called item-based scrolling. In this mode UI virtualization is on.
“UI virtualization refers to a technique by which a subset of UI elements are generated from a larger number of data items based on which items are visible on-screen. Generating many UI elements when only a few elements might be on the screen can adversely affect the performance of your application” (VirtualizingStackPanel Class, Remarks section).
A few controls like ListBox, ListView and DataGrid are in logical mode by default. In order to preserve application performance, MWLib keeps them in this mode by default. Nevertheless we can easily switch those controls to physical mode, which will turn on smooth scrolling.
Switching to Physical Mode
To switch the list box from logical to physical mode you have two choices:
- Either modify the value of the
ScrollMode attached property:
i:MouseWheel.ScrollMode="Physical"
This property applies to the decorated element and all its descendants. If we want the scrolling mode to be applied to a specific orientation, we can use VScrollMode and HScrollMode properties instead.
- Or modifying the value of the
CanContentScroll attached property:
ScrollViewer.CanContentScroll="False"
This property only applies to the decorated element.
Let’s begin with first option.
Modify the main window XAML code like this:
<Window
...
i:MouseWheel.Enhanced="True"
i:MouseWheel.ScrollMode="Physical">
<ListBox>
...
</ListBox>
</Window>
Let’s execute this code. Notice that now both vertical and horizontal scrolling are smooth.
Optionally, we can try the second way.
<Window
...
i:MouseWheel.Enhanced="True">
<ListBox
ScrollViewer.CanContentScroll="False">
...
</ListBox>
</Window>
You should observe the same behavior as previously.
Demo Applications
This article comes with two sample applications : ‘Before’ and ‘After’ using MWLib.
This application lets you experiment how WPF mouse wheel processing behaves natively. The user interface looks like this:
It is organized as a tree of tab items in which each leaf is a small ‘lab’ where you can test wheel behavior on various WPF controls. I suggest you navigate the tree and play with the wheel, observing both scroll and zoom.
- Zooming can be tested in the FlowDocumentxxx tabs by pressing the Control modifier key while rotating the wheel.
- Horizontal scrolling is not yet implemented in native WPF.
We can notice that the user experience is particularly poor with a wheel in high resolution mode, or in nested scroll or zoom tabs.
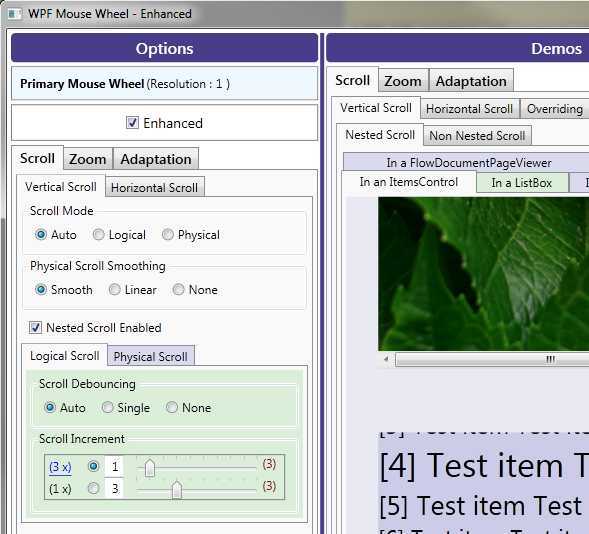
‘After’ MWLib (WpfMouseWheelEnhanced.exe)
Here you can notice the improvement brought by MWLib.
In addition to the various tabs already available in the ‘before’ application, the ‘after’ application offers a new tab: Adaptation, where the mouse wheel controls the cursor of a slider.
Furthermore an Options panel lets you customize various aspects of wheel motion.
In WPF Scrolling is supported by ScrollViewer and FlowDocumentPageViewer. Zooming by FlowDocumentScrollViewer and FlowDocumentPageViewer.
MWLib brings another field of application we call “Adaptation” in which the wheel can act upon any range-like control. The ‘After’ demo application gives an example of adaptation on a Slider.
It shows a list of available wheels with their name and resolution and a visual representation of attached properties of MouseWheel.
Before going further it’s worth noting that some of them participate in value inheritance.
Data binding between visual options and attached properties of MouseWheel follows the MVVM pattern: the properties of the view - MouseWheelOptionsView - are bound to the properties of its view-model - MouseWheelOptions which is set as a data context of the application main window. Then the scroll and zoom properties of MouseWheelOptions are bound to the corresponding attached properties of MouseWheel:
<Window.Resources>
<ObjectDataProvider x:Key="_options" ObjectType="{x:Type vm:MouseWheelOptions}" />
</Window.Resources>
<Window.DataContext>
<Binding Source="{StaticResource _options}" />
</Window.DataContext>
<vw:WorkspaceView Grid.Column="2"
i:MouseWheel.Enhanced ="{Binding Enhanced}"
i:MouseWheel.VScrollMode ="{Binding ScrollOptions.Y.ScrollMode}"
i:MouseWheel.HScrollMode ="{Binding ScrollOptions.X.ScrollMode}"
i:MouseWheel.VScrollSmoothing ="{Binding ScrollOptions.Y.Smoothing}"
i:MouseWheel.HScrollSmoothing ="{Binding ScrollOptions.X.Smoothing}"
i:MouseWheel.NestedVScroll ="{Binding ScrollOptions.Y.NestedScroll}"
i:MouseWheel.NestedHScroll ="{Binding ScrollOptions.X.NestedScroll}"
i:MouseWheel.PhysicalVScrollDebouncing ="{Binding ScrollOptions.Y.Physical.Debouncing}"
i:MouseWheel.PhysicalHScrollDebouncing ="{Binding ScrollOptions.X.Physical.Debouncing}"
i:MouseWheel.LogicalVScrollDebouncing ="{Binding ScrollOptions.Y.Logical.Debouncing}"
i:MouseWheel.LogicalHScrollDebouncing ="{Binding ScrollOptions.X.Logical.Debouncing}"
i:MouseWheel.PhysicalVScrollIncrement ="{Binding ScrollOptions.Y.Physical...SelectedItem}"
i:MouseWheel.PhysicalHScrollIncrement ="{Binding ScrollOptions.X.Physical...SelectedItem}"
i:MouseWheel.LogicalVScrollIncrement ="{Binding ScrollOptions.Y.Logical...SelectedItem}"
i:MouseWheel.LogicalHScrollIncrement ="{Binding ScrollOptions.X.Logical...SelectedItem}"
i:MouseWheel.ZoomSmoothing ="{Binding ZoomOptions.Smoothing}"
i:MouseWheel.ZoomDebouncing ="{Binding ZoomOptions.Debouncing}"
i:MouseWheel.NestedZoom ="{Binding ZoomOptions.NestedZoom}"
/>
In the above code the Enhanced binding as well as the Scroll and Zoom bindings are applied to the left workspace panel of the application - WorkspaceView. All of them are inheritable thus becoming available to all elements of the visual tree of WorkspaceView.
Adaptation options are not inheritable, and directly applied to the Slider control as shown below:
<Slider x:Key="L0-Slider" x:Shared="False"
...
i:MouseWheel.Smoothing ="{Binding CustomOptions.Smoothing}"
i:MouseWheel.Debouncing ="{Binding CustomOptions.Debouncing}"
i:MouseWheel.NestedMotion ="{Binding CustomOptions.NestedMotion}"
i:MouseWheel.Minimum ="{Binding RelativeSource={RelativeSource Self}, Mode=TwoWay, Path=Minimum}"
i:MouseWheel.Maximum ="{Binding RelativeSource={RelativeSource Self}, Mode=TwoWay, Path=Maximum}"
i:MouseWheel.Increment ="{Binding RelativeSource={RelativeSource Self}, Mode=TwoWay, Path=LargeChange}"
i:MouseWheel.Value ="{Binding RelativeSource={RelativeSource Self}, Mode=TwoWay, Path=Value}"
...
/>
The Enhanced check-box is bound to the MouseWheel.Enhanced attached property. It must be turned on so that MWLib features become active.
Note that you can declare this property as an attribute of the visual tree root element or from the level you wish the improved features to be enabled from.
One may wonder what happens if MouseWheel.Enhanced is set to False on an element. We can experiment it by un-checking Enhanced in the Options panel. The overall behavior of the wheel will mimic the native behavior we’ve seen previously in the ‘before’ application.
Those properties can be overridden in any element of the visual tree of WorkspaceView. The Scroll \ Overriding tab item presents two academic examples:
The first one shows how to customize the tab item visual tree so that nested controls scroll 64 pixels per notch in both directions.
<TabItem
Header="ItemsControl - Physical(64)"
Background="{StaticResource PhysicalModeBrush}"
i:MouseWheel.ScrollMode="Physical"
i:MouseWheel.ScrollSmoothing="None"
i:MouseWheel.PhysicalScrollIncrement="64"
Content="{StaticResource L0-ItemsControl}">
</TabItem>
In the second example, the nestet controls of the tab item behave as follows:
- Vertical scrolling is logical with a scroll increment of twice the number of lines selected in the vertical scrolling section of the wheel control panel (2*).
- Horizontal scrolling is physical with a smooth motion and a scroll increment of 16 times the number of characters selected in the horizontal section (16*)
<TabItem
Header="ListBox - V:Auto(2*) H:Smooth(16*)"
Background="{StaticResource LogicalModeBrush}"
i:MouseWheel.VScrollMode="Auto"
i:MouseWheel.HScrollMode="Physical"
i:MouseWheel.HScrollSmoothing="Smooth"
i:MouseWheel.LogicalVScrollIncrement="2*"
i:MouseWheel.PhysicalHScrollIncrement="16*"
Content="{StaticResource L0-ListBox}">
</TabItem>
The following paragraph is a description of important options.
It can take the following values:
- Auto: in this mode, the library uses some heuristics (
CreateEnhancedAutoBehavior) to decide which one of the logical or physical modes should be applied. Actually logical mode is used for elements that support item-based scrolling, except when such elements contain nested scrollable elements. In this case and in all other cases physical mode is used. - Physical: this mode can be applied to any scrollable element type. It’s the one that allows smooth motion control (
CreateEnhancedPhysicalBehavior).
private IMouseWheelInputListener CreateEnhancedAutoBehavior()
{
if (LogicalScrollEnabled)
{
if (ScrollViewer.HasNestedScrollFrames() || HostImplementsMouseWheelEvent)
return CreateEnhancedPhysicalBehavior();
else
return CreateEnhancedLogicalBehaviorItem();
}
else
return CreateEnhancedPhysicalBehavior();
}
private IMouseWheelInputListener CreateEnhancedPhysicalBehavior()
{
switch (Smoothing)
{
case MouseWheelSmoothing.None: return CreateEnhancedPhysicalBehaviorItem();
case MouseWheelSmoothing.Linear: return CreateEnhancedLinearBehaviorItem();
case MouseWheelSmoothing.Smooth: return CreateEnhancedSmoothBehaviorItem();
default: throw new NotImplementedException();
}
}
It is the value by which the scroll position is increased or decreased when you roll the wheel by one notch towards or away from yourself.
Scroll increment is implemented as a custom type (ScrollIncrement) rather than Double. In this manner, we can easily define a value scaled by the number of vertical scrolling lines or horizontal scrolling characters selected by the user in the mouse wheel control panel (star notation).
For example, modify your first smooth scrolling application with the following code:
 <Window
  ...
  i:MouseWheel.Enhanced="True"
  i:MouseWheel.LogicalScrollIncrement="2*">
  ...
</Window>
The resulting vertical scroll granularity will be twice the number of lines in the control panel. If you change this value the granularity will adapt accordingly.
It can be enabled on any element in two steps:
- Set its
MouseWheel.ScrollMode property to Physical. Alternatively, you can use the VScrollMode and the HScrollMode properties to have more specific control over vertical or horizontal direction. - Set its
MouseWheel.ScrollSmoothing property to Smooth : the default for elements in physical scroll mode. As before the VScrollSmoothing and the HScrollSmoothing properties are available for controlling a desired direction.
I don’t advise you to enable smooth zoom : it consumes a lot of CPU time and does not significantly enhance user experience more than linear zoom (the default value). If you still want to enable it use the MouseWheel.ZoomSmoothing attached property.
MWLib debouncing can be activated through various properties like LogicalVScrollDebouncing, ZoomDebouncing, … that can take one of the following values:
- Auto MWLib chooses the most appropriate debouncing function.
- None Debouncing is disabled.
- Single There is a single debouncing cell per notch. The wheel behaves as if it was in standard resolution mode.
8 Jul 2011:
7 Jun 2016:
- Added tilting scroll wheel support
- Posted source code on github
This member has not yet provided a Biography. Assume it's interesting and varied, and probably something to do with programming.


 General
  News
News  Suggestion
  Question
  Bug
Bug  Answer
  Joke
Joke  Praise
  Rant
Rant  Admin
Admin 


