Introduction
This article is about a simple method of generating dynamic images on the client side, without using new HTML5 <canvas> element. Why this? I got very interested in this topic seeing all the features coming with the new HTML5 standard on its way. The new <canvas> element offers a lot of freedom to a web developer. In this article, I did a simple experiment using available data-URI feature of images on the web page.
Background
Here, I would suggest to the reader to visit this place where the author is speaking about client-side generated image animation using data-URI but is focused on the old-school palette based animation of a static GIF image, and also this place where another author has built an image drawing tool upon data-URI feature.
But, in order to better understand what data-URI is useful for, I would suggest this place on Wiki containing general discussion.
Basically, data-URI would allow you to embed an image data inside the image src attribute. You don't need to get it from the server, or to draw it using <canvas>. You can have it already uploaded on the client, embedded inside the web page, or you can create it using JavaScript client code. The first method increases the size of the web page but is useful for small animated images. The second method offers to you more freedom to create an image from scratch. In this article, I have used the second method.
JavaScript Generated Image
The general <img> element is shown below:
<img id="myImage" src="http://image-url">
To load the image from the web server, you put the image URL as the value for the image src attribute.
To load the embedded image from the web page, you put the following as the value for the image src attribute:
<img id="myImage" src="data:image/bmp;base64,image-data">
The browser knows that, in the second case, image data would not be obtained by sending HTTP request to the web server, but rather is inside the src attribute of the image tag. The browser parses this and displays the image on the page correctly.
So, what is contained inside the src attribute in the second case? First of all, you tell the browser that you have image data by specifying the data:image/bmp value. This contains the definition for data-URI and a MIME-type for the image data that is following. If the image data is base64 encoded, you put this information also. So, general data-URI header is data:MIME-type[;base64],. The MIME-type can be any of the supported MIME-types for images but you must provide the image data in the requested format which can be a real challenge in the JavaScript world, but not impossible.
The next part is the raw image data. Where does it come from?
Well, as I said before, it can be obtained somewhere else and embedded into the web page, or rather directly into the src attribute of the image tag. If you need a generator for this, please visit this place. This web page generates the code you need to put inside your web page using the image you provide. It also offers you to preview the generated image. Nice work, isn't it.
But, what if you want to extend this to your own needs? What if you want to generate new image from scratch each time the page loads? Let us dive now into the JavaScript world, as this is your only way to do it on the client-side, and not using any of the available technologies: flash, activeX, HTML5, Java, or any of the server-side scripting languages.
At the beginning, we will keep it simple, that is, we will work only with BMP images, and later when you find some extra time, you can extend this to any other image format supported by the modern browsers.
Here on the Wiki, you can find everything you need to know about BMP image format. Now, see below the general structure of every bitmap image:
- File header [exactly 14 bytes long]
- Bitmap header [exactly 40 bytes long]
- Color palette [0 or n*3 bytes long, where n is the number of colors inside the palette]
- Bitmap data [exactly height*pitch bytes long, where pitch is width*bits-per-pixel bytes long, rounded to 4 bytes boundary]
To make it more clear, I have borrowed the following picture from the Wiki:
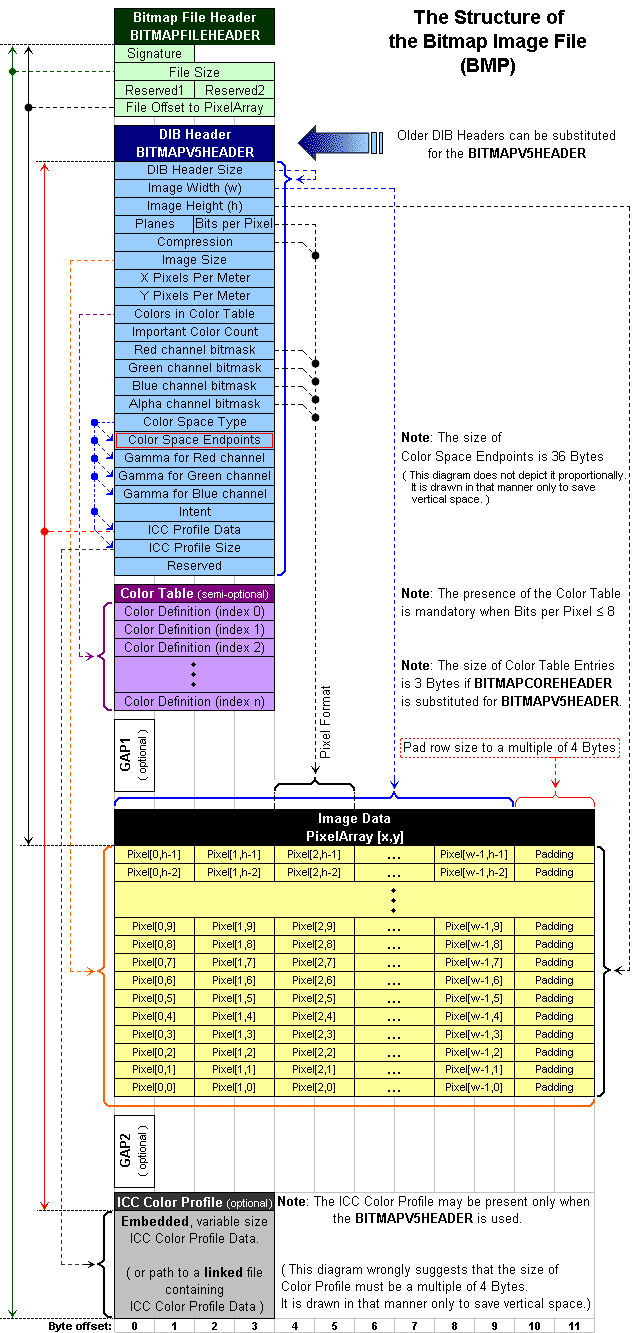
The first thing that is to be done is to fill this header information, since it will not change (image size on the web page changes rarely). Please see the following JavaScript code:
var imageHeader = ('BM' +
num_file_bytes +
'\x00\x00' +
'\x00\x00' +
'\x36\x00\x00\x00' +
'\x28\x00\x00\x00' +
width +
height +
'\x01\x00' +
'\x20\x00' +
'\x00\x00\x00\x00' +
'\x00\x00\x00\x00' +
'\x13\x0B\x00\x00' +
'\x13\x0B\x00\x00' +
'\x00\x00\x00\x00' +
'\x00\x00\x00\x00'
);
This way, we have created the header for the 32bpp bitmap image of the size width*height. This bitmap type does not have the color table, so it is missing from the header.
Since we have the correct header, we can now allocate the image data. See below:
var imageData = new Array();
It is basically an Array object that we will use to store the image pixels. Speaking about pixels, I have created the following class to store the color information:
function Color(r, g, b)
{
	this.red = parseInt(r) % 256;
	this.green = parseInt(g) % 256;
	this.blue = parseInt(b) % 256;

	return this;
}
Now, to create the value for the single pixel, having in mind the 32bpp color depth, I used the following:
var color = new Color(red, green, blue);
var newColor = String.fromCharCode(color.blue, color.green, color.red, 0);
When I wanted to put the value (the color) for some pixel in the image, I used the following:
imageData[y*width+x] = newColor;
It hardly can be simpler than this, right?
Using the Code
Based on the previous story, I have created a very small graphics library, written in JavaScript, that will demonstrate what can be done on the client-side. See the example below:
var graphics = createGraphics(320, 240);
graphics.clear(new Color(0,0,0));
graphics.updateImage("myImage");
NOTE: This will work correctly only in Firefox, Chrome, Opera and Safari.
Again, Why This?
In this time of the full HTML5 standard implementation, this is not an acceptable solution for building large animation systems. But still, it can serve as an alternative, although my graphics library offers very basic functionality. Many things are missing here and if I find time I will try to implement them. This is an experiment and the technology of the past, not for the future. I was trying to test the speed of JavaScript language in generating the full color images on the fly, and I think I got interesting results.
I have seen some JavaScript graphics libraries based on the DOM. A huge collection of DIV elements is created during rendering process and image creation on the client-side. It is another alternative, also.
Issues
The first issue I would point out here is a rendering speed. Although some will say it is not to slow (and it really isn't), I say it cannot match HTML5 <canvas> element, nor is it supposed to. This speed depends a lot on the size of the image: the smaller the image, the faster it will be shown. Next, JavaScript rendering algorithms are not the fastest in the world, you know.
The second thing is the type (or number of the colors) of the bitmap. I was using the 32bpp bitmaps, they offer quality, but they are the largest you can find on the market these days. If you use paletized bitmaps, you will work with less data and it will for sure be faster, but you will have the maximum of 256 different colors available, so you are making a compromise to quality to gain more speed.
The last thing is a constant image loading from the beginning. Each time you set the image src attribute, the browser parses its information from the beginning which is time consuming, having in mind previous two issues. A compressed image data is much better solution (especially for palettized bitmaps) but you better find very fast JavaScript GIF encoder. You can see this as an example but watch since it is implemented to generate monochrome GIF files. You can also search for a JavaScript LZW encoder.
Points of Interest
I have found out that there are some tricks and techniques that can be used to overcome problems that look impossible at first. I had a very good time developing this library and I hope that the reader of this article will find it useful to implement it in his work. Somehow, someway...
History
JavaScript image generation library, version 1.0
He has a master degree in Computer Science at Faculty of Electronics in Nis (Serbia), and works as a C++/C# application developer for Windows platforms since 2001. He likes traveling, reading and meeting new people and cultures.


 General
  News
News  Suggestion
  Question
  Bug
Bug  Answer
  Joke
Joke  Praise
  Rant
Rant  Admin
Admin 


