Contents
Introduction
Windows Presentation Foundation (WPF) is already known as a very powerful and complete platform for highly interactive Windows interfaces, because of its support for animations, 3D (now including interactive 3D as well), complex vector graphics, data binding, styles and templates, among many other features.
For this article, I've developed a 3D book-shaped interface for a text editor and reader. In this first iteration, the book opens and closes, you can type in the left page, and scribble in the right page. The left page, when double-clicked, is read using the Windows speech synthesis engine, and the right page can switch modes between ink and eraser with the right mouse button. The text editor also has integrated English spell-checking.
While you examine the code and read the article, you'll learn many interesting concepts in WPF 3.5, such as interactive 3D, basic speech and ink support, and a little bit about reusing and organizing your resources with styles and resource dictionaries.
Requirements
To follow this article, it's recommended to have a good understanding of WPF and XAML. You'll also need the .NET Framework 3.5 to run the sample app, and Visual Studio 2008 to be able to build the code.
WPF 3D basics
Before we start, we'll review some of the key concepts of WPF 3D programming. If you want to learn more about WPF 3D, I strongly recommend you to read Charles Petzold's "3D Programming for Windows" as an additional reference book.
The first key concept for WPF 3D is the three-dimensional space itself. The three dimensions are usually represented by three perpendicular axes (X, Y, and Z):

Figure 1: 3D axes as they appear in WPF. Edited from the MSDN Library.
In WPF, the 3D space is created through a Viewport3D object. We represent 3D objects in this space by creating their geometric representations called models. A model can represent either a physical geometry (a mesh) or a light source. When there are no light sources, you will only see a blank canvas. You also need a camera, so you can see the models from a specified point of view.
Meshes
Meshes are the main part in any 3D scene: they represent the physical 3D objects. In WPF, meshes are composed of many 3D triangles, which are joined to give the impression of a plane or curved 3D shape. The most important attributes of a geometry mesh are:
- Positions: a collection of points (
Point3D) representing the vertices of the triangles. - TriangleIndices: a collection of indices, or more specifically, triplets of integers, which represent how the vertices are joined to form triangles. For example, the triplet "0,1,2" means that a triangle should be created by joining points in the
Positions collection with the indices 0, 1, and 2. Also, the face of the triangle that will be visible is the one where the order of the indices is counter-clockwise. - TextureCoordinates: The 3D surface must be covered with a texture, a 2D element that will give the external appearance of the model. The
TextureCoordinates property is a collection of points (Point) which represents how the texture should be applied to the mesh. For each position, you map a 2D point to the 3D point, telling which part of the texture should be over that point, using relative coordinates (e.g., "0.5 0.5" is the center of the image). A picture might help to explain this concept:
Figure 2: The texture coordinates in the left 2D image are mapped to specific points in the 3D triangle. Picture taken from Daniel Lehenbauer's blog.
Materials
Besides the geometry, you also have to set the material covering the model. The material represents the way the model will treat the lighting. There are three main types of materials:
- DiffuseMaterial: a material that diffuses light as it hits the surface.
- EmissiveMaterial: a material that seems to be emitting light.
- SpecularMaterial: a material that reflects light as it hits the surface. It has a
SpecularPower property which represents how reflective is the material.
Lights
In the 3D programming world, lights are models which allow you to see 3D objects. They also help you to create a more realistic sensation in your scene, through the use of shadows and directional lights. To create a light in WPF, you need to know its type and color, and depending on the type, other attributes.
- Type: the type of the light used influences how the light is applied to the scene. The types of light included in WPF are:
- AmbientLight: uniform light in the whole scene, and doesn't have a specific direction.
- DirectionalLight: a light that allows you to create shadows and light areas in a specific direction. You can think of a directional light as the light that comes from a "window" in your room, with parallel rays of light.
- PointLight: a light that has a specific position in space. It glows in all directions, and its intensity diminishes when you increase the distance from the light source. You can think of it as a "lamp" in your scene.
- SpotLight: a light source that projects a cone in one direction in your scene. You can control the areas that are fully illuminated and partially illuminated to create the spotlight effect.
- Color: the color of the light. The way your objects will be displayed is very dependent on the color you choose for the lights: be careful, so you don't brighten a room too much or give it an unintended mood.
- Other attributes: depending on the light type, you can set the position, direction, range, attenuation, cone angles, and many other characteristics of the light.
Another thing to remember when building lights is the performance impact of the lighting and shading in your scene. For example, an AmbientLight has a much better performance than a SpotLight. According to the WPF 3D performance guidelines (http://msdn2.microsoft.com/en-us/library/bb613553.aspx), the performance, from the fastest to the slowest is: Ambient, Directional, Point, and Spot.
Cameras
Cameras are what give you a point of view in the 3D scene. In WPF, the most common types of cameras are:
- PerspectiveCamera: works like a camera in the real world; objects that are farther away appear smaller.
- OrthographicCamera: represents an orthogonal projection of the objects; objects appear the same in every position.
Figure 3: Difference between the orthographic and perspective projections. Picture taken from the MSDN Library.
For the cameras, you can also set many interesting properties, including:
- Position: The
Point3D that represents where the camera is. If the camera is farther from the object, it will seem smaller, while it will seem larger if the camera is nearer to the object. - LookDirection: The
Vector3D that points to where the camera is looking. An easy way to find the desired LookDirection: subtract the Position of the camera from the Position of the point you want to be in the center. For example: if you want to look at the origin of the space (0,0,0) and your camera is in the position (4,5,6), you should set the LookDirection property to (0,0,0) - (4,5,6) = (-4,-5,-6). Be careful: if the LookDirection is wrong, you may see only part of the model or even nothing at all. - UpDirection: A
Vector3D that points to the direction considered 'up' by the camera. Usually, it's the (0,1,0) vector, which points to the increasing values of Y. - FieldOfView: An angle in degrees that represents the view angle of the camera. Usually, a value of 30 degrees is sufficient.
Translating to XAML
When you understand all these concepts, you can already start writing your XAML. The models in your scene are represented by ModelVisual3Ds and the Camera is a property of the Viewport3D where the content is displayed. The following code, taken from the MSDN Library, represents a simple 3D scene:
<Page xmlns="http://schemas.microsoft.com/winfx/2006/xaml/presentation"
xmlns:x="http://schemas.microsoft.com/winfx/2006/xaml" >
<DockPanel>
<Viewbox>
<Canvas Width="321" Height="201">
<Viewport3D ClipToBounds="True" Width="150"
Height="150" Canvas.Left="0" Canvas.Top="10">
<Viewport3D.Camera>
<PerspectiveCamera Position="0,0,2"
LookDirection="0,0,-1" FieldOfView="60" />
</Viewport3D.Camera>
<Viewport3D.Children>
<ModelVisual3D>
<ModelVisual3D.Content>
<DirectionalLight Color="#FFFFFF"
Direction="-0.612372,-0.5,-0.612372" />
</ModelVisual3D.Content>
</ModelVisual3D>
<ModelVisual3D>
<ModelVisual3D.Content>
<GeometryModel3D>
<GeometryModel3D.Geometry>
<MeshGeometry3D
TriangleIndices="0,1,2 3,4,5"
Normals="0,0,1 0,0,1 0,0,1 0,0,1 0,0,1 0,0,1 "
TextureCoordinates="0,0 1,0 1,1 1,1 0,1 0,0 "
Positions="-0.5,-0.5,0.5 0.5,-0.5,0.5 0.5,0.5,0.5 0.5,
0.5,0.5 -0.5,0.5,0.5 -0.5,-0.5,0.5 " />
</GeometryModel3D.Geometry>
<GeometryModel3D.Material>
<MaterialGroup>
<DiffuseMaterial>
<DiffuseMaterial.Brush>
<LinearGradientBrush StartPoint="0,0.5"
EndPoint="1,0.5">
<LinearGradientBrush.GradientStops>
<GradientStop Color="Yellow" Offset="0" />
<GradientStop Color="Red" Offset="0.25" />
<GradientStop Color="Blue" Offset="0.75" />
<GradientStop Color="LimeGreen" Offset="1" />
</LinearGradientBrush.GradientStops>
</LinearGradientBrush>
</DiffuseMaterial.Brush>
</DiffuseMaterial>
</MaterialGroup>
</GeometryModel3D.Material>
<GeometryModel3D.Transform>
<RotateTransform3D>
<RotateTransform3D.Rotation>
<AxisAngleRotation3D Axis="0,3,0" Angle="40" />
</RotateTransform3D.Rotation>
</RotateTransform3D>
</GeometryModel3D.Transform>
</GeometryModel3D>
</ModelVisual3D.Content>
</ModelVisual3D>
</Viewport3D.Children>
</Viewport3D>
</Canvas>
</Viewbox>
</DockPanel>
</Page>
Interactive 3D
In WPF 3.5, the most notable change is the addition of the interactive 3D classes, which allow you to create models with focus, events, and even usable 2D controls without having to manually hit test the 3D scene. Some of these classes, now integrated to WPF, are an evolution of the Interactive 2D on 3D classes by Kurt Berglund that come with Daniel Lehenbauer's 3D Tools (http://www.codeplex.com/3DTools).
Unfortunately, there's not much material covering WPF Interactive 3D, so you'll have to figure most things out by yourself. Luckily, it's not very complex; you'll probably be able to work it out yourself after this brief introduction, based on a blog post in the WPF 3D blog (http://blogs.msdn.com/wpf3d/).
The two types in WPF 3.5 that enable the magic of interactive 3D are the UIElement3D and Viewport2DVisual3D.
UIElement3D: The UIElement3D makes it possible to add input, focus, and events in 3D visuals. As it's an abstract class, the WPF 3D team has provided two classes to use these functionalities directly:
ContainerUIElement3D: a container for interactive Visual3Ds.ModelUIElement3D: has a Model property, which is the model that visually represents the UI element.
Usually, you'll end up using Containers to treat events for a collection of models, and Models to treat events individually.
Viewport2DVisual3D: A huge help to create 3D interfaces, the Viewport2DVisual3D is like a ModelVisual3D, but it also has a Visual property where you can put 2D controls. These 2D controls work as if they were in a common 2D interface. For example, if you set the visual to a Button, it will support all events, such as Click and Focus, while being displayed in 3D. To use the Viewport2DVisual3D, you also have to set a material with the Viewport2DVisual3D.IsVisualHostMaterial set to true, representing the material where the visual will be shown.
Preparing the window for the 3D content
Now we can start examining the application. The first thing to do is prepare the window to display the 3D content. In my application, I started with a blank WPF Windows Application, and changed the window dimensions and background image. Right in this first step, I've already created a ResourceDictionary to store my ImageSources for the various images in the application, called ImageResources.xaml. As you'll see, I'm a bit of an organization freak, and even for a small project, I tend to organize everything in many ResourceDictionarys.
Then, I've created a Viewport3D, and set up the lights and camera in the Other3DResources.xaml file. At this step, the XAML looks like this:
[MainWindow.xaml]
<Window x:Class="BookWriter3D.MainWindow"
xmlns="http://schemas.microsoft.com/winfx/2006/xaml/presentation"
xmlns:x="http://schemas.microsoft.com/winfx/2006/xaml"
Title="BookWriter3D"
Height="768"
Width="1024">
<Window.Resources>
<ResourceDictionary>
<ResourceDictionary.MergedDictionaries>
<ResourceDictionary Source=".\Resources\ImageResources.xaml" />
<ResourceDictionary Source=".\Resources\Other3DResources.xaml" />
</ResourceDictionary.MergedDictionaries>
</ResourceDictionary>
</Window.Resources>
<Grid x:Name="_LayoutRoot">
<Grid.Background>
<ImageBrush ImageSource="{StaticResource Image_Background}" />
</Grid.Background>
<Viewport3D x:Name="_Main3D"
ClipToBounds="False"
Camera="{StaticResource Other3D_MainCamera}">
<StaticResource ResourceKey="Other3D_Lights" />
</Viewport3D>
</Grid>
</Window>
[ImageResources.xaml]
<ResourceDictionary xmlns="http://schemas.microsoft.com/winfx/2006/xaml/presentation"
                    xmlns:x="http://schemas.microsoft.com/winfx/2006/xaml">

    <ImageSource x:Key="Image_Background">Images/darkaurora.png</ImageSource>

</ResourceDictionary>
[Other3DResources.xaml]
<ResourceDictionary
       xmlns="http://schemas.microsoft.com/winfx/2006/xaml/presentation"
       xmlns:x="http://schemas.microsoft.com/winfx/2006/xaml">

    <PerspectiveCamera x:Key="Other3D_MainCamera"
                       Position="0 -2.5 6.5"
                       LookDirection="0 2.5 -6.5"
                       UpDirection="0 1 0"
                       FieldOfView="30" />

    <ModelVisual3D x:Key="Other3D_Lights">
        <ModelVisual3D.Content>
            <Model3DGroup>
                <AmbientLight Color="LightGray" />
                <DirectionalLight Color="Gray"
                                  Direction="2 -3 -1" />
            </Model3DGroup>
        </ModelVisual3D.Content>
    </ModelVisual3D>

</ResourceDictionary>
3D geometries: plane, cover, and edge
In this project, I've used three simple 3D models (or more specifically, mesh geometries) which represent the parts of the book. You can explore the file called MeshGeometry3DResources.xaml in the attached code to see how they are made.
The first model is the plane, which simply represents a plane in 3D in the shape of a sheet of paper. The second is the cover model, which is a thin rectangular box and will be the geometry of the front, back, and spine covers. And finally, there's the edge model, shaped as a 'strip' wrapped around a rectangular box, which will represent the left edge and right edge of the 3D book.
Figure 4: 3D models used in the application (sheet, cover, and edge), with textures and transforms applied for easier recognition.
Joining the book
Usually, when creating 3D WPF applications, I create the objects as simple as possible and then use 3D transforms to position and rotate them. That simplifies many actions that might come later, such as animations and movement, and it also helps to keep objects parallel or move objects together by applying the same set of transformations to different objects. Besides that, I usually store my geometries, materials, and transforms in separate ResourceDictionarys, to quickly find them when I need.
For this project, I'm using seven models: the front cover, the back cover, the spine, the left and right edges, and the left and right pages. The first five are contained in a Model3DGroup that represents the Model property of a ModelUIElement3D, because I want them to work as if they were one object, with the same events; the latter two are separate Viewport3DVisual2Ds because they will contain functional 2D controls.
To display and join these models, I've created a set of materials and transforms, and used the three geometries above. The materials are pretty simple: the ones for the static elements (covers, spine, and edges) are DiffuseMaterials with ImageBrushes, and the materials for the interactive controls are DiffuseMaterials with their IsVisualHostMaterial property set to true. The images are all in the folder \Resources\Images in the project folder, and are also referenced in the ImageResources.xaml for easier modification, if needed.
For the transforms, I used a rotation around the Y axis for each of the left and right 'blocks' (cover+edge+page), being careful with the rotation center so as to join the pages in the right place. Then, I added translations in the X axis for the blocks, and different translations (in X and in Z) for the covers. Finally, I applied three transforms for the spine: one scale transform to scale the cover mesh in the X direction (make it shorter), a rotation to be able to close the book, and a translation to make that rotation smooth. I did all that in separate resources to be able to 'name' the most useful transforms, and therefore easily access the resources later in the code.
To create the objects, after creating the resources and referencing the ResourceDictionarys, you can insert something like this in your Viewport3D:
<ModelUIElement3D>
<ModelUIElement3D.Model>
<Model3DGroup>
<GeometryModel3D x:Name="_FrontCover"
Geometry="{StaticResource MeshGeometry3D_Cover}"
Material="{StaticResource Material_FrontCover}"
Transform="{StaticResource Transform3D_FrontCover}" />
<GeometryModel3D x:Name="_BackCover"
Geometry="{StaticResource MeshGeometry3D_Cover}"
Material="{StaticResource Material_Cover}"
Transform="{StaticResource Transform3D_BackCover}" />
<GeometryModel3D x:Name="_SpineCover"
Geometry="{StaticResource MeshGeometry3D_Cover}"
Material="{StaticResource Material_Cover}"
Transform="{StaticResource Transform3D_SpineCover}" />
<GeometryModel3D x:Name="_LeftEdge"
Geometry="{StaticResource MeshGeometry3D_Edge}"
Material="{StaticResource Material_Edge}"
Transform="{StaticResource Transform3D_Left}" />
<GeometryModel3D x:Name="_RightEdge"
Geometry="{StaticResource MeshGeometry3D_Edge}"
Material="{StaticResource Material_Edge}"
Transform="{StaticResource Transform3D_Right}" />
</Model3DGroup>
</ModelUIElement3D.Model>
</ModelUIElement3D>
<Viewport2DVisual3D x:Name="_LeftPage"
Geometry="{StaticResource MeshGeometry3D_Plane}"
Transform="{StaticResource Transform3D_Left}">
<Viewport2DVisual3D.Material>
<DiffuseMaterial Viewport2DVisual3D.IsVisualHostMaterial="True" />
</Viewport2DVisual3D.Material>
</Viewport2DVisual3D>
<Viewport2DVisual3D x:Name="_RightPage"
Geometry="{StaticResource MeshGeometry3D_Plane}"
Transform="{StaticResource Transform3D_Right}">
<Viewport2DVisual3D.Material>
<DiffuseMaterial Viewport2DVisual3D.IsVisualHostMaterial="True" />
</Viewport2DVisual3D.Material>
</Viewport2DVisual3D>
As you can see, the Viewport2DVisual3Ds don't have anything set as their Visual property, so if you build the project now, you'll see something like this:
Figure 5: 3D book without the content pages.
Adding content
The content of each of the pages will be a simple TextBox with a few extras. First, you must add a TextBox as the Visual for each of the pages, for example, the left page:
<Viewport2DVisual3D x:Name="_LeftPage"
                    Geometry="{StaticResource MeshGeometry3D_Plane}"
                    Transform="{StaticResource Transform3D_Left}">
    <Viewport2DVisual3D.Material>
        <DiffuseMaterial Viewport2DVisual3D.IsVisualHostMaterial="True" />
    </Viewport2DVisual3D.Material>

    <Viewport2DVisual3D.Visual>
        <TextBox Padding="30,30,5,30"
                 FontFamily="Segoe Script"
                 Width="500"
                 Height="700"
                 IsTabStop="True"
                 FontSize="30"
                 AcceptsReturn="True"
                 TextWrapping="Wrap"  />
    </Viewport2DVisual3D.Visual>

</Viewport2DVisual3D>
Some interesting properties of this TextBox: its FontFamily is Segoe Script, so you have a more 'handwritten' look. It must be a tab stop, for easy keyboard navigation, and it must accept returns (the Enter key) to have a multi-line editor. It's also interesting to enable wrapping, so we don't have text flowing out of the horizontal visible area.
You can see that the two TextBoxes will have many properties in common, so it's a case where a style fits perfectly to organize and reuse the code. In fact, in the example above, the only property that changes between the TextBoxes is the Padding.
So, to add a style, it's useful to create another ResourceDictionary and use a Style like this:
<Style x:Key="Control_PagesStyle"
       TargetType="{x:Type TextBox}">
    <Setter Property="Width"
            Value="500" />
    <Setter Property="Height"
            Value="720" />
    <Setter Property="IsTabStop"
            Value="True" />
    <Setter Property="FontFamily"
            Value="Segoe Script, script" />
    <Setter Property="FontSize"
            Value="30" />
    <Setter Property="AcceptsReturn"
            Value="True" />
    <Setter Property="TextWrapping"
            Value="Wrap" />
</Style>
As suggested by the resource key, I've saved this resource in a file called ControlResources.xaml.
Spell-checking
One interesting feature WPF provides us is the integrated spell-checking interface. To enable it, it's very simple: just add a xml:lang="en-us" attribute in your root tag (usually Window or Page) and set the SpellCheck.IsEnabled property in the TextBox to true. I've done this in the style defined above:
<Style x:Key="Control_PagesStyle"
       TargetType="{x:Type TextBox}">
    ...
    <Setter Property="SpellCheck.IsEnabled"
            Value="True" />
</Style>
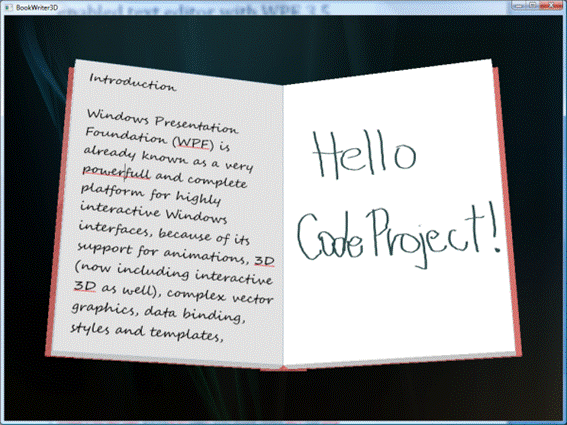
And that's it. Now you have a complete spell-checking 3D book writer, like this:
Figure 6: Integrated spell checking with WPF.
For more information about the spell checker, and some tips on how to improve the spell checker user interface, check out Josh Smith's article located at SmartTextBox.aspx.
Animating the book
Now, it's time to add the opening and closing animations to our book. For improved flexibility, I've decided to create the animations using code-behind. So, I've created two methods, OpenBook and CloseBook, which perform simple animations using temporary variables for organization. There are animations for the rotations, for the spine translation, and for the camera, to center the book. You can see the full method in the sample code; here, I'll post an excerpt for the left rotation, from the OpenBook method:
RotateTransform3D rot =
   (RotateTransform3D)TryFindResource("Transform3D_LeftRotation");
DoubleAnimation da = new DoubleAnimation(15,
   new Duration(TimeSpan.FromSeconds(durationSeconds)));
da.DecelerationRatio = 1;
rot.Rotation.BeginAnimation(AxisAngleRotation3D.AngleProperty, da);
One interesting addition brought by the use of the code-behind animations is the ability to further customize the animation. In this case, I've used a parameter (double durationSeconds) to be able to select how much time the animation will take. Another useful feature is the use of the TryFindResource method, which allows us to animate resources, and also works with external (merged) resource dictionaries.
After the animation code is done, it's just a matter of wiring up the events to trigger these animations. So, a bool field called IsBookOpen was created to store the state of the book, and the MouseDown event of the "cover" model (the ModelUIElement3D containing the covers and edges) was wired up to a handler like this:
private void Cover_MouseDown(object sender, MouseButtonEventArgs e)
{
    if (IsBookOpen) CloseBook(1.5);
    else OpenBook(1.5);
}
This way, the whole cover serves as a clickable area to open or close the book. I also added a 'splash' animation in the Loaded event of the window, which performs a fade-in effect and closes the book immediately (CloseBook(0)).
Adding speech to the book
This next feature is a very interesting one. By using the Windows speech synthesis engine, it's very simple to make your application read any text; the APIs included in .NET Framework 3.0 make it even easier.
To enable speech synthesis in an application, you must add a reference to the System.Speech namespace (Project > Add Reference... > .NET tab > System.Speech) and add System.Speech.Synthesis to the using clauses. After that, you only need to call the SpeakAsync method of a SpeechSynthesizer, and Microsoft Anna will read your text out loud (or Microsoft Sam, if you're on Windows XP):
using System.Speech.Synthesis;
...
SpeechSynthesizer synth = new SpeechSynthesizer();
synth.SpeakAsync("Hello, speech!");
In this application, the text in any of the textboxes is read when you double-click it, using a XAML-wired event handler.
Adding ink
In the attached sample, I've also added ink support in the right page. This is very easy: just replace the right visual (a TextBox) with an InkCanvas, and that's it. The Viewport2DVisual3D will do the hard part for you.
Another point of interest here is the DefaultDrawingAttibutes property of the InkCanvas. This property, of type DrawingAttributes, allows you to change many visual properties for the ink, such as color, width, and whether it should fit the strokes to a curve or not. In the sample, this property is defined in the InkCanvas style, which can be found in the ControlResources.xaml file.
Finally, an event handler is added to switch the InkCanvas editing mode from ink to eraser when you right-click it:
private void InkCanvas_PreviewMouseRightButtonDown(object sender, MouseButtonEventArgs e)
{
InkCanvas ic = sender as InkCanvas;
ic.EditingMode = (ic.EditingMode == InkCanvasEditingMode.Ink) ?
InkCanvasEditingMode.EraseByPoint : InkCanvasEditingMode.Ink;
}
Finishing touch: automatic trackball support with 3DTools
To finish this application, I've added trackball and zoom functionalities with the help of the previously mentioned 3D Tools for WPF (http://www.codeplex.com/3DTools). After downloading the 50KB DLL and adding a reference to it, all you have to do is wrap the Viewport3D inside a TrackballDecorator. To do this, you must also set a reference to the custom namespace in the XAML file:
<Window ...
        xmlns:tools="clr-namespace:_3DTools;assembly=3DTools"
        ...>
...
<tools:TrackballDecorator>
            <Viewport3D>
             ...
            </Viewport3D>
</tools:TrackballDecorator>
With the trackball enabled, use the left mouse button to rotate the scene, and the right mouse button to zoom in and out. The 3D Tools TrackballDecorator works by changing the camera position and orientation when you move your mouse over the scene. If you're interested, the 3D Tools project is Open Source, so you can check out how it's done.
For the future
And that wraps our project. Of course, my focus here was on showing the concepts, so it's a very simple application and there's much to be done. Some interesting ideas for the future:
- Refactor to a complete custom control
- Flipping pages, with a collection of visuals representing the pages
- Ink recognition support
- Speech recognition support
- An interface to change the cover images or the 'paper type'
What do you think?
I hope this article and app have taught you some useful concepts in WPF. What do you think? Please comment, vote, suggest modifications, correct me, and feel free to expand this code to your liking.
Other links and references
History
- V1.0 (12/21/07) - Initial release.
- V1.01 (12/21/07) - Added table of contents.
- V1.02 (10/30/09) - Corrected characters that didn't display correctly.


 General
  News
News  Suggestion
  Question
  Bug
Bug  Answer
  Joke
Joke  Praise
  Rant
Rant  Admin
Admin 


 .
. 
 By adding many features like office application eg. excel, word. lol
