Introduction
We often require the MessageBox while developing programs, and it's a very helpful tool to communicate with users. Sometimes, we want the MessageBox to look like a part of our application or match with the application theme, but it may not be possible always. For instance, we use LightSkyBlue as the background color for all our forms in an application but when we show a MessageBox, its style is always the same. A MessageBox would look odd and weird in this combination. In other words, we can say that we don’t have full control on MessageBox control. So, why don’t we make our own MessageBox that will work as we want, where we can have full control on it.
I wasted a lot of my precious time in searching for a solution for this, but I never found it anywhere. So, I planned to make it myself. After a lot of R&D, at last, I did it. And now, I think that I should share my solution to those who have the same problem. At the end of this article, the reader will have a customized MessageBox on which, he/she will have full control.
Designing
Create a new project, name it “Custom Featured MessageBox”, open its properties, and set “Output Type” to “Class Library” (because Class Library output will be a DLL that can be easily added to any project). Add a new project in the same solution, name it “Test”, right click on it, and hit “Set as StartUp Project”. Now, back to the “Custom Featured MessageBox” project.
We will require:
- A Windows Form
- A
PictureBox, to show an icon - A
TextBox, to show text (we cannot use Label here because we will require to count the lines) - Three
Buttons, for dialog results - Three
Panels, to keep all the controls in the correct locations and size
Set the control properties as:
Form:
Name: XMessageBox
ControlBox: False
FormBorderStyle: FixedSingle
Max.Box: False
Min.Box: False
Padding: 10, 10, 10, 0
ShowIcon: False
ShowInTaskbar: False
Size: 262, 104
StartPosition: CenterScreen

TextBox:
BackColor: Control
BorderStyle: None
Dock: Fill
MaxLength: 0 (i.e. Max Length)
Multiline: True
ReadOnly: True
TabStop: False
TextAlign: Center

Panels:

Panel 1:
Name: leftPanel
Dock: Left
Visible: False
    Controls:
           PictureBox
Panel 2:
Name: bottomPanel
Dock: Bottom
    Controls:
           Panel 3
Panel 3 :
Name: bottomInnerPanel
Location: 0, 0
Size: 236, 30
    Controls:
           Button 1
           Button 2
           Button 3

PictureBox:
BackgroundImageLayout: Stretch
Location: 0, 0
Size: 32, 32

Button 1:
Location: 0, 3
Visible: False

Button 2:
Location: 81, 3
Visible: False

Button 3:
Location: 162, 3
Visible: False
Well done!!! Now, it will look like:

Using the code
First, create two const member variables of type int.
const int minWidth = 262;
const int maxWidth = 600;
Then, we have to create two enums, XMessageBoxButtons and XMessageBoxIcon, with public modifiers:
public enum XMessageBoxButtons
{ OK, AbortRetryIgnore, YesNoCancel, YesNo, RetryCancel, }
public enum XMessageBoxIcon
{ Error, Question, Warning, Information, }
After this, create two methods SetButtons and SetIcon to set the buttons and icons, respectively:
void SetButtons(XMessageBoxButtons buttons)
{
if (buttons == XMessageBoxButtons.OK)
{
button2.Visible = true;
button2.Text = "OK";
button2.DialogResult = DialogResult.OK;
ControlBox = true;
}
else if (buttons == XMessageBoxButtons.AbortRetryIgnore)
{
button1.Visible = true;
button1.Text = "Abort";
button1.DialogResult = DialogResult.Abort;
button2.Visible = true;
button2.Text = "Retry";
button2.DialogResult = DialogResult.Retry;
button3.Visible = true;
button3.Text = "Ignore";
button3.DialogResult = DialogResult.Ignore;
if (this.Width < minWidth)
this.Width = minWidth;
}
else if (buttons == XMessageBoxButtons.RetryCancel)
{
button1.Visible = true;
button1.Text = "Retry";
button1.DialogResult = DialogResult.Retry;
button1.Location = new Point(41, 3);
button2.Visible = true;
button2.Text = "Cancel";
button2.DialogResult = DialogResult.Cancel;
button2.Location = new Point(122, 3);
if (this.Width < minWidth)
this.Width = minWidth;
}
else if (buttons == XMessageBoxButtons.YesNo)
{
button1.Visible = true;
button1.Text = "Yes";
button1.DialogResult = DialogResult.Yes;
button1.Location = new Point(41, 3);
button2.Visible = true;
button2.Text = "No";
button2.DialogResult = DialogResult.No;
button2.Location = new Point(122, 3);
if (this.Width < minWidth)
this.Width = minWidth;
}
else if (buttons == XMessageBoxButtons.YesNoCancel)
{
button1.Visible = true;
button1.DialogResult = DialogResult.Yes;
button1.Text = "Yes";
button2.Visible = true;
button2.DialogResult = DialogResult.No;
button2.Text = "No";
button3.Visible = true;
button3.DialogResult = DialogResult.Cancel;
button3.Text = "Cancel";
if (this.Width < minWidth)
this.Width = minWidth;
}
}
void SetIcon(XMessageBoxIcon icon)
{
if (this.Height < 104)
this.Height = 104;
if (this.Width <= 600)
this.Width += 55;
leftPanel.Visible = true;
if (icon == XMessageBoxIcon.Information)
pictureBox1.BackgroundImage =
Custom_Featured_MessageBox.Properties.Resources.Information;
else if (icon == XMessageBoxIcon.Warning)
pictureBox1.BackgroundImage =
Custom_Featured_MessageBox.Properties.Resources.Warning;
else if (icon == XMessageBoxIcon.Error)
pictureBox1.BackgroundImage =
Custom_Featured_MessageBox.Properties.Resources.Error;
else if (icon == XMessageBoxIcon.Question)
pictureBox1.BackgroundImage =
Custom_Featured_MessageBox.Properties.Resources.QuestionMark;
}
Now, we should create a method that will set the entire message box. Name it XmessageBox, and with seven arguments:
void XmessageBox(string text, string title, Size size, Font font,
     Color backColor, Color foreColor, bool customSize)
{}
Next, write code in it so that it can set the message box when called:
int width;
int height;
this.Text = title;
TextBox1.Text = text;
this.Font = font;
this.BackColor = backColor;
this.ForeColor = foreColor;
Graphics g = this.CreateGraphics();
SizeF textSize = g.MeasureString(text, font);
g.Dispose();
if (textSize.Width <= maxWidth)
width = (int)textSize.Width + 15;
else
width = maxWidth;
height = (TextBox1.Lines.Length * TextBox1.Font.Height) + 40 + 40;
if (customSize == true)
this.Size = size;
else
this.Size = new Size(width, height);
When finished, select the form (XMessageBox), double click on the Resize event, and write these two lines, to keep all the dialog buttons at the middle of the form.
int x = (bottomPanel.Width - bottomInnerPanel.Width) / 2;
bottomInnerPanel.Location = new Point(x, bottomInnerPanel.Location.Y);
Also, double click on the BackColorChanged as well as ForeColorChanged events, to set Textbox1 colors when the form colors change.
private void XMessageBox_ForeColorChanged(object sender, EventArgs e)
{
    TextBox1.ForeColor = this.ForeColor;
}
private void XMessageBox_BackColorChanged(object sender, EventArgs e)
{
    TextBox1.BackColor = this.BackColor;
}
Create a static method to show XMessageBox (because static methods can be called without making instance). Name it show, with an argument and a DialogResult return type.
public static  DialogResult show(string text)
{}
Write code in it:
XMessageBox f = new XMessageBox();
f.XmessageBox(text, "", f.Size, f.Font, f.BackColor, f.ForeColor, false);
f.SetButtons(XMessageBoxButtons.OK);
return f.ShowDialog();
In this code, we are making an instance of XMessageBox and calling some of its required methods. We are not calling SetIcon here, because this static method will only show a simple message box.
Next, add twelve more methods, to overload this method:
public static DialogResult show(string text, string title)
{
XMessageBox f = new XMessageBox();
f.XmessageBox(text, title, f.Size, f.Font, f.BackColor, f.ForeColor, false);
f.SetButtons(XMessageBoxButtons.OK);
return f.ShowDialog();
}
public static
DialogResult show(string text, string title, XMessageBoxButtons buttons)
{
XMessageBox f = new XMessageBox();
f.XmessageBox(text, title, f.Size, f.Font, f.BackColor, f.ForeColor, false);
f.SetButtons(buttons);
return f.ShowDialog();
}
public static DialogResult show(string text, string title,
XMessageBoxButtons buttons, XMessageBoxIcon icon)
{
XMessageBox f = new XMessageBox();
f.XmessageBox(text, title, f.Size, f.Font, f.BackColor, f.ForeColor, false);
f.SetButtons(buttons);
f.SetIcon(icon);
return f.ShowDialog();
}
public static DialogResult show(string text, string title,
XMessageBoxButtons buttons, Size size)
{
XMessageBox f = new XMessageBox();
f.XmessageBox(text, title, size, f.Font, f.BackColor, f.ForeColor, true);
f.SetButtons(buttons);
return f.ShowDialog();
}
public static DialogResult show(string text, string title,
XMessageBoxButtons buttons, XMessageBoxIcon icon, Size size)
{
XMessageBox f = new XMessageBox();
f.XmessageBox(text, title, size, f.Font, f.BackColor, f.ForeColor, true);
f.SetButtons(buttons);
f.SetIcon(icon);
return f.ShowDialog();
}
public static DialogResult show(string text, string title,
XMessageBoxButtons buttons, Size size, Font font)
{
XMessageBox f = new XMessageBox();
f.XmessageBox(text, title, size, font, f.BackColor, f.ForeColor, true);
f.SetButtons(buttons);
return f.ShowDialog();
}
public static DialogResult show(string text, string title, XMessageBoxButtons buttons,
XMessageBoxIcon icon, Size size, Font font)
{
XMessageBox f = new XMessageBox();
f.XmessageBox(text, title, size, font, f.BackColor, f.ForeColor, true);
f.SetButtons(buttons);
f.SetIcon(icon);
return f.ShowDialog();
}
public static DialogResult show(string text, string title,
Color backColor, Color foreColor)
{
XMessageBox f = new XMessageBox();
f.XmessageBox(text, title, f.Size, f.Font, backColor, foreColor, false);
f.SetButtons(XMessageBoxButtons.OK);
return f.ShowDialog();
}
public static DialogResult show(string text, string title,
Color backColor, Color foreColor, XMessageBoxButtons buttons)
{
XMessageBox f = new XMessageBox();
f.XmessageBox(text, title, f.Size, f.Font, backColor, foreColor, false);
f.SetButtons(buttons);
return f.ShowDialog();
}
public static DialogResult show(string text, string title, Color backColor,
Color foreColor, XMessageBoxButtons buttons, XMessageBoxIcon icon)
{
XMessageBox f = new XMessageBox();
f.XmessageBox(text, title, f.Size, f.Font, backColor, foreColor, false);
f.SetButtons(buttons);
f.SetIcon(icon);
return f.ShowDialog();
}
public static DialogResult show(string text, string title, Color backColor,
Color foreColor, XMessageBoxButtons buttons, Size size, Font font)
{
XMessageBox f = new XMessageBox();
f.XmessageBox(text, title, size, font, backColor, foreColor, true);
f.SetButtons(buttons);
return f.ShowDialog();
}
public static DialogResult show(string text, string title, Color backColor, Color foreColor,
XMessageBoxButtons buttons, XMessageBoxIcon icon, Size size, Font font)
{
XMessageBox f = new XMessageBox();
f.XmessageBox(text, title, size, font, backColor, foreColor, true);
f.SetButtons(buttons);
f.SetIcon(icon);
return f.ShowDialog();
}
Back to the Test project, right click on “References”, select “Add Reference…”, then tab to “Projects”, press “OK” after selecting “Custom Featured MessageBox”. When done, add a namespace reference in Form1.
using Custom_Featured_MessageBox;
Add a Button, double click on it, and write code:
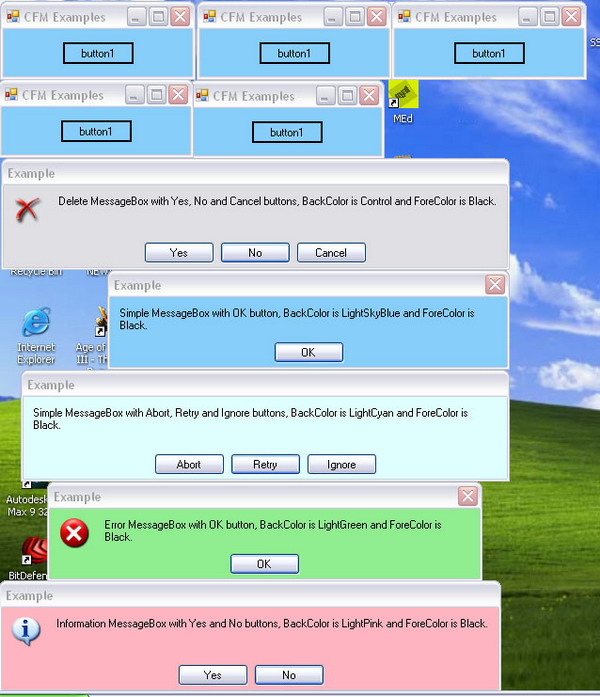
XMessageBox.show("Simple MessageBox with OK button, BackColor is LightSkyBlue " +
                 "and ForeColor is Black.", "Example",
                 Color.LightSkyBlue, Color.Black, XMessageBoxButtons.OK);
XMessageBox.show("Simple MessageBox with Abort, Retry and Ignore buttons, BackColor" +
                 " is LightCyan and ForeColor is Black.", "Example",
                 Color.LightCyan, Color.Black, XMessageBoxButtons.AbortRetryIgnore);
XMessageBox.show("Error MessageBox with OK button, BackColor is LightGreen " +
                 "and ForeColor is Black.", "Example", Color.LightGreen,
                 Color.Black, XMessageBoxButtons.OK, XMessageBoxIcon.Error);
XMessageBox.show("Information MessageBox with Yes and No buttons, BackColor " +
                 "is LightPink and ForeColor is Black.", "Example",
                 Color.LightPink, Color.Black, XMessageBoxButtons.YesNo,
                 XMessageBoxIcon.Information);
Now, it's time to check our custom message box. Run the solution, click the button, and see the result:
Now, we got a problem that it’s just showing one line. The word “Black”, which is in the second line, is not appearing (since word-wrap is enabled, “Black” is in the second line). Obviously, the problem is in the height setting. Let's check the cause out. We need to search for where we are setting the height. And, we reach the XmessageBox method, where we have:
height = (TextBox1.Lines.Length * TextBox1.Font.Height) + 40 + 40;
…to set the height, put a breakpoint on that line so that we can know the current values.
Points of interest
Run again, when the compiler stops at the breakpoint, hover the mouse on Length of TextBox1.Lines (first value, which is going to set the height), and we see that this property is returning "1". However, TextBox1 contains two lines. That means, the Length property doesn’t work properly when word-wrap is on. Therefore, we need to count the lines explicitly. To do that, add a class. Now, replace all its text with this:
using System;
using System.Windows.Forms;
namespace Custom_Featured_MessageBox
{
    public class XTextBox : TextBox
    {
        public int LinesCount()
        {
            Message msg = Message.Create(this.Handle, 0xBA,
                          IntPtr.Zero, IntPtr.Zero);
            base.DefWndProc(ref msg);
            return msg.Result.ToInt32();
        }
    }
}
In the above code, TextBox is inherited, and added with a method named LinesCount that will return the exact line length whether word-wrap is enabled or not. In this method, we are sending a message to the default window procedure of the base class as a reference. And that's all.
Replace the default TextBox with a new one as well as replace TextBox1.Lines.Length with TextBox1.LinesCount(). Now, the replaced line will look like:
height = (TextBox1.LinesCount() * TextBox1.Font.Height) + 40 + 40;
Now, Run, oh yeah!!! It's working….!!!
We can also add our own image as an icon. To do that:
- Add the image in Resources.
- Add the name (any) in the
XMessageBoxIcon enum. - Expand the
SetIcon method.
For example, if we want to add a ‘Delete’ image as an icon, then just add the ‘Delete’ image in Resources, and expand the XMessageBoxIcon enum:
public enum XMessageBoxIcon
{ Error, Question, Warning, Information, Delete, }
Expand “SetIcon” as well:
void SetIcon(XMessageBoxIcon icon)
{
.
.
.
.
    else if (icon == XMessageBoxIcon.Delete)
        pictureBox1.BackgroundImage =
          Custom_Featured_MessageBox.Properties.Resources.Delete;
}
Now, call XmessageBox with that icon:
XMessageBox.show("Delete MessageBox with Yes, No and " +
                 "Cancel buttons, BackColor is Control and ForeColor is Black.",
                 "Example", XMessageBoxButtons.YesNoCancel,
                 XMessageBoxIcon.Delete);
At the end, we have a message box that will do whatever we want. Please rate this article, only if you have read it from start to end.
This member has not yet provided a Biography. Assume it's interesting and varied, and probably something to do with programming.


 General
  News
News  Suggestion
  Question
  Bug
Bug  Answer
  Joke
Joke  Praise
  Rant
Rant  Admin
Admin 


