Introduction
This article will give you an overview of how to use an asp:GridView completely, and how to use RowEditing, RowUpdating, RowDeleting, RowCommand, RowDataBound, RowCancelingEdit, and Pagination in a DataGrid. From this article, you will have a clear view of the GridView data insert, delete, and update operations.
Background
GridView is a very popular control in ASP.NET, and for website development, it is a very important control. This control is especially important for CRUD operations.
Using the code
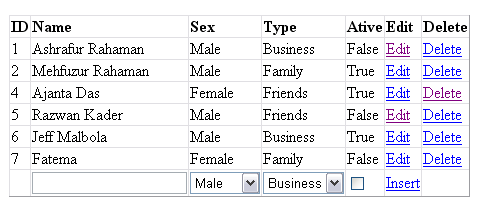
Make two tables in a database: Contact and ContactType. This is just an example of how we shall add, edit, and delete data in a GridView. I have also used a textbox, a drop down list, and a checkbox which we use in the case of data add, delete, and update.
Step by step
Take a web project, go to an .aspx page, for example, Default.aspx, and add an ASP.NET GridView:
<asp:GridView ID="grdContact" runat="server"
 AutoGenerateColumns="False" DataKeyNames="Id, Type"
 OnRowCancelingEdit="grdContact_RowCancelingEdit"
 OnRowDataBound="grdContact_RowDataBound"
 OnRowEditing="grdContact_RowEditing"
 OnRowUpdating="grdContact_RowUpdating" ShowFooter="True"
 OnRowCommand="grdContact_RowCommand"
 OnRowDeleting="grdContact_RowDeleting">
This is the GridView with all the necessary properties enabled and the events called.
For every column of the GridView, we need to make an <asp:TemplateField> field. I am using an <EditItemTemplate> to put the edit control, an <ItemTemplate> to bind data in a control, and a <FooterTemplate> to insert the control. Here is an example of a template field:
<asp:TemplateField HeaderText="Name" HeaderStyle-HorizontalAlign="Left">
   <EditItemTemplate>
    <asp:TextBox ID="txtName" runat="server" Text='<%# Bind("Name") %>'></asp:TextBox>
   </EditItemTemplate>
   <FooterTemplate>
    <asp:TextBox ID="txtNewName" runat="server" ></asp:TextBox>
   </FooterTemplate>
   <ItemTemplate>
    <asp:Label ID="lblName" runat="server" Text='<%# Bind("Name") %>'></asp:Label>
   </ItemTemplate>
</asp:TemplateField>

Let's take a look at the code for the GridView:
- Initialize the
GridView: To fill data in the GridView, I have written a method named FillGrid() which takes data from a DataTable and shows it in the grid.
public void FillGrid()
{
    ContactTableAdapter contact = new ContactTableAdapter();
    DataTable contacts = contact.GetData();
    if (contacts.Rows.Count > 0)
    {
        grdContact.DataSource = contacts;
        grdContact.DataBind();
    }
    else
    {
        contacts.Rows.Add(contacts.NewRow());
        grdContact.DataSource = contacts;
        grdContact.DataBind();

        int TotalColumns = grdContact.Rows[0].Cells.Count;
        grdContact.Rows[0].Cells.Clear();
        grdContact.Rows[0].Cells.Add(new TableCell());
        grdContact.Rows[0].Cells[0].ColumnSpan = TotalColumns;
        grdContact.Rows[0].Cells[0].Text = "No Record Found";
    }
}
- Fill dynamic values: There are two dropdownlist controls available in this example. One of the dropdownlists dynamically loads data from another table. In the
RowDataBound event of the GridView control, insert the following code:
protected void grdContact_RowDataBound(object sender, GridViewRowEventArgs e)
{
    ContactTypeTableAdapter contactType = new ContactTypeTableAdapter();
    DataTable contactTypes = contactType.GetData();
    if (e.Row.RowType == DataControlRowType.DataRow)
    {
        Label lblType = (Label)e.Row.FindControl("lblType");
        if (lblType != null)
        {
            int typeId = Convert.ToInt32(lblType.Text);
            lblType.Text = (string)contactType.GetTypeById(typeId);
        }
        DropDownList cmbType = (DropDownList)e.Row.FindControl("cmbType");
        if (cmbType != null)
        {
            cmbType.DataSource = contactTypes;
            cmbType.DataTextField = "TypeName";
            cmbType.DataValueField = "Id";
            cmbType.DataBind();
            cmbType.SelectedValue =
              grdContact.DataKeys[e.Row.RowIndex].Values[1].ToString();
        }
    }
    if (e.Row.RowType == DataControlRowType.Footer)
    {
        DropDownList cmbNewType = (DropDownList)e.Row.FindControl("cmbNewType");
        cmbNewType.DataSource = contactTypes;
        cmbNewType.DataBind();
    }
}
- Insert data: I have initialized the
GridView control with the DataTable, and also have some values filled in the footer dropdownlist, cmbNewType. Except Id, I have put FooterTemplate for every column because all the field are available. Clicking on "Insert" will enter data in your database table.
protected void grdContact_RowCommand(object sender, GridViewCommandEventArgs e)
{
    ContactTableAdapter contact = new ContactTableAdapter();
    bool flag= false;
    if (e.CommandName.Equals("Insert"))
    {
        TextBox txtNewName =
          (TextBox)grdContact.FooterRow.FindControl("txtNewName");
        CheckBox chkNewActive =
          (CheckBox)grdContact.FooterRow.FindControl("chkNewActive");
        DropDownList cmbNewType =
          (DropDownList)grdContact.FooterRow.FindControl("cmbNewType");
        DropDownList ddlNewSex =
          (DropDownList)grdContact.FooterRow.FindControl("ddlNewSex");
        if (chkNewActive.Checked) flag = true; else flag = false;
        contact.Insert(txtNewName.Text, ddlNewSex.SelectedValue,
                       cmbNewType.SelectedValue, flag);
        FillGrid();
    }
}
- Update data: In the case of data update, we do the same things as the insert. In the case of insert, I always took the footer row, but in the case of update, I take the current
RowIndex or the selected RowIndex. Click on Edit first, then call RowEditing, then the update and cancel options come.
protected void grdContact_RowUpdating(object sender, GridViewUpdateEventArgs e)
{
    ContactTableAdapter contact = new ContactTableAdapter();
    bool flag = false;
    Label lblId = (Label)grdContact.Rows[e.RowIndex].FindControl("lblId");
    TextBox txtName = (TextBox)grdContact.Rows[e.RowIndex].FindControl("txtName");
    CheckBox chkActive =
      (CheckBox)grdContact.Rows[e.RowIndex].FindControl("chkActive");
    DropDownList cmbType =
      (DropDownList)grdContact.Rows[e.RowIndex].FindControl("cmbType");
    DropDownList ddlSex =
      (DropDownList)grdContact.Rows[e.RowIndex].FindControl("ddlSex");
    if (chkActive.Checked) flag = true; else flag = false;
    contact.Update(txtName.Text, ddlSex.SelectedValue,
                   cmbType.SelectedValue, flag,Convert.ToInt32(lblId.Text));
    grdContact.EditIndex = -1;
    FillGrid();

}
protected void grdContact_RowEditing(object sender, GridViewEditEventArgs e)
{
    grdContact.EditIndex = e.NewEditIndex;
    FillGrid();
}
protected void grdContact_RowCancelingEdit(object sender,
                          GridViewCancelEditEventArgs e)
{
    grdContact.EditIndex = -1;
    FillGrid();
}
- Deleting data: Now, you may need to delete data. The
GridView calls RowDeleting for the delete event.
protected void grdContact_RowDeleting(object sender, GridViewDeleteEventArgs e)
{
    ContactTableAdapter contact = new ContactTableAdapter();
    int id = Convert.ToInt32(grdContact.DataKeys[e.RowIndex].Values[0].ToString());
    contact.Delete(id);
    FillGrid();
}
Points of Interest
So, now you have a DatGrid that is editable? Do you want to use CSS to give an excellent look of your grid? Just go to this link for a GridView CSS.
Happy coding
History
I was working on an admin panel in one of my projects, and saw that I needed many add, delete, and update operations for that panel. Now, I can easily solve that problem without a lot of programming by using an editable GridView.
Software engineer with broad experience in enterprise application development, product deployment automation, software test & test automation, application & system management, and manage big projects and team using proven agile technologies.
Passionate on Microsoft technologies, developed solutions using C#, .net (1.1/2.0/3.5/4), SQL Server (2005/2008). Work on Powershell, SSRS, SSIS, WPF, Ajax, WCF, JQuery.
Develop innovative application with cutting edge technologies always boosting inside.


 General
  News
News  Suggestion
  Question
  Bug
Bug  Answer
  Joke
Joke  Praise
  Rant
Rant  Admin
Admin 


