Introduction
I am somehow sure that most of us have some time in their software development career, come across the need to skip the Windows login screen, for instance an installer class making some changes that require a Windows restart. Well, that's exactly what I will demonstrate in a very simple way in this article... rebooting and logging into Windows XP using C# (.NET 2.0).
Background
We will be making use of System.Windows.Forms, and Microsoft.Win32 namespaces for our purpose. But before we go into that, let's see how Windows automatic login works. If you have used TweakUI, you must be aware that it offers an option for automatic login. Now TweakUI and many other such applications make a very simple but hidden modification that saves the login info and the user is not required to provide it to Windows next time s/he logs in.
This change although minor, is hidden in the Windows registry, yes that's where the user name and password will get saved. The exact location is :
SOFTWARE\Microsoft\Windows NT\CurrentVersion\Winlogon
All we have to do here is to enter some registry values and viola! But alas, this ease comes at a price, your password will be stored in the registry as 'plain text', which might become a security issue. But nevertheless, let's demonstrate the automatic login now.
Windows expects three string values at the registry location stated above. These three string values are :
DefaultUserName DefaultP<code>assword AutoAdminLogon
The key names are pretty self explanatory, i.e. DefaultUseName is where we are going to store our user name, then is the password and then, there's the AutoAdminLogon key, which too is of type string but Windows valid values for this key are 0 or 1.
0 - Auto login disabled 1 - Auto login enabled
Now we are probably ready to write this pretty small program! We will be making a Windows form and a simple class that uses Microsoft.Win32 namespace to write our values to the Windows registry, and THAT will pretty much be all we need to do to make it work!
(Take really good care while you play with Windows registry, do not tamper around because there is a high probability of destabilising your system, so let me reiterate 'be careful').
Using the Code
Create a Windows Forms application and title it WinAutoLogin. Leave everything else at its default state. First of all, let's add a class named RegistryWriter to your project, by right clicking on the top most (solution) node, and selecting Add Class. We will write two methods in this class, to add and remove registry entries. This class holds our sample application's core functionality, the rest is just user interface. Below is the class code with explanatory comments.
using System;
using System.Collections.Generic;
using System.Text;
using Microsoft.Win32;
namespace WindowsAutoLogin
{
class RegistryWriter
{
public void WriteDefaultLogin(string usr, string pwd)
{
RegistryKey rekey = Registry.LocalMachine.CreateSubKey
("SOFTWARE\\Microsoft\\Windows NT\\CurrentVersion\\Winlogon");
if (rekey == null)
System.Windows.Forms.MessageBox.Show
("There has been an error while trying to write to windows registry");
else
{
rekey.SetValue("AutoAdminLogon", "1");
rekey.SetValue("DefaultUserName", usr);
rekey.SetValue("DefaultPassword", pwd);
}
rekey.Close();
}
public void RemoveDefaultLogin()
{
RegistryKey rekey = Registry.LocalMachine.CreateSubKey
("SOFTWARE\\Microsoft\\Windows NT\\CurrentVersion\\Winlogon");
if (rekey == null)
System.Windows.Forms.MessageBox.Show("Registry write error");
else
{
rekey.DeleteValue("DefaultUserName", false);
rekey.DeleteValue("DefaultPassword", false);
rekey.DeleteValue("AutoAdminLogon", false);
}
rekey.Close();
}
}
}
Now that we have made our class for registry entries, let's add some components to our Windows form, to make it look more like a login form. So add three labels, three text boxes and three buttons to the one and only Windows form that's already present in our project.
Leave the names of button and label controls at their default value. Names of the TextBox controls however should be : txtWinUserName for Windows username text box, txtWinPassword for password text box and txtWinPassword2 for Verify Password text box. Well, if you choose to name them something else, you certainly can but do not forget then to reflect that change in the code as well.
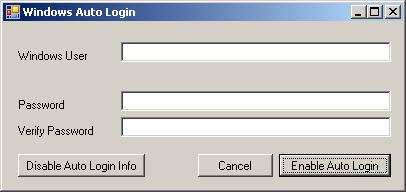
Set the PasswordChar property to '#' for txtWinPassword and txtWinPassword2, you also might want to set the TabIndex properties of the controls on the form if you are an aesthetic, well I did. So, after adding and modifying the controls properties, our form is now likely to look like:

As you can see, I have changed the labels text property to:
- Windows User
- Password
- Verify Password
And the buttons text properties to:
button1.Text = Enable Auto Login button2.Text = Cancel button3.Text = Disable Auto Login Info
Now dear reader, the forms appearance is in place. Our next step will be to add a button click event handler to button1, the 'Enable Auto Login' button. For that, simply double click on the button in your designer. This should open the code window, Visual Studio will automatically add the skeleton code for this button's click event. Let's add our code to this click event:
private void button1_Click(object sender, EventArgs e)
{
if (!txtWinPassword.Text.Equals(txtWinPassword2.Text))
{
MessageBox.Show("Password verification failed,
Please enter Password/Verify Password");
this.DialogResult = DialogResult.None;
}
else
{
RegistryWriter rw = new RegistryWriter();
rw.WriteDefaultLogin(txtWinUserName.Text, txtWinPassword.Text);
MessageBox.Show("User configured for autologin.");
}
}
Ok now, 'Enable Auto Login' is done, but you don't want to leave your precious computer in this automatic login state for ever, so let's put some life into the 'Disable Auto Login' button as well, double click the 'Disable Auto Login' button in the designer. The code window appears, type in the following lines :
private void button3_Click(object sender, EventArgs e)
{
RegistryWriter rw = new RegistryWriter();
rw.RemoveDefaultLogin();
MessageBox.Show("Automatic login info removed.");
}
We are almost done, the only thing left is the Cancel button, so follow the same procedure, go to the Visual Studio designer, double click on 'Cancel' button (button2) this time, which should open the code window and type the following:
private void button2_Click(object sender, EventArgs e)
{
this.Dispose();
}
Congratulations! This is it. You, my friend, have created a simple application that can take a user name/password pair, and tell Windows to automatically log you in instead of prompting. This is a fairly simple operation, but I hope it is useful. Have a nice day.
This member has not yet provided a Biography. Assume it's interesting and varied, and probably something to do with programming.


 General
  News
News  Suggestion
  Question
  Bug
Bug  Answer
  Joke
Joke  Praise
  Rant
Rant  Admin
Admin 


 good job