Introduction
This article describes UITestBench, a small but efficient library to implement User-Interface tests that can be run with NUnit or any other unit test framework. The source code provided with this project, a Visual Studio 2005 solution, is split into three parts/projects:
- A small sample application
- The UITestBench classes
- Two NUnit test cases for the demo application using the UITestBench
Requirements
The following requirements/assumptions were considered during the development of the UITestBench:
- The application under test (AUT) is written in pure .NET.
- The AUT does not need to be developed with UI testing in mind.
- The AUT need not be modified for implementing/running the tests.
- The AUT shall not be dependent on any test classes (so, a release version can also be tested).
- The UITestBench library shall be independent of the application under test and the Unit Test framework.
The following UML diagram shows the dependencies between the different parts of the project:
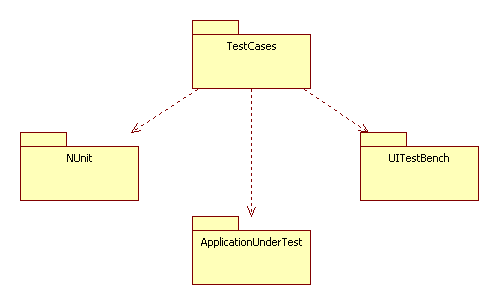
It can be seen that the requirements are met as the diagram shows the AUT is not dependent on any test classes or other packages, and the UITestBench is independent of the NUnit framework and the AUT.
Tasks
In order to perform a UI test, the following tasks need to be implemented:
- Launching the AUT from within a test case.
- Scanning the available UI elements of the application (buttons, menu items, lists, etc...).
- Performing actions on these elements.
- Ensure the application is shut down when the test case ends.
The first and the last step can either be performed for every test case, or once for a number of test cases.
The following UML sequence diagram shows how a minimal case may look like:

Launching the application under test
Applications using Windows Forms have to be run in an STA thread apartment (for more details, see MSDN). Usually, this is done by applying the STAThreadAttribute to the application's Main method:
[STAThread]
static void Main() {
...
}
However, when invoking the application from within a unit test, one cannot be sure what the actual thread apartment state is. But, this is no problem. As we need to create a new thread for running the application anyway (the original test thread is used for running the commands (the test case) against the application in the new thread), we simply have to set up this thread as an STA thread. This is done as follows:
public void StartApplication(string assemblyName, object args)
{
Assembly assembly = Assembly.Load(assemblyName);
if (assembly != null)
{
uiThread = new Thread(new ParameterizedThreadStart(this.Execute));
uiThread.TrySetApartmentState(ApartmentState.STA);
uiThread.Start(new ApplicationStartInfo(assembly, args));
}
else
{
throw new Exception("Assembly '" + assemblyName +"' not found!");
}
}
In the constructor of the thread, a new delegate is passed as entry point for the thread. The Execute method that is passed as a delegate method invokes the application's main-method by using the EntryPoint property of the Assembly-Type object that is passed as a parameter. Actually the object passed as a parameter is a helper class ApplicationStartInfo, which contains the assembly object to use as well as an argument object (e.g., as string[]) that is passed to the application's main-method.
private void Execute(object param)
{
    Console.WriteLine("UIExecute ThreadId: " +
                      Thread.CurrentThread.ManagedThreadId);

    Application.ThreadException += new
      ThreadExceptionEventHandler(Application_ThreadException);

    ApplicationStartInfo startInfo = (ApplicationStartInfo)param;

    Assembly ass = startInfo.AssemblyToStart;
    if (ass.EntryPoint.GetParameters().Length == 1)
    {
        ass.EntryPoint.Invoke(null, new object[] { startInfo.Arguments });
    }
    else
    {
        ass.EntryPoint.Invoke(null, new object[] { });
    }
}
So, launching the application from within the test fixture's SetUp method is as easy as this:
[SetUp]
public void SetUp()
{
myTestBench = new UITestBench();
myTestBench.StartApplication("FlexRayReplayScriptGenerator",
new string[] { });
Thread.Sleep(2000);
}
Scanning the available UI elements
Once the application is started and the first UI action can be invoked by the unit test (see next section), the open forms of the application have to be scanned for available UI controls. How do we get access to the open forms of the application? This is much easier than expected. One can simply use the static OpenForms property of the Application class:
foreach (Form openForm in Application.OpenForms)
{
string formId = formToScan.GetType().Name;
ScanUIElementsOfForm(openForm, formId);
}
The method ScanUIElementsOfForm now does the following steps:
- Creates a dictionary that will contain the scanned elements accessible via a unique ID,
- Calls
ScanUIElementsOfControl to recursively scan the elements of the form (which also is of type Control), - And replaces the old elements of the form (if scanned before) with the newly scanned elements.
private void ScanUIElementsOfForm(Form formToScan, string formId)
{
IDictionary<string,> newlyScannedElements = new Dictionary<string,>();
ScanUIElementsOfControl(formToScan, newlyScannedElements,
formToScan.GetType().Name, formToScan.GetType().Name);
foreach (string key in newlyScannedElements.Keys)
{
newlyScannedElements[key].OwningForm = formToScan;
Console.WriteLine(key);
}
if (uiForms.ContainsKey(formId))
{
uiForms.Remove(formId);
}
uiForms.Add(formId, new UIFormInfo(formToScan.Text, newlyScannedElements));
}
For each scanned element, an UIElementInfo object is created, which contains a WeakReference to the scanned element and to the owning form. The latter is required for being able to invoke actions on the element. For each scanned form, a UIFormInfo object is created, which contains the UIElementInfo objects of the form. The following class diagram shows this structure:
The .NET class WeakReference is used to store the references to the scanned forms and elements, as otherwise, these would be prevented from being collected by the .NET garbage collector even after the dialogs have been closed. A normal, strong reference, e.g., by assigning an object to a variable, prevents the referenced object from being collected. However, when there are no other strong references to the object, the target becomes eligible for garbage collection even though it still has a weak reference. So, by using weak references, the UI test does not interfere with the natural way the application's garbage collection would behave.
The UIElementInfo class allows access to the WeakReferences only via the corresponding properties which include a check if the referenced object is still alive. If this is not the case, an exception is thrown and the test case will fail.
The method ScanUIElementsOfControl used in the above method recursively adds all the available child controls of the passed control to the dictionary. Therefore (and, of course, for being able to build a test case), each element must have a unique ID. This unique ID (unique within a form) is constructed using the following rules:
- If the
AccessibleName property of a control is a string longer than 0, it is used as key. - Otherwise, the
Text property is used if it is not null and longer than 0.
If this key is already used by another control (e.g., if it has the same AccessibleName), the complete path to the control (via all the parent controls) is taken as key. This is always unique as an index is assigned to each control. For better understanding, the path name of a control is constructed from this index and the type name of the control.
private void ScanUIElementsOfControl(Control control,
IDictionary<string,> uiElements, string path, string parent)
{
int itemIdx = 0;
foreach (Control childControl in control.Controls)
{
string myPath = path + "/" + childControl.GetType().Name +
"[" + itemIdx + "]";
string key = myPath;
if (childControl.AccessibleName != null &&
childControl.AccessibleName.Length > 0)
{
key = parent + "/" + childControl.AccessibleName;
}
else if (childControl.Text != null && childControl.Text.Length > 0)
{
key = parent + "/" + childControl.Text;
}
if (!uiElements.ContainsKey(key))
{
uiElements.Add(key, new UIElementInfo(childControl, key));
}
else
{
uiElements.Add(myPath, new UIElementInfo(childControl, myPath));
}
ScanUIElementsOfControl(childControl, uiElements, myPath,
childControl.GetType().Name);
itemIdx++;
}
ToolStrip strip = control as ToolStrip;
if (strip != null)
{
ScanToolStripItems(strip.Items, uiElements, path, strip.Text);
}
}
Finally, it is checked if the given control is a ToolStrip as the foreach loop does not work for ToolStrips because for these, the Controls property always returns an empty collection. As the ScanToolStripItems method works similar, it is not elaborated in more detail at this point.
For being able to construct the test cases easily, the keys of the scanned elements are written to the console. So, when using the NUnit GUI, we can easily see the keys in the "Console.Out" tab. For the demo application, the elements of the main form are identified using the following keys:
Form1/SplitContainer[0]
Form1/SplitContainer[0]/SplitterPanel[0]
Form1/SplitContainer[0]/SplitterPanel[0]/ListBox[0]
Form1/SplitContainer[0]/SplitterPanel[1]
Form1/SplitContainer[0]/SplitterPanel[1]/ListBox[0]
Form1/toolStrip1
toolStrip1/Merge
Form1/menuStrip1
menuStrip1/File
File/Open text file 1...
File/Open text file 2...
File/
File/Exit
As the search for UI elements needs to be performed each time a new form is opened, the algorithm can either be called manually from within the test case, or called when the access of a UI element fails, that is the UI element ID is not found. If the element is still not found after the rescan, an exception is thrown and the test case fails.
Performing UI actions
For different types of UI elements, different actions can be performed. The UITestBench offers several convenience methods for accessing the most frequently occurring actions, e.g., clicking a button, or setting a text in a text box. Of course, it is easy to add more convenience methods if some action is needed frequently in your application. The following methods are provided:
public void PerformClick(String formKey, String itemKey) public void SetText(String formKey, String itemKey, string text) public void SetSelectedIndex(String formKey, String itemKey, int index)
For performing an action, the ID of the form and the unique ID of the UI element within the form have to be provided. Depending on the desired action, additional parameters (e.g., the text to be set) have to be passed. Internally, these methods use a delegate to invoke the action on the related UI element, as under some circumstances (dependent on how the application is started), an "Illegal Cross Thread Operation" exception is thrown when a control is called from a different thread than it was created on. Just Google for "illegal cross thread C#" to get more info about this problem.
Dealing with external dialogs
One last problem when implementing a UI unit test is the occurrence of external, that is not user implemented, or even not .NET based, dialogs. A typical example for such a dialog is the "Open File" dialog, which is used by the demo application, too. An easy way to deal with such dialogs, as long as they are not too complex, is to send keystrokes to the dialog by using the SendKeys class. So, to open the file dialog, select a file, and open it. Only the following steps are required for the demo application, which uses the standard .NET file dialog:
myTestBench.PerformClick("Form1", "File/Open text file 1...");
SendKeys.SendWait("file1.txt");
SendKeys.SendWait("{ENTER}");
Finishing the test
When a test case is finished, NUnit calls the TearDown method. This is now used to call the TerminateApplication method of the test bench which ensures that the started application is closed.
[TearDown]
public void TearDown()
{
    myTestBench.TerminateApplication();
}

public void TerminateApplication()
{
    Console.Write("Forcing application to shut down " +
                  "if it has not terminated already....");
    if (uiThread != null && uiThread.IsAlive)
    {
        Console.WriteLine("Done!");
        uiThread.Abort();
    }
    else
    {
        Console.WriteLine("not required!");
    }
}
Limitations
Currently, it is not possible to have two open forms of the same type as the type name is used as a unique key. This could be changed by simply appending an index to duplicate types. However, this is not required for this demo project or simple applications.
Using the code
The download contains a single Visual Studio 2005 Solution which is split up into three different projects: the demo application, the test bench framework, and the test case implementation. After opening the solution with Visual Studio, the demo application is set as the Start project, i.e., it can be started by simply pressing F5. To execute the test cases, you have to open "UITestDemoApp_UITest.dll", which is contained in the folder "UITestDemoApp_UITest\bin\Debug", with the NUnit GUI.
Conclusion
This project has shown how it is possible to build a simple but pretty useful UI testing framework based on the standard .NET framework. The major points of interest hereby are the access to the open forms using the Application.OpenForms property, the execution of the application under test in a separate STA type thread, the collection of the UI elements using weak references, as well as the invocation of the UI elements using delegates to prevent an invalid cross thread operation. Based on this basic framework, it is easy to implement additional UI testing functionality to tailor this project to specific needs. This is perfect for testing small to medium .NET applications without having to buy expensive and/or complex external solutions.
History
- [03.04.2008] - 1.0 - Initial release.


 General
  News
News  Suggestion
  Question
  Bug
Bug  Answer
  Joke
Joke  Praise
  Rant
Rant  Admin
Admin 


