Introduction
Java Server Faces is a new exciting technology for developing web applications developed by Java Community Process (JCP), a community of web application experts from different groups like Jakarta Struts, Oracle, Sun, IBM, ATG etc.
JSF technology provides standard APIs and tag libraries required to build web-based user interfaces. JSF defines a set of JSP tags that generate HTML form elements that can be bound to Java Bean properties.
JSF Tag Libraries
Tags in JSP represents a task or an action that we want to perform in a page. A set of tags represent a Tag library. In JSF, two categories of tag libraries are available :
- JSF Core Tag Libraries
- JSF HTML Tag Libraries
JSF Html Tags
The html_basic tag library defines tags for representing common HTML user interface components. The HTML components are text fields, buttons, form etc. HTML tags can be divided into the following categories:
| Inputs | (inputText, inputTextarea) |
| Outputs | (outputText, outputLabel) |
| Commands | (commandButton) |
| Selections | (selectOneRadio, selectOneListbox, selectOneMenu for radio buttons, list boxes, menu etc) |
| Layouts | (panelGrid) |
| Data table | (dataTable) |
| Errors and messages | (message, messages) |
Standard JSF HTML tags are used to represent HTML form controls and other basic HTML elements. These controls display data or accept data from the user. This data is collected as part of a form and is submitted to the server when the user clicks a button. Out of these tags, we will focus on selectOnemenu tag in this article.
h:selectOneMenu
It displays its child items in a listbox and the number of items displayed is always one. It displays a <select> element with the size attribute set to 1. All of its items configured by child UISelectItem or UISelectItems components are rendered as <option> elements.
There are following steps to create a web application in JSF:
- Create user interface components (JSP files)
- Create manage bean
- Write navigation rules
- Compile the application
- Deploy and test the application
Note: We assume that tomcat, JSF implementation and JDK is already installed on a computer.
Creating Web Application
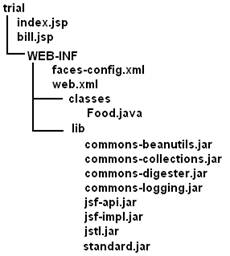
Let's create a directory trial under the apache-tomcat-6.0.14\webapps folder. Trial is any dummy name for our application. Then create the WEB-INF directory under apache-tomcat-6.0.14\webapps\trial. Also create classes and lib directories under apache-tomcat-6.0.14\webapps\trial\WEB-INF folder.
In all, our trial web application will consist of the following files and directories:
Create file web.xml under apache-tomcat-6.0.13\webapps\trial\WEB-INF with the following contents:
web.xml
='1.0'='UTF-8'
<!DOCTYPE web-app PUBLIC
"-//Sun Microsystems, Inc.//DTD Web
Application 2.3//EN"
"http://java.sun.com/dtd/web-app_2_3.dtd">
<web-app>
<servlet>
<servlet-name>Faces
Servlet</servlet-name>
<servlet-class>javax.faces.webapp.FacesServlet</servlet-class>
<load-on-startup> 1
</load-on-startup>
</servlet>
<servlet-mapping>
<servlet-name>Faces
Servlet</servlet-name>
<url-pattern>/faces/*</url-pattern>
</servlet-mapping>
</web-app>
The Faces servlet is the engine of all JSF applications. Each JSF application has its own Faces servlet and it builds a component tree of the JSP page whose control fires an event. It also creates an Event object and passes it to any registered listener. An event fired by a web control on the client browser is encapsulated in an HTTP request. All requests that need Faces servlet processing must be directed to this servlet. To invoke the Faces servlet with every HTTP request, use a servlet-mapping element in the deployment descriptor to map a particular URL pattern with the Faces servlet. The servlet element identifies the FacesServlet, which processes the lifecycle of the application. The load-on-startup element has a value of true, which indicates that the FacesServlet should be loaded when the application starts up.
The servlet-mapping element lists each servlet name defined in the servlet element and gives the URL path to the servlet. Tomcat will map the path to the servlet when a request for the servlet is received.
Copy JSF 1.1 library: Copy jsf-api.jar, jsf-impl.jar, commons-beanutils.jar, commons-collections.jar, commons-digester.jar, commons-logging.jar from C:\jsf-1.1\lib folder into apache-tomcat-6.0.14\webapps\trial\WEB-INF\lib directory.
Note: We assume that JSF implementation files are copied in the C:\jsf-1.1 folder.
Copy standard.jar and jstl.jar from C:\apache-tomcat-6.0.14\webapps\examples\ WEB-INF\lib folder into apache-tomcat-6.0.13\webapps\trial\WEB-INF\lib directory.
Usage of these Jar Files
| jsf-api.jar: | Contains the javax.faces.* API classes |
| jsf-impl.jar: | Contains the implementation classes of the JSF Reference Implementation |
| jsf-ri.jar | Contains the implementation classes of the JavaServer Faces RI |
| jstl.jar | Required to use JSTL tags and referenced by JavaServer Faces reference implementation classes |
| standard.jar | Required to use JSTL tags and referenced by JavaServer Faces reference implementation classes |
| commons-beanutils.jar | Utilities for defining and accessing JavaBeans component properties |
| commons-digester.jar | For processing XML documents |
| commons-collections.jar | Extensions of the Java 2 SDK Collections Framework |
| commons-logging.jar | A general purpose, flexible logging facility to allow developers to instrument their code with logging statements |
Make a file index.jsp file in trial folder with following contents :
index.jsp
<%@taglib uri="http://java.sun.com/jsf/html" prefix="h" %>
<%@taglib uri="http://java.sun.com/jsf/core" prefix="f" %>

<html>
<head>
<title>
</title>
</head>
<body>
<f:view>
  <h:form id="FastFood">
<h:outputText
value="Select your food "/>
<h:selectOneMenu
id="food" value="#{FoodBean.foodName}">
<f:selectItem
itemValue="pizza" itemLabel="Pizza" />
<f:selectItem
itemValue="burgar" itemLabel="Burgar" />
<f:selectItem
itemValue="chowmein" itemLabel="Chowmein" />
<f:selectItem
itemValue="hotdog" itemLabel="Hot Dog" />
</h:selectOneMenu>
  <h:commandButton action="submit" value="Submit" />
  </h:form>
</f:view>
</body>
</html>
There are two JSP custom tag libraries for expressing user interface (UI) components within a JSP page and for wiring components to server-side objects. To use the JSF tag libraries, we must import them with taglib directives. The first two lines are the directives which specify the location to find the JSF tags that defines HTML elements and core JSF tags respectively.
Syntax
<%@ taglib prefix="h" uri="http://java.sun.com/jsf/html" %>
We can choose any name for the prefixes. The convention is f and h, for the core and HTML libraries, respectively.
The tag <h:form id="FastFood"> generates HTML code for the form.
The tag <h:outputText value=" Select your food "/> generates "Select your food " message on the browser.
The tag <h:selectOneMenu id="food" value="#{FoodBean.foodName}"> displays a combo box with four options: Pizza, Burgar, Chowmein and Hot Dog. Whatever item is selected by the user is assigned to foodName property of the java bean named: FoodBean.
Make another file bill.jsp in trial folder with following contents:
bill.jsp
<%@ taglib uri="http://java.sun.com/jsf/html" prefix="h" %>
<%@ taglib uri="http://java.sun.com/jsf/core" prefix="f" %>
<html>
<head>
<title>
</title>
</head>
<body>
<f:view>
<h3>
<h:outputText
value="You have selected " />
<h:outputText
value="#{FoodBean.foodName}" /> <br/>
<h:outputText
value="and your bill is " />
<h:outputText
value="#{FoodBean.billAmt}" /> <br/>
</h3>
</f:view>
</body>
</html>
The tag <h:outputText value="#{FoodBean.foodName}" /> displays the value binded with the foodName property of the FoodBean java bean. For displaying the value of the foodName property, getFoodName() method will be executed defined in FoodBean java bean.
Similarly, the tag <h:outputText value="#{FoodBean.billAmt}" /> displays the value binded with the bilAmt property of the FoodBean javabean. Before displaying the value of billAmt property, getBillAmt() method in javabean will be executed first.
Now we will create a bean that will hold the data sent by the form. The JSF managed bean is a JavaBean component whose property and methods are used by JSF components.
In the classes folder make Managed Bean: Food.java with following contents :
Food.java
public class Food {
    private String foodName;
    private Integer billAmt=null;

    public String getFoodName() {
        return foodName;
    }
    public void setFoodName(String name) {
        foodName = name;
    }

    public Integer getBillAmt() {
        calc();
        return billAmt;
    }
    public void calc()
    {
        if(foodName.equals("pizza"))setBillAmt(80);
        if(foodName.equals("burgar"))setBillAmt(30);
        if(foodName.equals("chowmein"))setBillAmt(40);
        if(foodName.equals("hotdog"))setBillAmt(25);
    }
    public void setBillAmt(Integer amt) {
        billAmt = amt;
    }
}
As we can see in the above example, the JavaBean compenent that the getBillAmt() method is in is invoked while displaying the value of billAmt property, and invoking the calc() method, which is assigning the value to the billAmt property as per according to the foodName property set by the user through index.jsp page
Make a file faces-config.xml in WEB-INF folder with following contents:
faces-config.xml
='1.0'='UTF-8'
<!DOCTYPE faces-config PUBLIC
"-//Sun Microsystems, Inc.//DTD JavaServer Faces Config 1.1//EN"
"http://java.sun.com/dtd/web-facesconfig_1_1.dtd">
<faces-config>
<navigation-rule>
<from-view-id>/index.jsp</from-view-id>
<navigation-case>
<from-outcome>submit</from-outcome>
<to-view-id>/bill.jsp</to-view-id>
</navigation-case>
</navigation-rule>
<managed-bean>
<managed-bean-name>FoodBean</managed-bean-name>
<managed-bean-class>Food</managed-bean-class>
<managed-bean-scope>request</managed-bean-scope>
</managed-bean>
</faces-config>
In above XML file, we first define the navigation rule that when we get the outcome as submit, then navigate from index.jsp page to the bill.jsp page. The submit button in index.jsp creates the outcome: submit when clicked.
Then we are defining the managed bean which is referred in the application as FoodBean and its class name is Food.class.
Compiling the Java Bean Application
Open the command prompt and go to the classes folder of our application (trial) and give following command :
C:\apache-tomcat-6.0.14\webapps\trial\WEB-INF\classes> javac Food.java
To test the application run tomcat and type http://localhost:8080/trial/index.jsp. The browser displays the following screen:

When we select a type of food and press Submit button, we get following output :
B.M.Harwani is founder and owner of Microchip Computer Education (MCE), based in Ajmer, India that provides computer education in all programming and web developing platforms. He graduated with a BE in computer engineering from the University of Pune, and also has a 'C' Level (master's diploma in computer technology) from DOEACC, Government Of India. Being involved in teaching field for over 16 years, he has developed the art of explaining even the most complicated topics in a straight forward and easily understandable fashion. He has written several books on various subjects that includes JSP, JSF, EJB, PHP, .Net, Joomla, jQuery and Smartphones. To know more, visit http://bmharwani.com/blog


 General
  News
News  Suggestion
  Question
  Bug
Bug  Answer
  Joke
Joke  Praise
  Rant
Rant  Admin
Admin 


