Part 2 of "RESTful Web Services: A Quick-Start How-To Guide" explores foundational issues in coding RESTful operations, including Basic Authentication and Exception handling. Along the way I'll share with you multiple real-world coding tips and workarounds.
Introduction
As a teenager, one of my favorite TV shows was "The Wild Wild West." The show's description goes like this, "... a 60 minute western action series on CBS that was like no other. Special Agents James West and Artemus Gordon were spies for President Ulysses S. Grant shortly after the civil war. In every other way, they could be easily confused with James Bond of the 20th century. They had a "high-tech" (for its day) railroad car stocked with a compliment of advanced weapons. James West especially seemed to woo every beautiful woman he encountered. The agents' typical mission involved saving the United States from some disaster or from being taken over by some evil genius." Just in case you're curious or are a fan like me, here's a link to the
first part of a full episode on YouTube.
What do RESTful services have to do with the Wild Wild West? In my mind, lots. First, there's the "wildness" part. As even a brief comparison between service provider APIs will show you, all RESTful services are not created equal. Each service provider, while loosely conforming to the state representation paradigm, creates requests and responses in formats that suit their individual styles and predilections. The onus for implementing the client side of the service falls on the developer. Then there's the inventive side of things. Just like special agent Artemus Gordon, a RESTful client developer needs gadgets, inventiveness, and a continual awareness that she's dealing with an informal (enemy) specification. Plus, on the PowerBuilder side, there's no direct support for integrating with DataWindow technology (yet), so you'll have to invent ways to get data into and out of a display. There's also a need to protect your app against outside issues by wrapping calls in appropriate try catch blocks to handle possible HTTP exceptions in order to keep your app responsive and stable.
In my opinion, without a formal schema and metadata description support, configuring RESTful state service clients will remain an art. I have to admit that I stumbled many times during experiments while writing this article. I tried calling services whose communication format didn't quite match the generally expected format. One service provider expected parameters to be passed and results returned in line-separated text values in the message body instead of formatting data as XML or JSON. After quite a bit of poking and debugging it became apparent PowerBuilder will only generate and interpret message body content formatted as JSON and XML. There is no way to translate from any other format. All the low-level details are handled internally and there is no way to get inside the message to change the format. Another service provider showed their API in terms of JSON data sets, but after hours of experimentation and a little help from engineering, we discovered that the service needed multipart/form-data with the JSON sent as a form parameter. This is not a supported format. So e caveat emptor, make sure the service provider has a ‘traditional' form of RESTful API. Luckily, I believe most of the ‘big boys' with widely used APIs do.
Oh, Those Project Objects!
Before getting into details, a few words about RESTful project objects and generated code. RESTful project objects are designed to be like single shot Derringer pistols; fire one shot, then you have to reload. Each project object is capable of generating one proxy object for one method, period. That means if you are interacting with multiple web methods (GET, POST, PUT and DELETE) you're going to have multiple proxy objects. In addition, each operation, depending on its type, can have up to two referenced .NET value objects, one for the request and one for the response. One nice thing I noticed is that if multiple services rely on the same parameter sets, you can reuse referenced value objects instead of generating superfluous carbon copies. Figure 1 shows how you'd configure the project painter to reference an already-generated assembly. Each reference object is placed in its own assembly inside an identically named namespace. Unfortunately it seems like you can't have multiple value objects in a single assembly or namespace. Figure 2 shows how reference object assemblies appear in the Solution Explorer. Figure 3 shows you the wizard view when choosing an existing value object assembly.
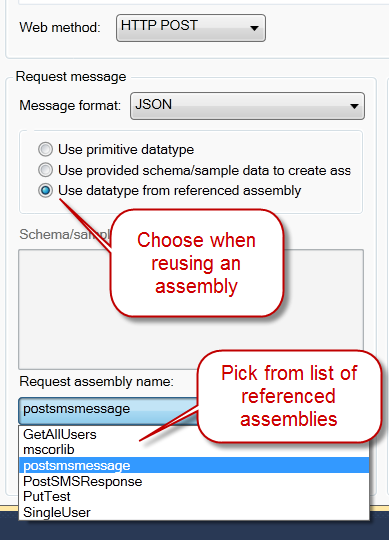
Figure 1: Reusing an already referenced assembly

Figure 2: Referenced object in Solution Explorer
Figure 3: Wizard View: Choosing and existing assembly
Here are a series of tips that I discovered while building my application:
Tip 1: The project object owns its generated proxy object. That means that any modifications you make to it will be lost if you regenerate the proxy. Because I needed to make modifications to the generated code, I adapted the strategy of using project object generation as a starting point only. Once the proxy objects were generated to my liking, I deleted the project object to avoid accidentally nuking my code.
Tip 2: If you have several services that use an identical request object or return the same result structure, you can reuse your value object definitions. Generate once, use many. Just pick them on the wizard or in the project object.
Tip 3: The only door into a new project object is in via the Wizard. This is unlike Classic where there were two doorways into a new project (Wizard or empty project painter page).
Tip 4: Here are a couple of neat XML sample data parsing features: First, if an XML element in the sample dataset has attributes, the attribute values are returned as part of the generated value object. Figure 4 shows a sample response dataset containing attributes; Figure 5 show the corresponding generated value object. Second, as you can see from Figure 6 that nested XML structures becomes separate objects within the generated assembly.
Figure 4: Sample DataSet with Atributes
Figure 5: Value object generated from sample dataset
Figure 6: Nested XML object
With these project object details behind us we can now move on to two important runtime housekeeping needs: return status checking and exception handling.
Checking Return Status
Some services indicate their outcome by returning data in a specific and constant format. Other services indicate their outcome by returning an HTTP status code instead of an XML or JSON embedded status message. Still other services return status conditions wrapped in specially formatted XML or JSON structures. If you need to check a HTTP return status code outcome you'll need to get the status code from the Response object. Here's how: The response object is returned to the proxy in the form of a PBWebHttp.WebMessage object. This object has a StatusCode property of type MessageStatus that holds the response outcome. You can test StatusCode against enumerated values of the WebResponseStatusCode class and branch accordingly. Figure 7 shows a partial list of MessageStatus codes and their corresponding meaning. For a complete listing of HTTP 1.1 code see http://www.w3.org/Protocols/HTTP/HTRESP.html. Listing 1 shows an example of testing a proxy method call status code.
PBWebHttp.WebMessage msg
PBWebHttp.MessageStatus l_msg_status
Try
msg = m_service.GetMessage()
l_msg_status= msg.Status
if l_msg_status.StatusCode = PBWebHttp.WebResponseStatusCode.OK! then
MessageBox('Success! ','call returned OK')
end if
.....
Listing 1: Testing Result Staus Code
Figure 7: MessageStatus codes
Exception Handling
Wizard-generated proxy code does not contain any exception handling logic. Any exceptions that occur are thrown up to the caller for processing. Unhandled, these exceptions become system errors. In the web world, Response status codes in the 400 range indicate client errors; those in the 500 range signal server errors. In WCF 400 and 500 codes raise exceptions.
Best coding practices mandate robust exception handling. Depending on the level of detail you need to report on, you can handle exceptions either at the proxy method caller level or within the proxy method call itself.
RESTful service methods, predicated on HTTP, usually throw a System.Net.WebException. Although the common System.Exception ancestor property Message contains a description of what went wrong, it's more useful to directly test the value of the returned status code. Luckily the WebException contains a reference to the returned Response object which holds the status code. Listing 2 shows an example of testing the status code when a call fails.
catch (System.Net.WebException webex)
System.Net.HttpWebResponse l_resp
l_resp = webex.Response
if l_resp.StatusCode = System.Net.HttpStatusCode.Unauthorized! then
MessageBox('Your Credentials Are Invalid', 'Uid=' + uid + '~r~nPwd=' + pwd )
return Result
end if
Listing 2: Testing the status code
Now that you are aware of housekeeping issues, let's take a look at security concerns.
Basic Authentication
WCF supports various forms of authentication ranging from None up to Digital Certificates. When using Basic Authentication you place your credentials in the user ID and password in request header fields. If HTTP is used, the credentials are encrypted within in a plain text header (however, freely available programs such as Fidder can decrypt SSL). If HTTPS is used, then SSL encryption is applied to all transferred packets. The client/server negotiation algorithm is: (1) Client makes a request; (2) Server responds with a 401 unauthorized response; (3) Client responds with a request including a login header containing a user id and password; (4) The client automatically includes the header in all requests for the duration of the exchange. Figure 8 show the conversation as revealed by Fiddler. For a more detailed discussion see http://www.4guysfromrolla.com/articles/031204-1.aspx
Figure 8: HTTP Authorization Conversation
From the PB WCF perspective, your programming job is to set up the credentials for the exchange. The low-level runtime exchange process is handled internally by the infrastructure. A minor challenge is that from the PowerBuilder coding perspective you're navigating into partially uncharted waters. There is no PowerBuilder documentation on the members of the Sybase.PowerBuilder.WCF.Runtime assembly. However, armed with a basic understanding of WCF and a few minutes to examine the members of the referenced assembly I imagine that you will be able to figure out what to do. Here's the basic algorithm:
- In the constructor of your proxy class, instantiate a WebClientCredential object and set your credentials and authentication type into it. Figure 9 shows the WebClientCredential class and its members (it's just a value object).
a. Set a value for the AuthenticationMode using a value from the AuthenticationMode enumeration. In our case we set the value to Basic!
b. Provide your user ID and password.
- Assign your WebClientCredential object to your WebConnection object. The WebConnection is already instantiated and has the identifier name restConnectionObject. Figure 9 shows this object with the important property.
- Call your service as usual. Be sure to include exception handling code that tests for the 401 HTTP error.
Figure 9: WebClientCredential class
Listing 3 shows a sample RESTful service configured to use Basic authentication.
m_service = create PBWebHttp.RestService("http://phprestsql.sourceforge.net/tutorial/user?firstname={p_first}&surname={p_last}&email={p_email}&company_uid={p_id}", PBWebHttp.WebMessageFormat.Xml!, PBWebHttp.WebMessageFormat.Xml!)
restConnectionObject = create PBWebHttp.WebConnection
restConnectionObject.Endpoint = http:
restConnectionObject.RequestMessageFormat = PBWebHttp.WebMessageFormat.Xml!
restConnectionObject.ResponseMessageFormat = PBWebHttp.WebMessageFormat.Xml!
PBWebHttp.WebClientCredential lsCredential
lsCredential = create PBWebHttp.WebClientCredential
lsCredential.AccessAuthentication = PBWebHttp.AuthenticationMode.Basic!
lsCredential.Password='demo'
lsCredential.Username='p126371rw'
restConnectionObject.ClientCredential = lsCredential
Listing 3
Secure Socket Layer Communication
Specifying and handling encrypted communication over a SSL transport is pretty transparent to the application developer. As you can see in Figure 10, all you need to do is specify the HTTPS protocol in the Project Painter Service URL. The handshake and encryption are handled by the underlying infrastructure as shown in Figure 11.
Figure 10: Setting up SSL communication
Figure 11: SSL Handshake
Conclusion
In addition to calling service methods, the PowerBuilder client-side developer is responsible for configuring authentication and authorization properties prior to making service calls as well writing code to handle server-side errors responses. With a bit of forethought this code can be written in a reusable manner to work in conjunction with project painter-generated proxy classes. With the addition of RESTful web service client-side infrastructure, PowerBuilder .NET clients can now enjoy the same service-oriented interoperability as other .NET languages.
Long Live PowerBuilder!
Yakov Werde is a passionate Certified Sybase Developer and Instructor, Sybase MVP and member of TeamSybase who has been guiding new and experienced PowerBuilder developers to develop the skills they need to succeed on their projects for 15 years. Yakov has been in the forefront of PowerBuilder .NET migration, having worked with, written about and built projects with PowerBuilder .NET since it's earliest release. Yakov's current passions include PowerBuilder .NET with WPF and mobile and cloud computing.
His company eLearnIT LLC helps corporations extend the life of their PowerBuilder applications by providing migration assistance, developer training and project consulting.


 General
  News
News  Suggestion
  Question
  Bug
Bug  Answer
  Joke
Joke  Praise
  Rant
Rant  Admin
Admin 


