Whilst I’m really impressed with Windows Phone 7 as a SmartPhone Operating System and even more impressed with the ease and simplicity with which developers
can produce applications for this new Operating System (it’s basically Silverlight 3 with a few phone-specific tweaks and additions), there are a few omissions
that can make life difficult for developers. One of these omissions is in the MessageBox API,
which offers the following two Show methods:
MessageBoxResult Show(string);
MessageBoxResult Show(string, string, MessageBoxButton);
The problem is that the MessageBoxButton
enumeration only supports the OK and OKCancel values, which means that we’re limited to either an OK button
or an OK and a Cancel button. The YesNo and YesNoCancel enumeration values are not supported.
I’ve just been working on a project where these additional values would have been helpful and in fact, instead of inventing a custom UI, I wanted to be able
to customize the button labels, so I set about creating my own MessageBoxService class (the use of an instance class instead of static methods
was mostly down to which way the wind was blowing!).
User Interface Layers
The following diagram shows the layers required on the user interface:
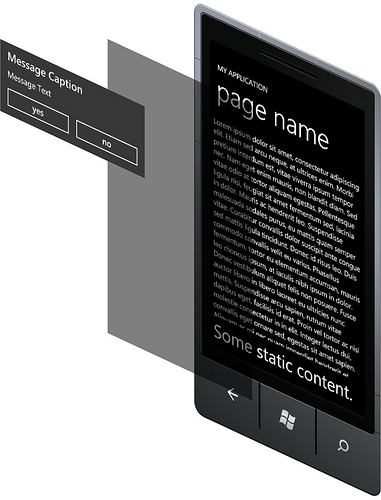
Basically, we need to display a semi-transparent blanking layer over the page content, and then display the message box on top of that. In order to correctly swap colors when the device theme changes there’s actually an extra layer under the message box content, too.
To all intents and purposes the XAML for the user interface (shown above) looks something like this:
 1:  <Grid Background="#7F000000" Grid.RowSpan="2">
 2:      <Grid.RowDefinitions>
 3:          <RowDefinition Height="Auto" />
 4:          <RowDefinition Height="*" />
 5:      </Grid.RowDefinitions>
 6:      <Grid Background="#7F000000">
 7:          <Grid.ColumnDefinitions>
 8:              <ColumnDefinition Width="*" />
 9:              <ColumnDefinition Width="*" />
10:          </Grid.ColumnDefinitions>
11:          <Grid.RowDefinitions>
12:              <RowDefinition Height="Auto" />
13:              <RowDefinition Height="Auto" />
14:          </Grid.RowDefinitions>
15:          <Grid.Projection>
16:              <PlaneProjection />
17:          </Grid.Projection>
18:          <Border Background="{StaticResource PhoneForegroundBrush}"
19:                  Grid.ColumnSpan="2"
20:                  Grid.RowSpan="2" />
21:          <Border Background="#7F000000"
22:                  Grid.ColumnSpan="2"
23:                  Grid.RowSpan="2" />
24:          <StackPanel Grid.ColumnSpan="2" Margin="12,0,12,12">
25:              <TextBlock FontFamily="Segoe WP Semibold"
26:                         FontSize="32"
27:                         Margin="12"
28:                         Text="Message Caption"
29:                         TextWrapping="Wrap" />
30:              <TextBlock FontSize="24"
31:                         Margin="12,0,12,12"
32:                         Text="Message Text"
33:                         TextWrapping="Wrap" />
34:          </StackPanel>
35:          <Button Content="yes" Grid.Row="1" />
36:          <Button Content="no" Grid.Column="1" Grid.Row="1"/>
37:      </Grid>
38:  </Grid>
In actual fact I create the user interface in code so that I can update the number of columns and the column span of the elements according to the number of buttons
being displayed. One of the other things that seemed odd to me with the framework MessageBox.Show methods is that if you only display an OK button,
that button only takes up half of the width of the message box, so I fixed that in my MessageBoxService so that when there is only one button, it stretches to fit.
Adding the Message Box to the Current Page
The next part in the process is to actually inject the user interface for our custom message box into the current page. To achieve this, I keep use
two properties: one to get the PhoneApplicationFrame that holds the application content, and another that is updated every time the message
box is shown which identifies the current PhoneApplicationPage, as shown below.
 1:  public PhoneApplicationFrame RootFrame
 2:  {
 3:      get
 4:      {
 5:          if (null == this._frame)
 6:          {
 7:              this._frame = Application.Current.RootVisual as PhoneApplicationFrame;
 8:          }
 9:
10:          return this._frame;
11:      }
12:  }
 1:  public PhoneApplicationPage CurrentPage
 2:  {
 3:      get
 4:      {
 5:          if ((null == this._page) &&
 6:              (null != this.RootFrame))
 7:          {
 8:              this._page = this
 9:                  .RootFrame
10:                  .GetVisualDescendants()
11:                  .OfType<PhoneApplicationPage>()
12:                  .FirstOrDefault();
13:              if (null == this._page)
14:              {
15:                  this._page = this.RootFrame.Content as PhoneApplicationPage;
16:              }
17:          }
18:
19:          return this._page;
20:      }
21:  }
Note: The GetVisualDescendants method is an extension method that is included in the code download.
Once I’ve got the current page, I then find the first visual descendant of the page that is a Panel, which is invariably a Grid
because of the templates that Visual Studio/Expression Blend provides.
1: private Panel FindRootVisual()
2: {
3: if (null != this.CurrentPage)
4: {
5:
6: return this
7: .CurrentPage
8: .GetVisualDescendants()
9: .OfType<Panel>()
10: .FirstOrDefault();
11: }
12:
13: return null;
14: }
If it is a Grid, I set the Grid.ColumnSpan and Grid.RowSpan attached properties on my own root element (for the message box)
so that it completely covers the page content.
1:
2:
3: if (rootVisual is Grid)
4: {
5: var parent = (Grid)rootVisual;
6: int columnCount = parent.ColumnDefinitions.Count;
7: if (columnCount > 0)
8: {
9: this._rootElement.SetValue(
10: Grid.ColumnSpanProperty,
11: columnCount);
12: }
13:
14: int rowCount = parent.RowDefinitions.Count;
15: if (rowCount > 0)
16: {
17: this._rootElement.SetValue(
18: Grid.RowSpanProperty,
19: rowCount);
20: }
21: }
Once we’ve done all that, it’s simply a matter of adding the root element of the message box user interface to the Children collection of the Panel element.
Animating the Message Box
The normal MessageBox animates in and out using an animation that appears to make the content “swivel” around it’s horizontal center.
To be as consistent as possible I wanted to do the same thing. Fortunately, the awesome Kevin Marshal
has already done the hard work in this respect in his WP7 – Page Transitions Sample
blog post. So, I added two Storyboards that are initialised in the constructor: one for the show animation and one for the hide animation. To the naked eye, the animations
are virtually indistinguishable from the normal MessageBox.
Once the message box user interface is added to the current page, I update the show Storyboard so that each part targets the correct element,
and then start the animation on the first layout.
1:
2: foreach (var timeline in this._showStoryboard.Children)
3: {
4: Storyboard.SetTarget(timeline, this._mbsRoot);
5: }
6:
7:
8: this._mbsRoot.InvokeOnLayoutUpdated(() =>
9: {
10: this._showStoryboard.Begin();
11: });
Note: The InvokeLayoutUpdated method is another extension method that is included in the code download.
Handling the Back Button
The next hurdle to overcome is handling the back button. With a page loaded, pressing the back button would normally navigate backwards through
the page stack, but when a message box is displayed pressing the back button should dismiss the message box instead.
Fortunately, I’ve already got a reference to the current page, so I use this to hook the BackKeyPress event. In the handler I check to make sure
that the message box is open, then cancel the back key press and close the message box.
1:  private void OnBackKeyPress(object sender, CancelEventArgs args)
2:  {
3:      if (true == this.IsOpen)
4:      {
5:          args.Cancel = true;
6:          this.Close();
7:      }
8:  }
Closing the Message Box
Closing the message box is a fairly simple process that is initiated by setting the Result property. The Result property
is a MessageBoxResult property and in the setter
I call the Close method. The close method does a bit of tidying up, makes sure that both storyboards are stopped, updates the target for the hide animation,
and then starts the hide animation. Once the hide animation has completed I raise the Closed event. Each of the buttons has it’s Click event
wired up to an event handler that sets the Result property to the appropriate value.
 1:  private void Close()
 2:  {
 3:      this.IsOpen = false;
 4:      this._showStoryboard.Stop();
 5:      this._hideStoryboard.Stop();
 6:      foreach (var timeline in this._hideStoryboard.Children)
 7:      {
 8:          Storyboard.SetTarget(timeline, this._mbsRoot);
 9:      }
10:
11:      this._hideStoryboard.Completed += this.HideStoryboard_Complete;
12:      this._hideStoryboard.Begin();
13:  }
14:
15:
16:  private void HideStoryboard_Complete(object sender, EventArgs e)
17:  {
18:      if (null != this._hideStoryboard)
19:      {
20:          this._hideStoryboard.Completed -= this.HideStoryboard_Complete;
21:      }
22:
23:      this.RaiseClosed();
24:  }
Using the MessageBoxService
So far I’ve covered the major points of the MessageBoxService implementation, but not now to use it. The
MessageBoxService class exposes a single Show method, a Result property, and a Closed event. You call Show, wait for the Closed event to fire, and then check the value of the Result property as the following code snippet shows.
 1:  private void MessageBoxService_Click(object sender, RoutedEventArgs e)
 2:  {
 3:      this._service.Closed += this.MessageBoxService_Closed;
 4:      this._service.Show(
 5:          this._message.Text,
 6:          this._caption.Text,
 7:          MessageBoxServiceButton.YesNoCancel);
 8:  }
 9:
10:  private void MessageBoxService_Closed(object sender, EventArgs e)
11:  {
12:      this._service.Closed -= this.MessageBoxService_Closed;
13:      this._result.Text = this._service.Result.ToString();
14:  }
You can also customize the button labels (which was one of my original goals) by passing in a List<string> of button labels.
When the MessageBoxService creates the buttons it checks to see if a custom label has been provided and uses that instead. The other labels
are stored in a Resources file to make localization easier.
The following code example shows how to specify custom button labels. Each label is used to replace the corresponding button in the supplied MessageBoxServiceButton enumeration value. In the following example, abort corresponds to yes and the Result property will be MessageBoxResult.Yes, and retry corresponds to no and the Result property will be MessageBoxResult.No.
1:  private void MessageBoxService_Click(object sender, RoutedEventArgs e)
2:  {
3:      this._service.Closed += this.MessageBoxService_Closed;
4:      this._service.Show(
5:          this._message.Text,
6:          this._caption.Text,
7:          MessageBoxServiceButton.YesNoCancel
8:          new List<string> { "abort", "retry", "cancel" });
9:  }
Known Issues
The standard MessageBox has better access to the operating system than us lowly developers do, so there are a couple of things that I wasn’t able to achieve in my
MessageBoxService implementation:
- There is no sound played when the message box is shown. The sound files that the operating system uses have not (yet?) been made publicly available, so I wasn’t able to include this. You could use your own sound, but I opted to go without for now. If you want to add your own sound, or when the Metro sound files are released, you can play a sound by using the XNA
SoundEffect class, as described on MSDN.
- When the system tray is visible, I’ve got no way to blank it out like the standard message box does, so the system tray remains visible. In the application I was working on, the system tray wasn’t visible, so not a big deal for me, and unlikely to be a problem more generally, but it still niggles.
- Similarly, there’s no way to extend the blanker overlay over the application bar, which is provided by the operating system. As a workaround for this, the
MessageBoxService class remembers whether the application bar was visible when it was shown, and then hides it. When it is closed, the application bar is shown again. Again, not an ideal solution, but better than having an enabled application bar.
Tips
A few other things I learned along the way:
- If you want to use a semi-bold font weight for the default Segoe font, you need to actually change the FontFamily to Segoe WP Semibold (it’s used for the title of the message box).
The Code
You can access the code from GitHub: https://github.com/dereklakin/MessageBoxService.
This member has not yet provided a Biography. Assume it's interesting and varied, and probably something to do with programming.


 General
  News
News  Suggestion
  Question
  Bug
Bug  Answer
  Joke
Joke  Praise
  Rant
Rant  Admin
Admin 


 My Vote 5