Note: Article has been updated - see Appendix D - Version 1.4
Contents
Features
- Windows Azure Service Bus Messaging (November 2014)
- WCF Technology
- Virtual Subscriber/Receiver (SessionMode=Allowed, Required; ReceiveMode=ReceiveAndDelete)
- Virtual Publisher/Sender
- Each Subscriber or Receiver is hosted in its own custom AppDomain
- Fire/Send BrokeredMessages (untyped contract)
- Displaying received BrokeredMessages (untyped contract)
- Load/Save and Copy/Paste Message
- ContentTypes: application/soap+msbin1, application/soap+msbinsession1, application/soap+xml, application/xml, application/json, text/plain
- REST Publisher
- Relay Publisher
- ServiceBusTester REST Endpoint
- Virtual Publisher with XSLT message transformation
Introduction
This article is a continuation of my recent article Using Windows Azure Service Bus Messaging, where I described in detail the usage of the Azure Service Bus Messaging by WCF and WF technologies. The ServiceBusTester is a tiny tool for Azure Service Bus Messaging. It is a virtual simulation of the publishers, senders, and consumers of the queues and topics from the Azure Service Bus namespaces. Basically, with this tool you can publish a message to the topic channel, create a subscriber for receiving BrokeredMessages, etc.
The following picture shows its position to the Windows Azure:
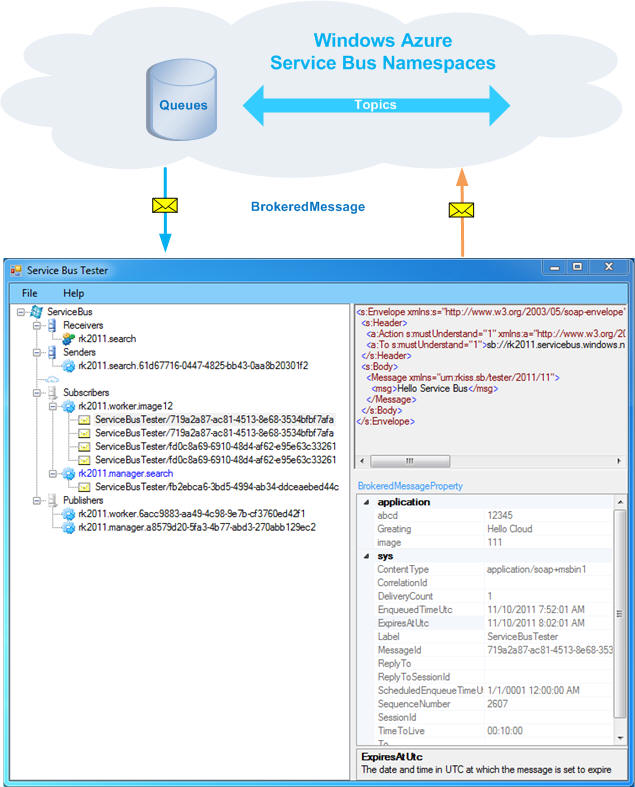
The ServiceBusTester can't change any entity in the Windows Azure Service Bus. Its position is like the well-known and popular WCFTestClient program for testing WCF services. We can create a publisher for a specific topic with an untyped BrokeredMessage and send it to the Azure Service Bus. On the other side, we can create a virtual subscriber (service) for a specific subscription and receive a copy of the BrokeredMessages. It can be done the same way for Queues with virtual senders and receivers.
With this little tool we can troubleshoot a logical connectivity between the providers and consumers of the Service Bus. It can also help to simulate a Publisher/Sender or evaluate a Subscription (Filter and Action)/Queue. I do recommend using a Service Bus Explorer for creating Service Bus entities such as namespace, queues, topics, subscriptions, and rules.
OK, let's describe its concept and design. I am assuming you have a working knowledge of the Windows Azure platform.
Concept and Design
The ServiceBusTester concept is based on providing and consuming untyped messages to/from the Azure Service Bus. The Publisher/Sender and Subscriber/Receiver are based on the WCF technology and they use the following contract for messaging:
[ServiceContract(Namespace = "urn:rkiss.sb/tester/2011/11")]
public interface IGenericOneWayContract
{
    [OperationContract(IsOneWay = true, Action = "*")]
    void ProcessMessage(System.ServiceModel.Channels.Message msg);
}
Note, that the Subscriber/Receiver contract is setup for SessionMode.Required programmatically.
The other conceptual feature is that each consumer (virtual service) to the Service Bus is hosted in its own private AppDomain. This feature allows us to connect and disconnect hosted subscribers or receivers on the fly without impacting each other. From the tool point of view, the Azure Service Bus represents a logical connectivity model between the producers (Publishers/Senders) and consumers (Subscribers/Receivers).
The following picture shows this concept:

As you can see, the ServiceBusTester process has a default (main) AppDomain, where is run WindowsForm, Publishers, Senders, and a Service for incoming messages from all Subscribers/Receivers. NetNamedPipeBinding transport is used for connectivity and passing messages between the virtual services hosted in the different AppDomains and the default AppDomain where is located a Tester Service.
The other "design trick" in this concept is how the BrokeredMessageProperty bag can be displayed in the default AppDomain. As we know, the BMP bag is stored in the message property for consuming by internal channel layers only, therefore it is necessary to copy and transfer it to the default AppDomain as a message header.
ServiceHostActivator
The ServiceHostActivator is a remoting object (derived from MarshalByRefObject) initiated in the custom AppDomain and its responsibility is to host and control a virtual service within its domain. The default AppDomain manages these custom AppDomains such as create, open, close, etc., programmatically based on UI actions. More details about this technique can be found in my article VirtualService for ESB from where I borrowed and modified some classes for this implementation.
For example, the following code snippet shows how the ServiceHostActivator can be created for a custom AppDomain:
public static ServiceHostActivator Create(AppDomain appDomain, ConsumerConfigData config)
{
string _assemblyName = Assembly.GetAssembly(typeof(ServiceHostActivator)).FullName;
ServiceHostActivator activator = appDomain.CreateInstanceAndUnwrap(_assemblyName,
typeof(ServiceHostActivator).ToString()) as ServiceHostActivator;
activator.SetHost(config);
return activator;
}
private void SetHost(ConsumerConfigData config)
{
try
{
if (_host == null)
{
var binding = new CustomBinding();
if (config.ContentType.StartsWith("application/soap+xml"))
binding.Elements.Add(new TextMessageEncodingBindingElement(MessageVersion.Soap12WSAddressing10, Encoding.UTF8));
else if (config.ContentType.StartsWith("text/plain"))
binding.Elements.Add(new TextMessageEncodingBindingElement(MessageVersion.None, Encoding.UTF8));
else if (config.ContentType.StartsWith("application/xml") || config.ContentType.StartsWith("application/json"))
binding.Elements.Add(new WebMessageEncodingBindingElement(System.Text.Encoding.UTF8));
binding.Elements.Add(new NetMessagingTransportBindingElement());
var securityBehavior = new TransportClientEndpointBehavior()
{
TokenProvider = TokenProvider.CreateSharedSecretTokenProvider(config.IssuerName, config.IssuerSecret),
};
EndpointAddress ea = new EndpointAddress(config.TopicAddress);
var se = new ServiceEndpoint(ContractDescription.GetContract(typeof(IGenericOneWayContract)), binding, ea);
if(string.IsNullOrEmpty(config.SubscriptionAddress) == false)
se.ListenUri = new Uri(config.SubscriptionAddress);
if (config.RequiresSession)
se.Contract.SessionMode = SessionMode.Required;
se.Behaviors.Add(securityBehavior);
_host = new ServiceHost(typeof(VirtualService));
_host.AddServiceEndpoint(se);
_host.Extensions.Add(config);
_host.Faulted += new EventHandler(_host_Faulted);
_host.Closed += new EventHandler(_host_Closed);
_host.Opened += new EventHandler(_host_Opened);
_name = config.Name;
this.AddToStorage(this);
}
else
{
throw new InvalidOperationException("The ServiceHost has been already setup");
}
}
finally
{
}
}
The host manager (located in the default AppDomain) will create a new domain and configuration data for virtual service. After that, it will invoke the above static method to obtain a reference of the ServiceHostActivator. Once the manager has this reference, we can control hosting a virtual service in the custom domain.
The following code snippet shows a remoting method for opening a host in the custom domain:
public void Open()
{
  if (_host != null)
  {
    try
    {
      if (_host.State == CommunicationState.Created)
      {
          _host.Open();
          Trace.WriteLine(string.Format("ServiceHostActivator '{0}' opened", this.Name));
      }
    }
    catch (Exception ex)
    {
      RemoveFromStorage(this);
      Trace.WriteLine(string.Format("Opening ServiceHostActivator '{0}' failed: '{1}'",
                      this.Name, ex.Message));
      throw ex;
    }
  }
}
A virtual service for receiving messages from Subscription/Queue is very simple and straightforward. Basically, it is a proxy to TesterService for forwarding a received message from the Service Bus to the default AppDomain via NamedPipe transport. The following code snippet shows its implementation:
public class VirtualService : IGenericOneWayContract
{
public void ProcessMessage(System.ServiceModel.Channels.Message msg)
{
ChannelFactory<IGenericOneWayContract> factory = null;
try
{
var config = OperationContext.Current.Host.Extensions.Find<ConsumerConfigData>();
if (config == null)
throw new Exception("Fatal error: Missing ServiceConfigData extension object");
var binding = new NetNamedPipeBinding(NetNamedPipeSecurityMode.None);
var se = new ServiceEndpoint(ContractDescription.GetContract(
typeof(IGenericOneWayContract)), binding, new EndpointAddress(config.TesterAddress));
factory = new ChannelFactory<IGenericOneWayContract>(se);
var channel = factory.CreateChannel();
using (var scope = new OperationContextScope((IContextChannel)channel))
{
if (msg.Properties.ContainsKey(BrokeredMessageProperty.Name))
{
OperationContext.Current.OutgoingMessageHeaders.Add(
MessageHeader.CreateHeader(BrokeredMessageProperty.Name,
BrokeredMessagePropertyExtension.XName.NamespaceName,
(msg.Properties[BrokeredMessageProperty.Name] as BrokeredMessageProperty).CopyTo()));
}
OperationContext.Current.OutgoingMessageHeaders.Add(MessageHeader.CreateHeader(
ConsumerConfigData.XName.LocalName,
ConsumerConfigData.XName.NamespaceName, config));
channel.ProcessMessage(msg);
}
factory.Close();
}
catch (CommunicationException ex)
{
}
catch (Exception ex)
{
}
}
}
As you can see, the BrokeredMessageProperty bag and ConsumerConfigData are passed via message headers.
On the other side, the default AppDomain, we have a TesterService for receiving all messages from the custom domains such as Subscribers/Receivers. The received message is encapsulated and cleaned-up from the temporary headers (BMP and ConsumerConfigData) and all these three objects are sent to the WinForm for their UserControls.
The following code snippet shows this implementation:
public class TesterService : IGenericOneWayContract
{
public void ProcessMessage(System.ServiceModel.Channels.Message message)
{
Form1 form = OperationContext.Current.Host.Extensions.Find<Form1>();
string action = OperationContext.Current.IncomingMessageHeaders.Action;
int indexBMP = message.Headers.FindHeader(BrokeredMessageProperty.Name,
BrokeredMessagePropertyExtension.XName.NamespaceName);
int indexConfig = message.Headers.FindHeader(ConsumerConfigData.XName.LocalName,
ConsumerConfigData.XName.NamespaceName);
try
{
var config = message.Headers.GetHeader<ConsumerConfigData>(indexConfig);
message.Headers.RemoveAt(indexConfig);
var bmp = message.Headers.GetHeader<BrokeredMessageProperty2>(indexBMP);
message.Headers.RemoveAt(indexBMP);
form.AddMessageToTreview(message, bmp, config);
}
catch (Exception ex)
{
}
}
}
Note, this process is executed as a background task, across the domains, and the UserInterface is updated on the fly. On the other side, as a user action (also implemented using a multitasking technique), the user via selecting a TreeNode and clicking on its context menu can invoke a specific action. For each action, a dialog is implemented to perform a task. In the next section, I will describe the usage.
For example, the following code snippet shows an action for Reconnect Subscriber:
private void toolStripMenuItemReconnectSubscriber_Click(object sender, EventArgs e)
{
ThreadPool.QueueUserWorkItem(delegate(object state)
{
try
{
TreeNode node = null;
this.InvokeEx(() => node = this.treeViewServiceBus.SelectedNode);
var config = node.Tag as ConsumerConfigData;
using (var progressnode = new ProgressNode(this, node, 6, 3))
{
HostServices.Current.Close(config.HostName);
Thread.Sleep(1000);
HostServices.Current.Add(config.HostName, config);
HostServices.Current.Open(config.HostName);
}
}
catch (Exception ex)
{
}
});
}
and one more example for firing a message on the Topic channel. The following code snippet shows this virtual Publisher:
private void toolStripMenuItemFirePublisher_Click(object sender, EventArgs e)
{
ThreadPool.QueueUserWorkItem(delegate(object state)
{
IOutputChannel channel = null;
try
{
TreeNode node = null;
string xmlmessage = null;
BrokeredMessageProperty bmp = null;
this.InvokeEx(delegate()
{
node = this.treeViewServiceBus.SelectedNode;
xmlmessage = this.richTextBoxMessage.Text;
this.propertyGridBMP.Item.Cast<CustomProperty>().FirstOrDefault(
p => p.Name == "MessageId" && p.Category == "sys").Value = Guid.NewGuid().ToString();
bmp = this.CreateBrokeredMessageProperty(this.propertyGridBMP.Item);
this.propertyGridBMP.Refresh();
});
using (var progressnode = new ProgressNode(this, node, 6, 3))
{
var config = node.Tag as ProviderConfigData;
EndpointAddress topicAddress = new EndpointAddress(config.EntityAddress);
var binding = new CustomBinding();
if (bmp.ContentType.StartsWith("application/soap+xml"))
binding.Elements.Add(new TextMessageEncodingBindingElement(MessageVersion.Soap12WSAddressing10, Encoding.UTF8));
else if (bmp.ContentType.StartsWith("text/plain"))
binding.Elements.Add(new TextMessageEncodingBindingElement(MessageVersion.None, Encoding.UTF8));
else if (bmp.ContentType.StartsWith("application/json") || bmp.ContentType.StartsWith("application/xml"))
binding.Elements.Add(new WebMessageEncodingBindingElement(System.Text.Encoding.UTF8));
binding.Elements.Add(new NetMessagingTransportBindingElement());
var securityBehavior = new TransportClientEndpointBehavior()
{
TokenProvider = TokenProvider.CreateSharedSecretTokenProvider(config.IssuerName, config.IssuerSecret),
};
var se = new ServiceEndpoint(ContractDescription.GetContract(typeof(IOutputChannel)), binding, topicAddress);
se.Name = "TopicPublisher";
se.Behaviors.Add(securityBehavior);
var factory = new ChannelFactory<IOutputChannel>(se);
channel = factory.CreateChannel();
using (var message = MessageExtension.CreateMessage(xmlmessage))
using (OperationContextScope scope = new OperationContextScope((IContextChannel)channel))
{
OperationContext.Current.OutgoingMessageProperties.Add(BrokeredMessageProperty.Name, bmp);
channel.Send(message);
}
((IClientChannel)channel).Close();
factory.Close();
}
}
catch (CommunicationException ex)
{
}
catch (Exception ex)
{
}
});
}
As the above implementation shows, we need to obtain a message text and a BMP bag from the WinForms control, then create a security behavior, service endpoint, generic channel factory, and operation scope for adding a BMP bag for the outgoing message.
At the end of this chapter, I would like to thank for 3rd party support such as PropertyGridEx.dll from CodeProject, coloring a RichTexBox, and the ControlExtensions class which simplified my implementation of the User Interface for this tiny tool.
OK, it's show time. Let's describe what this tiny tool can do for you.
Usage
First of all, the following are the prerequisites:
- Visual Studio 2013 Update 4 (option for creating assemblies)
- Windows Azure SDK v2.5 (November 2014)
- Windows Azure Platform account
- HTTP/S connectivity to the Internet
- Downloading packages (source and/or exe) for this article (option for creating assemblies)
- Some knowledge and experience for Windows Azure Platform and WCF
Balancing vs. Multicasting
Before connecting the ServiceBusTester to the Azure Service Bus, I would like to recap the differences between the Balancing and Multicasting subscribers on the Topic channel.
Subscribing a subscriber to the same subscription (for example, Subscription 1) the message will be balanced between all subscribers for this subscription. According to the above example, it will be between S1 and Tester. From the business point of view, the application will "lose" those messages delivered to the virtual Subscriber Tester.
For testing (and monitoring) purposes, we need to deliver messages in a multicasting manner. As the above picture shows, we need to share a RuleDescription (Filter) instead of the Subscription. The current version (September 2011) of the Azure Service Bus doesn't have this support for sharing filters or subscribing to the subscription clone or any other mechanism. However, we can consider some practices and patterns during the design of the Service Bus Entities such as Namespaces, Topics and Subscriptions for logical connectivity model and its mapping to the physical one.
For example, the following practice can be applied:
- creating namespaces based on the environment scope such as dev, staging, QA, demo, production, etc.
- cloning Topic for testing and monitoring purposes, where an originator topic will forward messages to the clone topic (Multicasting Topic)
- cloning Subscription, where the message will multicast for all subscriptions (Multicasting Subscription)
- cloning RuleDescription (Filter, Action) into one Subscription; in this scenario, each topic will have a special Subscription with a collection of the interesting RuleDescription other Subscriptions (Sharing Rules)
OK, let's continue with our usage of the ServiceBusTester with the following steps:
Step 1. Connect to the Azure Service Bus
Right clink on the ServiceBus root node, the following context will pop up on the screen:
Selecting Connect, the NamespaceDialog will show your connectivity to the Azure Service Bus via Namespaces. Only the Namespaces inserted by this dialog can be used in the entire tool.
You can type all interesting namespaces and then press the Refresh button, or type one by one with the Refreshing process. Pressing OK, all valid namespaces will persist in the ApplicationSettings, therefore we don't need to repeat it every time the ServiceBusTester is launched. After this step, the ServiceBus root node will show you four nodes grouped by Queue and Topic entities.
Step 2. Add Subscriber
This step will allow you to add a virtual Subscriber for a specific Namespace/Topic/Subscription.
Selecting a context menu Add on the Subscribers node, the following SubscriberDialog will pop up on the screen.
This dialog will allow you to select a specific subscription and display its rules. The above example shows my subscription rk2011/worker/image2 with two Rules, $Default and abcd. Notice again, this tool doesn't allow you to update a subscription, it is a trivial implementation task, but it is based on the concept and design of this tiny tool. Of course, you can modify the included source code for this feature, it is up to you. The other choice is to use the Service Bus Explorer.
Once we click OK, the TreeView is updated for this action. The following picture shows what happens. The Subscribers node has our first new virtual subscriber ready to receive a BrokeredMessages, so if you already have a publisher in your namespace, don't be surprised if you receive some messages.
Step 3. Add Publisher
This step will allow you to add a virtual Publisher for a specific Namespace/Topic channel.
Selecting a context menu Add on the Publisher node, the following PublisherDialog will pop up on the screen.
Each Publisher added in the ServiceBusTester should have a unique name. This name can be overwritten by your name for better orientation between the publishers.
By pressing OK, we can see this action in the TreeView, like it is shown in the following screen snippet:
As you can see, the Publishers node has a first virtual publisher for the topic worker in the rk2011 namespace. The tool also generates a template message and the BrokeredMessageProperty bag.
Now, based on our needs, the message and/or bag can be changed. You can drag&drop your message, load other messages, etc. The BMP bag has two categories, in the scope of the application (user) and sys. The properties in the sys scope are predefined, therefore we can change only their values. The other category such as application is completely driven by the application needs. The name, type, and value of this property can be added and modified. The template has three predefined application properties only for test purposes.
Editing the value of the application property can be done directly via a PropertyGrid, but for removing, adding, or changing a property type, we have to press the button like shown in the following screen snippet:
Using the Properties dialog, we can create, delete, or edit our application properties in the BMP bag.
At this moment, our tool registered one Subscriber and one Publisher with a template message and BMP bag, so we can make a Pub/Sub scenario, when the Publisher will fire a message and Subscriber will receive this interest.
OK, let's do this scenario. Right click on the Publisher to have this choice:
Step 4. Fire Publisher
Select Fire to process this action, which will send this message and its BMP bag to the Topic channel. If everything goes well, the message should be received by the subscriber like it is shown for my namespace in the following screen snippet:
That's great. Our virtual subscriber received messages (based on the subscription). In my case, where the subscription image12 has two Rules, we can see two copies of the messages. Every received message will create its own child node for the subscriber parent with a label of sys properties such as {Label}/{MessageId}. Of course, there is a place to modify the code and extend this feature for node naming by any BMP property. Note that the message and the BMP bag are read only.
Step 5. Show Subscription
This step will allow you to show a Subscription property including its Rules:
Selecting a context menu Show Subscription on the Subscriber node, the following SubscriptionDialog will pop up on the screen:
That's all for these major steps, where I described the user interface for Pub/Sub testing. A similar process exists for Sender/Receiver nodes such as adding receiver, sender, and sending a message to the queue.
Publisher message
As I mentioned earlier, the Connect action will persist your connections in the ApplicationSettings. The current version of this implementation doesn't allow to persist all TreeView objects including Publishers, etc., however, there is an implementation of the Load/Save and Copy/Paste messages for the virtual publisher. This feature allows you to load a specific message from the file system to the tool, modify it, and save it back.
The following screen snippet shows this context menu on the publisher's message node:
The message received by the Subscriber can be Copyd to the clipboard and Pasted in the Publisher.
The Copy/Paste feature allows us to resend this message again by the tester via a virtual Publisher. In this case, we also have to consider a BMP bag based on the application needs. Basically, this feature saves time to generate an untyped message for the virtual Publisher.
Conclusion
This article gives you a tiny tester for Azure Service Bus Messaging. It can be your helper for evaluating the Service Bus or for developing consumers and/or producers of the Service Bus. It is based on the WCF technology and the Windows Azure SDK 1.6 (November 2011) support.
Appendix A - Version 1.1
The Tester state can be saved any time into an XML formatted file for later opening. The following screen snippet shows a context menu for this feature:
The file can be removed from the list using a right click on the selected file:
Appendix B - Version 1.2
This update adds more content-types for sending and/or receiving messages such as application/soap+xml, application/xml and text/plain. The previous versions have been implemented for basic WCF binding represented by NetMessagingTransportBinding such as a binary message encoder with a contain-type application/soap+msbin1 resp. application/soap+msbinsession1.
The concept of handling a message content-type is based on the correct binding and encoder selection. The following code snippet shows an example of the publisher/sender implementation:
var binding = new CustomBinding();
if(bmp.ContentType.StartsWith("application/soap+xml"))
binding.Elements.Add(new TextMessageEncodingBindingElement(MessageVersion.Soap12WSAddressing10, Encoding.UTF8));
else if (bmp.ContentType.StartsWith("application/xml") || bmp.ContentType.StartsWith("text/plain"))
binding.Elements.Add(new TextMessageEncodingBindingElement(MessageVersion.None, Encoding.UTF8));
binding.Elements.Add(new NetMessagingTransportBindingElement());
Basically, we can use NetMessagingTransportBinding to transfer the xml/soap message as binary data and the other binding (in this version) such as TextMessageEncodingBinding to transfer data as a text. In this case, the text can be xml formatted POX/Soap or a plain text. In other words, the message encoder switches between the Soap12WSAddressing10 or None versions.
As you can see, the binding is selected based on the requested content-type in the brokered message (bmp.ContentType property). The specific value can be selected by combo-box like it is shown on the following picture:
The following two pictures show a publisher for POX content type and plain text.
Sending a brokered message with a specific content-type is a very straightforward step. Each published message by publisher or sender can have its own content-type. Different situation is for subscriber/receiver, where a virtual tester service for receiving a brokered message must be configured before it is open. That's by design of this Service Bus Tester.
For selecting a content-type at the subscriber or receiver, the additional combo-box has been added in the dialog. The following picture shows an example of the SubscriberDialog for creating a virtual subscriber for Subscription rk2014.servicebus.windows.net/test/Subscriptions/SantaAna.
Note, that the tooltip of the pointed subscriber in the tree will show you its content-type, for example:
[application/xml] sb://rk2014.servicebus.windows.net/test/Subscriptions/SantaAna
Advanced Example
If you are familiar with WABS (Windows Azure BizTalk Services), you can test this new version of the Service Bus Tester using the following example.
This is a very simple example of delivering a brokered message from the source Topic to the specific target based on the custom property filter router represented by name a. We are focusing to deliver message for Topic1, Queue1, Queue2 and Queue3 only, as the other destinations (Workflow and AzureBlob1) are from my upcoming article.
As you can see, each target is configured differently.
Basically, the Subscription Source TopicTest is passing a received brokered message via a Pass-Through Bridge (Fire) to the Destination based on the filter a.
Based on the above Destinations, we can create virtual receivers and subscriber in the Service Bus Tester.
Let's look at Topic1 as our first example. This destination is filtered by a=topic1, the Topic proxy sender is configured for binary transport, therefore the tester subscriber has a content-type=application/soap+msbin1. The virtual publisher is firing a message shown in the following picture on the topic sb://rk2014.servicebus.windows.net/test:
and the virtual subscriber will receive a brokered message with a content-type=application/xml:
Another test case is to fire a brokered message with a content-type=text/plain, where an xml formatted POX text is sent to the queue3.
The following picture shows this example, where a message is fired on the topic sb://rk2014.servicebus.windows.net/test, captured by the WABS subscriber and then via a Pass-Through Bridge the message is delivered to the Destination Queue3 configured as sb://rk2014.servicebus.windows.net/Queue/test3.
The following picture shows a virtual receiver for sb://rk2014.servicebus.windows.net/Queue/test3:
That's all.
Using a new version of the Service Bus Tester will enable you to use this tester for more virtual publishers/senders and subscribers/receivers based on the content-type of the brokered message. It is a great small tool for rapid development Windows Azure BizTalk Services (WABS) when source and/or destination is a Windows Azure Service Bus (WASB), especially when a real publisher/sender and/or subscriber/receiver doesn't exists.
One more comment. Please, modify the older files saved by version 1.0 or 1.1 by inserting a new property ContentType into each ConsumerConfigData object. See an example in the following picture:
The reason for this update is to enhance the Virtual Publisher to send a message using a REST API to the Service Bus entities such as queue, topic and relay. This feature allows publishing a message based on the address with a SAS/ACS keys without in advance registration of the Service Bus connectivity. More details about the SAS/ACS can be found in the Service Bus Authentication and Authorization and here.
The Publisher and Subscriber are fully transparent, therefore the Publisher can send a brokered message via a REST and the subscriber can be created using a WCF stack ( NetMessagingTransportBinding ).
Let's introduce the new features of the Service Bus Tester implemented in the Version 1.3.
1. The REST Publisher
The PublisherDialog has been slightly changed to enable a REST feature to be represented by the address toolbox. Switching between the REST and WCF binding is done by a checkbox. The default selection is the REST option.
The following screen snippet shows the PublisherDialog for this version:
As I mentioned earlier, the Address textbox allows to address a Service Bus entity such as queue, topic or relay included either the SAS or ACS keys in the query path. When you drop a connection string of the SAS or ACS of the Service Bus entity into the Address textbox control, the PublisherDialog logic will convert it to the uri address with a query string. The name of the entity is not known at this moment, therefore you have to replace the XXX text with the real name of the entity. As you can see the above picture this portion of the uri address as highlighted.
The Azure Service Bus doesn't have shortcut names for SAS/ACS keys similarly to the Azure Storage ones; therefore I created some shortcut names. The following are their mappings:
For SAS: SharedAccessKeyName=skn SharedAccessKey=skk and for ACS: SharedSecretIssuer=ssi SharedSecretValue=ssv
Example of the uri address with SAS <a href="https://mynamespace.servicebus.windows.net/appevents?skn=ae_abc2014&skk=mXXXXXXDDDddjkflsfllXWfHLr4w="> https://mynamespace.servicebus.windows.net/appevents?skn=ae_abc2014&skk=mXXXXXXDDDddjkflsfllXWfHLr4w=</a>
Example of the uri address with ACS https://mynamespace.servicebus.windows.net/appevents?ssi=owner&ssv=XcCyH+12345dwp3DW444nEUptTYYYYhhK/u5ve/nWA=
It will be nice to have some common design pattern (formatting) for addressing cloud entities with SAS/ACS keys within the Azure.
Anyway, I created a static helper class for handling SAS/ACS Token, posting message via a REST, etc. Please have a look the ServiceBusHelper class in details. It is located in the Extensions.cs file.
The following code snippet shows one of the static method from this class:
public static HttpResponseMessage SendMessageToSB(string addressWithKey, HttpContent content, dynamic brokerProperties,
dynamic userProperties = null)
{
addressWithKey = HttpUtility.HtmlDecode(HttpUtility.UrlDecode(addressWithKey));
string qAddress = GetResourceAddress(addressWithKey);
string token = GetToken(addressWithKey);
var httpClient = new HttpClient() { BaseAddress = new Uri(qAddress) };
httpClient.DefaultRequestHeaders.TryAddWithoutValidation("Authorization", token);
if (brokerProperties != null && brokerProperties is string)
httpClient.DefaultRequestHeaders.TryAddWithoutValidation("BrokerProperties", brokerProperties);
else if (brokerProperties != null && brokerProperties is object)
httpClient.DefaultRequestHeaders.
TryAddWithoutValidation("BrokerProperties", JsonConvert.SerializeObject(brokerProperties));
if (userProperties != null)
{
if (userProperties as NameValueCollection != null)
{
foreach (string key in (userProperties as NameValueCollection).AllKeys)
httpClient.DefaultRequestHeaders.TryAddWithoutValidation(key, (userProperties as NameValueCollection)[key]);
}
else if (userProperties as Dictionary<string, string> != null)
{
foreach (string key in (userProperties as Dictionary<string, string><string, string="">).Keys)
httpClient.DefaultRequestHeaders.TryAddWithoutValidation(key, (userProperties as Dictionary<string, string="">)[key]);
}
else
{
foreach (var property in userProperties.GetType().GetProperties(BindingFlags.Public | BindingFlags.Instance))
{
if (property.CanRead)
httpClient.DefaultRequestHeaders.TryAddWithoutValidation(property.Name, property.GetValue(userProperties, null));
}
}
}
return httpClient.PostAsync("messages", content).Result;
}
</string,></string,>
The key part of the above method is getting the token based on the uri address with the SAS/ACS keys. Once we have the token, we can add headers and content to the HttpClient instance. Note, that the BrokerProperties must be passed in the JSON formatted text. The other properties such as users are added as an individual header in the name/value fashion.
Let's make some simple usage example:
Example
This example shows how we can create a REST Publisher.
Right click on the node Publisher and select Add. The following picture shows this result:
Drop the SAS connection string for your Service Bus entity. Replace the XXX text with the actual name of the entity (note, this version supports only queue, topic or relay entities). Once you have the address, please press the button Refresh to validate this address authentication with a Service Bus. In the case of the valid address, the OK button is enabled.
By pressing the OK button, the PublisherDialog is closed and the Publisher will have a new publisher in the TreeView. Note, that this REST Publisher has a different icon indicated that this is a REST Publisher.
Now, we can fire a message via the REST Publisher. Note, that the full REST address can be copied to the clipboard.
Great, now you can create three REST publishers for each service bus entities such as queue, topic and relay and send a messages to them with a different content type.
2. The Relay Publisher
The Relay Publisher is a new feature of the Publisher using a WCF BasicHttpRelayBinding. To create a Relay Publisher we need to uncheck a checkbox and select a Relay item in the combo box.
The following picture shows these selections:
Note, that the Relay Service must be registered to see the name of the endpoint in the combo box. Once we selected a Relay Service Endpoint, the OK button is enabled for confirmation and exit.
The following code snippet shows a WCF Client with a BasicHttpRelayBinding. Its implementation is very straightforward, typical for WCF programming:
#region using Relay
EndpointAddress topicAddress = new EndpointAddress(config.EntityAddress);

var binding = new BasicHttpRelayBinding();
binding.Security.Mode = EndToEndBasicHttpSecurityMode.Transport;
binding.Security.RelayClientAuthenticationType = RelayClientAuthenticationType.None;

var securityBehavior = new TransportClientEndpointBehavior()
{
    TokenProvider = TokenProvider.CreateSharedSecretTokenProvider(config.IssuerName, config.IssuerSecret),
};

ServiceEndpoint se =
  new ServiceEndpoint(ContractDescription.GetContract(typeof(IOutputChannel)),binding,topicAddress){Name="RelayPublisher"};

se.Behaviors.Add(securityBehavior);

var factory = new ChannelFactory<ioutputchannel>(se);
channel = factory.CreateChannel();

using (var message = MessageExtension.CreateMessage(xmlmessage))
{
    channel.Send(message);
}

((IClientChannel)channel).Close();
factory.Close();
#endregion


</ioutputchannel>
Note, that this version supports only Relay Service with a BasicHttpRelayBinding.
Example
This simple example shows creating a Relay Publisher based on the Relay Service Endpoint (in this example, the endpoint has a name Bulk)
Once, the Relay Endpoint has been validated, the OK button is enabled and ready to confirm the process creation.
The following picture shows a right click context menu on the Relay Publisher. Note, that the Relay Publisher has its own icon and tooltip.
As you can see in the above screen snippet, there is no a BrokeredMessageProperties. That's correct, because the Relay Service Endpoint has a BasicHttpRelayBinding.
Note, that the message must be a Soap 1.1 version.
3. Advanced GUI functions
Two GUI features have been added into the TreeView such as renaming and drag&drop node.
The following picture shows two renamed publishers in the Publishers node:
The Drag&Drop feature in the TreeView allows to rearrange the groups and nodes within the same group. In other words, we cannot mix the nodes between the Publishers, Subscribers, etc.
The following picture shows the Publishers node as a first node in the ServiceBus TreeView:
The Drag&Drop feature works easily. As the above picture shows, the Publishers node has been dragged and then dropped into the Receivers node, which it will be inserted before this node. Also, the publisher BasicHttpRelayBinding node has been done the same way, such as inserted before the REST-Relay node.
4. Advanced Example
This special advanced example demonstrates the usage of the Service Bus Tester to simulate a fire of the event for triggering a scheduled watchdog. To better understand, let's describe a Pub/Sub Topology for event driven distributed architecture. The Azure Service Bus allows to create many patterns for Pub/Sub model.
The following picture shows an example of the Pub/Sub design topology pattern based on the Windows Azure Service Bus entities and their quotas ( Azure Service Bus Quotas ). Based on these entities quotas and environment scopes such as development, stage, qa, demo, live, etc. we can create an agile model suitable for continuous deployment. The model agility is done at the namespace level, where each environment scope is represented by the service namespace. The root of the model is located at the Account level where there are basically only two pillars such as Stage and Production (it is the same fashion like we have for cloud services).
The Pub/Sub (Topic/Subscription) Topology within the Namespace is the same for each environment scope during the design and deployment time, therefore we can use a tool for continuous deployment (push deployment from the development to the production scope).
In the Azure Service Bus, the Topic entity can be used for isolation of the clients, where each client can see only its own topic for subscribing services. This concept allows to decouple an internal logical model of the application connectivity from the multi-tenant external logical model connectivity.
As the above picture shows, all events are published to the root Topic (named as appevents). From this "bus" (topic), there are events distributed by subscriptions to their services or forwarding to another Topics based on the application model connectivity. As you may know, Microsoft Azure Service Bus added a special subscription feature that enables to create a topology of the Pub/Sub Model Connectivity such as ForwardTo property. Currently, we can only forward an event only to the Topic and Queue Entities within the same Namespace, but I hope very soon we will have a capability to forward a message to the Relay Endpoint and across the Namespace or Account.
Note, that the ForwardTo property represents a conceptual feature for building a Pub/Sub Topology. As the above example shows, the appevents topic has a few subscriptions. The first one is very straightforward subscription to allow capturing any event (message) on the appevents topic and delivering it to the AppLog Service for troubleshooting, post-processing, reporting, etc. The second subscription represents a group of the Client Subscriptions, where the specific events related for each client are forwarded to their topic such as Client1, etc.
The last subscription in the above example is a ScheduledWatchdog subscription. With this subscription I am going to demonstrate the Service Bus Tester usage, where the tester will fire an event to the appevents topic and this subscription will forward a scheduled message (45 seconds delay) to the Watchdogs Topic. This is a typical pattern for event driven architecture, where the workflow process is watched by "Watchdog Service" for its completion within the specific time.
The following picture shows a ScheduledWatchdog Subscription:
As you can see, there is a ForwardTo property setup for watchdogs topic. This setup is easy and straightforward. More tricks were implemented in the setup of the ScheduledEnqueueTimeUtc in the SqlExpression text box for Action in the $Default Rule. What we need to do is to add 45 seconds to the current time to delay a forwarded message to the watchdogs topic. The SqlRuleAction supports only subset of the SQL 92 Expression, therefore the specific delay has been created in the brokered message as a user property (see the following picture application property watchdogScheduledTimeUtc ).
We can create the above Pub/Sub Topology using the tool Service Bus Explorer. The Service Bus Tester tool can be used for testing the watchdog event. The following picture shows firing an event to the appevents topic which will trigger a ScheduledWatchdog forwarded message to the Watchdogs topic. The brokered message will be received by Watchdog_AppA subscriber.
Note, that the application property watchdogScheduledTimeUtc has a string value in the UTC date formatted text, for example: 8/19/2014 2:12:11 PM
This version enhances the ServiceBusTester for the following features:
1. Using a Connection String
Since Azure SDK 2.5 (November 2014), the Azure Portal doesn't support a default ACS authentication when the namespace is created. The Service Bus Namespace uses a SAS authentication as a default. The following changes were made to the ServiceBusTester in order to accommodate for Azure Portal namespace changes:
As you can see, the above NamespaceDialog allows authenticating namespace by Connection String as well. In this case, the InssuerName property must have an empty value.
2. ServiceBusTester REST Endpoint
The ServiceBusTester stores four entities such as Receivers, Senders, Subscribers and Publishers messages. Messages are stored dybamically in the Receivers and Subscribers containers. By adding a REST Endpoint to ServiceBusTester, we can query any resource from these containers based on the business needs. The following context menu shows how to retrieve resources from each container:
By clicking on the selected menu, we can see the content of the selected container in the browser. The ServiceBusTester REST Endpoint url is http://localhost:10100/sb. Note that the port number is created dynamically from the configuration file for each instance of the ServiceBusTester.
By typing url address in your browser, for instance: http://localhost:10100/sb/Subscribers you will see all the created subscribers including the received messages.
The following are few examples of the built-in query:
We can use a simple query such as http://localhost:10100/sb/* , in order to see all messages stored in the ServiceBusTester.
The following screen snippet shows an example of that result (via web browser):
That's great. By having this feature in our tester tool, it will enable us creating more sophisticated tooling, monitoring, troubleshooting process using a declarative way, etc. With the REST Endpoint we can obtain a specific resource received by Virtual Receiver or Subscriber and fire a Virtual Publisher. Note, that the renaming value of the tree nodes must be a valid xname value, otherwise the query will show an error for this node.
The following new feature shows the usage of the ServiceBusTester REST Endpoint
3. Generating Publisher/Sender message by XSLT transformation
This is a very powerful feature which enables us to generate dynamically brokered message based on the received messages. Instead of the explicitly formatted message, now we can use a XSLT transformation to create a brokered message. The XslCompiledTransform class allows to add a custom function for handling a brokered message properties and getting any resource from the REST endpoint. Now you can understand why previous feature was necessary to add into the ServiceBusTester.
The following code snippet shows a fragment of adding a custom object to the XSLT compiler:
XsltArgumentList xsltArgList = new XsltArgumentList();
xsltArgList.AddExtensionObject("urn:rkiss.sb/tester/2014/09", new XslBMPExtensions(){
  EndpointAddress = endpointAddress,
  UserProperties = userProperties,
  SysProperties = sysProperties,
  BMP = bmp
  });
The custom function such as XslBMPExtensions has two methods used in the xslt resource. The first one is ThisEndpoint to obtain a current ServiceBusTester REST Endpoint and the other method is to Set a brokered message properties.
The following picture shows this custom object. Note, that the name of this object has been hardcoded for urn:rkiss.sb/tester/2014/09 for its referencing in the xslt resource.
Finally, the following picture shows a usage of the custom XslBMPExtensions object in the xslt resource:
<xsl:stylesheet version="1.0" xmlns:xsl="<a href="http:
xmlns:msxsl="urn:schemas-microsoft-com:xslt"
xmlns:bmp="urn:rkiss.sb/tester/2014/09"
exclude-result-prefixes="msxsl bmp">
<xsl:output method="xml" encoding="UTF-8" indent="no" omit-xml-declaration="yes" />
<xsl:strip-space elements="*" />
<xsl:variable name="apos">'</xsl:variable>
<xsl:variable name="uri" select="concat(bmp:ThisEndpoint(), '/Subscribers/AppLog?$xpath=
As you can see, first we declared this custom object as xmlns:bmp, then we concatenated a variable uri for the REST endpoint. In this example, we want to get the element of the first message with a name HelloWorld received by the Subscriber AppLog. Once we have the query address for REST Endpoint, we can use a Microsoft extension function document to get the resource value and assign it to the variable. In this example, it is an input variable. Of course, the variable element can be queried using an xpath for specific attribute/element based on the needs.
Custom function bmp:Set with one parameter XPathNavigator (which allows us to pass a variable) is used to set a BrokeredMessageProperties. Note, that the variable must have a structure like it is shown in the above example, see variable bmp.
You can copy the above xslt example into the clipboard and paste it in the publisher during your testing. The first fire message will show you short received payload (there is no message HelloWorld), but firing it again, you will see a different result.
That's all for this update. I hope there will be a next one shortly, once I come up with another business requirement during the usage of the ServiceBusTester.
References:
[0] Service Bus
[1] Service Bus Explorer
[2] The Developers Guide to AppFabric
This member has not yet provided a Biography. Assume it's interesting and varied, and probably something to do with programming.


 General
  News
News  Suggestion
  Question
  Bug
Bug  Answer
  Joke
Joke  Praise
  Rant
Rant  Admin
Admin 


