Introduction
The Model-View-ViewModel (MVVM) is a design pattern that is
a variation of the Presentation Model pattern, which was first described by Martin Fowler. Since Microsoft introduced it with the first release of WPF, MVVM has become increasingly popular among WPF and Silverlight developers and many MVVM frameworks are now available.
As with the predecessor design patterns MVC (model–view–controller) and MVP (model–view–presenter), one of the key principles of
the MVVM pattern is Separation of Concerns (SoC), which allows cleanly
separating the data, presentation and behavior aspects of the application.
In this article we will show you how Xomega Framework takes
the basic principles of MVC and MVVM to the next level, which allows you to rapidly
build .Net applications with high degree of flexibility and reusability and a
minimum learning curve. Read on to see how you can quickly and easily develop applications with Xomega Framework.
About Xomega Framework
Xomega Framework is a powerful open source framework that has been built from more than 10 years of experience and is based on the approach that has been proven in many large scale applications. The primary goals of the framework are to:
- Enable rapid application development.
- Promote reusability, which can significantly reduce maintenance costs.
- Ensure consistency to deliver the best user experience.
To demonstrate one of the problems that Xomega Framework is designed to solve efficiently, let’s consider the following example. Suppose that your application has a common field Customer that appears on pretty much every other screen of your application. The requirements for this field are as follows.
- If the customer is not editable on the screen, then it should be displayed as [Customer Number] – [Customer Name], where the customer number is an integer key for the customer, which should be formatted as a six-character string padded with leading zeros, e.g. 001234 – Joe Doe.
- In the screens where the customer is editable, it should be selected from a drop down list, where each item is displayed as Customer Number – Customer Name as in the previous requirement. If multiple customers need to be selected, such as for search criteria, then a list box will be used instead.
- In some screens, where the power users know the customer numbers by heart and need to be able to quickly enter the customer, a text box will be used that accepts the integer customer number without leading zeros. If multiple customers need to be specified, a comma-separated list of customer numbers will be accepted in the text box.
- The customer field should be visible only if the user has a View Customer privilege.
- The customer field should be editable only if the user has an Edit Customer privilege.
In a typical WPF application you would probably define several reusable methods and classes to retrieve the list of customers, validate the input for both single entry and multiple entries and format the output to be displayed on the screen. Then for each screen you will need to set up bindings for the customer fields to use these methods and classes or you will need to wire it up in some other way.
One of the basic principles of software development is DRY: Don’t Repeat Yourself. Instead of wiring up the fields in every single place, wouldn’t it make more sense to create a single reusable property that encapsulates all this kind of behavior, which you can easily bind to various UI controls: read-only labels, drop-down lists, textboxes, list boxes, etc.? You can then easily add such properties to a data object that is part of your view model and you will have your presentation model built in no time.
Read on to learn how Xomega Framework makes implementing this kind of requirements just a breeze.
Xomega Data Properties
At the core of the Xomega Framework’s support of the presentation model lies a concept of a Data Property, which can store anything as a value - strings, primitives, dates with times or complex objects with additional attributes, for which Xomega also provides a convenient generic class called Header. Each property can provide methods to convert the value to and from different formats. By default, Xomega defines the following formats:
Internal format is used to store the values internally, which would be primitives, date/time, etc. When you set the property value, it will always try to convert it to the internal format. If it fails to convert the value to the internal format, it will store the value as is (typically as a string) so that the input is not lost, but the property will fail validation.DisplayString format is used to display the value to the user as a string when the property is not editable. This could be a formatted number or a date/time, money with the currency symbol or any other representation of the value for display purposes.EditString format is used to represent the value as a string when the user is editing the value in a textbox. This format is targeted for ease of entry and is by default the same as the DisplayString. Transport format is used to convert the internal value into the value that is sent to the service layer and eventually gets stored in the database. For example, when internal value is an object that stores a numeric ID along with the display text, the transport value will be the numeric ID.
One of the key differentiators of Xomega Framework is the integrated support of multi-valued properties. All you have to do is to set the IsMultiValued flag of the property to true and the property will apply the same conversion and validation rules to each individual value and will also be able to display the list of values as a comma (or any other delimiter) separated string as well as to parse the values from such string. Binding to multi-valued properties is identical to binding to single valued properties. So, for example, if you allow searching by a single value, then you can make the search criteria field multi-valued with a minimal effort.
The most notable feature of the Xomega Framework is that it stores the state of the properties, such as whether the property is editable, required, visible, etc., directly as part of the property. Binding the property to a control will not only bind the control value to the property value, but will also bind the control state to the property state with no extra work required. It also allows you to write the behavior logic right in the presentation model in a clean and reusable way. For example, your view model may listen to a change in the value of one property and as a result make other properties required or update their editability or visibility.
In a typical MVVM implementation you would have to define additional flags on the view model that store whether the property is visible or editable, and manually bind the control visibility and editability to these flags.
If you tried building a standard MVVM application and got tired of the tedious implementations of the INotifyPropertyChange and IDataErrorInfo interfaces in your view models, which are required by the standard WPF two-way bindings and validations respectively, then you will surely appreciate the fact that you don’t have to do any of this with the Xomega Framework.
Xomega data properties fire a custom property change event whenever anything changes about the property – either the value or any metadata, which you can listen to and then execute any behavior logic in your view model. The event has a PropertyChange attribute that indicates which attributes of the property changed, so that there is no need to subscribe for multiple events.
Controls that are bound to data properties automatically listen to the property change events and update their state accordingly. If the property is not editable, then the corresponding control will be disabled or made otherwise read only. By the same token, if the property is not visible, e.g. due to security restrictions, then the bound control will be hidden along with the associated label. Similarly, controls that are bound to a required property can be automatically highlighted by having a bold label, for example.
Data properties may also implement a method that returns a list of possible values for the property. If a selection list control, such as a drop down list or a list box, is bound to such a data property, then the list of selection items will be automatically populated and kept in sync with the list of possible values for the property. For controls like a drop down list that do not allow to clear the selected item, a special blank item will be added if the property is not required. You can also configure your property to display a certain text if the value is blank, such as <None>, <No Customer>, etc.
As we mentioned before, you don’t have to bother implementing the IDataErrorInfo interface in your view model to validate individual properties. The validation logic that you write once in your property (or oftentimes don’t even write, but rather inherit from the base property) will be automatically applied everywhere that property is being used, so that you Don’t Repeat Yourself.

When a data property is invalid, the bound control will be highlighted and will display the validation error messages. Unlike other reusable validation functions that produce a generic error message like “Invalid number” with no mention of the property name, which would be pretty useless if not displayed right next to the corresponding field, Xomega data properties generate error messages that contain the property names, or even the actual labels from the screen. This allows you to not only display the error messages over the corresponding fields, but also to output the error message summary somewhere on the screen or in a popup dialog and the user will be able to identify the fields that need to be corrected.
Coming back to our customer property example, here is what the property implementation would look like.
using System;
using System.Collections.Generic;
using System.ServiceModel;
using Xomega.Framework;
using Xomega.Framework.Lookup;
using Xomega.Framework.Properties;
public partial class CustomerProperty : EnumIntProperty
{
public const string EnumTypeCustomer = "customer";
public const string AttributeFormattedCustomerId = "formatted customer id";
public CustomerProperty(DataObject parent, string name)
: base(parent, name)
{
EnumType = EnumTypeCustomer;
DisplayFormat = String.Format("{0} - {1}",
string.Format(Header.AttrPattern, AttributeFormattedCustomerId),
Header.FieldText);
Validator += ValidateCustomer;
bool canUserViewCustomers = true;
bool canUserEditCustomers = true;
AccessLevel = canUserEditCustomers ? AccessLevel.Full :
canUserViewCustomers ? AccessLevel.ReadOnly : AccessLevel.None;
}
protected override object ConvertValue(object value, ValueFormat format)
{
int id;
if (format == ValueFormat.Internal && Int32.TryParse("" + value, out id))
{
return base.ConvertValue(id, format);
}
return base.ConvertValue(value, format);
}
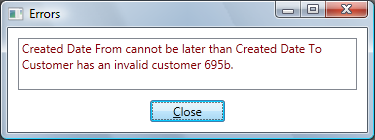
public static void ValidateCustomer(DataProperty dp, object value)
{
Header cust = value as Header;
if (value != null && (cust == null || cust.Type != EnumTypeCustomer))
dp.ValidationErrors.AddError("{0} has an invalid customer {1}.", dp, value);
}
protected override LookupTable GetLookupTable()
{
LookupTable res = base.GetLookupTable();
if (res == null)
{
List<Header> data = new List<Header>();
foreach (Store_ReadListOutput row in ReadList())
{
Header h = new Header(EnumType, "" + row.CustomerId, row.Name);
h[AttributeFormattedCustomerId] = row.CustomerId.ToString("000000");
data.Add(h);
}
res = new LookupTable(EnumType, data, true);
LookupCache cache = LookupCache.Get(CacheType);
if (cache != null) cache.CacheLookupTable(res);
}
return res;
}
protected virtual IEnumerable<Store_ReadListOutput> ReadList()
{
ChannelFactory<IStoreService> factory = new ChannelFactory<IStoreService>("IStoreService");
IStoreService svc = factory.CreateChannel();
IEnumerable<Store_ReadListOutput> output = svc.ReadList(new Store_ReadListInput());
factory.Close();
return output;
}
}
Xomega Data Objects as View Models
Xomega Framework comes with a rich set of base properties that implement validations and value conversions for most common types. As you have seen above, you can also define your own generic or application-specific Xomega data properties that are powerful and highly reusable.
Once you have a set of data properties that your application uses, building your view models is just a piece of cake. All you need to do is to create a subclass of the Xomega DataObject, where you simply create and configure instances of your named properties during the data object initialization. We strongly recommend that you also define string constants for your property names, which you should use to reference the properties. This will make refactoring much easier and will also allow some compile time checks in the XAML, which we will describe below. We also recommend that you provide public getters for your properties for convenience. Here is an example of such data object:
using System;
using Xomega.Framework;
using Xomega.Framework.Properties;

public partial class StoreCriteria : DataObject
{
    #region Constants

    public const string CreatedDateFrom = "CreatedDateFrom";
    public const string CreatedDateTo = "CreatedDateTo";
    public const string Customer = "Customer";

    #endregion

    #region Properties

    public DateProperty CreatedDateFromProperty { get; private set; }
    public DateProperty CreatedDateToProperty { get; private set; }
    public CustomerProperty CustomerProperty { get; private set; }

    #endregion

    #region Construction

    protected override void Initialize()
    {
        CreatedDateFromProperty = new DateProperty(this, CreatedDateFrom);
        CreatedDateToProperty = new DateProperty(this, CreatedDateTo);
        CustomerProperty = new CustomerProperty(this, Customer);
        CustomerProperty.Required = true;
        CustomerProperty.IsMultiValued = true;
    }

    #endregion
}
Xomega Framework supports nesting child objects and object lists within their parent data object. This will allow you to build view models for complex views and have a better control over the view behavior, as you will see below.
As with the data properties, Xomega data objects have an Editable flag, which controls whether or not the data object is editable. When it’s not editable, all its properties and child objects will be not editable, which will automatically make all controls bound to them disabled or read only. If the user can open your form for viewing and needs to click Edit to enable the controls, then all you have to do is to set the editable flag on the underlying data object to true. You no longer need to write lengthy methods to enable or disable all controls in the view.
Another useful feature of the data objects is support for modification tracking. Normally you need to write a lot of custom logic that detects if the user made any changes to be able to prompt for unsaved changes when the user closes the view. With Xomega data objects it happens automatically and all you have to do is to check the Modified flag of the DataObject.
As we mentioned before, each data property encapsulates the logic for validating its value. However, if you need to perform any cross-field validations, such as to make sure that the start date is not later than the end date, then you can do those in the corresponding data object as follows:
public override void Validate(bool force)
{
base.Validate(force);
if (CreatedDateFromProperty.Value != null && CreatedDateToProperty.Value != null &&
CreatedDateToProperty.Value < CreatedDateFromProperty.Value)
{
validationErrorList.AddError("{0} cannot be later than {1}",
CreatedDateFromProperty, CreatedDateToProperty);
}
}
After you call the Validate method on a data object, which will validate all the properties and nested child objects, you will be able to call the GetValidationErrors method to get the list of errors generated during the validation. If the list contains any errors, then you can show them to the user and terminate the save operation as follows.
criteria.Validate(true);
ErrorList valErr = criteria.GetValidationErrors();
if (valErr.HasErrors())
{
    Errors.Show(valErr);
    return;
}
As you may know, the standard MVVM pattern is somewhat limited to the WPF and Silverlight development only. What makes the Xomega view model data objects so great is that you can define the presentation logic in these objects in a platform-independent way and then easily bind them to ANY view: WPF, Silverlight, ASP.NET or WinForms if need be. Read on to see how Xomega Framework supports binding to the first three types of views.
Binding to WPF, Silverlight and ASP.NET views
Introduction of XAML in WPF and Silverlight has made it significantly easier to declaratively define your views. Ideally, you want to be able to have experienced UI designers lay out and style your controls on the form and also have seasoned developers program the view model, which you could easily wire up with the view. Unfortunately, even with the standard WPF and Silverlight you still have to do a lot of legwork to hook up your view with the underlying data model. You need to know about value converters and validators, bind control state, such as the Enabled attribute, to the corresponding view model flags and bind the selection item lists to an appropriate list of values.
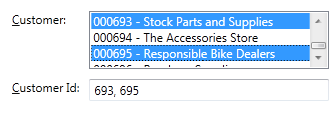
Xomega Framework simplifies it so much that all you need to do is to specify the property name that you want to bind your control to and set your data object as the DataContext for the control and it will handle the rest. Here’s an example of how a customer list box can be bound to the customer property in WPF:
<Label Name="lblCustomer">Customer:</Label>
<ListBox xmlns:xom="clr-namespace:Xomega.Framework;assembly=Xomega.Framework"
         xmlns:l="clr-namespace:MyProject.Objects;assembly=MyProject.Objects"
         xom:Property.Name="{x:Static l:StoreCriteria.Customer}"
         xom:Property.Label="{Binding ElementName=lblCustomer}"
         Name="ctlCustomer"/>
Binding a text box or a combo box to the customer property would have exactly the same syntax, which makes it extremely simple to switch the type of control for a property from one to another.
Note that we use the static constant StoreCriteria.Customer we defined as the property name. This will ensure that if we refactor our view model to rename the property then the application will still work if we just change the value of the constant, and we will get a compile time error if we actually change the constant name during refactoring. Mind you that if you use the standard WPF binding path, then you will get no compilation error if you change the property name, but rather a runtime error.
Binding to Xomega data properties in the XAML for Silverlight is pretty much the same as for the WPF, but you don’t get to use the constant, since Silverlight doesn't support the x:Static construct.
<TextBlock Name="lblCustomer" Text="Customer:" />
<ListBox xmlns:xom="clr-namespace:Xomega.Framework;assembly=Xomega.Framework"
         xmlns:l="clr-namespace:MyProject.Objects;assembly=MyProject.Objects"
         xom:Property.Name="Customer"
         xom:Property.Label="{Binding ElementName=lblCustomer}"
         Name="ctlCustomer"/>
As you may have noticed, Xomega Framework allows you to associate a label with each property-bound control, which helps the framework to show and hide both the control and the label simultaneously and to use that label’s text as the property name in the error messages, so that the user can easily identify the field in error when looking at the error summary. It also allows you to highlight the required fields by making the corresponding label bold. You can do that by defining a global label style as follows.
<Style x:Key="LabelStyle" TargetType="{x:Type Label}"
       xmlns:xom="clr-namespace:Xomega.Framework;assembly=Xomega.Framework">
  <Style.Triggers>
    <Trigger Property="xom:Property.Required" Value="True">
        <Setter Property="FontWeight" Value="Bold"/>
    </Trigger>
  </Style.Triggers>
</Style>
Binding ASP.NET controls to Xomega data properties is equally straightforward - all you have to do is to specify the property name, for which you can use the constant defined in your object. Here’s how the corresponding binding will look like:
<asp:Label runat="server" ID="lblCustomer" Text="Customer:" />
<asp:ListBox runat="server" ID="ctlCustomer" LabelID="lblCustomer"
             Property="<%# StoreCriteria.Customer %>"  />
To easily bind the whole containing panel to your data object you can call the following utility method.
WebUtil.BindToObject(pnlCriteria, criteria);
Any property level validation errors in Xomega are integrated into the WPF validation mechanism. Thus, if you want to define a custom validation template that displays a red asterisk with an error messages as a tool tip next to the invalid field, you can do that in a standard way as follows.
<ControlTemplate x:Key="validationTemplate">
  <DockPanel>
    <TextBlock Foreground="Red" Text="*" FontSize="18" FontWeight="Bold"
               ToolTip="{Binding ElementName=adornerPlaceholder,
        Path=AdornedElement.(xom:Property.Validation).Errors.ErrorsText}" />
    <AdornedElementPlaceholder Name="adornerPlaceholder"/>
  </DockPanel>
</ControlTemplate>
Binding data grids in WPF is pretty similar. What you have to do is to set the data object list as the DataContext for the grid and specify the data templates for the cells in each column as follows.
<ListView Grid.Row="2" Name="gridResults">
  <ListView.View>
    <GridView>
        <GridView.Columns>
            <GridViewColumn Header="Customer Id">
              <GridViewColumn.CellTemplate>
                <DataTemplate>
                  <TextBlock xom:Property.Name="{x:Static l:CustomerObject.CustomerId}"/>
                </DataTemplate>
              </GridViewColumn.CellTemplate>
            </GridViewColumn>
            <GridViewColumn Header="Name">
              <GridViewColumn.CellTemplate>
                <DataTemplate>
                  <TextBlock xom:Property.Name="{x:Static l:CustomerObject.Name}"/>
                </DataTemplate>
              </GridViewColumn.CellTemplate>
            </GridViewColumn>
        </GridView.Columns>
    </GridView>
  </ListView.View>
</ListView>
The same applies to the ASP.NET grid, except that you’ll bind the data object list using the Xomega utility method WebUtil.BindToObject.
<asp:GridView runat="server" ID="grdResults">
  <Columns>
    <asp:TemplateField HeaderText="Customer Id">
      <ItemTemplate>
        <asp:HyperLink runat="server" ID="fldCustomerId"
                       Property="<%# CustomerObject.CustomerId %>"
                       NavigateUrl="~/CustomerDetailsPage.aspx?CustomerId={value}" />
      </ItemTemplate>
    </asp:TemplateField>
    <asp:TemplateField HeaderText="Name">
      <ItemTemplate>
        <asp:Label runat="server" ID="fldName" Property="<%# CustomerObject.Name %>"/>
      </ItemTemplate>
    </asp:TemplateField>
  </Columns>
</asp:GridView>
How to get started with Xomega Framework
If you would like to test drive the Xomega Framework to see how easy it makes building .Net applications, here are the different ways that you can do it:
- Download the latest version of the Xomega Framework from CodePlex. It has a sample application based on the AdventureWorks database from Microsoft, which demonstrates the framework features.
- If you use NuGet , you can also add the Xomega Framework to your project through the Package Manager. Just search the packages for Xomega.
Please vote and leave a comment if you like the article or if you have any questions, or if you would like to share your experience with the framework.
Additional Resources
History
- 11/29/2011: The first version of this article published.
- 12/18/2011: Uploaded a sample project with the current examples.


 General
  News
News  Suggestion
  Question
  Bug
Bug  Answer
  Joke
Joke  Praise
  Rant
Rant  Admin
Admin 


