Introduction
Overview
More and more clients are demanding that their interfaces to data be web-based, not Windows Forms-based. There is an article posted on MSDN, at http://msdn.microsoft.com/en-us/library/bb384570.aspx, which outlines the steps necessary to create a basic N-tier data application. But what is different in order to create a ASP.NET presentation tier as opposed to utilizing Windows Forms?
In this article, we will have you first go through the walkthrough mentioned above, but with the last three steps being different, so we can take the path of implementing a data display application using ASP.NET as opposed to Windows Forms. Portions of the article referenced above are adapted here in order to give a sense of textual continuity. In this walkthrough, you will:
- Create a new N-tier solution that will contain multiple projects.
- Add two class library projects to the N-tier solution.
- Create a typed dataset by using the Data Source Configuration Wizard.
- Separate the generated TableAdapters and
dataset code into discrete projects. - Create a Windows Communication Foundation (WCF) service to call into the data access tier.
- Create methods in the service to retrieve data from the data access tier.
- Create a Web Forms application using ASP.NET to serve as the presentation tier.
- Create Web Forms controls that are bound to the data source.
- Write code to populate the data tables.
The steps you’ll be doing differently in order to implement our web-based approach are highlighted in bold in the list above. Before getting started, it’s worth mentioning the necessary prerequisites. This article assumes you’re using Microsoft Visual Studio 2010 and ASP.NET 4 as your development environment, with C# being the code-behind language.
Prerequisites
As with the walkthrough already referenced above, you will need the same prerequisites. Specifically, make sure the Northwind sample database is installed in your local SQL Server Express and that you have access to it.
The article posted at http://msdn.microsoft.com/en-us/library/8b6y4c7s.aspx has detailed instructions as to how to obtain the sample databases provided by Microsoft.
Going Through the Previous Walkthrough Steps
I am going to assume you know how to go through the walkthrough at http://msdn.microsoft.com/en-us/library/bb384570.aspx and follow the steps up to where you would otherwise create a Windows Forms based application to serve as the presentation tier.
Get Ready for Doing this Walkthrough
To get ready for doing this walkthrough, first go through the walkthrough mentioned above. But stop just before you get ready to add the Presentation Tier.
To Get Ready for Doing this Walkthrough
- Go to http://msdn.microsoft.com/en-us/library/bb384570.aspx.
- Create a new N-tier solution that will contain multiple projects as explained therein.
- Add two class library projects to the N-tier solution.
- Name the two projects
DataAccessTier and DataEntityTier, creating them exactly as outlined in the document referenced above.
- Create a typed dataset from the
Customers and Orders tables as directed, utilizing the Data Source Configuration Wizard. - Separate the generated
TableAdapters and dataset code into discrete projects.
- Do this by adding the
dataset first to the DataAccessTier project, and then double-clicking the .xsd file in the Solution Explorer window, and then by selecting DataEntityTier for the DataSet Project property in the Properties window.
- Create a Windows Communication Foundation (WCF) service to call into the data access tier.
- Create methods in the service to retrieve data from the data access tier.
Once you’re finished with Step 7 above, then you’re ready to create the Web-based presentation tier using C# and ASP.NET. Visual Basic can also be utilized, but my language of choice is C#. Before proceeding, make sure your Solution Explorer looks like that shown in Figure 1.
Creating an ASP.NET Presentation Tier to Display Data from the Data Service
At this point, the Solution Explorer window should look close to the view shown in Figure 1. It contains the Data Access Tier, the Data Entity Tier, and the WCF Service project, DataService. Now we’re going to create the Presentation Tier for the project
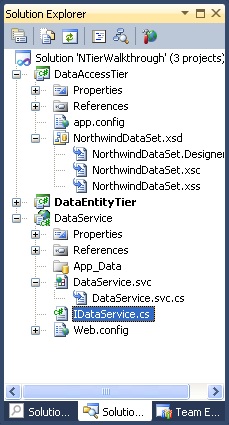
Figure 1. Solution explorer containing the Data Access Tier and Data Entity Tier and the WCF service, DataService.
Creating an ASP.NET Web Application to serve as the presentation tier
To Create the PresentationTier Project
- From the File menu, add a new project to the
NTierWalkthrough solution. - In the New Project dialog box, in the Project types pane, click Web. In the Templates pane, click ASP.NET Web Application.
- Name the project
PresentationTier. - In the Solution drop-down, make sure Add to solution is selected, and then click OK.
- The
PresentationTier project is created and added to the NTierWalkthrough solution.
Setting the Presentation Tier as the StartUp Project
The presentation tier is the actual client application that end users will see. To aid in debugging, let’s set it as the StartUp Project in Visual Studio so that the website you build will load when you run the program from within Visual Studio.
To Set the PresentationTier Project as the StartUp Project
- In Solution Explorer, right-click the icon for the
PresentationTier project, and then click Set As StartUp Project.
When you’ve set the PresentationTier project to be the StartUp project, its name will appear in bold in the Solution Explorer.
Adding References to the Presentation Tier
In order to call into our WCF services, references must be added to the PresentationTier project. To add the references required in order to access database objects, complete the following steps. It’s necessary to add both a service reference to the DataService WCF service project, and a reference to the DataEntityTier layer. This second reference is to enable something called “type sharing” between the WCF service and the client, through the inclusion of the partial database classes generated by the DataSet Designer.
To Add a Reference to the Presentation Tier
- In Solution Explorer, right-click
PresentationTier, and then click Add Reference. - In the Add Reference dialog box, click the Projects tab.
- Select
DataEntityTier, click Add, and then click Close.
To Add a Service Reference to the Presentation Tier
- In Solution Explorer, right-click
PresentationTier, and then click Add Service Reference. - In the Add Service Reference dialog box, click Discover.
- Select DataService.svc and then type
DataServiceReference in the Namespace box. - Click OK.
To Rebuild the Solution in Order to Update Reference Information
Visual Studio will generate code to enable the references you just added once you do a build.
- In Visual Studio, click the Build menu, and then click Rebuild Solution.
Connecting the ASP.NET Presentation Tier to the Data
To connect the ASP.NET web application to the data, we need to use an ObjectDataSource and then use an ASP.NET DataGridView to display the data.
Adding Controls to the Presentation Tier
The first goal is to prepare the Default.aspx page so it looks as shown in Figure 2:

Figure 2. The starting point for changes to the Default.aspx page.
To prepare the Default.aspx page for insertion of data-bound controls:
- In the Solution Explorer, double-click the Site.Master file.
- Press CTRL+G and type 17 in the Line Number box, and then click OK.
- You should be in a section of code enclosed by a
<div class="title"> tag. - Change the title of the site from “My ASP.NET Web Application” to “Presentation Tier.”
- Close the Site.Master file and save your changes.
- In Solution Explorer, double-click the Default.aspx file.
- Switch to Design mode.
- Click in the
<p> element shown in Figure 2, and then erase all the text inside it. This is where we are going to add our controls. - In the Toolbox window, open the Data tab, and then drag an
ObjectDataSource control from the toolbox onto your Default.aspx page. - Right-click the
ObjectDataSource control just added, and then click Properties. - In the (ID) field of the Properties window, call the control the
CustomersDataSource. - From the Toolbox, drag another
ObjectDataSource to the page, and call it the OrdersDataSource.
Next, we will configure the ObjectDataSource controls to connect to our data.
To Access the WCF Methods that Get Data from the Customers Table
- Right-click the
CustomersDataSource control and then click Configure Data Source… from the menu to open the Configure Data Source wizard.
- On the Choose a Business Object page, leave the Show only data components checkbox blank.
- In the Choose your business object drop-down, select the
PresentationTier.DataServiceReference.DataServiceClient object. - Click Next.
- On the SELECT tab of the Define Data Methods page, select
GetCustomers(), returns CustomersDataTable in the Choose a method drop-down. - Click Finish.
To Access the WCF Methods that Get Data from the Orders Table
- Right-click the
OrdersDataSource control and then click Configure Data Source… from the menu to open the Configure Data Source wizard. - As before, leave the Show only data components checkbox blank.
- In the Choose your business object drop-down, select the
PresentationTier.DataServiceReference.DataServiceClient object. - Click Next.
- On the SELECT tab of the Define Data Methods page, select
GetOrders(), returns OrdersDataTable in the Choose a method drop-down. - Click Finish.
Managing the ASP.NET-to-WCF-Service Connection State during Page Lifetime
As an additional step when accessing the heavily state-based WCF architecture from a stateless system such as an ASP.NET page, you must add custom code to open and close and otherwise manage the connection to the WCF service during the page lifetime.
To Manage the WCF Client Connection State and Message Size
- Right-click the
CustomersDataSource control, and then click Properties. - In the Properties window, click the Events button.
- Double-click the
ObjectCreating and ObjectDisposing events to add handlers for them in the Default.aspx.cs file. - Repeat the above steps for the
OrdersDataSource control. - In Solution Explorer, double-click the Default.aspx.cs file.
- At the top of the
_Default partial class, add the line of code shown in bold below:
namespace PresentationTier
{
public partial class _Default : System.Web.UI.Page
{
DataServiceReference.DataServiceClient _dataClient = null;
}
}
- Implement the page’s
Page_Load handler as follows:
protected void Page_Load(object sender, EventArgs e)
{
    if (_dataClient == null)
    {
        _dataClient = new DataServiceReference.DataServiceClient();
        _dataClient.Open();
    }
}
- Create a new method in the
_Default class and name it InitializeDataConnection(). Make the new method return void and be a private method. Implement it as follows:
private void InitializeDataConnection(ref ObjectDataSourceEventArgs e)
{
if (_dataClient.State == System.ServiceModel.CommunicationState.Opened)
e.ObjectInstance = _dataClient;
}
- Implement the
ObjectCreating event handlers for both the CustomersDataSource and OrdersDataSource as follows:
protected void CustomersDataSource_ObjectCreating(object sender,
ObjectDataSourceEventArgs e)
{
    InitializeDataConnection(ref e);
}

protected void OrdersDataSource_ObjectCreating(object sender,
ObjectDataSourceEventArgs e)
{
    InitializeDataConnection(ref e);
}
- Add a new,
private method to the class called CloseDataConnection(), and implement it as follows:
private void CloseDataConnection(ref ObjectDataSourceDisposingEventArgs e)
{
e.Cancel = true;
}
- Implement the
ObjectDisposing event handler methods for the CustomersDataSource and OrdersDataSource controls as follows:
protected void CustomersDataSource_ObjectDisposing(object sender,
ObjectDataSourceDisposingEventArgs e)
{
    CloseDataConnection(ref e);
}

protected void OrdersDataSource_ObjectDisposing(object sender,
ObjectDataSourceDisposingEventArgs e)
{
    CloseDataConnection(ref e);
}
- In Solution Explorer, under the
PresentationTier project, double-click its web.config file. - Make sure the
maxBufferSize, maxBufferPoolSize, and maxReceivedMessageSize attributes of the binding tag near line 58 all have the value 6553600.
Now, we are ready to move on with putting some GridView controls on the form to show our Customers and Orders table results.
Adding Customers and Orders GridViews to the ASP.NET Form and Modifying the Form Styles so the GridViews Fit in the Page
To add a GridView to the Form to Display the Customers Table
- In Solution Explorer, double-click the Default.aspx.cs file to open it. Place the insertion point after the
OrdersDataSource control. - In the Toolbox, expand the Data tab and then drag a
GridView control onto the page. - Click the Smart Tag on the
GridView in order to open its GridView Tasks menu. - In the Choose Data Source drop-down, click
CustomersDataSource. - Click any other options you may wish to use with your new control.
- Right-click the
GridView, and then click Properties from the menu to set the focus on the Properties window. - In the (ID) box, erase the existing
GridView1 default value, type CustomersGridView, and then press the ENTER key on your keyboard. - Set the insertion point to just above the
GridView and then type to give the GridView a heading, such as Customers:.
To Add a GridView to the Form to Display the Orders Table
- Place the insertion point after the
CustomersGridView control, and then type two carriage returns. - Type the text
Orders:. - Drag another
GridView onto the form from the Toolbox. - Click the new
GridView’s Smart Tag, and then click OrdersDataSource in the Choose data source drop-down. - Right-click the new
GridView and then click Properties to display the Properties window. - In the (ID) box, erase the default text, type
OrdersGridView, and then press the ENTER key on your keyboard. - Save your changes.
The Orders table has many more columns than the Customers table, and as such, its GridView will be a little too wide to fit within the rectangular area of the pre-built ASP website page provided by the Visual Studio template. We need to go into the Cascading Style Sheet (CSS) file for the site and modify a setting in order to make the page width accommodate our data.
To Adjust the CSS Stylesheet so the Orders Table Fits on the Page
- In Solution Explorer, expand the
PresentationTier project, expand the Styles folder, and then double-click the Site.css file. - Press CTRL+G to show the Go To dialog box.
- In the Line Number box, type 89, and then press ENTER.
- In the
.pages CSS class, alter the width: style parameter to be 1200px. - Save your changes.
Run the Site to Preview your New Tables
Now you have a fully-functioning, N-Tier data application that connects to the Northwind database, retrieves all the data from the Customers and Orders tables, and then displays it in a web form as the presentation layer.
To Run the Website to Preview the Presentation Layer
- On the Build menu, click Rebuild Solution.
- On the Debug menu, click Go, or press the F5 key on your keyboard.
Visual Studio loads your web application presentation layer in the browser, and also loads and hosts the WCF server and connects to your data. When finished, the result should be as follows:
Figure 3. A web browser displaying our web-based presentation layer.
Conclusion
In this article, we adapted and expanded upon the Microsoft-posted tutorial on creating an N-Tier data application. The key difference in our article is that, instead of using Windows Forms to display our data in the Presentation Tier, we instead use an ASP.NET Web Application to display the data. The steps are the same in by and large, with the key difference being the step where we had to add code to handle the ObjectCreating and ObjectDisposing events of the ObjectDataSource control, in order to manage the state of the WCF connection for our GridViews.
History
- 1st December, 2011: Initial version
Brian C. Hart, Ph.D., is a strategic engagement leader on a mission to leverage space technology to protect U.S. interests and assets against adversaries. Throughout Dr. Hart's career, he has enjoyed: Working closely with business executives to provide strategic direction and leadership, translating customer and competitive intelligence into compelling capture strategies and solutions, and mentoring teams to enhance individual and company capabilities while fostering an engaging and accountable environment, being involved in STEAM initiatives and education to develop greater awareness in the community, and serving the armed forces with the U.S. Navy and U.S. Army National Guard. He is excited to begin developing his career in Jacobs's Critical Mission Systems business unit, supporting NORAD and the U.S. Space Force.


 General
  News
News  Suggestion
  Question
  Bug
Bug  Answer
  Joke
Joke  Praise
  Rant
Rant  Admin
Admin 


