Aquarium Express Primer
Aquarium Express Primer is provided as a free introduction to the capabilities of Data Aquarium Framework. This sample project can be used as a solid foundation for Web 2.0 applications of any complexity. It uses state-of-the-art ASP.NET 3.5 and Ajax Control Toolkit.
See a live demo of Aquarium Express Primer.
Download complete source code of the sample application and Aquarium Express in VB.NET and Visual C# (AquariumExpressPrimer.zip - 908.77 KB ). The base code has been generated with free Code OnTime Generator.
We will be developing an order management application for a mail order company Northwind with Microsoft SQL Server 2005 and Visual Studio 2008. Free Visual Web Developer 2008 Express Edition can also be used to develop applications created based on Aquarium Express.
Start the code generator and create new Aquarium Express project named Northwind. Leave default settings and complete project source code generation. A browser window will open up with a default sample page. Close the browser and run your version of Visual Studio. Select File | Open Web Site menu option and browse to [My Documents]\Code OnTime\Aquarium Express\Northwind folder. Click Open button to open the project.
Alternatively you can download the source code provided with this article and open VB.NET or C# version of the source code in your version of Visual Studio. All code modifications described here are already included in the source.
Customer List
Create Forms folder in the root of the web site. Right-click Forms folder and select Add New Item option. Create a web form with name Customers and make sure to select its master page MasterPage.master available in the root of the web site. Change the page as shown below.
<%@ Page Language="C#" MasterPageFile="~/MasterPage.master" AutoEventWireup="true"
    CodeFile="Customers.aspx.cs" Inherits="Forms_Customers" Title="Customers" %>
<asp:Content ID="Content1" ContentPlaceHolderID="head" runat="Server">
</asp:Content>
<asp:Content ID="Content2" ContentPlaceHolderID="Header1Placeholder" runat="Server">
    Customers
</asp:Content>
<asp:Content ID="Content3" ContentPlaceHolderID="Header2Placeholder" runat="Server">
    Northwind
</asp:Content>
<asp:Content ID="Content4" ContentPlaceHolderID="BodyPlaceholder" runat="Server">
    <div id="CustomerList" runat="server" />
    <aquarium:DataViewExtender ID="CustomerExtender" runat="server"
        Controller="Customers" View="grid1" TargetControlID="CustomerList" />
</asp:Content>
Control DataViewExtender is a cornerstone of web applications created with Data Aquarium Framework. Two key properties Controller and TargetControlID are providing data controller descriptor and presentation container target accordingly. If you view the page in a browser then the following presentation is rendered.

Notice that whenever you click on any link in the left-most column the grid view is switch into form mode and customer details are presented. Let's change this behavior and have the page redirect to another web form and pass along ID of a selected customer. Open ~/Controllers/Customers.aspx page and change the actions with Grid scope to read as shown in example.
<actionGroup scope="Grid">
  <action commandName="Navigate" headerText="Show Orders"
     commandArgument="Orders.aspx?CustomerID={CustomerID}"/>
  <action commandName="Select" commandArgument="editForm1"
     headerText="View Customer Information"/>
  <action commandName="Edit" />
  <action commandName="Delete" confirmation="Delete?" />
  <action whenLastCommandName="Edit" commandName="Update" headerText="Save" />
  <action whenLastCommandName="Edit" commandName="Cancel" />
</actionGroup>
Reference to the CustomerID field in the curly brackets will be replaced with an actual value when the first action is executed in a web browser. This happens if user clicks on a link or selects Show Orders context menu option.
Order List
Add Orders web form to the ~/Forms folder while following the same routine described above. Make the page markup look like this.
<%@ Page Language="C#" MasterPageFile="~/MasterPage.master" AutoEventWireup="true"
    CodeFile="Orders.aspx.cs" Inherits="Forms_Orders" Title="Orders" %>
<asp:Content ID="Content1" ContentPlaceHolderID="head" runat="Server">
</asp:Content>
<asp:Content ID="Content2" ContentPlaceHolderID="Header1Placeholder" runat="Server">
    Orders
</asp:Content>
<asp:Content ID="Content3" ContentPlaceHolderID="Header2Placeholder" runat="Server">
    Northwind
</asp:Content>
<asp:Content ID="Content4" ContentPlaceHolderID="BodyPlaceholder" runat="Server">
    <div id="Customer" runat="server" class="CustomerInfo" />
    <aquarium:DataViewExtender ID="CustomerExtender" runat="server"
        Controller="Customers"
        View="editForm1" TargetControlID="Customer" ShowActionBar="false" />
    <div id="OrderList" runat="server" />
    <aquarium:DataViewExtender ID="OrderExtender" runat="server" Controller="Orders"
        View="grid1" TargetControlID="OrderList" />
</asp:Content>
Open Customers form in a web browser and select any customer. The following views will be presented.
The form automatically filters orders to match the customer ID in the URL of the browser. You can immediately edit customer information and make all sorts of changes to the orders . As good as this screen looks there are quite a few deficiencies. The form is too long and we don't know what is the total amount of each order. Plus we don't really want to allow any order changes and would rather use a dedicated order edit form.
First, we will make the form shorter. Add the following markup anywhere in the Content4 in Orders web form.
<div id="Customers_editForm1" style="display: none">
    <table style="width: 100%">
        <tr>
            <td>
                {CustomerID}
            </td>
            <td style="font-weight: bold">
                {CompanyName}
            </td>
            <td>
                {ContactName}
            </td>
            <td>
                {ContactTitle}
            </td>
            <td>
                {Phone}
            </td>
            <td>
                {City}
            </td>
            <td>
                {Country}
            </td>
        </tr>
    </table>
</div>
This creates an invisible form templates, which is automatically used by Web.DataView java script component of Data Aquarium Framework. The component will use the field names in the curly brackets as placeholders for the data fields rendered in a browser. Refresh Orders page and the following view will be displayed.
Notice that template ID is matched to editForm1 view when rendered for Customers controller. You can read additional discussion about form templates here.
This new look is a substantial improvement over the previous version. Let's take out the row with the buttons under the customer form and descriptive text above the form. This will leave a clean panel with customer information above the orders.
Create a CSS style sheet with name Northwind.css in ~/App_Themes/MyCompany folder. Enter the following text in the style sheet body.
.CustomerInfo .HeaderTextRow, .CustomerInfo .BottomButtonsRow
{
    display<span class="code-none">:none<span class="code-none">;
<span class="code-none">}       </span></span></span>
The first Div element of the form is defined with a CSS class name.
<div id="Customer" runat="server" class="CustomerInfo" />
Class CustomerInfo allows us to customize presentation of the header row with descriptive text and the bottom action buttons row. Customization is quite simple - we are not displaying either of them. Refresh the page to see it like that.
Now let's add a total amount to each order line. Data Aquarium Framework automatically parses the queries in your data controller to construct select, update, insert, and delete SQL statements. We will create an additional view in Northwind database and join this view to the query in ~/Controllers/Orders.xml file. Please create the following SQL view with SQL Management Studio or your favorite database management tool.
CREATE view [dbo].[OrderTotals]
as
select
    "OrderDetails"."OrderID",
    sum("OrderDetails"."UnitPrice" * "OrderDetails"."Quantity" *
        (1 - "OrderDetails"."Discount")) "ItemsTotal"
from "dbo"."Order Details" "OrderDetails"
group by "OrderDetails"."OrderID"
Then open the data controller file and change the text of command1 as shown below.
<text>
<![CDATA[
</text>
The main points of interest are the left join at the bottom of the query and two fields at the end of the field clause. Both fields are defined as expression, which must be enclosed with parenthesis to help the regular expressions of Data Aquarium Framework to correctly identify the expression and the corresponding alias. The left join is linking in the new view.
Add two new fields into /dataController/fields element.
<field name="ItemsTotal" type="Decimal" readOnly="true" label="Items Total"
    dataFormatString="c"/>
<field name="OrderTotal" type="Decimal" readOnly="true" label="Total"
    dataFormatString="c"/>
Make sure to mark both fields as read-only. The data format string will ensure that both fields are displayed as currency. You can use alternative syntax for the data format string: {0:c}, which is compatible with String.Format function that you know and love.
Move the grid view grid1 to be after the form view editForm1 to ensure that the edit form will become the default presentation view for Orders controller. Format fields in grid1 as displayed here.
<view id="grid1" type="Grid" commandId="command1" label="Orders">
  <headerText>This is a list of orders. </headerText>
  <dataFields>
    <dataField fieldName="OrderID" />
    <dataField fieldName="CustomerID" aliasFieldName="CustomerCompanyName" />
    <dataField fieldName="EmployeeID" aliasFieldName="EmployeeLastName" />
    <dataField fieldName="OrderDate" columns="10" />
    <dataField fieldName="RequiredDate" columns="10" />
    <dataField fieldName="ShippedDate" columns="10" />
    <dataField fieldName="ShipVia" aliasFieldName="ShipViaCompanyName" />
    <dataField fieldName="Freight" dataFormatString="c" columns="15" />
    <dataField fieldName="ItemsTotal"/>
    <dataField fieldName="OrderTotal"/>
  </dataFields>
</view>
We have introduce the primary key field OrderID, which you would likely want to serve as a visual reference for end users. Fields with item and order totals at at the end of the list. Refresh Orders page to see the following. Make sure that you can sort by order and items total.
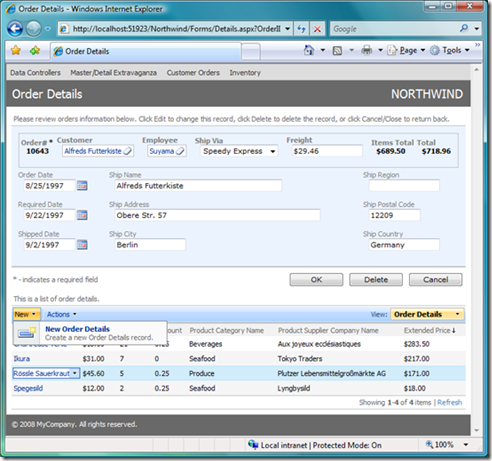
The last step is to change the actions available in the context menu of the grid view. Also take out all actions that are supposed to be displayed on action bar with header text Actions.
<actionGroup scope="Grid">
  <action commandName="Navigate"
    commandArgument="~/Forms/Details.aspx?OrderID={OrderID}"
    headerText="Order Details"/>
</actionGroup>
This will present itself as illustrated in the picture.
Order Details
Add Details.aspx web form following the same steps that were explained when we were creating Customers.aspx and Orders.aspx forms. Format the page as explained in the example.
<%@ Page Language="C#" MasterPageFile="~/MasterPage.master"
    AutoEventWireup="true" CodeFile="Details.aspx.cs"
    Inherits="Forms_Details" Title="Order Details" %>
<asp:Content ID="Content1" ContentPlaceHolderID="head" runat="Server">
</asp:Content>
<asp:Content ID="Content2" ContentPlaceHolderID="Header1Placeholder" runat="Server">
    Order Details
</asp:Content>
<asp:Content ID="Content3" ContentPlaceHolderID="Header2Placeholder" runat="Server">
    Northwind
</asp:Content>
<asp:Content ID="Content4" ContentPlaceHolderID="BodyPlaceholder" runat="Server">
    <div id="Order" runat="server" class="Order" />
    <aquarium:DataViewExtender ID="OrderExtender" runat="server" Controller="Orders"
        View="editForm1" TargetControlID="Order" ShowActionBar="false" />
    <div id="Details" runat="server" />
    <aquarium:DataViewExtender ID="DetailsExtender" runat="server"
    Controller="OrderDetails"
        View="grid1" TargetControlID="Details" />
</asp:Content>
As we've seen before, the page is fully functional but is somewhat difficult to use.
We will start with the template for the order form.
<div id="Orders_editForm1" style="display: none">
    <table style="width: 100%">
        <tr>
            <td colspan="3">
                <table style="width: 100%; border: solid 1px silver;">
                    <tr>
                        <td style="font-weight: bold">
                            {OrderID}
                        </td>
                        <td style="font-weight: bold">
                            {CustomerID}
                        </td>
                        <td style="font-weight: bold">
                            {EmployeeID}
                        </td>
                        <td style="font-weight: bold">
                            {ShipVia}
                        </td>
                        <td style="font-weight: bold">
                            {Freight}
                        </td>
                        <td style="font-weight: bold">
                            {ItemsTotal}
                        </td>
                        <td style="font-weight: bold">
                            {OrderTotal}
                        </td>
                    </tr>
                </table>
            </td>
        </tr>
        <tr>
            <td valign="top">
                <div>
                    {OrderDate}</div>
                <div>
                    {RequiredDate}</div>
                <div>
                    {ShippedDate}</div>
            </td>
            <td valign="top">
                <div>
                    {ShipName}</div>
                <div>
                    {ShipAddress}</div>
                <div>
                    {ShipCity}</div>
            </td>
            <td valign="top">
                <div>
                    {ShipRegion}</div>
                <div>
                    {ShipPostalCode}</div>
                <div>
                    {ShipCountry}</div>
            </td>
        </tr>
    </table>
</div>
This template breaks the order fields in three groups. This provides instant improvement in presentation.
Fields ItemsTotal and OrderTotal are missing in the rendered presentation. Make the following changes to editForm1 in Orders.xml to add the missing fields to the form.
<view id="editForm1" type="Form" commandId="command1" label="Order">
  <headerText>Please review orders information below. Click
    Edit to change this record, click Delete to delete the record, or
    click Cancel/Close to return back.</headerText>
  <categories>
    <category headerText="Orders">
      <description>These are the fields of the orders record
    that can be edited.</description>
      <dataFields>
        <dataField fieldName="CustomerID" aliasFieldName="CustomerCompanyName" />
        <dataField fieldName="EmployeeID" aliasFieldName="EmployeeLastName" />
        <dataField fieldName="OrderDate" columns="10" />
        <dataField fieldName="RequiredDate" columns="10" />
        <dataField fieldName="ShippedDate" columns="10" />
        <dataField fieldName="ShipVia" aliasFieldName="ShipViaCompanyName" />
        <dataField fieldName="Freight" dataFormatString="c" columns="15" />
        <dataField fieldName="ShipName" columns="40" />
        <dataField fieldName="ShipAddress" />
        <dataField fieldName="ShipCity" columns="15" />
        <dataField fieldName="ShipRegion" columns="15" />
        <dataField fieldName="ShipPostalCode" columns="10" />
        <dataField fieldName="ShipCountry" columns="15" />
        <dataField fieldName="ItemsTotal"/>
        <dataField fieldName="OrderTotal"/>
      </dataFields>
    </category>
  </categories>
</view>
We will change behavior of the action buttons by replacing definitions for Cancel and Close commands.
<actionGroup scope="Form">
  <action commandName="Edit" />
  <action commandName="Delete" confirmation="Delete?" />
  <action commandName="Back" headerText="Close"/>
  <action whenLastCommandName="Edit" commandName="Update" headerText="OK" />
  <action whenLastCommandName="Edit" commandName="Delete"
    confirmation="Delete?" />
  <action whenLastCommandName="Edit" commandName="Select"
    commandArgument="editForm1" headerText="Cancel" />
  <action whenLastCommandName="New" commandName="Insert" headerText="OK" />
  <action whenLastCommandName="New" commandName="Cancel" />
</actionGroup>
Close button simply directs the browser to go back one step in the history, which will bring user back to the list of orders. Button with Cancel header selects the current record and displays it in editForm1, which replaces the standard behavior of displaying the first view defined in the data controller.
Also change the item presentation style of field ShipVia from Lookup to DropDownList. There are only three shippers in the database and it makes little sense to display a popup window to select a shipper. Cosmetic changes to the labels of the lookup fields will make the form similar to the one in the picture when you edit any order.
Next we will introduce ExtendedPrice field to Order Details and get rid of order customer, employee, and shipping information, which is already being displayed above the details. Open ~/Controllers/OrderDetails.xml data controller descriptor and make the following changes.
Change text element to command1 to calculate the extended item price by taking into account item quantity and discount. Make sure to use parenthesis around the expression.
<text>
<![CDATA[</text>
Add extender price field to fields element in OrderDetails.xml.
<field name="ExtendedPrice" type="Decimal" allowNulls="true"
   readOnly="true" label="Extended Price" dataFormatString="c"/>
Change view grid1 to display the data fields as in this snippet.
<view id="grid1" type="Grid" commandId="command1" label="Order Details">
  <headerText>This is a list of order details. </headerText>
  <dataFields>
    <dataField fieldName="OrderID" aliasFieldName="OrderCustomerID" />
    <dataField fieldName="ProductID" aliasFieldName="ProductProductName" />
    <dataField fieldName="UnitPrice" dataFormatString="c" columns="15" />
    <dataField fieldName="Quantity" columns="15" />
    <dataField fieldName="Discount" columns="15" />
    <dataField fieldName="ProductCategoryCategoryName" columns="15" />
    <dataField fieldName="ProductSupplierCompanyName" columns="40" />
    <dataField fieldName="ExtendedPrice"/>
  </dataFields>
</view>
Add the following CSS class definition to Northwind.css to hide the top row of action buttons. Here we are taking advantage of Orders class name attribute of the first div element of the form.
.Order .TopButtonsRow
{
    display<span class="code-none">: none<span class="code-none">;
<span class="code-none">}  </span></span></span>
The order details are nicely presented to the viewer with the extended price in the last column.
Automatic Refreshing When Order Details Are Changed
Changes to the order freight are instantly reflected on screen when you save changes. Not so when order details are changed. Order totals must be recalculated whenever a new item is ordered, existing item is modified, or deleted. The product price is not being transferred to the UnitPrice of Order Details record when you add a new item . You have enter the product unit price in on your own. It will default to zero if you leave the field blank.
Field UnitPrice can be safely omitted from the view createForm1 if we automatically copy the product price as soon as order details record has been inserted into database. Change createForm1 in OrderDetails.xml as follows.
<view id="createForm1" type="Form" commandId="command1" label="New Order Details">
<headerText>Please fill this form and click OK button to
create a new order details record. Click Cancel to return
to the previous screen.</headerText>
<categories>
<category headerText="New Order Details">
<description>Complete the form. Make sure to enter
all required fields.</description>
<dataFields>
<dataField fieldName="OrderID" aliasFieldName="OrderCustomerID" />
<dataField fieldName="ProductID" aliasFieldName="ProductProductName" />
<dataField fieldName="Quantity" columns="15" />
<dataField fieldName="Discount" columns="15" />
</dataFields>
</category>
</categories>
</view>
This will result in the following presentation when you add a new item. Note that field OrderID is not displayed since it is being filtered by in Details.aspx via OrderID parameter in the page URL.
Next we will write some code. Right-click App_Code folder in the project tree and add Class1 class to the web site code base. This class will implement a custom action handler for OrderDetails data controller. Change OrderDetails.xml to link the custom action handler to Data Aquarium Framework.
<dataController .... xmlns="urn:schemas-codeontime-com:data-aquarium"
 actionHandlerType="Class1">
Here is C# code that you need to enter.
using System;
using MyCompany.Data;

public class Class1 : ActionHandlerBase
{
    protected override void AfterSqlAction(ActionArgs args, ActionResult result)
    {
        if (args.CommandName == "Insert")
        {
            double price = 0;
            using (SqlText findPrice = new SqlText(
                "select UnitPrice from Products where ProductId = @ProductID"))
            {
                findPrice.AddParameter("@ProductId", args["ProductID"].Value);
                price = Convert.ToDouble(findPrice.ExecuteScalar());
            }
            using (SqlText updatePrice = new SqlText(
                "update [Order Details] set UnitPrice = @UnitPrice " +
           "where OrderID = @OrderID and ProductID = @ProductID))
            {
                updatePrice.AddParameter("@UnitPrice", price);
                updatePrice.AddParameter("@OrderID", args["OrderID"].Value);
                updatePrice.AddParameter("@ProductID", args["ProductID"].Value);
                updatePrice.ExecuteNonQuery();
            }
        }
        if (args.ContextKey.EndsWith("DetailsExtender"))
            result.ClientScript =
                "Web.DataView.find('OrderExtender').goToPage(-1);" +
                "this.set_lastCommandName(null);" +
                "this.goToView('grid1');";
    }
}
Here is VB.NET equivalent of the same class.
Imports Microsoft.VisualBasic
Imports MyCompany.Data

Public Class Class1
    Inherits ActionHandlerBase

    Protected Overrides Sub AfterSqlAction(ByVal args As MyCompany.Data.ActionArgs, _
    ByVal result As MyCompany.Data.ActionResult)
        If args.CommandName = "Insert" Then
            Dim price As Double = 0
            Using findPrice As SqlText = New SqlText( _
                "select UnitPrice from Products where ProductId = @ProductID")
                findPrice.AddParameter("@ProductID", args("ProductID").Value)
                price = Convert.ToDouble(findPrice.ExecuteScalar())
            End Using
            Using updatePrice As SqlText = New SqlText( _
                "update [Order Details] set UnitPrice = @UnitPrice " & _
           "where OrderID = @OrderID and ProductID = @ProductID")
                updatePrice.AddParameter("@UnitPrice", price)
                updatePrice.AddParameter("@OrderID", args("OrderID").Value)
                updatePrice.AddParameter("@ProductID", args("ProductID").Value)
                updatePrice.ExecuteNonQuery()
            End Using
        End If
        If args.ContextKey.Contains("DetailsExtender") Then
            result.ClientScript = _
                "Web.DataView.find('OrderExtender').goToPage(-1);" + _
                "this.set_lastCommandName(null);" + _
                "this.goToView('grid1');"
        End If
    End Sub

End Class
Let's analyze the code.
Our action handler is automatically invoked by the framework whenever an action execution is requested by java script Web.DataView component in a browser and OrderDetails data controller is involved.
We want to intercept each Insert command and will copy UnitPrice from dbo.Products table to dbo.[Order Details] table. Data Aquarium Framework provides two utility classes, SqlStoredProcedure and SqlText, to simplify execution of SQL stored procedures and arbitrary SQL commands. You can use your favorite data access library to interact with the database.
The purpose of the second conditional statement is to intercept any actions coming from client java script Web.DataView component that was instantiated by DataViewExtender with the name DetailsExtender. This conditional statement simply assigns client-side java script statements to the CientScript property of the result parameter. This java script will be executed in the browser when the action returns control from the server code.
The first java script statement will find OrderExtender and ask it to navigate to page with index -1. This will cause order summary view to refresh itself.
Next the last executed command is cleared to allow action state machine of Web.DataView to continue correct operation. Actions are always executed in the context of last action command name. Here we want to clear the last action command name as it is being done by default.
The last java script statement will force the order details view to display the grid view grid1. Insert and Update commands are initiated from the form view and this statement is required to make sure that the form view is switched to the grid presentation style.
If there is no client script returned form the server upon completion of action execution then java script statements two and three are automatically performed by Web.DataView. We have decided to force the order view to be refreshed and now we have to take care of the low level details on our own.
Try playing with order details to make that order summary is automatically updated to reflect the order changes.
Inventory Manager
Now we will put together an inventory manager for our mail order company. Create a new page Inventory.aspx in ~/Forms folder of the web site. Format the page to include a TabContainer with a few TabPanel components. Both controls are a part of Ajax Control Toolkit. Tag prefix act is registered in web.config file of your web site. Data Aquarium Framework relies on the toolkit for a significant portion of its client-side functionality.
<%@ Page Language="C#" MasterPageFile="~/MasterPage.master" AutoEventWireup="true"
    CodeFile="Inventory.aspx.cs" Inherits="Forms_Inventory" Title="Inventory" %>
<asp:Content ID="Content1" ContentPlaceHolderID="head" runat="Server">
</asp:Content>
<asp:Content ID="Content2" ContentPlaceHolderID="Header1Placeholder" runat="Server">
    Inventory
</asp:Content>
<asp:Content ID="Content3" ContentPlaceHolderID="Header2Placeholder" runat="Server">
    Northwind
</asp:Content>
<asp:Content ID="Content4" ContentPlaceHolderID="BodyPlaceholder" runat="Server">
    <act:TabContainer ID="InventoryTabs" runat="server">
        <act:TabPanel ID="ProductsTab" runat="server" HeaderText="Products">
            <ContentTemplate>
                <div id="Products" runat="server" />
                <aquarium:DataViewExtender ID="ProductsExtender" runat="server"
                    Controller="Products"
                    TargetControlID="Products" />
            </ContentTemplate>
        </act:TabPanel>
        <act:TabPanel ID="SuppliersTab" runat="server" HeaderText="Suppliers">
            <ContentTemplate>
                <div id="Suppliers" runat="server" />
                <aquarium:DataViewExtender ID="SuppliersExtender" runat="server"
                    Controller="Suppliers"
                    TargetControlID="Suppliers" PageSize="5" />
                <br />
                <div id="SupplierProducts" runat="server" />
                <aquarium:DataViewExtender ID="SupplierProductsExtender" runat="server"
                    Controller="Products"
                    TargetControlID="SupplierProducts" FilterSource="SuppliersExtender"
                    FilterFields="SupplierID" PageSize="5" />
            </ContentTemplate>
        </act:TabPanel>
        <act:TabPanel ID="CategoriesTab" runat="server" HeaderText="Categories">
            <ContentTemplate>
                <div id="Categories" runat="server" />
                <aquarium:DataViewExtender ID="CategoriesExtender" runat="server"
                    Controller="Categories" TargetControlID="Categories" PageSize="5" />
                <br />
                <div id="CategoryProducts" runat="server" />
                <aquarium:DataViewExtender ID="CategoryProductsExtender" runat="server"
                    Controller="Products" TargetControlID="CategoryProducts"
                    FilterSource="CategoriesExtender" FilterFields="CategoryID"
                    PageSize="5" />
            </ContentTemplate>
        </act:TabPanel>
    </act:TabContainer>
</asp:Content>
Open Inventory.aspx in a web browser.
Products tab is displaying a list of products, while Suppliers and Categories tabs are presenting the corresponding entities with products linked to them in master-detail relationship. Users can quickly create new inventory entities and browse them as they wish.
We can make few more enhancements to the product management by introducing additional product views. Open ~/Controllers/Products.xml and add two commands just after command1.
<command id="command2" type="Text">
<text>
<

 General
  News
News  Suggestion
  Question
  Bug
Bug  Answer
  Joke
Joke  Praise
  Rant
Rant  Admin
Admin 


