Introduction
This article explains the nature and purpose of Windows Sockets. This is a simple application to demonstrate about socket, socket types, and general flow diagram of socket communication, CSocket, CAsyncSocket and its API call in the easiest manner.
Definition of a Socket
A socket is a communication endpoint — an object through which a Windows Sockets application sends or receives packets of data across a network. A socket has a type and is associated with a running process, and it may have a name. Currently, sockets generally exchange data only with other sockets in the same “communication domain,” which uses the Internet Protocol Suite.
Both kinds of sockets are bi-directional: they are data flows that can be communicated in both directions simultaneously (full-duplex).
Two socket types are available:
Stream Sockets
Stream sockets provide for a data flow without record boundaries — a stream of bytes. Streams are guaranteed to be delivered and to be correctly sequenced and unduplicated.
Datagram Sockets
Datagram sockets support a record-oriented data flow that is not guaranteed to be delivered and may not be sequenced as sent or unduplicated.
“Sequenced” means that packets are delivered in the order sent. “Unduplicated” means that you get a particular packet only once.
About CSocket
Class CSocket derives from CAsyncSocket and inherits its encapsulation of the Windows Sockets API. A CSocket object represents a higher level of abstraction of the Windows Sockets API than that of a CAsyncSocket object. CAsyncSocket operates in nonblocking mode.
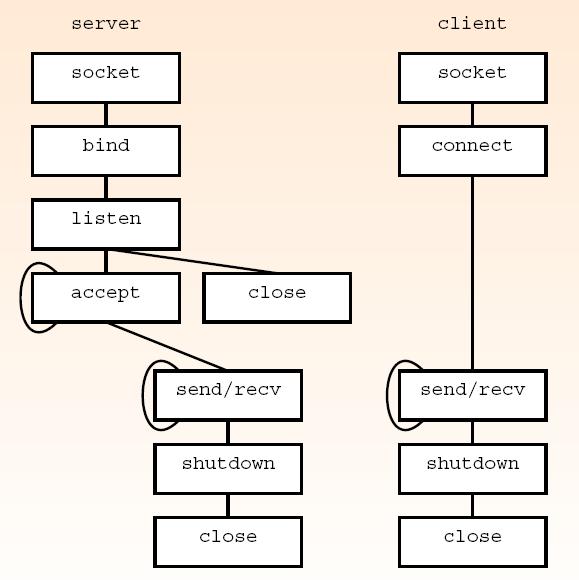
Socket Flow Diagram for Client and Server Application
Initializing Sockets
First, we need to initialize a socket using a function AfxSocketInit(), before the socket has been created. Its returns value is nonzero if the function is successful; otherwise 0.
BOOL CChatServerDlg::OnInitDialog()
{
	if( AfxSocketInit() == FALSE)
	{
		AfxMessageBox("Failed to Initialize Sockets");
		return FALSE;
	}
}
Server performs the following actions. They are:
- Create
- Listen
- Accept
- Send/Receive
- Shutdown
- Close
Creating Server Socket
Using ServerSocket class (which is derived from CSocket) variable m_Server, a socket is created with default Port ID “1001” using create() function.
Syntax
BOOL Create( UINT nSocketPort = 0, int nSocketType = SOCK_STREAM,
long lEvent = FD_READ | FD_WRITE | FD_OOB | FD_ACCEPT | FD_CONNECT |
FD_CLOSE, LPCTSTR lpszSocketAddress = NULL );
For Example
m_Server.create(1001);
Listening Socket
After creating the socket, we need to make the server listen to the specific port using the listen() function.
Syntax
BOOL Listen( int nConnectionBacklog = 5 );
For Example
m_Server.Listen( );
Accepting Client Connection Request
Client connection request is accepted by server using the accept() function call.
Syntax
virtual BOOL Accept( CAsyncSocket& rConnectedSocket,
SOCKADDR* lpSockAddr =   NULL, int* lpSockAddrLen = NULL );
For Example
Accept(m_Client);
Receive Data
Call this member function to receive data from a socket. This function is used for connected sockets and is used to read incoming data.
Syntax
virtual int Receive( void* lpBuf, int nBufLen, int nFlags = 0 );
For Example
Receive(buff,sizeof(buff));
Sending Data
Call this member function to send data on a connected socket. Send is used to write outgoing data on connected sockets.
Syntax
virtual int Send( const void* lpBuf, int nBufLen, int nFlags = 0 );
For Example
m_Server.m_Client.Send(buff,sizeof(userinfo));
Shutting Down Connection
Call this member function to disable sends and/or receives on the socket. ShutDown is used on all types of sockets to disable reception, transmission, or both.
Syntax
BOOL ShutDown( int nHow = sends );
For Example
m_Server.m_Client.ShutDown(0); m_Server.m_Client.ShutDown(1); m_Server.m_Client.ShutDown(2);
Closing Connection
This function closes the socket.
Syntax
virtual void Close( );
For Example
m_Server.Close();
Client performs the following actions:
They are:
- Create
- Connect
- Send/Receive
- Shutdown
- Close
The same set of syntax is used for calling functions like create(), send(), receive(), shutdown() and close().
Connecting to a Server
Call this member function to establish a connection to an unconnected socket.
Syntax
BOOL Connect( LPCTSTR lpszHostAddress, UINT nHostPort );
For Example
m_Client.Connect(m_sIPAddress,1001)
About the Application
Server-Side
Start Server Button
When user presses “Start Server” button that time, create() function is called to create socket with a default port id (1001) and made server to listen() to 1001 port.

void CChatServerDlg::OnStart()
{
	m_Server.m_Client.pDlg=this;

	if(m_Server.Create(1001)==FALSE)
	{
		MessageBox("Failed to create");
		return;
	}
	if(m_Server.Listen()==FALSE)
	{
		MessageBox("Failed");
		return;
	}
}
Stop Server Button
It is used to disable send and receive on the socket by calling shutdown() function and close the socket with the help of close() function.
void CChatServerDlg::OnStop()
{
	m_Server.m_Client.ShutDown(2);
	m_Server.Close();
}
Send Button
Send button is used to send data on a connected socket by calling Send() function.
void CChatServerDlg::OnSendInfo()
{
	UpdateData(TRUE);
	userinfo uinf;

	strcpy(uinf.cUserName,"Server");
	strcpy(uinf.csMsg,m_Msg);

	char *buff=(char*)&uinf;
	m_Server.m_Client.Send(buff,sizeof(userinfo));
}
For better understanding, I created two classes and they are ServerSocket.cpp and ClientSocket.cpp. Both are derived from CSocket.
When client sends the request on the socket that time Accept callback function is triggered automatically to accept client request. For understanding, I created the ServerSocket class and Accept API function is placed here.
void CServerSocket::OnAccept(int nErrorCode)
{
m_Client.m_hSocket = INVALID_SOCKET;
AfxMessageBox("Client Request Connection");
Accept(m_Client);
CSocket::OnAccept(nErrorCode);
}
ClientSocket class is created to understand that data are received from client. So Receive API function definition is done in the ClientSocket class.
void CClientSocket::OnReceive(int nErrorCode)
{
	char buff[1000];

	int ibuf = Receive(buff,1000);
	buff[ibuf] = '\0';

	userinfo *udata;
	udata = (userinfo*)buff;

	((CChatServerDlg*)pDlg)->AddMsg(udata);

	CSocket::OnReceive(nErrorCode);
}
Client-Side
Connect Server Button
IP address is a must to connect with the server. So before pressing “Connect Server” button, provide IP address in the IP address text box and that address is passed to connect() function as a parameter.
void CChatClientDlg::OnConnect()
{
UpdateData(TRUE);
if(m_Client.Create()==FALSE)
{
MessageBox("Failed to Create Socket");
return;
}
if(m_Client.Connect(m_sIPAddress,1001)==FALSE) {
MessageBox("Failed to Connect");
return;
}
m_Client.pDlg = this;
}
Stop Button
The same functionality is implemented for disabling send and receive and closing socket and which is cited above.
void CChatClientDlg::OnStop()
{
m_Client.ShutDown(2); m_Client.Close();
}
Send Message Button
Give user name and type message which you are going to send and user name is optional.
Procedure to Run an Application
- Run “ChatSever.exe”.
- Press Start Server button to create a socket.
- Then Run “ChatClient.exe”.
- Give valid IP Address and press Connect Server button to establish a connection to an unconnected socket.
- Now server and client are ready to chat and sample snapshot given is below:
I am working in R&D department. In programming, I'm very much interested in OOPS concepts and I have written a book on "Programming in C++". My hobbies are playing cricket, painting and I have started a Educational trust "Illuminate Educational Trust".


 General
  News
News  Suggestion
  Question
  Bug
Bug  Answer
  Joke
Joke  Praise
  Rant
Rant  Admin
Admin 


