Introduction
This article is an attempt to demystify the use of dialog boxes to gather user input. It is not intended to be exhaustive, rather, it is aimed at new or beginning programmers. There is a Part 2 under construction, which deals with "complex" data, i.e. more than one piece of data.
Background
Recently a regular contributer to The Lounge, here on CP, posted about the difficulty he was having in understanding this topic, and suggested that an article would be a good idea. This is my attempt at fulfilling his request.
One thing that seems to confuse new programmers, is how to get input from the user by using a dialog. It is actually quite simple to do once you understand the big secret:
In some way you have to allow the calling routine to have access to the data from the user.
There are many ways to do this and the accompanying code samples demonstrates just a few of these.
The sample solution contains three projects.
All three of them deal with "simple" user input i.e. getting just one piece of information.
The Dialog Forms
All of the Forms with filenames ending “Dialog.cs” and the file InputBox.cs have at least the following properties and components:
Common Components
- a button named 'btnOK' with its DialogResult property set to
DialogResult.OK - a button named 'btnCancel' with its DialogResult property set to
DialogResult.Cancel
Form Properties
- FormBorderStyle set to
FormBorderStyle.FixedDialog - StartPosition set to
FormStartPosition.CenterParent (I prefer this although it is not necessary) - AcceptButton set to 'btnOK' (this enables the user to press Return to accept the changes)
- CancelButton set to 'btnCancel' (this enables the user to press Esc to cancel changes)
- ControlBox, MaximizeBox and MinimizeBox all set to
false (optional) - You can also set the ShowInTaskbar to
false (does what it says on the tin)
This project demonstrates what I consider to be the easiest and also least 'correct' method.
Here is the code from the calling form that causes the dialog to display and handles the user input when it closes:
private void btnEdit_Click(object sender, EventArgs e)
{
VeryVerySimpleInputDialog input = new VeryVerySimpleInputDialog();
if (input.ShowDialog() == DialogResult.OK)
{
<a name="ex1ErrorLine">this.txtInputOutput.Text = input.txtInput.Text;</a>
}
if (input != null)
{
input.Dispose();
}
}
The code should be self explanatory, with the help of the comments.
Here is the dialog:
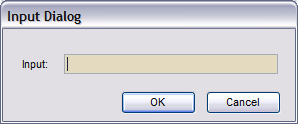
As you can see it only has one control for user input, a TextBox.
It is the text that the user types into this TextBox that should be returned if the user presses OK.
If you build your own input dialog by just copying the visual appearance of this one and do nothing else to the dialog to enable the retrieval of the users' input, you will get an error when you try to compile.
VeryVerySimpleDialog.VeryVerySimpleInputDialog.txtInput is inaccessible due to its protection level
The line number for the error will point at this line from the code from the calling form, above:
<a href="#ex1errorLine">this.txtInputOutput.Text = input.txtInput.Text;</a>
In order to allow the calling form access to the users' text (i.e. implement the secret), the quickest way, involving the least amount of work is to select the TextBox in the dialog designer, then in the Properties Window scroll down to the Design category and change the Modifiers property to anything other than private or protected. You will now find that your project will compile and run. You might however encounter some problems from other people with this methodology. You see, it breaks one of the cardinal rules of Object Orientation, “Encapsulation,” at least partly. This is not the place for a more in-depth explanation. Look it up in MSDN, or Google it for more detail. It does however work, and by doing so, demonstrates that the secret is the cure for dialog ills.
The next example resolves the Encapsulation problem.
Things to Research Yourself
This example is very similar to the previous one, the dialog is slightly more complicated in that it allows you to display a prompt to the user and suggest some input to use as a default. In order to allow this to happen the main form is also slightly more complicated. It also, as mentioned above, resolves the Encapsulation problem.
The main form code is largely the same as the previous example, only complicated by the need to create different flavours of dialog according to the style RadioButton checked. We'll look at that later.
First here is the dialog with all options:
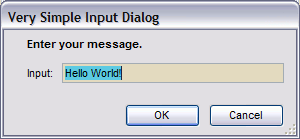
Notice the prompt and the default input. So if the user clicks OK now the input will be 'Hello World!'.
The code for the dialog is where the problem of Encapsulation is resolved:
public VerySimpleInputDialog()
{
    InitializeComponent();

    this.lblPrompt.Text = "";
}

public VerySimpleInputDialog(string prompt)
: this()
{
    if (!string.IsNullOrEmpty(prompt))
    {
        this.lblPrompt.Text = prompt;
    }
}

public VerySimpleInputDialog(string prompt, string defaultInput)
: this()
{
    if (!string.IsNullOrEmpty(prompt))
    {
        this.lblPrompt.Text = prompt;
    }

    this.txtInput.Text = this.defaultValue = defaultInput;
}
Notice that there are three constructors. The standard one, for use when neither prompt or default text is needed. One which has a single string parameter, for use when only a prompt is wanted. The third one takes two string parameters, for occasions when both a prompt and default text is required. The latter two constructors call the standard constructor (the : this() line) in order to perform the standard component initialization.
Take note of the:
this.txtInput.Text = this.defaultValue = defaultInput;
line. Not because it does anything special or clever but because it saves a copy of the default text in a private member defaultValue as well as copying it into the input TextBox.
defaultValue declaration:
private string defaultValue = string.Empty;
The defaultValue member is used when the user presses the 'Cancel' button or hits the Esc Key. Here's the code for that:
private void btnCancel_Click(object sender, EventArgs e)
{
if (!string.IsNullOrEmpty(this.defaultValue))
{
this.txtInput.Text = this.defaultValue;
}
}
If the user decides to cancel for any reason, the stored defaultValue if any is copied into the input TextBox ready to be used by the calling form.
Here is the code that solves the encapsulation dilemma:
public string UserInput
{
    get
    {
        return this.txtInput.Text;
    }
}
It is a public read-only property, which returns the contents of the input TextBox when called. This methodology is OK because it only allows access to the content of the TextBox, and read-only access at that. The previous example gave access to the entire TextBox and with a reference to an object you can do whatever you like, e.g. Dispose() it, which could be disastrous.
Now the main form:
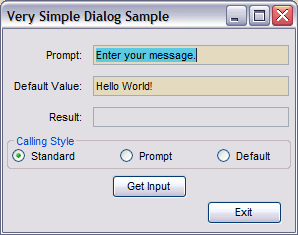
The 'Prompt' TextBox allows you to specify the prompt that will appear in the dialog, just above the input TextBox.
The 'Default Value' Text box allows you to specify some text that will be used if the user doesn't input anything.
The three radio buttons in the 'Calling Style' GroupBox allows you to specify the appearance of the dialog. If the 'Standard' option is selected, the dialog will be very much like the one in the previous example. If the 'Prompt' option is selected the dialog will include the prompt from the main form. If the 'Default' option is selected the dialog will include both the prompt and default text.
Here is the code from the calling form that causes the dialog to display and handles the user input when it closes:
private void btnEdit_Click(object sender, EventArgs e)
{
if (rbtnStandard.Checked)
{
VerySimpleInputDialog input = new VerySimpleInputDialog();
if (input.ShowDialog() == DialogResult.OK)
{
this.txtResult.Text = input.UserInput;
}
if (input != null)
{
input.Dispose();
}
}
else if (rbtnPrompt.Checked)
{
VerySimpleInputDialog input =
new VerySimpleInputDialog(this.txtPrompt.Text);
if (input.ShowDialog() == DialogResult.OK)
{
this.txtResult.Text = input.UserInput;
}
if (input != null)
{
input.Dispose();
}
}
else if (rbtnDefault.Checked)
{
VerySimpleInputDialog input =
new VerySimpleInputDialog(this.txtPrompt.Text, this.txtDefault.Text);
input.ShowDialog();
this.txtResult.Text = input.UserInput;
if (input != null)
{
input.Dispose();
}
}
}
Note that for each option, the line setting the content of the result TextBox uses the public, read-only UserInput property to get the data.
Things to Research Yourself
- Properties
- Read-Only Properties
This example differs from the previous two, mainly in the way the dialog is created. You will recall that in those examples it was the calling form that created and controlled the display of the dialog. In this example that responsibility is delegated to the dialog itself.
Here is the dialog (an instance of InputBox)
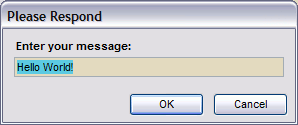
The only real difference in the dialog itself is the added ability to set the dialog caption and to validate the input against a type specified when it is created. The first thing to notice about the code for the InputBox is that the default constructor has had its accessibility set to private. This prevents anyone from creating an instance without using one of the ShowDialog() methods, the inbuilt MessageBox uses a similar strategy with the MessageBox.Show() static method. There are several overloaded versions of the ShowDialog() method to allow for the different combinations of parameters permitted. I have not included a method for all possible combinations, that could drive you to drink, just those that I thought would be useful at the time I designed the dialog. It would be easy to add more at a later date if felt necessary but once the dialog has been used in any applications it could be fatal to remove any of them.
Here is the code for just two of these methods:
public static DialogResult ShowDialog(out string input)
{
return InputBox.ShowDialog(null, null, null, out input, InputBoxResultType.Any);
}
public static DialogResult ShowDialog(string caption, string prompt, string defaultValue,
out string input, InputBoxResultType validationType)
{
InputBox inputBox = new InputBox();
if (string.IsNullOrEmpty(caption))
{
inputBox.Text = Application.ProductName;
}
else
{
inputBox.Text = caption;
}
if (!string.IsNullOrEmpty(prompt))
{
inputBox.lblPrompt.Text = prompt;
}
if (!string.IsNullOrEmpty(defaultValue))
{
inputBox.defaultValue = inputBox.txtInput.Text = defaultValue;
}
Size promptSize = inputBox.lblPrompt.CreateGraphics().MeasureString(prompt,
inputBox.lblPrompt.Font,
inputBox.ClientRectangle.Width - 20).ToSize();
if (promptSize.Height > inputBox.lblPrompt.Height)
{
promptSize.Width += 4;
promptSize.Height += 4;
}
inputBox.lblPrompt.Width = inputBox.ClientRectangle.Width - 20;
inputBox.lblPrompt.Height = Math.Max(inputBox.lblPrompt.Height, promptSize.Height);
int postLabelMargin = 2;
if ((inputBox.lblPrompt.Top + inputBox.lblPrompt.Height + postLabelMargin) >
inputBox.txtInput.Top)
{
inputBox.ClientSize = new Size(inputBox.ClientSize.Width,
inputBox.ClientSize.Height +
(inputBox.lblPrompt.Top + inputBox.lblPrompt.Height + postLabelMargin -
inputBox.txtInput.Top));
}
else if ((inputBox.lblPrompt.Top + inputBox.lblPrompt.Height + postLabelMargin) <
inputBox.txtInput.Top)
{
inputBox.ClientSize = new Size(inputBox.ClientSize.Width,
inputBox.ClientSize.Height -
(inputBox.lblPrompt.Top + inputBox.lblPrompt.Height + postLabelMargin -
inputBox.txtInput.Top));
}
input = string.Empty;
DialogResult result = DialogResult.None;
while (result == DialogResult.None)
{
result = inputBox.ShowDialog();
if (result == DialogResult.OK)
{
input = inputBox.txtInput.Text;
if (validationType != InputBoxResultType.Any)
{
if (!inputBox.Validate(validationType))
{
input = string.Empty;
result = DialogResult.None;
MessageBox.Show(inputBox, "The data entered is not a valid " +
validationType.ToString() + ".");
inputBox.txtInput.Select();
}
}
}
else
{
if (string.IsNullOrEmpty(inputBox.defaultValue))
{
input = string.Empty;
}
else
{
input = inputBox.defaultValue;
}
}
}
if (inputBox != null)
{
inputBox.Dispose();
}
return result;
}
The second of the methods above is the only one that actually does anything. The others, like the first one above, simply calls the last one, substituting sensible values for any required parameters missing from its own parameter list. All of the ShowDialog() methods are declared as
public static DialogResult ShowDialog
The key to this working is the static access modifier which enables this methodology to work. Its use means that you don't need to create an instance of the class in order to use it. A method declared as 'static' belongs to the type, not to a specific instance of the type. So if you create a class called Banana which has a public static method called SoldOut, like this:
public class Banana
{
    public static bool SoldOut()
    {
        return true;
    }
}
The SoldOut method is called like:
bool anyBananas = Banana.SoldOut();
rather than the way you are used to:
Banana newBanana = new Banana();
if (newBanana.SoldOut())
{
}
this will give a compile error.
Throughout the code examples in this article you will see many occurrences of:
if (string.IsNullOrEmpty(aString))
{
    etc.
}
IsNullOrEmpty is a static member of the string Type. It is not a member of a particular instance of string.
This example implements the secret by using an out parameter. There are lots of examples for this type of parameter in MSDN. Here is the code that the main form uses to display the dialog and use the input:
private void btnTest_Click(object sender, System.EventArgs e)
{
string userInput = string.Empty;
InputBox.ShowDialog(txtCaption.Text, txtPrompt.Text, txtdefault.Text,
out userInput, this.validationType);
if (string.IsNullOrEmpty(userInput))
{
this.txtResult.Text = "Input cancelled by user.";
}
else
{
this.txtResult.Text = userInput;
}
}
After the main form calls InputBox.ShowDialog(.....) it makes use of the users' input with the line:
this.txtResult.Text = userInput;
you can see that userInput is declared at the start of the method and is then passed as the input parameter of the ShowDialog() method. I have initialized userInput as an empty string but that is not required. If you were using ref instead of out, and you could, the initialization would be necessary.
I prefer using this methodology for dialogs when possible, because it comes nearest to the ideals of OOP programming. Sometimes, however, it just gets too complicated to work out how to do certain things in this way, so I go back to the methodology used in example 2. I try not to use the methodology in example 1.
This dialog was originally written using VS2003 and .NET 1.1 when I was trying to learn C#. I have cleaned it up slightly in some areas since then (e.g. I have moved the validation code to a separate method), originally it was included in the static ShowDialog() method, so that at some later date it will be easier to replace it without breaking any of my apps that use this dialog. At the time I was writing it I didn't know about the ErrorProvider component, or the Validating event available for the TextBox but this works as is and I have therefore refrained from messing too much. Perhaps one day!
Things to Research Yourself
- static access modifier
- out keyword
- ErrorProvider components
- Validating event
Using the Code
The code from the sample should work in all versions of C#. (For pre VS2008 you will need to cut and paste the code.) A lot of it comes directly from projects of mine written using VS2003 and .NET 1.1, although the solution and project files included were produced with VS2008 and .NET 3.5. For all of the included projects, when compiled and run, the initial form has a fairly central button. Clicking this button causes a dialog to appear where the data can be entered or modified. Clicking the 'OK' or 'Cancel' button on the dialog causes the dialog to close and the new information, to be passed back to the main form.
History
This is the first posted version of theis article.
Retired Systems Admin, Programmer, Dogsbody.
Mainly on Systems for Local Government, Health Authorities,
Insurance Industry - (COBOL eeeeeeeugh).
Inventor of Synchronized Shopping.


 General
  News
News  Suggestion
  Question
  Bug
Bug  Answer
  Joke
Joke  Praise
  Rant
Rant  Admin
Admin 


