Introduction
This article will describe how to embed a .NET Windows Forms application in a web browser using a WPF browser application. Basically, this article will show you how to web enable any Windows Forms .NET application with very few modifications to your project and no code modifications to your WinForms app.
Now, I realize that this is cheating, this article does not actually show you how to convert a .NET Windows Forms application to WPF. If you want to take advantage of all the features that come with WPF, eventually, you will need to re-write your GUI into WPF. However, if in the short term it is not feasible to convert all of your GUI code into WPF, then this solution is a primitive workaround that enables you to host your applications online.
Creating a sample Windows Forms application
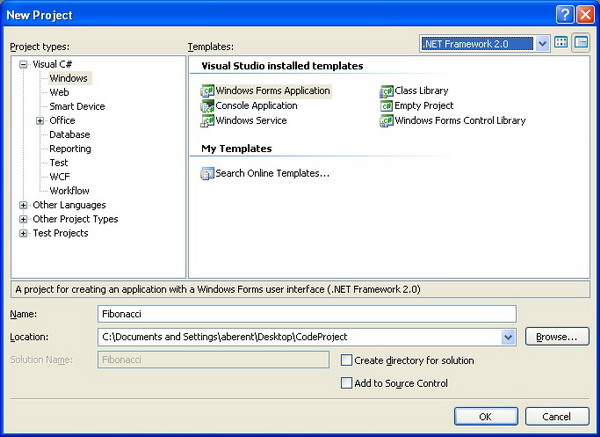
The first step in this article will be to create a simple Windows Forms C# application. This can be any WinForms application, but for the purpose of this article, I will create a small application that calculates a Fibonacci number and displays it on the user interface. This WinForms application can be in either .NET 2.0 or 3.5.
My application will have a form called MainForm, a button called btnCalculate, and a text box called txtResult.

Here is the code for the button click event and the Fibonacci calculation:
static int Fibonacci(int x)
{
    if (x <= 1)
    {
        return 1;
    }
    return Fibonacci(x - 1) + Fibonacci(x - 2);
}

private void btnCalculate_Click(object sender, EventArgs e)
{
    txtResult.Text = Fibonacci(10).ToString();
}
Now that we have our sample application, the next step is to convert it to a Class Library. Right click on your project and choose Properties. Under the Application tab in the Output type combo box, choose Class Library, save, and rebuild.
Note, in order to have your application be referenced in WPF, this is the only change you will have to make to your Windows Forms project.
Creating a WPF browser host application
The next step will be to create a WPF browser application. You can do this within the same solution as your Windows Forms application, or in a new solution. In this sample, I am simply going to add the WPF browser application project to the same solution. I have called this new project WPFHost.
The first thing we are going to do is add a reference from our WPFHost project to our WinForms Fibonacci application.
Since the WinForms project is in the same solution, we will add the reference to the Fibonacci project. If the WinForms application was in a different solution, we would browse to the created DLL and add a reference to it.
We will also need to add a reference to the Windows Forms Integration and System Windows Forms Component in the .NET tab.
The next step will be to add a StackPanel to our Page1 XAML window.
The full XAML for Page1.xaml is:
<Page x:Class="WPFHost.Page1"
    xmlns="http://schemas.microsoft.com/winfx/2006/xaml/presentation"
    xmlns:x="http://schemas.microsoft.com/winfx/2006/xaml"
    Title="Page1">
    <Grid>
        <StackPanel Margin="0,0,0,0" Name="stackPanel"
           HorizontalAlignment="Left" VerticalAlignment="Top" />
    </Grid>
</Page>
OK, we are almost there. The next step will be to add some code to Page1.xaml.cs in our project. The magic will happen in the Page1 constructor. Our code will create a WindowsFormHost object and assign the previously created MainForm object from our Fibonacci assembly as the child. The WindowsFormHost will then be added as a child to our WPF StackPanel. The only other obscure line of code sets the TopLevel property of the MainForm object to false. I am not sure why this is required, but you will get a compile error if you do not add this step.
The code looks as follows:
using System.Windows.Controls;
using System.Windows.Forms.Integration;
using Fibonacci;
namespace WPFHost
{
public partial class Page1 : Page
{
private readonly MainForm mainForm = new MainForm();
public Page1()
{
InitializeComponent();
WindowsFormsHost windowsFormsHost = new WindowsFormsHost();
stackPanel.Width = mainForm.Width;
stackPanel.Height = mainForm.Height;
windowsFormsHost.Width = mainForm.Width;
windowsFormsHost.Height = mainForm.Height;
mainForm.TopLevel = false;
windowsFormsHost.Child = mainForm;
stackPanel.Children.Add(windowsFormsHost);
}
}
}
Don’t forget to Save.
OK, this is the last step, I promise. It is also the most obscure one that took me some time to figure out. When I first created the WPF project, I could get this code to work in a regular WPF application, but I always received a weird error when I tried it in a WPF browser application. I almost gave up, thinking that maybe it is not possible to host a Windows Forms application in a web browser. At the end, I found a post on Google groups that gave me the solution. The last step is to right click on the WPFHost project, choose Properties, and navigate to the Security tab. In the tab, change the radio button from “This is a partial trust application” to “This is a full trust application”.
OK, I lied, there is one more step. Right click on your WPFHost project and choose “Set as Startup Project”.
Save, Compile, and Run. You should see your default web browser open with the following page:
Conclusion
That’s it. If you wish to embed the created .xbap in an HTML web page, you can use the <iframe> tag as follows:
<iframe src="WPFHost.xbap" width="329" height="443" />


 General
  News
News  Suggestion
  Question
  Bug
Bug  Answer
  Joke
Joke  Praise
  Rant
Rant  Admin
Admin 


