Introduction
The tool can be used as a short cut for launching applications using mouse.
There aren't many technical things to tell in this article. Most of the things are available on the Internet and I searched and used them. I will give the links in this article.
The techniques used are:
- Mouse hook
- How to get icons from EXE
Background
Thanks to Stephen Toub for the useful article on how to hook the mouse in C#.
How to Use
After starting the application, the application will run in the background. To view the tool:
- Use the mouse wheel click.
- Or Double click in the tray icon. (useful for mouse with no wheel)
- Or Right click on the tray icon, then select "Show" from the menu.
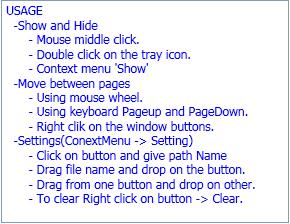
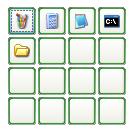
4x4 matrix buttons will appear on the screen. Now set each button for launching the new application. To do that:
- Right click on the tray icon to view the menu.
On the menu, select "Setting". The below dialog will open:
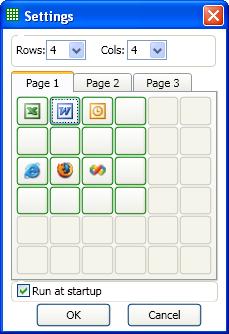
- The Rows and Cols will change the number of button to display.
- Click on each button to give the application path and arguments if any.
- Check the startup checkbox if you want to run the application during startup.
- There are 3 pages and each page contains 36 buttons. Each button can be configured as a shortcut for an application or can be set as blank.
After the matrix of buttons is visible, clicking anywhere on the screen will hide it. Middle click will also hide the matrix of buttons.
- By rotating the mouse wheel, we can move to next page of buttons.
- Right click on the buttons will also move to next page. (This is done for mouse with no wheel)
- Click on the button to launch each application.
Using the Code
Mouse Hook
Please follow the above article for the mouse hook process.
The main window has two delegates that will be called by the mouse hook methods.
One for show and hide the window. ShowHide(int x, int y) will show or hide the window in mouse middle click.
The second one is for scrolling the window. ScrollIcon() will increase the page number of the window.
private static IntPtr HookCallback(int nCode, IntPtr wParam, IntPtr lParam)
{
if (nCode >= 0 &&
MouseMessages.WM_LBUTTONUP == (MouseMessages)wParam)
{
showhide(0,0);
}
else if (nCode >= 0 &&
MouseMessages.WM_MBUTTONDOWN == (MouseMessages)wParam)
{
MSLLHOOKSTRUCT hookStruct = (MSLLHOOKSTRUCT)
Marshal.PtrToStructure(lParam, typeof(MSLLHOOKSTRUCT));
showhide(hookStruct.pt.x, hookStruct.pt.y);
return (IntPtr)(-1);
}
else if (nCode >= 0 &&
MouseMessages.WM_MOUSEWHEEL == (MouseMessages)wParam)
{
if (scrolIcon() == true)
{
return (IntPtr)(-1);
}
}
return CallNextHookEx(_hookID, nCode, wParam, lParam);
}
Transparent Window
The second part to consider in the tool is a transparent window containing a matrix of buttons.To make a transparent window in WPF is very simple. Below is the XAML code. Make AllowsTransparency = true and Background='Transparent".
<Window x:Class="ZWheel.Window1"
    xmlns="http://schemas.microsoft.com/winfx/2006/xaml/presentation"
    xmlns:x="http://schemas.microsoft.com/winfx/2006/xaml"
    Title="Window1" Height="180" Width="180"  WindowStyle="None"
		AllowsTransparency="True"
    Background="Transparent" Visibility="Hidden"
	Icon="/ZWheel;component/ZWheel.ico" Topmost="False" ShowInTaskbar="False">
Get Icons from Filename
The following code is used to get the icons from the file name:
[DllImport("Shell32.dll")]
public extern static int ExtractIconEx(string libName, int iconIndex,
IntPtr[] largeIcon, IntPtr[] smallIcon, int nIcons);
public static Icon GetIconFromPath(string filePath)
{
int numIcons = 10;
IntPtr[] largeIcon = new IntPtr[numIcons];
IntPtr[] smallIcon = new IntPtr[numIcons];
Icon smallIco = null;
try
{
if (Directory.Exists(filePath) == true)
{
ExtractIconEx("shell32.dll", 0, largeIcon, smallIcon, numIcons);
smallIco = System.Drawing.Icon.FromHandle(smallIcon[4]);
}
else
{
ExtractIconEx(filePath, 0, largeIcon, smallIcon, numIcons);
smallIco = System.Drawing.Icon.FromHandle(smallIcon[0]);
}
}
catch (Exception)
{ }
return (smallIco);
}
Put the Icon in the Button
To put the icon on the button, declare each button with an image as below. Get the System.Drawing.icon for the file using the above code. Create a bitmap from the icon and assign the image.Source property as shown in the code below:
<Button Name="P1_Btn00" Grid.Column="0" Grid.Row="0" Click="Btn_Click">
       <Image Name="IC_Btn00" Stretch="None"  />
</Button>
btnIcon = GetIcon.GetIconFromPath(btnInfo.Path);

Bitmap bmp = btnIcon.ToBitmap();
MemoryStream strm = new MemoryStream();
bmp.Save(strm, System.Drawing.Imaging.ImageFormat.Png);
strm.Seek(0, SeekOrigin.Begin);
PngBitmapDecoder pbd = new PngBitmapDecoder
	(strm, BitmapCreateOptions.None, BitmapCacheOption.Default);
btnImage.Source = pbd.Frames[0];
Improvements
I know there is nothing much in the code. I put it just to get some comments on the tool for its improvement. I would also like some ideas to use it in Notebook.
History
- 22nd December, 2008: Initial post
- 29th December, 2008: Updated with new EXE version (1.0.0.2)
This member has not yet provided a Biography. Assume it's interesting and varied, and probably something to do with programming.


 General
  News
News  Suggestion
  Question
  Bug
Bug  Answer
  Joke
Joke  Praise
  Rant
Rant  Admin
Admin 


