Introduction
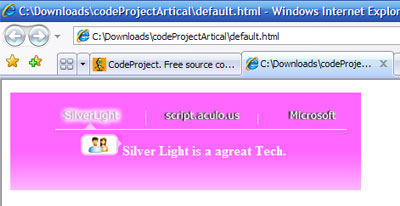
With this article, you can see how easy it is to build a nice navigation bar for your websites that looks like the one on the Silverlight home page only using script.aculos.us & JavaScript.
Please forgive me for the stupid graphics colors & that bad hover effect.
I am not a talented graphics designer.
Background
This article assumes that you are a professional web developer with hands on JavaScript and know about the script.aculo.us JavaScript library and how to use it.
Using the Code
To see it, please download the zipped article files and run the HTML page.
Now, let us talk about making such great animations.
When I first saw Silverlight, I got so excited. I wanted to learn it to be able to do such nice things. But as usual, we as developers are always with our heads to the wall of reality that there is no way to use the new technology in our projects that fast. For me our website host only has .NET 1.1 so the question is, "Can I do something like that with the tools I have?"
I started my own trys from scratch and I was so close, but did not get the perfect results and while searching the net, I came by the genius JavaScript library from script.aculo.us, which is free to use neat JavaScript library with out of the box effects and drag and drop features that you can use in your code without having the fear of being not supported on all browsers.
Using this library will compact your JavaScript code and will make your JavaScript time more fun. Believe me!! :)
By the way, with the source I uploaded the psd file of the bar so you can try your own graphics.
To start, we need a normal bar with the rollover effects ready in our HTML page. We will skip talking about how to do so.
In our HTML code, we need to reference the script.aculo.us library with these two lines in the head of our HTML & also the CSS file.
<script src="jsLib/prototype.js" type="text/javascript"></script>
<script src="jsLib/scriptaculous.js?load=effects" type="text/javascript"></script>
<link href="bar.css" rel="stylesheet" />
For further information about referencing the library, you will need to go and read about it.
Now declare the script tag inside the head of your HTML page, and inside it we talk about the following JavaScript code.
var t;
var pos=0;
var Mtext= new Array();
Mtext[0]='Silver Light is a a great Tech.';
Mtext[1]='Genius javascript platform.';
Mtext[2]='Genius Programmers & Planners.';
var arrowPositions=new Array();
arrowPositions[0]='0';
arrowPositions[1]='130';
arrowPositions[2]='260';
t: will be used as a reference to the interval we will build for our animation.pos: will hold indicator that leads to the current position of our hero arrow.Mtext: array holds the text related to each link.arrowPositions: array holds the exact left values of the arrow div for it to point at the middle of our links, the array number is different depending on how wide link divs is but is absolute to the container!!
Now, we set and think loudly about what we want to do, we need to call a function every x secs to do animation that means we will need the setInterval function of JavaScript which will let us code another function. So here it is:
function doAutoAnimate(){
    t = setInterval('autoAnimate()',3000);
}
This function exists only to start the animation by calling anther function (this is the technique used with setInterval JavaScript function). Now, simply another function is screaming to be written, it is the one responsible for stopping the animation.
function stopAutoAnimate(){
     clearInterval(t);
  }
Now here is the autoAnimation function:
function autoAnimate()
  {
      var pos = parseInt(document.getElementById('_currentActive').value)
      document.getElementById('img'+pos).src=document.getElementById
		('img'+pos).src.replace("_","");
       if(pos<2)
       {
          pos +=1;
       }
       else pos=0;

     animateManual(pos,arrowPositions[pos]);
     document.getElementById('_currentActive').value = pos;
  }
For autoAnimate, I just forward the arrow along the bar one step ahead-that is the job of the hidden field _currentActive and the pos variable - by calling the animation function giving it the target index (new position) so I can get the Description Text and Position of the arrow from the two mentioned arrays for that new position.
Note that I need to change the current active link image to remove the hover effect which is done by the second code line above.
Here comes at how great the JavaScript library I am talking about is. Just look at the hero code next:
function animateManual(target,off){
var title = document.getElementById('fdet');
new Effect.Parallel([
new Effect.Move('fdet',
{x:0,mode:'absolute',transition: Effect.Transitions.full}),
new Effect.Appear('fdet',{duration:0.1, from:0, to:0.9}),
new Effect.Move('fdet', {x:30,mode:'absolute',
transition: Effect.Transitions.reverse}),
new Effect.Move('imgArrow', {x:off,y:0,mode:'absolute',
transition: Effect.Transitions.linear})],
{duration:0.4,beforeStart:function(){document.getElementById
('descText').innerText=Mtext[target];
document.getElementById('desImg').src = 'images/imgEmpty.png';},
afterFinish:function(){document.getElementById('desImg').src =
'images/img'+target+'.png';}});
switch(target){
case 0:
document.getElementById('img0').src='images/sil_.jpg';
break;
case 1:
document.getElementById('img1').src='images/scri_.jpg';
break;
case 2:
document.getElementById('img2').src='images/mic_.jpg';
break;
}
document.getElementById('_currentActive').value = target;
}
That's it!! All the magic is done here.
This function takes two arguments:
target: is the index that gives the supposed to show text and animated description image beside it.off: is the arrow left value where arrow must move to it.
Effect.Parallel: You can think of it as a scene or starboard in Silverlight but written from down up with JavaScript.
This Effect takes array of sub effects and can take options like what you see in the code. For further reading about this, you can check the library. I will go on talking about the code.
The parallel effect runs so many effects at the same time.
First, I need to move the description animated area down the links to the right and while doing that, I need to hide it so the user will see the new text and the blank image comes from the right to the left.
So I use effect.move to move the div to the start point where left=0..!! Yes, that is the start point not the right one cause while there I will use an effect that is being governed by a mathematical function already built inside the JavaScript library. To see all the option motions (Transitions) for the Effect.Move, please check reverse transition.
Then make the appear effect to make it like a movie trailer. Then move the arrow div to the desired place. Note that the parallel makes all this for you all at the same time. Really cool, isn't it?
One of the nicest things is that I have the ability for the JavaScript code to be executed before or after an effect.
With this, I could be able to change the down blank moving image to the target link descriptive one on the right time.
Finally, we ask ourselves where exactly to put the call to the functions? The answer is on mouseover of li elements I call the animateManual function. For the div that has the ul, I call the function doAutoAnimate() and stopAutoAnimate() on mouseover and mouseout events. So when the user puts the mouse on the ul, the auto animation stops and the animateManual will be called because surely the user will be on one of the li elements.
On onmouseout, I want to do exactly the same like the Silverlight nice animation by running the autoanimation back.
The last thing to say is that I want page load to the animation to start from the starting point so in the image loading function, I called the manual animation directly to have an immediate move to the start point of animation and called the autoanimated function to let the autoanimation starts after x secs, so it will work by itself non stop unless the user is with her/his mouse on the bar.
Finally, I want to say thank you to the geniuses at Microsoft for the great efforts, stand up hats down to the great script genius programmer behind the JavaScript library I used.
For all of you out there that got tears like me when seeing the nice Silverlight bar and want to have one just like it, but don't have Silverlight support with your host, I hope I could turn your crying reasons to something else ...:) Thanks all for taking the time to read.
Note: I was not looking at how to make JavaScript code more neat or graphics. I was just running after a very very nice animation bar.
History
- Uploaded the source code again to meet the reported no source file bug.


 General
  News
News  Suggestion
  Question
  Bug
Bug  Answer
  Joke
Joke  Praise
  Rant
Rant  Admin
Admin 


