Overview of Custom Control Building
When we create a composite control, we build a new control from existing controls. For example, we can create a composite AddressForm control from existing TextBox and RequiredFieldValidator controls. When we create a composite control, we bundle together existing controls as a new control.
The second question that we must address is the choice of the base control of our new control. We can inherit a new control from any existing ASP.NET control. For example, if we want to create a better GridView control, then we can inherit a new control from the GridView control and add additional properties and methods to our custom GridView control.
Typically, when building a basic control, we inherit our new control from one of the following base classes:
System.Web.UI.Control System.Web.UI.WebControls.WebControl System.Web.UI.WebControls.CompositeControl
The CompositeControl class inherits from the WebControl class, which inherits from the Control class. Each of these base classes adds additional functionality.
The base class for all controls in the ASP.NET Framework is the System.Web.UI.Control class. Every control, including the TextBox and GridView controls, ultimately derives from this control. This means that all the properties, methods, and events of the System.Web.UI.Control class are shared by all controls in the Framework.
All Web controls inherit from the base System.Web.UI.WebControls.WebControl class. The difference between the Control class and WebControl class is that controls that derive from the WebControl class always have opening and closing tags. Because a WebControl has an opening and closing tag, we also get more formatting options. For example, the WebControl class includes BackColor, Font, and ForeColor properties.
For example, the ASP.NET Literal control inherits from the base Control class, whereas the Label control inherits from the base WebControl class. The Repeater control inherits from the base Control class, whereas the GridView control (ultimately) inherits from the WebControl class.
Finally, the System.Web.UI.WebControls.CompositeControl is new in the ASP.NET 2.0 Framework. We should use this class as the base class for any composite control. The CompositeControl automatically creates a naming container for its child controls. It also includes an overridden Controls property that forces child controls to appear in Design view.
Step by Step Process to Create a Custom Control
- Create new project, select Class Library Template and name it as
RequiredTextBox.
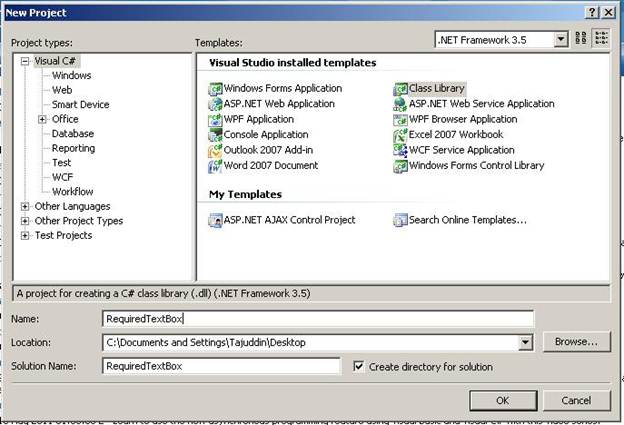
- Rename the Class Library’s Class to RequiredTextBox.cs.
- Add
sys.web reference to your project, as above, we discussed it is base class for all the web controls. - Select your project and right click and select Add Reference like below:

Click on Add Reference, and then you will get popup in that select sys.web component, from .NET tab like below:
Building Composite Controls
We can build a composite control. When we create a composite control, we create a new control from existing controls.
Every ASP.NET control has a Controls property that represents all of its child controls. If we add child controls to a control, then the child controls are automatically rendered when the parent control is rendered.
When we create a composite control, we typically override a control's CreateChildControls() method. This method is called when a control builds its collection of child controls.
In the following example, the control combines a TextBox control and RequiredFieldValidator control.
Code for RequiredTextBox.Cs
using Microsoft.VisualBasic;
using System;
using System.Collections;
using System.Collections.Generic;
using System.Data;
using System.Diagnostics;
using System.Web.UI.WebControls;

namespace RequiredTextBox
{
    public class RequiredTextBox : CompositeControl
    {
        private TextBox input;

        private RequiredFieldValidator validator;
        public string Text
        {
            get
            {
                EnsureChildControls();
                return input.Text;
            }
            set
            {
                EnsureChildControls();
                input.Text = value;
            }
        }

        protected override void CreateChildControls()
        {
            input = new TextBox();
            input.ID = "input";
            this.Controls.Add(input);

            validator = new RequiredFieldValidator();
            validator.ID = "valInput";
            validator.ControlToValidate = input.ID;
            validator.ErrorMessage = "(Required)";
            validator.Display = ValidatorDisplay.Dynamic;
            this.Controls.Add(validator);
        }
    }
}
Build the solution, then you will find the Required Textbox.dll in bin of the project.
Notice that the control in the above example inherits from the base Comp<code>ositeControl class. Furthermore, rather than override the base control's RenderContents() method, the control overrides the base control's CreateChildControls() method.
We should notice one other special thing in the example. Notice that the EnsureChildControls() method is called in both the Get and Set methods of the Text property. The EnsureChildControls() method forces the CreateChildControls() method to be called. However, it prevents the CreateChildControls() method from being called more than once.
The Text property gets or sets a property of a child control (the TextBox control). If you attempt to use the Text property before the CreateChildControls() method is called, then you receive a null reference exception. The child controls must be created before you can access any of the child control properties.
The following steps illustrate how we can use the RequiredTextBox control in a page.
Now we have to add the RequiredTextBox.dll to Toolbox:
This member has not yet provided a Biography. Assume it's interesting and varied, and probably something to do with programming.


 General
  News
News  Suggestion
  Question
  Bug
Bug  Answer
  Joke
Joke  Praise
  Rant
Rant  Admin
Admin 


