Introduction
This web control provides you with the ability to maintain the content of your website pages without the need for using any client software or heavyweight server side content management system. What motivated me to develop this control was that I had an existing ASP.NET website and I wanted a means to be able to regularly update its content quickly from anywhere by simply using a browser. You can visit www.goodforyourecords.co.uk which demonstrates this control in action. It's straightforward to incorporate into your site, and easy to use. The control allows you to edit, preview, and save your content to a database, and provides comprehensive editing through the use of the FreeTextBox control.
What this control is designed to do:
- edit and preview HTML content within an ASP.NET page
- save and retrieve the content using a database (MS Access / SQL Server / SQL Express / SQL Compact Edition)
- allow the content displayed by the control to change through use of query string parameters
- allow multiple instances of the control to reside on a single page
- easy modification of your existing pages to incorporate the content control
- tested with IE7 and Firefox 3.0.5
What it doesn't do:
- manage the page structure of your site (it's not a content management system!)
- allow multi-user editing (there's no locking functionality implemented - yet)
Incorporating this control into one of your pages is simple:
- within Visual Studio, add the
ContentEditor control to your toolbox and drop the control onto your page - assign a content ID to the control
- drop the empty WebSiteContent.mdb database file to your web app's App_Data directory
- add some configuration items to your web.config
- authenticate the current user to allow editing to begin ...
That's it - you now have a page whose content can be edited online through your web browser.
Adding the ContentEditor Control to Pages
The demo project provides a simple example of what can be done with the ContentEditor control. The Default.aspx file contains four instances of the control of which three demonstrate the idea of switching content using query string parameters - more on this later. There is also a demo login page which provides a means of authenticating a user to enable him or her to modify the content of these instances. If your site already has a means of authenticating users, then you may not require this. If you don't, you will need to add at least this page to your site - don't worry, it's simple.
Steps to Add ContentEditor to your Website
Adding the Control to Visual Studio
Open your website in Visual Studio, and add the control to the toolbox. Do this through View->Toolbox. Right click in the toolbox panel, and select "Choose Items". On the ".NET Framework Components" tab, click "Browse", and then locate the bin folder of ContentEditor.dll in the source code project. Click "Open" and then "Ok". The control DLL should have been copied to your bin folder and now be available in your toolbox. You should now be able to drag and drop the control onto the design surface of your page.
In the properties grid, set the ContentId of the control to a unique string value. This identifies the content that will be displayed by the control.
Adding Configuration to Web.Config
Add the following configuration to your web.config file:
<appSettings>
    <add key="ContentEditor.ContentDataProviderAssembly" value="ContentEditor"></add>
    <add key="ContentEditor.StyleSheetUrl" value="ContentEditor.css"></add>
</appSettings>
You'll need to copy the ContentEditor.css style sheet from the demo project to the root directory of your website. If you wish to use another folder, modify the value of ContentEditor.StyleSheetUrl to specify the appropriate path.
Now, you need to decide what sort of database to use to hold the content. By far, the simplest solution is to use an in-process database such as MS Access or SQL Compact Edition. There's no database administration to worry about, just a file to drop into the App_Data folder. It's the best option for a small site. Not all ISPs support SQL Compact, and if yours doesn't, then choose MS Access. If you choose MS Access, then add the following to the <appSettings> element of your web.config:
<add key="ContentEditor.ContentDataProviderType"
     value="ContentEditing.OleDb.OleDbContentDataProvider"></add>
If you wish to use SQL Compact, SQL Express, or SQL Server, add the following instead:
<add key="ContentEditor.ContentDataProviderType"
     value="ContentEditing.LinqSql.LinqSqlContentDataProvider"></add>
If using either MS Access or SQL Compact, copy either the .mdb (for MS Access) or the .sdf (for SQL Compact) database file to your website's App_Data folder. For MS Access, add the following to the <connectionStrings> element in your web.config file:
<add name="ContentEditor.WebContentDatabase"
     connectionString="provider=Microsoft.Jet.OLEDB.4.0;
                       data source=|DataDirectory|WebSiteContent.mdb"/>
For SQL Compact, use:
<add name="ContentEditor.WebContentDatabase"
     connectionString="data source=|DataDirectory|WebSiteContent.sdf;
                       Persist Security Info=false"/>
For SQL Express or SQL Server, you'll need to setup up the database manually using SQL Server Management Studio. The CreateContentTable.sql SQL script in the ContentEditor project can be used to create the required table. Set the connection string accordingly; for example, for SQL Server:
<add name="ContentEditor.WebContentDatabase"
     connectionString="Data Source=localhost;Initial Catalog=WebSiteContent;
                       Integrated Security=True"/>
Authenticating Users to Edit Content
Now, you need to enable authenticated users the ability to edit content. As mentioned previously, you can either use an existing authentication mechanism of your site, or if you don't have one, then copy the login page (Login.aspx) from the demo site. The ContentControl class provides two static methods to control editing behaviour:
public static void EnableEditingForCurrentSession()
public static void DisableEditingForCurrentSession()
Once your authentication mechanism has deemed the user worthy of editing content, you simply call EnableEditingForCurrentSession. This will allow the user to edit and preview content for the duration of the client's session. Calling DisableEditingForCurrentSession disables any editing for the client's session, and switches the control to View mode, whereby the edited content is rendered directly by the control - in other words, as it will be seen by end users. Call this when the user logs out.
If you choose to use the login page from the demo project, simply copy the page to your website. You'll need to add the user's username and password to your web.config, as follows:
<authentication mode="Forms">
    <forms name="appNameAuth" protection="All" timeout="30">
        <credentials passwordFormat="Clear">
            <user name="user" password="password" />
        </credentials>
    </forms>
</authentication>
By default, successful authentication results in a redirect to Default.aspx. Change this to your required page by setting the DestinationPageUrl property of the ASP.NET login control used by the login page.
There's just one last change required before editing can begin. Because you are allowing HTML to be posted back to your site when you edit content through the control, ASP.NET will validate the request to ensure it does not contain any malicious cross site scripting elements. You will have to disable this feature for your page by setting the validateRequest attribute to false on your page directive as follows:
<%@Page ValidateRequest="false" %>
Editing Website Content
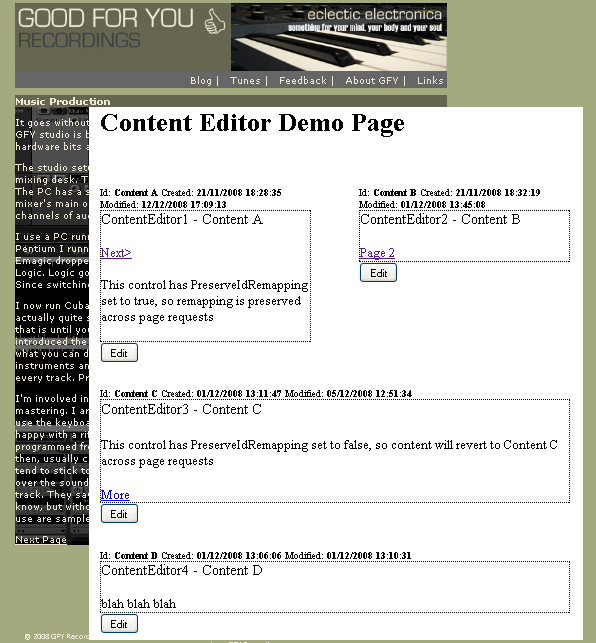
Once EnableEditingForCurrentSession has been called, it is possible to edit content for the current client session. All instances of the control will be rendered as shown in Figure 2. This is the "Preview" mode.

Figure 2 - Preview Mode
Here, the content ID, the original creation date, and the last modification date are shown above the content. The content is shown as it will be viewed by the end user. Clicking the "Edit" button switches the control to "Edit" mode, where the FreeTextBox control takes over, allowing you to modify the content in both HTML and Design modes, as shown in Figure 3.
Figure 3 - Edit Mode
Clicking on "Save" will permanently update the content and revert to "Preview" mode where the new content can be previewed. It is no longer possible to revert back to the original content at this point. Clicking "Cancel" will revert back to "Preview" mode, leaving the original content unmodified. Clicking "Preview" will revert to "Preview" mode, allowing you to view the changes, but in this case, it will be possible to revert back to the original content should what you see not be to your liking. Also, end users do not yet see your changes.
Figure 4 - Preview Mode with a Pending Change
Figure 4 shows the control in "Preview" mode where the content has not been permanently updated. This is signified by the red border. If you're not happy with the changes, clicking "Cancel" at this point will revert the content back to the original content. If you are happy with what you see, clicking "Save" permanently updates the content. In both cases, you are left in "Preview" mode. Clicking "Edit" allows further modifications to the already modified content. End users do not see your update until you click "Save" to permanently update the change.
When DisableEditingForCurrentSession is called, the control switches to "View" mode. In this case, the control renders exactly what is rendered in the "Preview" mode, except all editing features are removed. The page is rendered as the end user will see it.
Using Query String Parameters to Modify the Content ID
A really useful feature of the control is the ability to modify the content ID of any instance on a page by passing parameters in the query string of the page request. By doing this, it is possible for the same control instance to display different content for different page visits. A single query string can specify multiple remappings if you have more than one instance on a page. By creating hyperlinks in the actual content itself that contain such query strings, it's possible to implement a form of pagination, as demonstrated by the demo project.
Figure 5 - The "Next" Hyperlink Alters the Content ID for the Control Instance
In figure 5, the "Next" hyperlink is defined with the following URL:
/Default.aspx?ids=ContentEditor1,Content%20A2
The default content ID for "ContentEditor1" is "Content A", as specified in the ASPX markup, so the content for this ID is what will be displayed if a query string is not supplied. By specifying "id=ContentEditor1,Content A2", when the page is loaded, the content ID of "Content A2" is assigned to the instance whose ID is "ContentEditor1", overriding the default value and causing the content for "Content A2" to be loaded. Figure 6 is what the user then sees.
Figure 6 - The "Prev" Hyperlink Modifies the Content ID of the Control Instance Back to the Original Value
In figure 6, the "Previous" hyperlink is defined with the URL:
/Default.aspx?ids=ContentEditor1,Content%20A
This is setting the content ID, for instance, "ContentEditor1" back to the original value of "Content A". When the user clicks this link, they see what is shown by Figure 5. So, we now have some basic pagination which allows the user to move between "Content A" and "Content A2" within the same control instance.
The PreserveIdRemapping property of the control, when set to true, allows you to specify that the remapping received in the query string of a page request remains in effect for the duration of the user's session. By requesting the same page with no query string override, any previous remapping for a control instance remains in effect - the default content ID specified in the ASPX markup is not used. When set to false, if a page is requested and there is no override in the query string, the default in the markup is used regardless of any previous remapping. The purpose of this feature is to allow the control to display the last content viewed by a user if they return to a page from elsewhere in the site where a content remapping has not been defined in a URL. In particular, it is useful in a case where you have multiple content controls implementing pagination on a single page. By preserving the remapping, clicking on the "Next" hyperlink in one instance does not cause another instance to revert back to the original content when the page is returned.
Customization of the ContentEditor Control
Changing the Appearance
You may need to change the appearance of the control, for example, to change the colour or style of the preview border so it is visible within the website in which it is used. This is achieved by changing the styles in the stylesheet defined by the ContentEditor.StyleSheetUrl property specified in the configuration file.
Creating New Content Providers
The control is designed using the Strategy Pattern which means it is possible for you to plug in a different content provider should you require to store your data in a data source other than a SQL Sever or MS Access database. To do this, you need to create a class that implements the ContentEditor.IContentProvider interface and follow the contract described by the XML comments in the source file. Then, in the configuration file, simply change the ContentEditor.ContentDataProviderAssembly property to specify the name of the assembly containing the new type and the ContentEditor.ContentDataProviderType to specify the name of the new type.
Future Development
Multi User Access
Currently, it is not safe for more than one user to edit content concurrently without the danger of changes being overwritten by another user. So, a future enhancement would be to introduce some form of locking, allowing only one user to change content at a time.
Access Control
Different users could be assigned different roles. So, a user in an "editor" role can update content, but only a user in an "approver" role can approve the update for viewing by end users.
History
- 1.0 - 19 January 2009 - Initial version.
Chris has worked in software development for over 20 years. He works as a consultant for Microsoft Consulting Services UK and specialises in solution design and development on the .NET platform.


 General
  News
News  Suggestion
  Question
  Bug
Bug  Answer
  Joke
Joke  Praise
  Rant
Rant  Admin
Admin 


