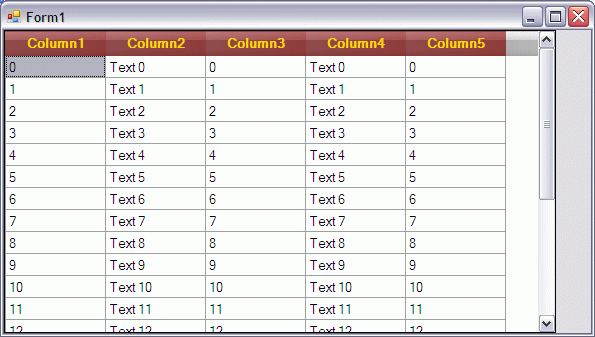
Here's a screen shot of what you will get by using this code:

Introduction
This code came out as an elaboration of Custom draw datagridviewcolumnheader (like Excel 2007) by Andy32.
Normally, a DataGridView control won't allow you to set a background image for its column headers. This code will do that, in a very easy way.
I made this just to simplify what has already been done by the original author.
I supplied an image, which is a stripe (1 pixel wide), to use a background. You don't need more, because it will be stretched to fill the whole columnheader.
Now, since it is a semi-transparent PNG, you'll see the color of the Columheader. By doing so, you won't need to supply a different image for each colour you'd like to paint your Headers - you just change the ColumnHeadersDefaultCellStyle.BackColor property and you're done.
It couldn't be any easier, I think.
Background
As the original article, this code illustrates how to custom draw a DataGridView Column Headers.
My version is just an optimized version of the original, with much less code and a small improvement (the mentioned small-sized transparent image that lets the underlying color be seen through).
There is very little code: an enumeration (a set of grouped constants), a method and its call inside an event of the DataGridView. Nothing more than this!!
Oh, well, I forgot to mention that a little bit of initialization code is required (here I do that directly in the Form's Load event handler, but you can put it into a method and call that method from the Load event).
Private Sub frmMain_Load(ByVal sender As Object, ByVal e As EventArgs) _
Handles Me.Load
With dgvData.ColumnHeadersDefaultCellStyle
.Alignment = DataGridViewContentAlignment.MiddleCenter
.BackColor = Color.DarkRed
.ForeColor = Color.Gold
.Font = New Font(.Font.FontFamily, .Font.Size, _
.Font.Style Or FontStyle.Bold, GraphicsUnit.Point)
End With
For i As Int32 = 0 To 20
Dim arrStrings As String()
arrStrings = New String() _
{ _
i.ToString, "Text " & i.ToString, i.ToString, _
"Text " & i.ToString, i.ToString _
}
dgvData.Rows.Add(arrStrings)
arrStrings = Nothing
Next i
End Sub
Just to put some data into the DataGridView and to set the Color for its column headers.
Using the Code
Inside the CellPainting event of the DataGridView, call the supplied GridDrawCustomHeaderColumns method (feel free to shorten the name, if you want):
Private Sub dgvData_CellPainting(ByVal sender As Object, _
ByVal e As DataGridViewCellPaintingEventArgs) _
Handles dgvData.CellPainting
If e.RowIndex = -1 Then
GridDrawCustomHeaderColumns(dgvData, e, _
My.Resources.Button_Gray_Stripe_01_050, _
DGVHeaderImageAlignments.Stretch)
End If
End Sub
The code above will override the normal CellPainting with the code contained in our method:
Private Sub GridDrawCustomHeaderColumns(ByVal dgv As DataGridView, _
ByVal e As DataGridViewCellPaintingEventArgs, ByVal img As Image, _
ByVal Style As DGVHeaderImageAlignments)
Dim gr As Graphics = e.Graphics
gr.FillRectangle( _
New SolidBrush(dgv.ColumnHeadersDefaultCellStyle.BackColor), _
e.CellBounds)
If img IsNot Nothing Then
Select Case Style
Case DGVHeaderImageAlignments.FillCell
gr.DrawImage( _
img, e.CellBounds.X, e.CellBounds.Y, _
e.CellBounds.Width, e.CellBounds.Height)
Case DGVHeaderImageAlignments.SingleCentered
gr.DrawImage(img, _
((e.CellBounds.Width - img.Width) \ 2) + _
e.CellBounds.X, _
((e.CellBounds.Height - img.Height) \ 2) + _
e.CellBounds.Y, _
img.Width, img.Height)
Case DGVHeaderImageAlignments.SingleLeft
gr.DrawImage(img, e.CellBounds.X, _
((e.CellBounds.Height - img.Height) \ 2) + _
e.CellBounds.Y, _
img.Width, img.Height)
Case DGVHeaderImageAlignments.SingleRight
gr.DrawImage(img, _
(e.CellBounds.Width - img.Width) + _
e.CellBounds.X, _
((e.CellBounds.Height - img.Height) \ 2) + _
e.CellBounds.Y, _
img.Width, img.Height)
Case DGVHeaderImageAlignments.Tile
Dim br As New TextureBrush_
(img, Drawing2D.WrapMode.Tile)
gr.FillRectangle(br, e.ClipBounds)
Case Else
gr.DrawImage( _
img, e.CellBounds.X, e.CellBounds.Y, _
e.ClipBounds.Width, e.CellBounds.Height)
End Select
End If
If e.Value Is Nothing Then
e.Handled = True
Return
End If
Using sf As New StringFormat
With sf
Select Case dgv.ColumnHeadersDefaultCellStyle.Alignment
Case DataGridViewContentAlignment.BottomCenter
.Alignment = StringAlignment.Center
.LineAlignment = StringAlignment.Far
Case DataGridViewContentAlignment.BottomLeft
.Alignment = StringAlignment.Near
.LineAlignment = StringAlignment.Far
Case DataGridViewContentAlignment.BottomRight
.Alignment = StringAlignment.Far
.LineAlignment = StringAlignment.Far
Case DataGridViewContentAlignment.MiddleCenter
.Alignment = StringAlignment.Center
.LineAlignment = StringAlignment.Center
Case DataGridViewContentAlignment.MiddleLeft
.Alignment = StringAlignment.Near
.LineAlignment = StringAlignment.Center
Case DataGridViewContentAlignment.MiddleRight
.Alignment = StringAlignment.Far
.LineAlignment = StringAlignment.Center
Case DataGridViewContentAlignment.TopCenter
.Alignment = StringAlignment.Center
.LineAlignment = StringAlignment.Near
Case DataGridViewContentAlignment.TopLeft
.Alignment = StringAlignment.Near
.LineAlignment = StringAlignment.Near
Case DataGridViewContentAlignment.TopRight
.Alignment = StringAlignment.Far
.LineAlignment = StringAlignment.Near
End Select
StringFormatFlags.FitBlackBox
.HotkeyPrefix = Drawing.Text.HotkeyPrefix.None
.Trimming = StringTrimming.None
End With
With dgv.ColumnHeadersDefaultCellStyle
gr.DrawString(e.Value.ToString, .Font, _
New SolidBrush(.ForeColor), e.CellBounds, sf)
End With
End Using
e.Handled = True
End Sub
So, what it does, basically is to:
Draw the background color, overlay an image over it, draw the text.
The way it aligns text is how you would draw the text on any other control: check how user wants the text to be aligned and operate accordingly with the StringFormat object you'll use in combination with the DrawString method.
There's two properties to do this: Alignment (horizontally) and LineAlignment (vertically); and three values Near (Left or Up), Far (Right or Down), and Center (Middle).
The combination of these properties with their values gives the nine possible alignments for a text.
The way it draws the image can be tricky, so...
... you'll notice a section, in the above code, delimited by two "all asterisks" comment lines.
That's room for improvements (surely due to my misinterpretation of the DrawImage method).
I hope that other programmers will find this code useful as per their needs.
Let me know how you make this code better.
History
- 9th March, 2009: Initial post
This member has not yet provided a Biography. Assume it's interesting and varied, and probably something to do with programming.
 General
  News
News  Suggestion
  Question
  Bug
Bug  Answer
  Joke
Joke  Praise
  Rant
Rant  Admin
Admin 


