Introduction
I love Channel9 and I think this website must be on every developer's favorites list! A few days ago, I saw the "hybrid smart client" contest and I thought that this is a good opportunity to create a nice WPF application that connects me to Channel 9 in 3D way in order to view all of those great videos.
Background
A while ago, I created a WPF 3D View control, project hosted on Codeplex that inspired me of creating this 3D way of reading Channel 9's RSS. So, the WPF 3D view control was the first brick of this application. As every WPF developer knows (or should know), there's a very nice toolkit for putting 2D elements on a 3D content inside a common WPF application - content that is "clickable". The tookit's name is 3D Tools for Windows Presentation Foundation and it is also hosted on Codeplex.
Using the Code
First of all, I want to show you how can you work with the 3DView control. There are two ways of playing with this control: XAML and C#.
First Way: XAML
Create a standard WPF application, download the 3DView control and it's dependencies, add them to your project (Right click on References -> Add Reference->Browse->(look at the download location)->OK). Inside Window1.xaml, create a connection between your application and WPF 3D View assembly using xmlns.
After that, inside the Grid element, create a _3DViewControl element, set it's properties and add the children. A single child element,_3DViewElemet has a front element, _3dwns:_3DViewElement.FrontElement and a back element _3dwns:_3DViewElement.BackElement. Inside this elements you can put the actual 2D content.
The code is below.
<Window x:Class="WpfApplication1.Window1"
xmlns="http://schemas.microsoft.com/winfx/2006/xaml/presentation"
xmlns:x="http://schemas.microsoft.com/winfx/2006/xaml" Loaded="Window_Loaded"
xmlns:_3dwns="clr-namespace:_3DView;assembly=3DView"
Title="Window1" Height="466" Width="639">
	<Grid Name="myGrid" >

	<_3dwns:_3DViewControl x:Name="My3DView"
                                    Height="{Binding ElementName=myGrid, Path=Height}"
				Width="{Binding ElementName=myGrid, Path=Width}"
                                    TimeSpanMiliseconds="450">
		<_3dwns:_3DViewControl.Children>
			<_3dwns:_3DViewElement>
				<_3dwns:_3DViewElement.FrontElement>
					<Button>Click me1</Button>
				</_3dwns:_3DViewElement.FrontElement>
				<_3dwns:_3DViewElement.BackElement>
					<Button>Click me11</Button>
				</_3dwns:_3DViewElement.BackElement>
			</_3dwns:_3DViewElement>

			<_3dwns:_3DViewElement>
				<_3dwns:_3DViewElement.FrontElement>
					<Button>Click me2</Button>
				</_3dwns:_3DViewElement.FrontElement>
				<_3dwns:_3DViewElement.BackElement>
					<Button>Click me22</Button>
				</_3dwns:_3DViewElement.BackElement>
			</_3dwns:_3DViewElement>

			<_3dwns:_3DViewElement>
				<_3dwns:_3DViewElement.FrontElement>
					<Button>Click me3</Button>
				</_3dwns:_3DViewElement.FrontElement>
				<_3dwns:_3DViewElement.BackElement>
					<Button>Click me33</Button>
				</_3dwns:_3DViewElement.BackElement>
			</_3dwns:_3DViewElement>
		</_3dwns:_3DViewControl.Children>
	</Grid>

</Window>
Second Way: C#
In order to add the element dynamically, you have to remove all <_3dwns:_3DViewElement> elements. After that you should use the AddNewChild method described in the next section.
3DView Control Methods
A _3DViewControl derives from UserControl. So beside all of the UserControl methods, I've added some new methods for adding and removing new children.
public void AddNewChild(_3DView._3DViewElement child)
{
...
}
public void RemoveAt(int index)
{
...
}
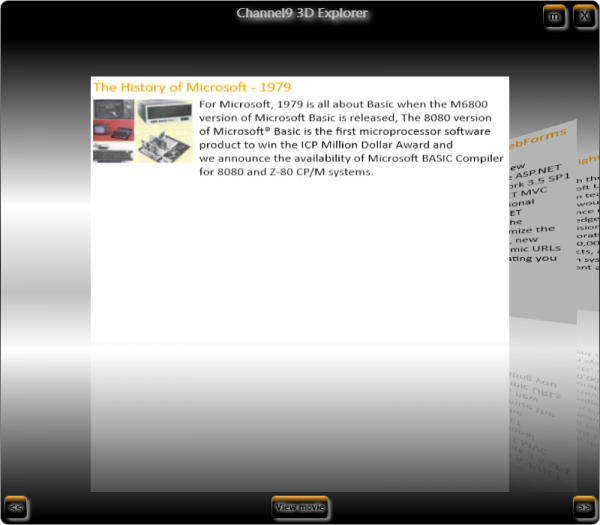
As an example, I will show you how the Channel 9 RSS Explorer elements are added. So for the front element I've created a XAML UserControl and named it FrontDisplayControl. The markup of this element is:
<Grid Background="White" Height="250">
    <Grid.RowDefinitions>
		<RowDefinition Height="Auto"/>
        <RowDefinition Height="*"/>
        <RowDefinition Height="10"/>
    </Grid.RowDefinitions>
    <TextBlock Margin="2" x:Name="TitleTextBlock"
           Style="{StaticResource CustomHeaderTextBlockStyle}"
           HorizontalAlignment="Left" TextWrapping="Wrap" Grid.Row="0"/>

	<Grid Grid.Row="1" VerticalAlignment="Top">
		<Grid.ColumnDefinitions>
			<ColumnDefinition Width="80"/>
			<ColumnDefinition/>
		</Grid.ColumnDefinitions>

		<Image Margin="2" x:Name="MyImage"
                      Visibility="Visible" VerticalAlignment="Top"
                      HorizontalAlignment="Left" Grid.Column="0"/>
		<TextBlock Margin="3,0,3,0" Background="White"
                      x:Name="DescriptionTextBlock"
                      Style="{StaticResource NormalTextBlockStyle}"
		Grid.Column="1" TextWrapping="Wrap"/>
	</Grid>

</Grid>
As you can see, this is where the image and the description of the post are.
For the back element, the markup is:
<StackPanel Background="Transparent">
	<Grid HorizontalAlignment="Center" VerticalAlignment="Bottom">
		<Image x:Name="PlayImage" Source="..\Images\play.png" Width="25"
                      Height="25" HorizontalAlignment="Left"/>
		<Image x:Name="PauseImage" Source="..\Images\pause.png" Opacity="0"
                      Width="25" Height="25" HorizontalAlignment="Left"/>
	</Grid>
	<Grid>
		<MediaElement x:Name="MyPlayer" LoadedBehavior="Manual"
                      UnloadedBehavior="Stop"/>
	</Grid>
</StackPanel>
The back element has a MediaElement where you play the video. To see the video, all I have to do is to flip the element.
After reading the RSS from the website, you create a _3DViewElement, a FrontDisplayControl and a BackDisplayControl. For the front control set the image from <img> tag, title and the description and for the back element set the video URL. After that, call the AddNewChild method. That's it!
_3DViewElement element = new _3DViewElement();
FrontDisplayControl frontControl = new FrontDisplayControl(img);
frontControl.Title = __MyNodeItem["title"].InnerText;
frontControl.AddressLink = __MyNodeItem["link"].InnerText;
frontControl.Description = text;
BackDisplayControl backControl = new BackDisplayControl();
...
backControl.VideoLink = url;
element.FrontElement = frontControl;
element.BackElement = backControl;
this.My3DView.AddNewChild(element);
3DView Control Proprietes
As all controls, this has some specific properties.
public int CurrentItem
{ get; set; }
public double CurrentItemOffset { get; set; }
public int Duration { get; set; }
public bool ViewFlipButton
{
set
{
if (value == false)
this.FlipButton.Visibility = Visibility.Collapsed;
else
this.FlipButton.Visibility = Visibility.Visible;
}
get
{
return this.FlipButton.Visibility == Visibility.Visible;
}
}
public string FlipButtonContent
{
set
{
if (value == null)
return;
this.FlipButton.Content = value;
}
}
public double CameraZPosition
{
set
{
Point3D point = this.MyCamera.Position;
this.MyCamera.Position = new Point3D(point.X, point.Y, value);
}
get
{
return this.MyCamera.Position.Z;
}
}
Table of properties:
| Property name | Description |
| CurrentItem | Gets or sets the current item. It is used if you want to start at a diffrent item (like the middle item). |
| CurrentItemOffset | Gets or sets the Z position of the current item. |
| Duration | Time in miliseconds for the putting the current item into the stack and show the next one. |
| ViewFlipButton | Gets or sets the visibility of the Flip button. |
| FlipButtonContent | Gets or sets the content of the Flip button. |
| CameraZPosition | The Z value of the camera. |
Adding Gestures
Recently, I was able to play with an IBM Think Pad X41 that is a Tablet PC too, having a TrackPoint as a input device type. Of course, you can attach a mouse device but as long as you have the stylus, you don't need a mouse. So, I thought to make this application respond to gestures. All I did is override some mouse move methods, like OnMouseMove, OnMouseUp and OnMouseDown inside the 3D View control.
But first you have to remove the actions (Zoom and Track) inside the TrackballDecorator class (this is a 3D Tool class).
Point __PreviousPosition;
protected override void OnMouseMove(MouseEventArgs e)
{
base.OnMouseMove(e);
if (e.LeftButton == System.Windows.Input.MouseButtonState.Pressed)
{
Point position = e.GetPosition(this);
if (position == __PreviousPosition) return;
if (position.Y < __PreviousPosition.Y - 50)
{
this.CameraZPosition -= 0.1d;
__PreviousPosition = position;
}
if (position.Y > __PreviousPosition.Y + 50)
{
this.CameraZPosition += 0.1d;
__PreviousPosition = position;
}
if (position.X > __PreviousPosition.X + 75)
{
this.MoveItem(RotateDirection.Left);
__PreviousPosition = position;
}
if (position.X < __PreviousPosition.X - 75)
{
this.MoveItem(RotateDirection.Right);
__PreviousPosition = position;
}
}
else
__PreviousPosition = e.GetPosition(this);
}
protected override void OnMouseDown(MouseButtonEventArgs e)
{
base.OnMouseDown(e);
__PreviousPosition = e.GetPosition(this);
}
protected override void OnMouseUp(MouseButtonEventArgs e)
{
base.OnMouseUp(e);
__PreviousPosition = e.GetPosition(this);
}
The gestures are:
- If you want to see the next item (the right item), just drag and drop the current item from right to left.
- If you want to see the previous item (the left item), just drag and drop the current item from left to right.
- If you want to zoom in, just drag and drop from down to up.
- If you want to zoom out, just drag and drop from up to down.
If you'll ask me why I choose these directions, I have only one answer: In my vision these actions are natural.
You can see in the image the application running on the IBM ThindPad.

I've created a video that shows these gestures.
Control Styles
I won't talk here about styling the application's user interface. If you want to know more about that, you can start here.
I hope that you'll use this application or at least the WPF 3D view control. :)
Hope I'll win this contest to buy myself a computer with multi-touch interface to make this application multi-touch enabled! :)
is a developer at LetsVR.ro.


 General
  News
News  Suggestion
  Question
  Bug
Bug  Answer
  Joke
Joke  Praise
  Rant
Rant  Admin
Admin 


