I was recently doing some testing of IE9's Site
Pinning API
and found out about a cool bit of functionality that can enhance user
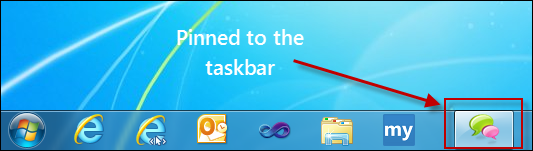
notifications. If you’re not familiar with site pinning, it’s a great way to
allow users to have easy and quick access to their favorite sites via the
Windows taskbar. There’s a really nice overview of it on BuildMyPinnedSite.com that explains
how it works.
Keeping Users Up-to-Date
One of the features the API provides is
the notion of notifications that can allow developers to provide alerts to end
users. The functionality allows you to dynamically insert custom overlay icons
that can alert users when an important bit of information is available. These
overlay icons are rendered over the favicon that is pinned to the taskbar. If
you look at the image below, you can see it in action:
Pinned site with no overlay icon

Pinned site with overlay icon
So if you think about the possibilities,
any site that offers users an inbox, special deals or sends out time-sensitive
alerts could use this notification capability to keep their users up-to-date
and more engaged on the site. Sites like the Huffington Post have already
discovered that users that pinned HuffPost spent 49% more
time on the site.
The best part is that adding this
capability is insanely easy.
Setting it Up
For this post, we’re not going to go
into the basics of how to pin a site. If you want to learn more, here’s a GREAT
resource for getting you up to speed quickly: BuildMyPinnedSite.com. In fact, I
used that site to help get me up-to-speed on the basics and it’s well-worth
visiting.
To add notifications, you’ll need a
couple of things:
- A cool favicon for your site. If
you don’t have one, you can use the handy web-based
X-Icon Editor
to create one.
- A set of overlay icons to use. The
recommended size is 16×16.
The API is JavaScript-based and we’ll
use the following methods:
The window.external.msSiteModeClearIconOverlay
method is used to clear out any previously set overlay icons. window.external.msSiteModeSetIconOverlay
allows you to specify the name of the notification icon as well as a accessible
description. Lastly, we’ll use window.external.msSiteModeActivate to
flash the pinned icon to notify the user of the update. Lastly, window.external.msIsSiteMode
will let us know if the page was launched as a pinned site, thus allowing us to
better determine when to run the code.
For the overlay icons, I’m using five
images that display numbers 1 through 5 respectively to designate the number of
messages are in a user’s inbox.
The Code
The first thing I need to add is the
reference to my favicon. Note that if you don’t add one, then the Internet
Explorer’s icon will be used by default.
<link rel="shortcut icon" type="image/ico" href="favicon.ico" />
Next, I want to create some sample data
to work with. What I want to do for my demo is to have the overlay icon
dynamically change every 5 seconds to simulate a more real-world scenario. The
data is a simple array containing JSON data in each element.
myPin.init([{ "num": 1, "label": "Label 1" },
{ "num": 2, "label": "Label 2" },
{ "num": 3, "label": "Label 3" },
{ "num": 4, "label": "Label 4" },
{ "num": 5, "label": "Label 5" }
]);
By setting a timer, I’ll be able to pull
a new set of data every 5 seconds.
setInterval(function () { myPin.getData(); }, 5000);
The main thing to keep in mind is that
I’m "simulating" getting data from some remote host. In reality, all that the myPin.getData()
method does is use a running counter to grab a new set of data and render a new
overlay icon:
getData: function () {
var idx = 0;
if (window.external.msIsSiteMode()) {
idx = this.currIndex++;
this.currIndex = (this.currIndex < 5) ? this.currIndex : 0;
this.dispOverlay(this.dataBin[idx]);
}
}
As you can see, it uses the running
counter var currIndex to determine which array element to grab and then
passes the data to dispOverlay(). This is where we use window.external.msSiteModeClearIconOverlay()
to clear out any previously displayed overlay icons and also generate a string
for the actual icon name. You can see that the oImg var is created on the fly
based on the data we’re using.
dispOverlay: function (theData) {
var oImg = "";
if (theData) {
window.external.msSiteModeClearIconOverlay();
oImg = "images/num_" + theData.num + ".ico";
this.setOverlay(oImg, theData.label);
}
}
That icon name, along with the
accessible label text for the icon, is passed to setOverlay() which sets
the overlay icon via window.external.msSiteModeSetIconOverlay and
flashes the taskbar icon using window.external.msSiteModeActivate.
setOverlay: function (icon, desc) {
window.external.msSiteModeSetIconOverlay(icon, desc);
window.external.msSiteModeActivate();
}
Test it Out
To test this out, it’s a simple matter
of running your newly pinned page in Internet Explorer 9, grabbing the tab and
dragging it down to your taskbar:
Tab being dragged to the taskbar
Pinned site with no overlay icon
Five seconds after the page has been
pinned, the code will fire off the first notification and continue to cycle
through the other icons every subsequent five seconds.
Pinned site with overlay icon
An important thing to remember is that
the IE F12 Developer
tools
are available to you to use in debugging your pinned site. So if you run into
quirks, simply press the F12 key and the tools will appear.
The Demo and Final Code
You can check out the demo I whipped up
by going here in IE9:
http://reybango.com/demos/sitepinning/index.html
When the page renders, drag the tab down
to your taskbar and pin it. You should see a new windows appear with your newly
pinned site. Five seconds later, you’ll see the first overlay icon appear in
the taskbar.
Here’s the full source code. You can
also download
everything here.
The really great part is that it isn’t a lot of code to implement this. In
fact, to use the API only required 4 method calls. The bulk of the code was to
simulate pulling in data. And the ">impact on
user engagement
is certainly worth adding in the capability.
<!DOCTYPE html>
<html>
<head>
<title>Pinned Site Test</title>
<link rel="shortcut icon" type="image/ico" href="favicon.ico" />
<meta name="application-name" content="Pinned Site Test" />
<meta name="msapplication-starturl" content="http://reybango.com/demos/sitepinning/index.html" />
<meta name="msapplication-navbutton-color" content="#3480C0" />
<meta name="msapplication-window" content="width=1024;height=768" />
<meta name="msapplication-tooltip" content="Testing the Pinned Site API" />
<style>
body {
background: none repeat scroll 0 0 #4492CE;
color: #EDEFF4;
}
h1 {
float: left;
font: 440%/1.4em 'Segoe Light',Segoe,'Segoe UI','Meiryo Regular','Meiryo',sans-serif;
margin-left: 10px;
position: relative;
}
</style>
</head>
<body>
<h1>Pinned Site Test</h1>
<div></div>
<script>
var myPin = {
currIndex: 0,
dataBin: [],
getData: function () {
var idx = 0;
if (window.external.msIsSiteMode()) {
idx = this.currIndex++;
this.currIndex = (this.currIndex < 5) ? this.currIndex : 0;
this.dispOverlay(this.dataBin[idx]);
}
},
setOverlay: function (icon, desc) {
window.external.msSiteModeSetIconOverlay(icon, desc);
window.external.msSiteModeActivate();
},
dispOverlay: function (theData) {
var oImg = "";
if (theData) {
window.external.msSiteModeClearIconOverlay();
oImg = "images/num_" + theData.num + ".ico";
this.setOverlay(oImg, theData.label);
}
},
init: function (myData) {
this.dataBin = myData;
}
};
window.external.msSiteModeClearIconOverlay();
myPin.init([{ "num": 1, "label": "Label 1" },
{ "num": 2, "label": "Label 2" },
{ "num": 3, "label": "Label 3" },
{ "num": 4, "label": "Label 4" },
{ "num": 5, "label": "Label 5" }
]);
setInterval(function () { myPin.getData(); }, 5000);
</script>
</body>
</html>


 General
  News
News  Suggestion
  Question
  Bug
Bug  Answer
  Joke
Joke  Praise
  Rant
Rant  Admin
Admin 


