Introduction
Authoring conceptual and API reference documentation for a .NET project (but not only) can be done with various tools, including
DocProject and Sandcastle Help File Builder (or simply SHFB). In this article I will explore some of the features of DocProject and the offerings of MAML,
the mark-up language used for writing conceptual documentation. The first part of the article focuses on DocProject, showing how to setup a project,
and the second on MAML and how to write conceptual documentation. This article is not a complete tutorial on building help projects with DocProject,
but rather a walkthrough of the most important aspects.
Types of Documentation
Throughout this article I will mention two types of documentation: conceptual and API reference. Before going forward I shall clarify what these stand for.
Conceptual documentation consists of custom topics, walkthroughs, FAQs, glossary, troubleshooting and others and is written in MAML. You must explicitly author this documentation (using a text editor, anything from notepad to Visual Studio).
API reference documentation is documentation of APIs (namespaces, types, methods, properties, fields, events, etc.) both manager or unmanaged, generated from reflection information on the APIs and XML documentation files generated from XML comments in code. Sandcastle is able to reflect on managed APIs, but requires external tools for unmanaged APIs. This documentation is auto-generated, though it still requires you to manually write the XML comments in your code.
MAML
Conceptual documentation is written in XML files using MAML. MAML, sometimes referred as Microsoft AML, stands for Microsoft Assistance Markup Language, and is a XML-based markup language developed by Microsoft's User Assistance Platform team for writing help systems. The language was introduced with the release of Windows Vista.
The authoring model of MAML focuses on the structure of the information and not the presentation, that is later determined based on formats and styles. When a topic is displayed several transformations occur:
- structural: the actual structure of the document and its text is determined (reusable bits and structural conditions are resolved in this step)
- presentational: the document is transformed into one of the available formats (including RTF, XAML and DHTML)
- rendering: applies styles to publish the document into the desired form.
MAML defines several content types, including conceptual, FAQ, glossary, procedure, reference, reusable content, task, troubleshooting, and tutorial. We will look at some of these types later in the article.
The tool chain
HTML Help Workshop
This is a compiler for building Microsoft HTML Help (or Help 1.x ). HTML Help is the standard help systems for Windows. It was introduced with Windows 98 and is still supported. Help is delivered in a binary file with the .chm extension, consisting of a set of HTML files, a table of contents and an index. The compiler is free and is available for download here. More information on HTML Help (currently version 1.4) in MSDN.
Visual Studio SDK
In 2001 Microsoft introduced a new help format, called Help 2.x. It was intended for building the help system for Visual Studio .NET 2002 and the MSDN Library, but was later used for other products (not only from Microsoft). Help 2.x files have the extension .HxS and are built from a set of HTML pages and several other files (a .HxC main project file, a .HxF include file, a .HxT table of contents, a .HxA attribute definition file, and a number of .HxK indexes). Building Help 2.x requires a compiler available in Visual Studio SDK. For Visual Studio 2008, the SDK can be downloaded from here.
Sandcastle
Sandcastle is a help compiler created by Microsoft, and freely available at sandcastle.codeplex.com. It is a tool that produces MSDN-like documentation consisting of any or both API reference documentation (from .NET assemblies and their associated XML documentation files) and conceptual documentation (from XML files that you author with MAML). Sandcastle produces XML-based HTML files, which are later compiled into Help 1.x or 2.x by the aforementioned compilers. It provides scripts to automate this build process using external compilers. However, Sandcastle is a command-line tool, which makes it cumbersome to use for creating help files. For more information about Sandcastle see Sandcastle Help.
DocProject
DocProject is also a free tool, available at docproject.codeplex.com, built on top of Sandcastle, enabling to customize Sandcastle's output from Visual Studio and the use of MSBuild. It provides various project templates that build compiled help 1.x or 2.x. For more information on DocProject see DocProject Documentation.
Requirements for this article
This tutorial assumes you have the following tools available:
- Visual Studio 2008
- Sandcastle (version 2.4.10520, from May 2008)
- DocProject (version 1.11.0 RC, last version)
- HTML Help Workshop compiler for building Help 1.x (.chm)
- (optional) Microsoft Help 2.x API for building Help 2.x (.HxS); comes with Visual Studio 2008 SDK
Creating a project with DocProject
In this article I will show how to create a DocProject project and setup the basics for building a help file. We will create a solution with two projects: a dummy C# class library project with just some types to act as a source for API reference documentation, and a DocProject project, where we can author conceptual documentation and build everything together into the final help file.
When you install DocProject it adds new project templates to Visual Studio (for VC# and VB.NET). In this tutorial I will use the DocProject template with Visual C#.
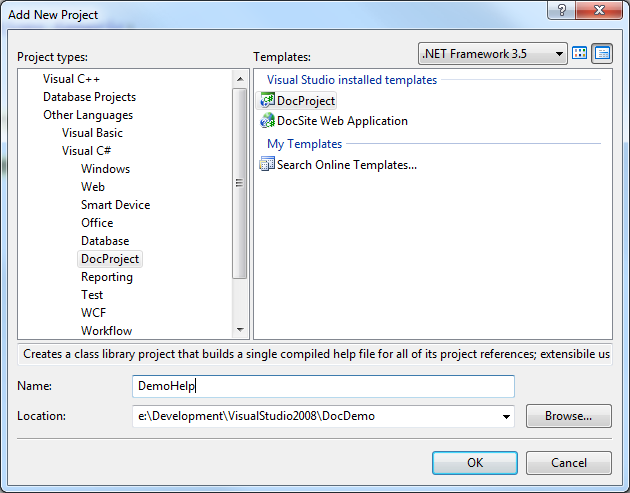
Once you select the type, name and location, a wizard guides you through selecting additional settings for the new project, including the build engine, the presentation styles, the help format (1.x or 2.x) and the sources (from external sources or other projects in the solution) from which the Sandcastle should build documentation. These must be .NET projects that have XML documents with comments for their public interfaces. The following images show the wizard pages.
Step 1: choosing the build engine | Step 2: choosing a presentation style |
 | |
Step 3: Importing topics and settings | Step 4: choosing the help format to be built (Help 1.x or 2.x) |
| |
Step 5: Creating shared content | Step 6: selecting sources for content |
| |
Neither of these are one time settings. They can be changed at any later stage. Through my settings I have selected to use the Sandcastle engine to build Help 1.x using the Visual Studio 2005 presentation style, and use my dummy C# class library as a source for API reference documentation. (At the time of creating the project and making these screenshots I only had HTML Help Workshop, therefore Help 2.x was not available to select.)
The wizard generates all the necessary files including styles, scripts, images, even C#/VB.NET code that allows hooking into the project's build process. Here is a screenshot of the solution with the dummy C# class library and the DocProject project.
At this point (assuming the C# class library has XML-comments for all the public entities) you can actually build the project. It should produce Help 1.x (.chm) and/or Help 2.x (.HxS) files, depending of the wizard configuration.
At the end of the first build it will ask whether the output files should be added to the project or not. I prefer not, and I will come back to this point a bit later.
The options you select in this dialog can be changed at any time from the DocProject properties window, shown below. This window can be opened from the context menu for the DocProject project. All these settings shown here are set to False when the project is created (therefore the dialog above is shown at the end of the first build).
The DocProject - Sandcastle toolbar allows you to open the Help 1.x (.chm) and Help 2.x (.HxS) help files if they exist. The toolbar also has commands for opening the Topics Designer and Topics Explorer.
The generated Help 1.x file looks like in the following image.
Organizing the project
At this point, the project has no conceptual documentation. The Topic Explorer shows only the auto-generated API reference documentation, under a node called Namespaces.
You can use the "Insert new conceptual topic" to add a new topic. For each topic, two XML files are generated, one having the extensions
.aml and one .cmp. The .aml file contains the documentation itself, while the companion file
.cmp contains metadata, such as the title or the title under the table of contents.
Each topic is identified by a unique ID represented by a GUID.
When you add the first conceptual topic, a new file is generated under the folder Settings. This file is called topics.xml and defines the hierarchy of topics, as modeled in the Topics Explorer.
Here is the content of the topics.xml file:
="1.0"="utf-8"
<topics>
<topic id="679431bf-4adc-4f8b-a90d-012a4f14d6c4" file="Conceptual.aml" />
<stoc project="Project" />
</topics>
After all these are set we can start adding more topics and organizing them into the desired hierarchy.
Tips and Tricks with DocProject
IntelliSense for MAML
Conceptual topics can be authored with Visual Studio that can provide IntelliSense, based on the MAML schemas. Sandcastle makes these schemas available on your machine, and DocProjects copies them from the Sandcastle installation to your project's Help\Schema folder. Visual Studio can use these schemas from the project to provide IntelliSense. However, namespaces clash with its own schemas.
The details or the problem and solutions to fix it are provided in this tutorial. I have found the following solution to be the most appealing, but you can use the one you find the most acceptable:
- remove the folder Help\Schemas from the DocProject project
- create a catalog under Visual Studio's global schema cache folder, which is located at [VS Install Path]\Xml\Schemas.
Let's call this mamlcatalog.xml. Its content should look like this:
<SchemaCatalog xmlns="http://schemas.microsoft.com/xsd/catalog">
  <Association extension="aml" schema="%DXROOT%Schemas\Authoring\developer.xsd" />
</SchemaCatalog>
DXROOT is an environment variable that points to the installation folder for Sandcastle (such as C:\Program Files (x86)\Sandcastle\).
This solution basically enables Visual Studio to use directly the schemas from Sandcastle, without having to copy them and modify other Visual Studio files. However, if you must delete the Help\Schema folder from every DocProject project that you create.
Before (no IntelliSense) | After (supports IntelliSense) |
|
|
Add Output to Project
I have mentioned earlier that DocProject allows you to add the output of the build to project. I recommend you set this to "No", otherwise all the project output (both the intermediary HTML files and the final chm/HxS) will be added to the project. This can significantly increase the build time, especially when you use source control, because existing files need to be checked out or added to source control. From experience with TFS and a rather medium project (that produced several thousand intermediary HTML files) the time spent with source control was several times the rest of the build time (but this probably depends on various factors including size of project, TFS load, network, etc.).
Using Images
You can use images in the conceptual documentation. All images must be placed in the Help\Art folder of the project, and an <item> must be defined for each such image
in the Help\Settings\conceptual_art.xml file. An image can be referred throughout the project by a unique ID, not the file name. An item looks like this:
<item id="myimage">
<image file="image.jpg">
  <altText>Alternate text for the image.</altText>
</image>
</item>
Having this defined, you can refer the image using a <mediaLink> node.
<mediaLink>
  <image xlink:href="myimage" />
</mediaLink>
API Reference Documentation
When you merge together conceptual documentation and auto-generated API reference documentation you probably want to put the two into some particular structure (or hierarchy). You should notice that no matter from how many sources you build auto-generated API reference, this documentation can go into a single place into the topics hierarchy.
If you look at the topics.xml file again, you'll notice this node:
<stoc project="Project" />
It represents the node with the auto-generated API reference. It can be put anywhere into the hierarchy, either manually or from the Topics Explorer. In this example I will make it a child of a root item called API Reference.
Here is how the topics.xml file has been updated:
<topics>
  <topic id="679431bf-4adc-4f8b-a90d-012a4f14d6c4" file="Conceptual.aml" />
  <topic id="0fa8f38b-522c-4894-9af8-cd6449d1b169" file="API Reference.aml">
    <stoc project="Project" />
  </topic>
</topics>
And the resulting Help 1.x .chm file:
Conceptual types
DocProject allows you to create several types of conceptual documentation. New topics can be added from the Topics Explorer using the command "Insert a new conceptual topic". The following templates for MAML documents are available (for most of them the title is self-explanatory):
- Conceptual
- Error Message
- Glossary
- How to
- Orientation
- Reference (several templates)
- Sample
- SDK Tech (several templates)
- Troubleshooting
- UI reference
- Walkthrough
- Whitepaper
- XML reference
MAML defines a collection of tags and how they relate to each other. The schemas are available in Schemas\Authoring folder under the Sandcastle installation folder. The following table is an excerpt from these schemas. It shows the most important elements and their description (and additional comments).
| Tag | Description |
<para> | The para element describes a paragraph. It is the most basic documentation unit. |
<content> | This element holds authored content. It can be anything from code to sections or procedures, links or tables, etc. |
<title> | The title element describes the name of a part of the document. |
<quote> | The quote element describes a quotation. |
<summary> | This element contains a summary, introduction, or short description of the current item. This text typically appears in a topic and may also be used as the description of the topic that appears in a jump table when the topic is being linked to. |
<remarks> | This element contains a detailed discussion of the current item. |
<comments> | This element holds a general discussion. |
<description> | This element holds a general discussion. |
<conclusion> | This element holds a conclusion to some piece of documentation. |
<introduction> | This element contains an introduction to some piece of documentation. |
<sections> | This element holds a collection of section elements. |
<section> | The section element describes a section within a document. The section element supports recursion. |
<sectionSimple> | The sectionSimple element describes a section within a document. This element is similar to the section element; however, it is not recursive. |
<glossary> | The glossary element describes a set of terms and their definitions. |
<glossaryEntry> | glossaryEntry is a single definition in the glossary with a set of terms attached. |
<relatedTopics> | relatedTopics is used to link to other topics that might be interesting to the reader. |
<procedure> | This element is the root of a procedure. |
<steps> | This element is a collection of steps in a procedure. |
<step> | This element is a step in a procedure. |
<list> | The list element describes content that should be displayed as a list. The class attribute describes the type of list, which can be "bullet", "nobullet" or "ordered". The "class" attribute is mandatory. |
<listItem> | The listItem element describes an item within a list. The content of the
listItem element will be treated as a unit. |
<link> | The link element can contain text but this text is discarded at build time in favor of the actual title of the link target, so the text in this element is not localizable. |
<externalLink> | The externalLink element describes links that are external to Microsoft and must be managed through a redirection scheme. |
<linkText> | The linkText element describes the text of a link. |
<linkAlternateText> | The linkAlternateText element describes the alternate text of the link, used for "alt text" on the Web. |
<linkUri> | The linkUri element describes the URI of the link. |
<mediaLink> | The media element represents media objects of any type. It is intended as a placeholder for images, audio and video. The rendering program will be responsible to render the referenced object in a reasonable manner. |
<codeExamples> | This element is a collection of codeExample elements. |
<codeExample> | This element holds a discussion of a code example. |
<buildInstructions> | This element holds instructions for building a code example. |
<codeEntityReference> | This element holds a reference to a code entity. |
<parameterReference> | This element holds a reference to a parameter. |
Before seeing how these tags are used to build conceptual topics, we will pay a special attention to
codeEntityReference.
codeEntityReference
This element holds a reference to a code entity. It allows you to provide links between the conceptual topic and the API reference documentation for a particular code entity. This could be a type, method, property, etc. The element's text must be the entity's identifier in the format defined by the ECMA specification.
The specification requires that the identifiers:
- have no white spaces in the string
- the first part is a prefix indicating the type of member being documented, formed by a single character followed by a colon. It defines the following kind of members:
- E: event
- F: field
- M: methods (including constructors, finalizers and operators)
- N: namespace
- P: property and indexer
- T: Type (class, struct, delegate, enum and interface)
- !: error string, the following part of the string providing information about the error (e.g. links cannot be resolved)
- the second part of the string is the fully qualified name of the element, starting at the root of the namespace
When it comes to the second part of the identifier, you must observe the following rules, for which you can find a comprehensive set of examples here. In the table below, in the examples column, Foo is a namespace, Bar is a class and Func is a method.
| Applies to | Rule | Example |
| Methods and properties with arguments | Require list of arguments enclosed in parentheses. | M:Foo.Bar.Func(System.Boolean) |
| Methods and properties without arguments | Parentheses are omitted. | M:Foo.Bar.Func |
| Constructors | Use #ctor instead of the name. If the constructor has arguments, the same rule as for methods apply for the arguments list. | M:Foo.Bar.#ctor |
| Static constructors | Use #cctor instead of the name. If the constructor has arguments, the same rule as for methods apply for the arguments list. | M:Foo.Bar.#cctor |
| Finalizers | Use Finalize for the method name. | M:Foo.Bar.Finalize |
| Arguments | Separated by commas, no whitespaces in between. Arguments are represented by their complete documentation name (which is based on their fully qualified name). E.g. int becomes System.Int32, string becomes System.String, etc. The same rule applies for used-defined types too. | M:Foo.Bar.Func(System.Int32,System.String,Foo.Widget) |
out and ref arguments | Their type name is followed by a "@" character. | M:Foo.Bar.Func(System.Int32@) |
Arguments passed by value or params | No special notation | |
| Arguments that define generic type parameters | Have an appended grave accent character "`", followed by the number of type parameters; for example, C`1. For nested types, the number is based upon the of new type parameters on the nested type; for example, C`1.NestedC`2. | T:Foo.Bar`1 |
| Arguments that are arrays | Are represented as [lowerbound : size , ... , lowerbound : size] where the number of commas is the rank less one, and the lower bounds and size of each dimension, if known, are represented in decimal. If a lower bound or size is not specified, it is omitted. If the lower bound and size for a particular dimension are omitted, the ":" is omitted as well. | M:Foo.Bar.Func(System.Int32[0:,0:]) |
| Arguments that are jagged arrays | Are represented by one "[]" per level. | M:Foo.Bar.Func(System.Int32[],System.Int64[][]) |
| Arguments that have pointer types other than void | Are represented using a * following the type name. | M:Foo.Bar.Func(System.Char*,Foo.Widget**) |
| Arguments that are pointer to void | Represented by the type name System.Void. | M:Foo.Bar.Func(System.Void*) |
| Arguments that refer to generic type parameters on types | Encoded using a single grave accent character "`" followed by the zero-based index of the type parameter. | M:Foo.Bar`1.Func(`0) |
| Arguments that use generic parameters on methods | Encoded using double grave accent characters "``" followed by the zero-based index of the type-parameter. | M:Foo.Bar.Func(``0,``1) |
| Arguments that refer to constructed generic typs | Encoded using the generic type followed by a comma-separated list of type arguments, enclosed by braces "{" and "}". | M:Foo.Bar.Func(System.Collections.Generic.List{System.String}) |
With all these being said, let's look at several of the most common conceptual templates. It won't make sense to walk through all of them; once you figure how to use some of them it will be easy to use any one that you find suitable for your topics.
As you will see, these content types are rather flexible, without a well defined boundary or differences between; some types can easily be transformed into others. Their purpose is to provide a swift start for documenting a topic, and avoid defining a document structure from scratch each time you author a new document.
Conceptual template
This is a simple, yet maybe mostly used, conceptual topic. As the name implies it is quite general and can be used for anything that's not define through another template. The conceptual template contains a summary, an introduction, a section, and related topics. The summary element is optional, the introduction is mandatory, there must be at least one section or a procedure. The related topics element is also mandatory, but it can be empty. Below is a dummy example of a general conceptual topic and a screenshot with the generated help page.
<topic id="679431bf-4adc-4f8b-a90d-012a4f14d6c4" revisionNumber="0">
   <developerConceptualDocument xmlns="http://ddue.schemas.microsoft.com/authoring/2003/5"
                                xmlns:xlink="http://www.w3.org/1999/xlink">
      <summary>
         <para>This is a simple summary of a conceptual topic.</para>
      </summary>

      <introduction>
         <para>The conceptual template is the most used template.</para>
      </introduction>

      <section>
         <title>The section title</title>
         <content>
            <para>
               The para element describes a paragraph.
               It is the most basic documentation unit.
            </para>
            <list class="bullet">
               <listItem>
                  <para>this is an item</para>
               </listItem>
               <listItem>
                  <para>this is another item</para>
               </listItem>
            </list>
            <para>
               This is a link to the documentation of
                 <codeEntityReference>T:DemoLibrary.IMath`1</codeEntityReference> interface.
            </para>
         </content>
      </section>

      <relatedTopics>
         <link xlink:href="cc595a59-57cd-493d-b059-297ffe93290d" />
      </relatedTopics>

   </developerConceptualDocument>
</topic>
Glossary
A glossary is an alphabetical list of terms and their definitions. Usually, a glossary includes terms within the documentation that are either newly introduced, uncommon, or specialized. MAML defines a template for a glossary, called "Glossary". The template consists of a glossary, that has a title and either at least a glossary entry or a glossary division (a section within the glossary), which in turn consists in at least glossary entry. Each entry has at least a term and a definition. Below is an example of a glossary and a screenshot with the result.
="1.0"="utf-8"
<topic id="cc595a59-57cd-493d-b059-297ffe93290d" revisionNumber="0">
<developerGlossaryDocument xmlns="http://ddue.schemas.microsoft.com/authoring/2003/5"
xmlns:xlink="http://www.w3.org/1999/xlink">
<glossary>
<title>This is the title of the glossary.</title>
<glossaryDiv>
<title>This is a glossary division</title>
<glossaryEntry>
<terms>
<term termClass="used">blogging</term>
</terms>
<definition>
<para>writing on or otherwise using online journals known as web logs or blogs</para>
</definition>
</glossaryEntry>
<glossaryEntry>
<terms>
<term termClass="used">tweet</term>
</terms>
<definition>
<para>a small message sent by a user of the website Twitter.</para>
</definition>
</glossaryEntry>
</glossaryDiv>
</glossary>
</developerGlossaryDocument>
</topic>
How to
A "how to" topic is supposed to document a certain procedure that someone has to do. The template consists of an optional summary, a mandatory introduction, a procedure (can also be a section) and related topics. Other elements are possible, such as code example, build instructions or security. A procedure is a sequence of steps (displayed in an ordered fashion - with numbers, or with bullets). A step has a content that can be any piece of documentation, including other procedures.
="1.0"="utf-8"
<topic id="8935f12d-9594-43cc-9ec5-1cafa88359e3" revisionNumber="0">
<developerHowToDocument xmlns="http://ddue.schemas.microsoft.com/authoring/2003/5"
xmlns:xlink="http://www.w3.org/1999/xlink">
<summary>
<para>This is the summary of this how to.</para>
</summary>
<introduction>
<para>This is a simplified version of the How to template. It only contains a procedure.</para>
</introduction>
<procedure>
<title>How to write a procedure</title>
<steps class="ordered">
<step>
<content>
<para>add a new topic from a "how to" template</para>
</content>
</step>
<step>
<content>
<para>remove the unnecessary elements from the template</para>
</content>
</step>
<step>
<content>
<para>document the steps of the procedure</para>
</content>
</step>
</steps>
</procedure>
<relatedTopics>
</relatedTopics>
</developerHowToDocument>
</topic>
Walkthrough
A walkthrough is similar to a how to, though a bit more complex. A how to is supposed to answer a particular question or questions related to a well defined topic. A walkthrough may refer to a wider topic, or a series of procedures that someone has to follow. A walkthrough could actually be a collections of how tos. The walkthrough template has an optional summary, an introduction, a section of prerequisites, a procedure, a section for next steps, and related topics. In a simpler form, a walkthrough can only have a summary, an introduction, a procedure and related topics, which is the exact structure of the how to template.
="1.0"="utf-8"
<topic id="4a84d8eb-7880-4a1a-99e1-fdf0527a22d5" revisionNumber="0">
<developerWalkthroughDocument xmlns="http://ddue.schemas.microsoft.com/authoring/2003/5"
xmlns:xlink="http://www.w3.org/1999/xlink">
<summary>
<para>This is a simple walkthrough.</para>
</summary>
<introduction>
<para>In this walkthrough we will see how to write walktroughs.</para>
</introduction>
<prerequisites>
<content>
<para>You need the following prerequisites:</para>
<list class="bullet">
<listItem>
<para>HTML Help Workshop</para>
</listItem>
<listItem>
<para>Sandcastle and DocProject</para>
</listItem>
<listItem>
<para>Visual Studio</para>
</listItem>
</list>
</content>
</prerequisites>
<procedure>
<title>How to write a walkthrough</title>
<steps class="ordered">
<step>
<content>
<para>add a new topics using the walkthrough template</para>
</content>
</step>
<step>
<content>
<para>document the steps of the walkthrough</para>
</content>
</step>
</steps>
</procedure>
<nextSteps>
<content>
<para>After reading this walk-through read the troubleshooting template documentation.</para>
</content>
</nextSteps>
<relatedTopics></relatedTopics>
</developerWalkthroughDocument>
</topic>
Conclusion
Sandcastle and DocProject make relatively easy documenting your product or library or any other project that you might need to document.
You can write conceptual documentation (custom topics, FAQs, walkthroughs, glossaries, etc.) and API reference documentation (that is auto-generated
from managed assemblies and XML files with comments) and even mix them together. The tools for building documentation are all free and their setup
is relatively simple. In this article we have seen how to get started with DocProject and looked at some of the conceptual topics templates.
What you have to do is get some practice with these templates and the tags defined by MAML so you can build your documentation.
Marius Bancila is the author of Modern C++ Programming Cookbook and The Modern C++ Challenge. He has been a Microsoft MVP since 2006, initially for VC++ and nowadays for Development technologies. He works as a system architect for Visma, a Norwegian-based company. He works with various technologies, both managed and unmanaged, for desktop, cloud, and mobile, mainly developing with VC++ and VC#. He keeps a blog at http://www.mariusbancila.ro/blog, focused on Windows programming. You can follow Marius on Twitter at @mariusbancila.


 General
  News
News  Suggestion
  Question
  Bug
Bug  Answer
  Joke
Joke  Praise
  Rant
Rant  Admin
Admin 


