Introduction
Talking with a prospective client, I found that one of the features that they were looking to do was document processing.
The basic idea was to create a template that would be populated with data in a repetitious fashion. A prior client of mine used
a third party tool that costs more than a couple of pennies. Not having that kind of money, I thought I would take a look at .NET to see what I could do.
I found the FlowDocument class which contains lots of features.
This article will take a very basic look at what I found and how to use it to satisfy the template based document.
The intent of this article is to allow a general user to create a document with a familiar application such as MS-Word,
add some special markers, and then import it into a .NET application as a template for producing custom documents.
Background
This article uses the FlowDocumentPageViewer, FlowDocument and supporting classes which are part of the WPF library PresentationFramework.dll.
The Code
There are two projects located within the Zip file:
- DocumentReader - This project will explore the loading and saving of Rich Text Files (RTF) and XAML. We will look at the easy way
of creating an XPS document by first creating a Rich Text File.
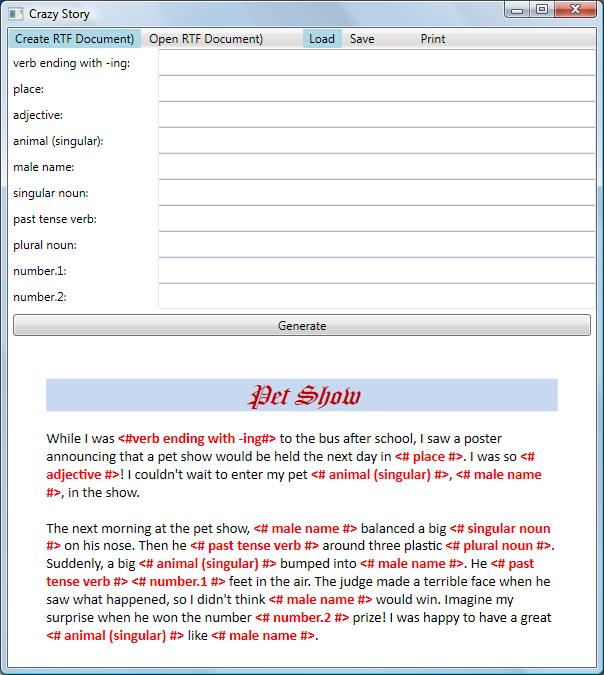
- CrazyStory - This project builds on the DocumentReader. It demonstrates how to query the document for markers that need to be replaced and prompt the user for input.
Project Information
DocumentReader
The XAML file contains a content holder for the FlowDocument: <FlowDocumentPageViewer Name="docViewer"/>,
and the code-behind file contains two methods: Load() and Save(). These
two methods demonstrate how to load both the XAML and RTF documents.
At the core of the Load method is the following code:
using (FileStream fs = File.Open(documentFile, FileMode.Open))
{
    switch (extension)
    {
        case ".xaml":
            flowDocument = XamlReader.Load(fs) as FlowDocument;
            break;
        case ".rtf":
            flowDocument = new FlowDocument();
            TextRange range = new TextRange(
                                flowDocument.ContentStart,
                                flowDocument.ContentEnd);
            range.Load(fs, DataFormats.Rtf);
            break;
    }

    docViewer.Document = flowDocument;
}
Depending on the type of the document, there are two different methods to load a document. For loading an RTF file, you will need to use
the TextRange.Load() method, but for XAML, you could also use the XamlReader.Load() method. The one caveat here is that if you save
using TextRange.Save(), then you need to use TextRange.Load(). The same is true for XamlWriter.Save() and XamlReader.Load().
Mixing the two different methodologies will cause problems.
using (FileStream fileStream = File.Open(documentFile, FileMode.Create))
{
    switch (extension)
    {
        case ".xaml":
            XamlWriter.Save(flowDocument, fileStream);
            break;
        case ".rtf":
            TextRange range = new TextRange(
              flowDocument.ContentStart,
              flowDocument.ContentEnd);
            range.Save(fileStream, DataFormats.Rtf);
            break;
    }
}
Using the XamlWriter.Save() method gives you the additional benefit of saving information about the graphic, but not the actual graphic.
The graphic will remain in the document for the remainder of the run of the application. If you close the application and re-open the XAML document, you will not see the graphic.
In order to have the graphic appear when you load the XAML, you will have to load the graphic. The following code will show how.
Open the XAML and find the paragraph where you want to add the graphic, and then put the <floater> tag within it.
<Paragraph>
    <Floater Width="100" Padding="5,0,5,0" HorizontalAlignment="Right">
        <BlockUIContainer>
            <Image Source="c:\temp\julius-caesar.jpg" />
        </BlockUIContainer>
    </Floater>
</Paragraph>
I didn't dig too deep into the graphics as it fell outside my original intent, but the only way I could get the graphic to display was with a fully qualified path.
Crazy Story
private void ParseDocument())
{
SortedList<string, >> markers = new SortedList<string, >>();
gridWords.Children.Clear();
foreach (Block block in _originalDocument.Blocks)
{
Paragraph paragraph = block as Paragraph;
if (paragraph == null)
continue;
foreach (Inline inline in paragraph.Inlines)
{
Span span = inline as Span;
if (span == null)
continue;
Run run = span.Inlines.FirstInline as Run;
if (run == null)
continue;
FindMarker(markers, run);
}
}
}
Within the Run node, there can be lots of things, one of which could be the marker. If we find the marker
the first time we create a list of Run nodes, assign it and attach it to a TextBox for use later. Any subsequent finds of the marker just get added to the list.
private void FindMarker(SortedList<string,>> markers, Run run)
{
Regex regex = new Regex(@"(\<\#(?<name>[^#]+)\#\>)");
MatchCollection matches = regex.Matches(run.Text);
foreach (Match match in matches)
{
string text = match.Groups["Name"].Value.Trim();
if (markers.Keys.Contains(text))
{
markers[text].Add(run);
continue;
}
List<run> runList = new List<run> {run};
markers.Add(text, runList);
BuildTextBox(runList, text);
}
}
private void BuildTextBox(List<run> runList, string text)
{
RowDefinition row = new RowDefinition();
gridWords.RowDefinitions.Add(row);
Label lbl = new Label();
lbl.Content = text + ":";
Grid.SetColumn(lbl, 0);
Grid.SetRow(lbl, gridWords.RowDefinitions.Count - 1);
gridWords.Children.Add(lbl);
TextBox txt = new TextBox();
Grid.SetColumn(txt, 1);
Grid.SetRow(txt, gridWords.RowDefinitions.Count - 1);
gridWords.Children.Add(txt);
txt.Tag = runList;
}
After the user fills in the values and presses the Generate button, the following code will run.
The code will look for all the controls in the grid that is in the first column and grab the dynamically created TextBox.
The list of Run nodes are retrieved from the tag and then iterated through, and the value of the text is replaced.
private void cmdGenerate_Click(object sender, RoutedEventArgs e)
{
foreach (UIElement child in gridWords.Children)
{
if (Grid.GetColumn(child) != 1)
continue;
TextBox txt = child as TextBox;
if (txt == null || txt.Text == "")
continue;
List<run> runList = txt.Tag as List<run>;
if (runList == null)
continue;
foreach (Run run in runList)
run.Text = txt.Text;
}
}
The document can be reused once it is opened and parsed. You would just supply new values and click the Generate button again.
Printing
I would like to just make a brief mention on printing. I added a print menu item that will print the document.
If you click on it and print the document, you will notice that the document is displayed in two columns. This is most annoying
if you don't want it. This has nothing to do with the number of columns in the RTF document. That is just the way it is. In order to get around this,
you can set the ColumnWidth on the FlowDocument to a larger value, say 600. This will print the document out in a single column.
Conclusion
As I have reached the end of what I was attempting to do, I draw this article to an end. Hopefully, this article will give
you a starting point to enable a richer document processing application.
Dave is an independent consultant working in a variety of industries utilizing Microsoft .NET technologies.


 General
  News
News  Suggestion
  Question
  Bug
Bug  Answer
  Joke
Joke  Praise
  Rant
Rant  Admin
Admin 


