Harness the power of
PICTools high-performance native libraries and give your Java applications up
to 7 times faster JPEG compression over Java JPEG support. This white
paper and sample code will describe how to inject this performance into
existing Java applications, without the need for a complete rewrite. Some of the largest medical, photo and document
imaging companies in the world have relied on the performance and reliability
of PICTools libraries for the last 10+ years. When performance really
matters, the PICTools native libraries can be accessed via a JNI interface to
provide performance where needed in an existing Java application.
Before You Start
The PICTools toolkits
provide 32-bit and 64-bit versions on Windows, Linux, Solaris, AIX, and Mac
OSX. Android's Java environment and Apple iOS are supported by AIMTools, the
mobile version of PICTools.
The PICTools toolkits
are packaged in several editions offering a wide range of functionality to suit
the needs of the application you are building. Visit http://www.accusoft.com/pictools.htm to learn more. This tutorial
demonstrates functionality that can be found in the PICTools Photo Edition.
To compile this tutorial
you will need to download the 32-bit PICTools Photo toolkit and ensure you have a 32-bit
version of the Java Development Kit (JDK) 1.6 (Java 6) or higher installed in
your development environment. You can download the JDK from Oracle's website
at http://www.oracle.com/technetwork/java/javase/downloads/index.html. You will also need to have Microsoft
Visual Studio 2010 installed.
If you do not wish to
compile the program at this time, a compiled demo has been provided for you to run in
the demo directory. You can also browse the source code provided in the Source
directory.
Writing the Java Application
The Java application we
are going to write will read a bitmap file from disk, compress it using JPEG
compression, and write it out using the JFIF file format. To provide a
comparison, we will use the javax.imageio.ImageIO class to perform the
operation and then perform the same operation using PICTools. The PICTools
implementation will provide quality and compression settings to produce a JPEG
compressed image that is as close as possible to the image produced by the Java
library.
In the directory
"Source", you will find a batch file named,
"CompileAndRun.bat". We are calling a 32-bit native library, so we must
make sure to invoke the 32-bit version of the Java compiler and runtime. The
batch file has been provided for your convenience to compile and run the
program. The source for the Java file shown below is located in the
"Source/Java/Accusoft" directory in the file named
"MyClass.java".
NOTE:
This was compiled with JDK1.6 Update 25. You may need to change the path in the
batch file depending on the version of Java you have installed.
The timing is provided
as a comparison between the two operations and includes the time to read the
source file from disk and write out the new file. Using the ImageIO.write()method did not allow for the compression time to be measured without the disk
I/O included, which can skew the timing results. For this reason the total time
to read the file from disk, compress the image, and write the file to disk is
included in the timing measurements. The PICTools timing includes an extra
timing measurement which is only the compression time in milliseconds.
package Accusoft;
public class MyClass
{
public native int PicToolsMakeJPG(String srcBmp, String tgtJpg);
static long pictime = -1;
public static void main(String[] args) throws java.io.IOException
{
long start, stop;
if (args.length < 1)
{
String msg = "Copyright 2012 Accusoft Corporation. All rights reserved.\n" +
"Java PICTools Tutorial.\n" +
"Usage: source.bmp";
System.out.println(msg);
System.exit(1);
}
System.loadLibrary("PicToolsWrapper");
java.io.File file = new java.io.File(args[0]);
start = System.currentTimeMillis();
java.awt.image.BufferedImage image = javax.imageio.ImageIO.read(file);
java.io.File output = new java.io.File(file.getName() + "-javax_imageio.jpg");
javax.imageio.ImageIO.write(image, "jpg", output);
stop = System.currentTimeMillis();
System.out.println(String.format("Total Time Java: %s ms",stop-start));
Accusoft.MyClass test = new Accusoft.MyClass();
String outfile = file.getName() + "-pictoolsJNI.jpg";
int status = test.PicToolsMakeJPG(args[0], outfile);
if (status == 0)
{
start = System.currentTimeMillis();
status = test.PicToolsMakeJPG(args[0], outfile);
stop = System.currentTimeMillis();
if (status == 0)
{
String msg = "Total Time PICTools: %s ms, compress time %s ms";
System.out.println(String.format(msg,stop-start,pictime));
}
else
ReportError(status);
}
else
{
ReportError(status);
}
System.exit(0);
}
private static void ReportError(int statuscode)
{
String msg = String.format("\nThe error code %d was returned. ", statuscode);
msg += "Failed to create JPEG compressed file.\n";
if (statuscode == 4)
msg += "A 24bpp bitmap image is required as the source image.";
else if (statuscode == -2101)
msg += String.format ("The file picn1020.dll was not found in your path.");
else if (statuscode == 1)
msg += "Failed to open the file input file.";
System.out.println(msg);
}
}
Writing the Windows DLL
There is some work
involved in creating a native library that can be called from Java, but this is
a one-time cost that can then be leveraged by all of your Java applications.
This tutorial will explain the steps necessary to create a Windows DLL and
correctly expose a native function that can be called from your Java
application. You can later build on this to add more advanced features offered
by the PICTools toolkits and then expand this to other platforms if desired.
Creating
the Visual Studio Project
- Using the Visual Studio New Project
Wizard, Create a new Visual C++ Win32 project and give it the name
"PicToolsWrapper".
- When the Wizard starts, navigate to
the Application Settings page and select the Application type of
"DLL".
- Click Finish to exit the wizard.
Adding
the Java Native Interface Header Files
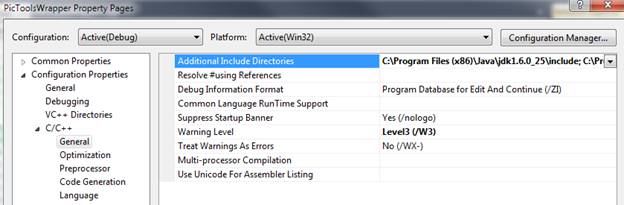
After you have created
the project, we need to add the header file jni.h to the file dllmain.cpp.
Unless you have previously set up Visual Studio for another project using Java,
it is likely that Visual Studio will not be able to find the JNI header files.
Open your project's settings and add the include path to the Java JDK installed
on your machine.
In
the file dllmain.cpp add the lines below the include statement for the file
stdafx.h and then compile the project. It should compile error free.
#include "stdafx.h"
#include <jni.h>
Adding
the JNI Native Method
Next we will define the
native method that we will call from our Java application. When the Java
Virtual Machine (JVM) invokes our function, it passes a JNIEnv pointer, a
jobject pointer, and any arguments declared by the Java method. The JNIEXPORT
and JNICALL
are
defined in the jni.h header file and are aliases for __declspec(dllexport),
exports a function from a Windows DLL, and __stdcall, a Windows API calling
convention. The compiler changes method names to include parameter and return
types. By using extern
"C",
we instruct the compiler to not change the function name.
extern "C" JNIEXPORT void JNICALL Java_ClassName_MethodName
(JNIEnv *env, jobject obj)
{
}
From the Java JNI formal
signature we can now write our native method. Notice that we must use the fully
qualified Java class name in the native method name. We have also introduced
the Java types jint and jstring, which are defined in the file jni.h and
provide a mapping between Java types and native types.
extern "C" JNIEXPORT jint JNICALL Java_Accusoft_MyClass_PicToolsMakeJPG
(JNIEnv *env, jobject obj, jstring srcfile, jstring tgtfile)
{
}
Converting
Java Types to Native Types
In this example we are
passing two strings as arguments to our function. The String object in the Java
language, which is represented as jstring in Java Native Interface (JNI), is a
16-bit Unicode string. The conversion function GetStringUTFChars() will
allocate memory and retrieve an 8-bit representation of the string. Because we
have allocated memory, we must call the function ReleaseStringUTFChars() to
inform the Java Virtual Machine that it can free the memory it allocated. The
function internal_PicToolsMakeJPG separates the
"plumbing" of our Java native method from the work that will be
performed by PICTools. Copy this function to your dllmain.cpp file, below the
DllMain function.
extern "C" JNIEXPORT jint JNICALL Java_Accusoft_MyClass_PicToolsMakeJPG
(JNIEnv *env, jobject obj, jstring srcfile, jstring tgtfile)
{
const char *pszSrcBmp = env->GetStringUTFChars(srcfile, 0);
if (pszSrcBmp == NULL)
return NULL;
const char *pszTgtJPG = env->GetStringUTFChars(tgtfile, 0);
if (pszTgtJPG == NULL)
{
env->ReleaseStringUTFChars(srcfile, pszSrcBmp);
return NULL;
}
long compressTime = -1;
int output = internal_PicToolsMakeJPG(pszSrcBmp, pszTgtJPG, &compressTime);
jclass cls = env->GetObjectClass(obj);
jfieldID fid = env->GetStaticFieldID(cls, "pictime", "J");
if (fid != NULL)
{
jlong time = compressTime;
env->SetStaticLongField(cls, fid, time);
}
env->ReleaseStringUTFChars(srcfile, pszSrcBmp);
env->ReleaseStringUTFChars(tgtfile, pszTgtJPG);
return output;
}
Introduction
to the PICTools API
If you are not familiar
with the PICTools architecture, now is a good time for a brief overview in the
context of the code that will perform the JPEG compression. Please refer to the
"PICTools and AIMTools
Programmers Guide"
and the "PICTools Quick Start
Guide"
for a complete discussion
of the architecture.
PICTools uses a plug-in
type architecture where DLLs, referred to as opcodes, are loaded dynamically at
runtime to perform compression, decompression, and image manipulation. Your
application links to the PICTools dispatcher, which is a DLL responsible for
loading an opcode at runtime, and is the primary way for you to transfer data
between your application and the opcode.
The dispatcher exports
two main functions: PegasusQuery and Pegasus. The first function
is used to determine the image type. In our case, after we have allocated
memory and loaded the bitmap into our buffer, this function will read enough of
the data in the buffer to determine the image type. The second function is the
primary way your application communicates with the opcode. It does this by
passing a pointer to a PIC_PARM structure, defined in the file pic.h, and
passing a constant to indicate the requested action, which will be used to
perform initialization, execution, and termination.
This is an excerpt of
the PIC_PARM structure taken from the file pic.h. The "Op" field is
used to tell the dispatcher which opcode (DLL) to load. The "Head"
field will be filled out after a call to PegasusQuery and will return
information about the bitmap we are going to JPEG compress. The "Get"
field is a pointer to memory that our application has allocated and contains
the bitmap image. The "Put" field is a pointer to memory that our
application has allocated and will contain the JPEG compressed image.
typedef struct PIC_PARM_TAG {
...
long         Op;
BITMAPINFOHEADER Head;
RGBQUAD      ColorTable[272]
QUEUE        Get;
QUEUE        Put;
...
} PIC_PARM;
The following table
shows the DLLs used in this tutorial.
| Opcode
| DLL
| Description
|
| n/a | picn20.dll | 32bit PicTools dispatcher, Applications link with picnm.lib to use this DLL. Exposes the functions PegasusQuery() and Pegasus(). |
| OP_D2S | picn1020.dll | DIB to Huffman Sequential JPEG |
Working
with the PICTools API
In this example, we
assume you have extracted the PICTools Photo toolkit in the directory
C:\PICTools. Open up your Visual Studio project settings and add a path to
C:\PICTools\include for the header files and C:\PICTools\lib for
the library path. In the Linker settings you also need to add the library picnm.lib.

In the file dllmain.cpp
above the function Dllmain, add the PICTools header files and the function
prototype shown below, then add the function body at the end of the dllmain.cpp
file. The project should compile with no errors. The WINAPI macro is an alias
for the __stdcall convention that we discussed earlier. Please note that in
this example error handling has been kept to a minimum to illustrate the
concepts. Arbitrary return codes are used to demonstrate potential errors.
Ensure that your application provides any necessary error handling that you may
require.
#include <stdlib.h>
#include <time.h>
#include "pic.h"
#include "errors.h"
int WINAPI internal_PicToolsMakeJPG(const char *srcbmp, const char *tgtjpg, long *compresstime);
int WINAPI internal_PicToolsMakeJPG(const char *srcbmp, const char *tgtjpg, long *compresstime
)
{
return 0;
}
Filling
out the Function Body
The three main steps you
must take when calling an opcode to perform an operation are initialization,
execution and termination. Before calling any of the PICTools API functions you
must initialize the PIC_PARM structure to zero to ensure we have reasonable
default values. After which you can perform opcode specific initialization by
modifying the PIC_PARM structure before calling the pegasus function. Please
refer to the "PICTools Programmer's
Reference" for a
complete discussion of what must be initialized before using a specific opcode.
There is a five second
evaluation dialog that is displayed the first time you call an opcode unless
you have provided registration codes. When you purchase the toolkit and are
supplied with registration codes, you would simply add them to your source code
and re-compile the project.
PIC_PARM p;
RESPONSE res;
char *pszRegistrationName = NULL;
char *pszDispatcherRegistrationName = NULL;
unsigned long RegistrationCode = 0x00000000;
unsigned long DispatcherRegistrationCode = 0x00000000;
memset (&p,0,sizeof(PIC_PARM));
p.ParmSize = sizeof(PIC_PARM);
p.ParmVer = CURRENT_PARMVER;
p.ParmVerMinor = 1;
p.Op = OP_D2S;
p.ReservedPtr6 = (BYTE*)pszRegistrationName;
p.ReservedPtr7 = (BYTE*)(PICINTPTRT)RegistrationCode;
if ( DispatcherRegistrationCode != 0 )
{
p.Flags |= F_ReservedPtr5;
p.ReservedPtr4 = (BYTE*)pszDispatcherRegistrationName;
p.ReservedPtr5 = (BYTE*)(PICINTPTRT)DispatcherRegistrationCode;
}
The Get queue is a
structure that contains a Start and End pointer, which are used to determine
the size of the buffer. It also contains a Front and Rear pointer, which are
used to orient how you want to read data from the queue. If you imagine the
queue as a horizontal line, then the question becomes are we reading left to
right or right to left. The opcode will read the image data from the Get queue.
In this step we allocate memory and read the entire file into the buffer. More
advanced techniques allow you to process the image in chunks and have the
opcode report progress back to the application.
FILE *fp;
if (fopen_s(&fp, srcbmp, "rb") != 0)
return 1;
fseek(fp,0L, SEEK_END);
long size = ftell(fp);
fseek(fp, 0, SEEK_SET);
p.Get.Start = (unsigned char *)malloc(size);
if (p.Get.Start == NULL)
{
fclose(fp);
return -1; }
p.Get.End = p.Get.Start + size;
p.Get.Front = p.Get.Start;
p.Get.Rear = p.Get.End;
p.Get.QFlags = Q_EOF;
int bytesRead = fread(p.Get.Start,1,size,fp);
if (bytesRead != size)
{
fclose(fp);
free(p.Get.Start); return 2; }
fclose(fp);
After we have read the
file into our Get queue we can call the function PegasusQuery()
to determine the file type. This will fill out the BITMAPHEADER structure with
information about the bitmap.
p.u.QRY.BitFlagsReq = QBIT_BICOMPRESSION | QBIT_BICLRIMPORTANT | QBIT_BIBITCOUNT;
if (!PegasusQuery(&p))
{
free (p.Get.Start);
return 3; }
memset(&p.u.QRY, 0, sizeof(p.u.QRY));
if (p.Head.biCompression != BI_RGB || p.Head.biClrImportant != 0
|| p.Head.biBitCount != 24)
{
free (p.Get.Start);
return 4; }
p.Get.Rear = p.Get.Front + sizeof(BITMAPFILEHEADER) + sizeof(BITMAPINFOHEADER);
p.Get.Front = p.Get.End;
p.Get.QFlags |= Q_REVERSE;
p.u.D2S.LumFactor = 32;
p.u.D2S.ChromFactor = 32;
p.u.D2S.SubSampling = SS_411;
p.u.D2S.PicFlags |= PF_OptimizeHuff;
Before starting the PICTools operation, we allocate memory for the Put queue, which is where the opcode will write the compressed JPEG image.
p.Put.Start = (unsigned char*)malloc(size);
if (p.Put.Start == NULL)
{
free(p.Get.Start);
return -1; }
p.Put.End = p.Put.Start + size;
p.Put.Front = p.Put.Start;
p.Put.Rear = p.Put.Start;
long start_time = clock();
res = Pegasus(&p, REQ_INIT);
while (res != RES_DONE)
{
if (res == RES_ERR)
{
if (p.Status == ERR_OPCODE_DLL_NOT_FOUND) {
free(p.Get.Start);
free(p.Put.Start);
return p.Status;
}
}
res = Pegasus(&p, REQ_CONT);
}
if (res != RES_ERR)
{
res = Pegasus(&p, REQ_EXEC);
Pegasus(&p, REQ_TERM);
if (res != RES_DONE)
{
free(p.Get.Start);
free(p.Put.Start);
return p.Status;
}
}
long end_time = clock();
*compresstime = ((end_time - start_time)*1000)/CLOCKS_PER_SEC;
Finally we write out the
file to disk and free the memory that we allocated.
if (fopen_s(&fp, tgtjpg, "w+b") != 0)
return 6;
size_t len = p.Put.Rear-p.Put.Front;
if (fwrite(p.Put.Front,1,len,fp) < len)
{
free(p.Get.Start);
free(p.Put.Start);
fclose(fp);
return 7; }
fclose(fp);
free(p.Get.Start);
free(p.Put.Start);
p.Get.Start = NULL;
p.Put.Start = NULL;
return 0;
Running the Program
Demo
Program
A compiled demo program
has been provided in the directory "Demo". Because we are loading a
32-bit native library, we must invoke the 32-bit JVM. A batch file named
"RunDemo.bat" has been provided which ensures that we run the correct
version. The batch file also sets the PATH environment variable to the current
directory to ensure the PicToolsWrapper.dll, picn20.dll, and picn1020.dll files
can be found and loaded at runtime. When the batch file exits the PATH variable
is restored to the original value.
When you run the batch
file it will read in the source .bmp image and produce the files java-pictoolsJNI.jpg
and javax-imageio.jpg. It will also display the time it took to read the file
from disk, perform the compression, and write the new file to disk. The
PICTools example code sets quality and compression ratio settings to produce an
image that is as close as possible to the settings used by the Java
implementation.
Compiled
Program
In the directory
"Source\Java" you will find a batch file named
"CompileAndRun.bat". This will compile the Java program and then run
the program. If you have followed along with the tutorial and created your own
PicToolsWrapper project, you will need to copy your compiled DLL,
PICToolsWrapper.dll, from your output directory to the directory
"Source\Java\Accusoft".
The batch file also adds
"current directory\Accusoft" to the PATH environment variable
to ensure the PicToolsWrapper.dll, picn20.dll, and picn1020.dll files can be
found and loaded at runtime. When the batch file exits the PATH variable is
restored to the original value.
| DLL
| Description
|
| PicToolsWrapper.dll
| The Windows DLL created during this tutorial.
|
| picn20.dll
| 32bit PicTools dispatcher, Applications link with picnm.lib to use this DLL. Exposes the functions PegasusQuery () and Pegasus().
|
| picn1020.dll
| DIB to Huffman Sequential JPEG
|
Conclusion
When performance
matters, PICTools can be plugged into your existing application using the Java
Native Interface (JNI) to gain up to 7 times faster compression of JPEG
images. Other PICTools libraries are available to provide high-speed
imaging support such as image cleanup, image enhancement and compression and
decompression for a wide variety of image formats. The PICTools
architecture allows you to include only the libraries needed for your desired
imaging support, keep your binary as small as possible, and develop on the most
popular platforms available today. For more information and to download
the fully featured trial version visit: www.accusoft.com/pictools.htm.
About the Authors
Andy Dunlap is a Senior Software Engineer
with Accusoft. Prior to joining Accusoft in 2011, Andy was an AV-8B Harrier
Avionics Technician and Instructor in The Marine Corps for 10 years before
transitioning from hardware to software. His software career began at a flight
simulator company in Tampa, Florida where he used his aircraft knowledge to
design real-time flight simulator software in Fortran, C, and C++ on Unix and
Windows platforms. Desiring a change, he then began work in commercial software
where he developed database applications
using Microsoft SQL Server, Win32, .NET and
COM+ technologies. Currently, he is working
as part of Accusoft's Native Core Imaging
Team on imaging technology. Andy earned a Bachelor of Science in Computer
Science at Park University.
Accusoft provides a full spectrum of document, content, and imaging solutions as fully supported, enterprise-grade, client-server applications, mobile apps, cloud services, and software development kits. The company is focused on solving document lifecycle complexities through:
- A customer-focused approach
- Continuous product development
- Proactive support
- Forward-thinking leadership
Founded in 1991, Accusoft has grown through persistent product innovation and strategic mergers and acquisitions into the best-in-class solutions provider it is today. The company has been awarded 30 patents and is recognized as a thought leader in the industry.


