Introduction
Microsoft Visual Studio Team System 2008 is an integrated application lifecycle management (ALM) product family with the tools and processes that help development teams work more effectively together.
Microsoft Visual Studio Team System 2008 Team Foundation Server (TFS) is a team collaboration platform that combines team portal, version control, work-item tracking, build management, process guidance and business intelligence into a unified server. It allows everyone on the team to collaborate more effectively and deliver better-quality software.
Project or Team Project is created on Team Foundation Server. Team Explorer is a client tool that speaks with the TFS. Using Team Explorer, we can create a team project.
In this article, let me show in a step by step manner how to setup a project on TFS and setup permissions to make the project operational for the project team.
Project Setup Steps
Prerequisites for Project Setup
Your login (domain user) should have the permission in TFS to connect and setup project. You must have Team Explorer installed.
If the Team Explorer is not opened up, click on View menu and then select Team Explorer.
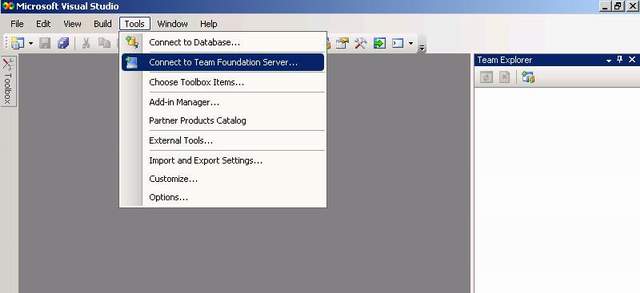
The first step is to connect to the TFS. Click on Tools menu in Visual Studio and click on Connect to Team Foundation Server. Refer to the following screenshot:
In the Connect to Team Foundation Server window, if the TFS is not already listed in the dropdown list, click on Servers button. Refer to the following screenshot:

In the Add/Remove Team Foundation Server, click on Add button and put in the TFS name. Port number is 8080 and Protocol is HTTP by default, if your installation is not using a different port or protocol and then click OK button and also OK on the Connect to Team Foundation server window. This should list your TFS in your Team Explorer. Refer to the following screenshot:
Right click on TFS in the Team Explorer and then select New Team Project. If the project is already created, you can select Add Existing Project to work on that project. Refer to the following screenshot:
The New Team Project dialog box opens up and here put in the name of the team project that you wish to create and click on Next button. Refer to the following screenshot:
While setting up a project on TFS, you must select a Process Template for your project. TFS comes with process template for MSF for Agile and MSF for CMMI. You can define your own process template following the process guidelines of your organization and use the same or use the most relevant ones provided by TFS. Process Template provides the SDLC guidelines for various phases and also provides various templates to be used in the project in terms of Project Management, Requirements Management, Quality management and so on and so forth. It is a big area to be described in this article. I shall come up with a different article for the same in this series.
Select the relevant process template and click on Next. Refer to the following screenshot:
In this window, you can put in a brief description for the project. However this is optional. Click on the Next button. Refer to the following screenshot:
In this window, you need to specify the Source Control Settings. It may so happen that your project is a subproject or a new version of an existing project, such that you can add this project as a branch to an existing project. If this is a fresh new project, create an empty source control folder. You also have the option to define the source control later on by selection of the third option. It may so happen that you are creating a non-software project, wherein you do not want a source control, you want other features of TFS. Click Next once done. Refer to the following screenshot:
Click on Finish to complete the project creation process. It takes a few minutes after this to Add the New Project in the TFS as it involves lots of activities like setting up of the Project Portal (a WSS 3.0 site / Sharepoint Site), Reports Server, Process Template download and so on. Refer to the following screenshot:
Once the project is added, you will see the following screen. You can browse through the process guidance if you may wish to do so. Click on the Close button.
By now, your project is created and added to TFS. Refer to the following screenshot:
Now you need to setup access permissions for your project for the team members of the project in terms of project access, project portal (Sharepoint site for the project) and Reports Access. Apart from setting up permissions for the project, you may also wish to define the Areas and Iterations for the project.
To setup access permission for the TFS project, right click on the Project --> Team Project Settings --> Click on Group Membership. Refer to the following screenshot:
There are various Project Groups in terms of access rights. Select the relevant group for your project team member(s). Click on Properties button. Refer to the following screenshot:
In the Properties window, select Window User Group option and click on Add to add the users in your project. Please note that the users are domain users as TFS is tied up with domain user credentials and authenticate users from Active Directory. Repeat the steps until all the users are added and then click on OK to complete the process. This will enable the users of your project team to access the TFS team project that you have created.
The next logical step is to define the Areas and Iterations for the project.
Iterations—Represents the lifecycle iterations into which a project is divided such as Planning, Envisioning, Development, etc.
Areas—Represents a logical division of project into feature areas and components. For example, you can divide your project tasks as per logical architecture: User Interface layer, Business layer and Data Access Layer.
However you are free to interpret the meaning of Areas and Iterations of your own and define them accordingly. Areas and Iterations are very useful in assigning tasks and adding bugs/defects using the Work Item Tracking feature of TFS for the project. Refer to the following screenshot:
Next, you can define the access permission for the Reports. This is one of the feature of TFS. There are lots of built in reports to be utilized for the project or you can define your own reports. These are SQL Server Reporting Services reports. So it is similar to the permission setup for SQL Reporting Services reports.
Report Server URL [http://ServerName<servername>/Reports/]
Refer to the following screenshot:
Next, you need to setup permissions for the project portal or the Sharepoint site that is automatically created for the TFS project. Right click on the project --> Show Project Portal. In the project portal, click on Site Settings --> People and Groups and then go on adding Users. Once again these are domain users.
URL looks like [http://ServerName/Sites/ProjectName].
Once done, your project setup is complete.
Conclusion
In this article, I have put in the steps in detail to setup projects and permission for a TFS Team Project. This article does not cover the features of VSTS and TFS in depth.
To learn more about the features of VSTS and TFS, please refer to this link.


 General
  News
News  Suggestion
  Question
  Bug
Bug  Answer
  Joke
Joke  Praise
  Rant
Rant  Admin
Admin 


