Introduction
If you look at the .NET framework documentation, you will be overwhelmed with the amount of types that are there. There are over 7000+ types in the framework class library and they cater to all the needs of computing ever envisaged. There are data structures for representing collections, hash tables, dictionaries, network protocols and so on….
The System.Collections namespace contains a series of types for representing various types of collections, which can be used to store objects of various types and retrieved according to the access method dictated by the collection.
In this article, I'm going to look at the Stack type that is present in the System.Collections namespace and see how the stack can be used for programming tasks. I will show some simple examples that show the operation of this collection and then use these concepts to build upon an application that will perform more meaningful tasks. But before we start on the examples, some basics…
What is a stack?
If you look at any book on data structures, a stack is defined as a last in first out list. We will stick to this definition and not complicate it further!
By last-in-first-out what we mean is, if a set of objects are put into a stack, the last object that was put in, will be the first object to be taken out. For example, if you see in restaurants that have an automatic plate dispenser, a stack of plates are kept and as each person takes a plate, the next plate in the stack becomes available. Diagrammatically, this looks like the following:
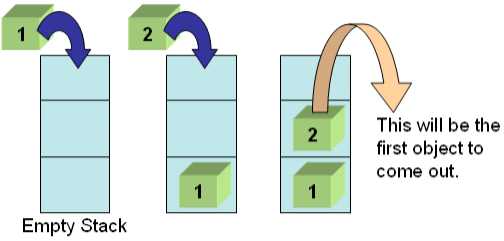
The operation of putting an object into a stack is called push and the operation of taking an object out of the stack is called pop. Sometimes, it might be required to just "examine" the top element from a stack without taking it out. This operation is called peek. This simple data structure represents a very common concept that we keep seeing/doing in our daily lives!!
There are many ways to program a stack. The traditional method has been to represent a stack by means of an array (wrapped around a class) and then provide methods that allow the operations discussed above. If you are a Visual Basic programmer, you can see an implementation at: http://www.developersdomain.com/vb/articles/stack.htm.
Rather than having various implementations of stacks floating around by programmers, the .NET team has provided a type called Stack that provides the above discussed features and operations and more.
Stack in .NET
In .NET, the stack type is present in the System.Collections namespace. The following are the operations available to us on a Stack object.
Public Constructors
Stack constructor. This is an overloaded constructor that initializes a Stack.
Public Properties
Count. This property gets the number of elements in the stack.
IsSynchronized. Gets a value indicating whether access to the Stack is synchronized (thread-safe).
SyncRoot. Gets an object that can be used to synchronize access to the Stack.
Public Methods
Clear. Removes all objects from the Stack.
Clone. Creates a shallow copy of the Stack.
Contains. Determines whether an element is in the Stack.
CopyTo. Copies the Stack to an existing one-dimensional Array, starting at the specified array index.
GetEnumerator. Returns an IEnumerator for the Stack.
Peek. Returns the object at the top of the Stack without removing it.
Pop. Removes and returns the object at the top of the Stack.
Push. Inserts an object at the top of the Stack.
Synchronized.Returns a synchronized (thread-safe) wrapper for the Stack.
ToArray. Copies the Stack to a new array.
All collections also inherit from System.Object. Therefore all the methods from the base class are also available for access.
We will not see examples of all the above methods, but only see the important ones. For more information on each of these methods, see the .NET Framework documentation.
A simple stack example
Ok, enough of the basics. Let's get down to work. Fire up Visual Studio .NET and choose Console Application (Visual Basic .NET) as the project type and type in the following code into the editor.
Imports System.Collections
Module TestModule
Sub Main()
Dim oStack As Stack
oStack = New Stack
oStack.Push("1")
oStack.Push("2")
Console.WriteLine("Stack Count = {0}", oStack.Count())
Console.WriteLine("Top Element = {0}", oStack.Peek())
Console.WriteLine("Get First Element = {0}", oStack.Pop())
oStack.Clear()
Console.WriteLine("Stack Count = {0}", _
oStack.Count())
Console.Read()
End Sub
End Module
Note that I've changed the module name to TestModule. This means that you have to change the VS.NET project properties to set the startup object as TestModule.
And that's it!! We have a stack implemented. The output of the program will be as follows:

So what did we do? We created a stack and then pushed two items into it using the push method. Then, using some of the Stack object methods, we print some details about the stack. Note that the peek method did not remove the top element. Finally, we clear the stack and print the count and its 0, indicating that the stack is now empty.
That was a very simple example that showed some details about the stack. Now, let's build a more interesting application.
The Reverse Polish Notation calculator
In this section, we are going to build a simple calculator application that well, adds and subtracts numbers (there are more sophisticated calculators in the market, but we are going to keep it simple!!).
The method that we are going to use to represent the calculator object is by using a notation called the reverse polish notation. You can find more details about this at: http://www.calculator.org/rpn.html. Essentially, in the polish calculator, the various operators and operands are "pushed" and "popped" from a stack to obtain the results. To start with, as and when we encounter numbers, we "push" them onto the stack and when we start encountering operators, we "pop" the values from the stack, do the operation and "push" the result onto the stack. So let's take a simple example: Say we want to evaluate the expression (3 + 5) * (7 – 2). In the RPN calculator, this expression would be represented as 3 5 + 7 2 - * and from a programming perspective would be made of the following steps:
- Push 3 onto the stack.
- Push 5 onto the stack. The stack now contains (3, 5).
- Apply the + operation: take the top two numbers off the stack, add them together, and put the result back on the stack. The stack now contains just the number 8.
- Push 7 onto the stack.
- Push 2 onto the stack. It now contains (8, 7, 2).
- Apply the - operation: take the top two numbers off the stack, subtract the top one from the one below, and put the result back on the stack. The stack now contains (8, 5).
- Apply the * operation: take the top two numbers off the stack, multiply them together, and put the result back on the stack. The stack now contains just the number 40.
This looks pretty interesting, right? So let's model a .NET class for doing this operation for us. In the VS.NET project opened earlier, right click and add a new class module (called PolishCalc). Paste the code from the following snippet onto the editor.
Imports System.Collections
Public Class PolishCalc
Private oStack As Stack
Public Sub New()
oStack = New Stack
End Sub
Public ReadOnly Property Result()
Get
Return (oStack.Peek())
End Get
End Property
Public Function Evaluate(ByVal Expression_
As String) As Integer
Dim nLength As Integer, i As Integer,_
nValue As Integer
Dim strValue As String
nLength = Expression.Length()
For i = 0 To (nLength - 1)
strValue = (Expression.Chars(i)).ToString()
Select Case strValue
Case "+"
nValue = CType(oStack.Pop(), Integer) _
+ CType(oStack.Pop(), Integer)
oStack.Push(nValue.ToString())
Case "-"
nValue = CType(oStack.Pop(), _
Integer) - CType(oStack.Pop(), Integer)
oStack.Push(nValue.ToString())
Case "*"
nValue = CType(oStack.Pop(), _
Integer) * CType(oStack.Pop(), Integer)
oStack.Push(nValue.ToString())
Case Else
oStack.Push(strValue)
End Select
Next
End Function
Public Function Clear()
oStack.Clear()
End Function
End Class
The above code represents a simple calculator with 3 operations (+, - and *). As mentioned in the polish specification, we use a stack to model all out operations. The result of the expression is available as a read-only property called Result. Note that we use the peek function to return the result, since we want the last result to be available in the stack for any other operations. Finally, we have a clear method that allows us to start all over again.
Ok, let's test our code. Go back to the console application in the VS.NET solution window and type in the following code:
Imports System.Collections
Module TestModule
Sub Main()
Dim oPolish As PolishCalc
oPolish = New PolishCalc
oPolish.Evaluate("35+27-*")
Console.WriteLine("Result = {0}", oPolish.Result)
oPolish.Evaluate("5+")
Console.WriteLine("Result = {0}", oPolish.Result)
oPolish.Clear()
Console.Read()
End Sub
End Module
The output from the previous program would be 40 and 45. Since the Result property does not remove the latest value from the stack, we are able to add another expression to it.
Advanced concepts
The above representation of the Stack worked well because you were the only one accessing it. If you deployed this application and had multiple threads working on this stack, then how do you guarantee that other threads do not read off the stack or manipulate it when you are working on it? The answer is to use synchronization. The Stack class provides properties and methods that will help you to synchronize access to the stack while accessing it. A sample access method would be:
SyncLock oStack.SyncRoot
   ' Do the operations here
End SyncLock
The above code lets you perform thread safe operations on the stack so that you do not encounter sudden exceptions. For more information, see the .NET framework documentation.
What's next?
Well, if you are adventurous and want to learn .NET more, you could try a lot of things in this program. Here are some of my thoughts…
- Implement error handling in the pop and push operations.
- Handle numbers greater than 10. Our calculator does not handle this, since we split the string character-by-character.
- Handle other operations like dividing, modulus etc.
- Handling floating point numbers.
- And many more…. All the best!!
Conclusion
The System.Collections is a vast namespace and we have seen the application of just of one its types called Stack. In the future articles, I will touch upon the other collection types that are more interesting.
Working as a Product Development Manager in SCT Software Solutions India and also as the head of Technology Labs, an internal company initiative which works on the latest technologies from Microsoft and determines its applicability into our product line.


 General
  News
News  Suggestion
  Question
  Bug
Bug  Answer
  Joke
Joke  Praise
  Rant
Rant  Admin
Admin 


