Develop a Windows 8 app in 30 days
Link: http://tron.vectorform.com/
Thanks to the amazing teamwork of Disney and Vectorform, it took just about 1 month to build the new Disney TRON: Legacy Digital Book Site, an immersive HTML5 experience built on top of Internet Explorer 9 Hardware Accelerated HTML5.
In this post I’d like to share some of the "behind the scenes" stories from the team involved in the project, with a particular focus on lessons learned and implementation best practices. I’d like to thank in particular Ken Disbennett, Creative Director, and Alex Barkan, Lead Developer, from Vectorform for sharing their experiences and thoughts about the project.
From Paper to Web (Ken Disbennett)
It all started from the printed comic book. The goal was to leverage the power of HTML5 to upgrade that experience without losing the sense of authenticity of the traditional comic experience. We wanted to ensure that each panel of the comic had life and action of its own just as they would in the printed version, and that the site provided a sense of pacing through the story. Therefore we decided that a linear, timeline type experience was the most appropriate. Each panel featured a custom reveal that emphasized and re-enforced the action of the story. The left to right action of progressing through the comic kept the feel of a traditional reading experience without the interruption of page turning.
The original assets have been provided as high resolution Photoshop source files, organized by book page or chapter.
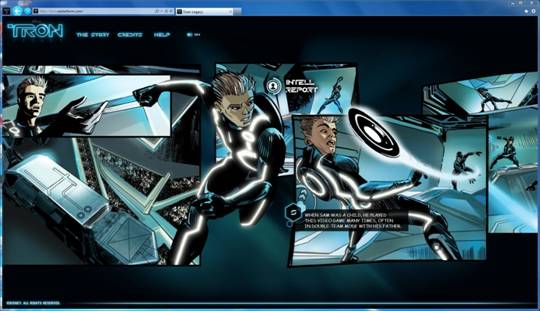
It took about 5 days to meticulously separate the characters and essential elements from the background of each comic panel. We back-painted the scenery to give the background a seamless appearance. Each panel was then reconstructed in sequence with the linear and organic layout of the site. Finally each element was isolated and exported in various states to produce the final animated outcome.
Choosing the Best Underlying Technology (Alex Barkan)
It took about 5 days to build a few prototypes that would help us identify the underlying technology that would fit better in this project and offer the best results across browsers.
The initial thought was to use CSS3 (in particular, CSS3 2D Transforms). We started building a few tests simulating the level of interaction we needed for this project using CSS3; the main complexity was to interact programmatically without losing performance. We went through several approaches and experiments using pure JavaScript, jQuery animation, applying drawing, DOM, and CSS optimizations; none of these patterns, however, gave us 60 frames per second (FPS) performance across any browser.
Not satisfied by the CSS3 performance, we looked at a solution based on the HTML5 <canvas> element. Starting from our previous project (Foursquare HTML5 Playground), we built a new prototype to stress the browser performance. The prototype was smooth, clocking in at 60 FPS on low-spec office equipment; we could manage 10,000 buildings and render hundreds of 32-bit RGBA PNGs with basic viewport-clipping functionality. The big "aha" moment came when we added animated sprites using the image-slicing-capable version of the drawImage() canvas method (more on this below). We added hundreds of sprite characters, with depth-testing, walking around hundreds of buildings.
It was clear – HTML5 <canvas> in Internet Explorer 9 (and to a smaller degree on other browsers as well) changed the game!
Reducing the Bandwidth Without Reducing Quality (Alex Barkan)
Bandwidth was an obvious issue from the start. We wanted HD imagery: lots of pixels, high bitrate, and smooth transparency. For a parallax effect to work correctly we need to overlay multiple layers with more than 1-bit of alpha, otherwise the images look no better than GIFs. PNGs were the obvious—though expensive—choice. But along the way John Einselen (Art Director at Vectorform) brought up a handy tool called pngquant. All browsers nowadays support PNG/8, a rarely seen variation of PNGs where RGB and Alpha can be stored within the same 8-bit channel, allowing us to have multiple bits of alpha for smoother alpha-blending while cutting file sizes in half! We had to experiment to find places where this sort of quantizing was appropriate and didn't take away too much quality from image fidelity.
One trick we learned was a split-compromise between 8-bit RGBA and 32-bit RGBA. You bake an image as two separate layers: base texture and glows. Then compress both as 8-bit RGBA. This gives a lot of bits for smooth glows (think lamp posts in fog) but cuts out 16-bit worth of data per RGB triplet. The result is lower total file size than a single 32-bit RGBA png, and higher quality than a single 8-bit RGBA! Here’s the glow of the car on the first page (full image in the ‘Navigating the code with the Developer Tools’ section).

The assets we had to work with had multiple layers, all using different blending modes and some needing paint work to fill in missing backgrounds. Our artists, Ken and John, had to convert to normal-blending modes in Photoshop for the rendered images to appear correctly in web-browsers. They also filled in backgrounds where necessary and made good use of the available pixels which we then resampled down to look crisp. One big lesson we learned was that we needed a fixed-size target screen in order to produce animations that revealed the story in a way that made sense and was enjoyable. During the entire duration of the project, this has been a key challenge to solve: smooth easing animations that work regardless of browser size and mouse sensitivity and powered by a background image pre-loader.
Keeping Things in Sync and Fast (Alex Barkan)
A common animation problem that spans all technologies (CSS, HTML, Canvas) is what to do about vsync. The complexity was that all browsers had a different timer resolution with a bigger or smaller margin of errors. Because of this, it’s possible to have some code drawing into a framebuffer while it’s being drawn to screen. In order to prevent visual glitches, we had to fine-tune the setTimeout() draw callback to try and match the 60hz redraw. Overall, I wish this was easier across the board. I’m looking forward to seeing the evolution of the conversations about requestAnimationFrame in W3C.
At the end, we were very impressed with the hardware acceleration support in Internet Explorer 9; the actual image rendering inside the Canvas 2D proved to be extremely performant. On other browsers it gave us good results too, eventually, although with some artifacts on lower end machines.
Navigating the Code with the Developer Tools
In order to keep the application flexible, modular, and easier to maintain – the entire playground has been divided into 13 different "pages" (as in the original book). The pages are pre-cached during the startup of the application and laid out one after the other on the horizontal axis. Each page defines its own display and interaction logic, which is relative to its X coordinate (configured during the startup).
There is only one drawing loop (Draw(), inside experience.js) that takes care of drawing all the visible panels on screen (and eventually the debug information).
Tip: As you inspect the code, you can make the JavaScript more readable by enabling "Format JavaScript" in the Developer Tools (press F12)
Debug Mode
Most pages include debugging information that helped during the development. In particular you can display the performance frame counter by pressing "d" on your keyboard. Additional debugging data is sent to the Console (press F12, Console tab).
PS: There is another hidden key in the application, can you figure out which one and what it does?
Preloading Images
During the first page load, each page asynchronously requests the required resources for the preloader class defined in experience.js. The preloader is responsible for queuing and downloading all the resources in the project.
During the loading phase, a nice spinning circle is displayed. This is achieved using a sprite animation technique. The animation is defined inside an image (loading-base-128.png , for display purposes it’s rotated of 90o below) as a loopable series of finite steps. As we draw the image on the Canvas, we change the drawing window to clip only one state at a time and increment the offset as needed.
How do we know this image is ready before all the others? Easy. We download it before any other asset and keep its size relative small.
Keeping the Original Fonts
Maintaining the same fonts of the original comic book was a critical aspect for this application. After looking into the WOFF format, we decided to use FontSquirrel.com to package the WOFF fonts (and other formats for fallback) and to generate the @font-face code snippet we needed.
IE9 site pinning
With a few extra lines we’ve been able to improve the site’s User Experience even further when viewed in Internet Explorer 9. The site can even be pinned to the Windows 7 taskbar (just drag and drop the tab into the taskbar). We used BuildMyPinnedSite.com to create the high resolution icon of the site (which includes 16x16, 24x24, 32x32, and 64x64 pixels sizes).
<meta name="application-name" content="Tron: Legacy HTML5" />
<meta name="msapplication-tooltip" content="Enter Tron: Legacy" />
<meta name="msapplication-navbutton-color" content="#00CCFF" />
<link rel="shortcut icon" type="image/x-icon" href="favicon.ico" />
Testing and Interoperability
In order to display the site correctly, your browser needs to support HTML5 <canvas>, HTML5 <audio>, and CSS3 WOFF. From our tests, although Internet Explorer 9 offered the best and fastest experience, it also displays correctly in Firefox, Safari, Chrome and Opera. We used feature detection technique to identify older browsers that would not be able to run the page.
var canvas = document.createElement('canvas');
if (!canvas.getContext) {
}
This member has not yet provided a Biography. Assume it's interesting and varied, and probably something to do with programming.


 General
  News
News  Suggestion
  Question
  Bug
Bug  Answer
  Joke
Joke  Praise
  Rant
Rant  Admin
Admin 


