Content
1 Introduction
2 Background
2.1 Validating user input in Windows.Forms
2.2 Validating user input in WPF
2.3 Conclusion
3 The Libraries
3.1 Validators
3.2 Links
3.2.1 WPF
3.2.2 Windows.Forms
3.2.3 MVVM
3.3 Customizing
3.3.1 Validators
3.3.2 Links
3.4 Known issues
1 Introduction
Working with a Dialog in .NET causes many trouble and efforts if all data the user does input must be validated. There are many standard approaches to do the validation in a reliable way. All these approaches have in common that they must be reimplemented for each dialog.
It is my goal to minimize the efforts and costs that are caused by the continual reimplementation of dialog based input validation. To reach this goal it is necessary to find a way to abstract and centralize the validation code in a manner that makes the dialog exempt from validating the input data itself. Further I want to validate the user's input just in time to deny or adjust an input character.
The libraries I want to introduce with this article are grown over many years. The attached file contains the parts that deal with input validation.
2 Background
In this chapter I will explain some basics of customized input validation in .NET with all its difficulties and issues. Who already is well versed in this topic and has just been through the headaches of customized input validation may jump over this chapter to continue with the solution in chapter 3.
2.1 Validating user input in Windows.Forms
The by name most notable event is Control.Validating. This is raised when the control has to validate its content. That is usually the case when the control loses the input focus. But this event may also be raised when the dialog that contains the control is going to be closed.
The Validating event seems to be that event to validate the users input. But a second look on it brings disillusionment:
- It is not possible to determine the reason for the event. Further more we cannot failsafe detect the reason for closure if the event is raised because the dialog is going to be closed. This leads into several problems:
- The control cannot explicitly hold (respective lose) the input focus if some circumstances requires a handling other than the default handling. The changing of the input focus on invalid input is either always allowed or it is always denied.
- The dialog cannot be closed by [Esc] or by a "Cancel" button if any of the controls contains an invalid input. It is possible to close a dialog by a "Cancel"-button when some properties of the dialog and the regarding controls are set cleverly but there will always be displayed a message about invalid input before the dialog is closed finally. The message must be displayed by the implementor because it is impossible to detect the reason for that the dialog is going te be closed. That is because the
Validating event is raised before other events that are raised when the dialog is closed. The message could be suppressed by a flag that is set within the Click-handler of the "Cancel"-button, but it cannot be easily suppressed when the user clicks the close button within the dialog's frame.
- It is necessary to handle the
Validating event for each control that shall be validated. This is always done within the code-behind file of the dialog. The code cannot be separated or transferred for this reason. - The input cannot be validated "live". That means that the Validating event is not raised when the user inputs a character. It is raised only if the user closes the dialog or selects another control. Therefore it is not possible to validate each input character singly. From this follows that the event cannot be used to check whether the input character is a digit or not. And it cannot be used to modify an input, e.g. changing a lowercased letter to the uppercased equivalent.
To validate a character the user does currently input into the control the Control.TextChanged event seems to be the right place. But modifying the input character within the TextChanged event leads into an endless recursion (apart from that we don't know which of the characters of the text was currently put in). To avoid the recursion of the TextChanged event a flag must be defined to indicate the reason for the event. This flag must be queried and set within the event handler. This must be separatly done for each control thats input shall be validated this way.
A better solution than the TextChanged event for just in time validation is the KeyPress event. This is raised before the input character is shown within the input line. Suppressing or changing the input character does not lead into an endless recursion.
But the TextChanged event has got a great disadvantage, too: In many cases it is necessary to validate the input character within the context of the whole text that was already input before. That means that the input character must be manually inserted at the correct position into the already existing text. To do this it is necessary to build an internal buffer from the control's content where to insert the input character into (to validate the whole text). In itself, this solution is expensive and errorpregnant (particularly in connection with the Control.KeyDown event that must be overridden in some cases to to handle the [Del] key that is never given to a KeyPress event).
Last but not least, the Control.Leave event can be used to validate input text in dependence of the current dialog state. The Leave event enables the programmer to detect the control that shall be got the input focus next. In some cases it may be allowed to move to that control even if the current text is not valid. In other cases losing the focus may not be allowed if the input text is invalid. The Leave event can then be used to prevent a focus change.
If it is not necessary to validate each input character just in time and if it is not necessary to deny the lost of input focus on invalid input the easiest way is handling the Closing event of the dialog. However, even this simple solution involves an expensive implementation for each dialog. Nothing at all, the Closing event allows the detection of the reason for the closure and can be handled accordingly:
protected override void OnClosing( CancelEventArgs e )
{
if( DialogResult != DialogResult.Cancel )
{
if( !ValidateAllControls() )
e.Cancel = true;
}
base.OnClosing(e);
}2.2 Validating user Input in WPF
The basics for the validation of user input in WPF applications are the same as in Windows.Forms, although there are more possibilities to separate the code from the UI. Some events are named differently (e.g. TextInput instead of KeyPress), but the principle for a customized validation is almost the same, except that the data binding provides a powerful option to work validation outside the UI.
Gimmicks like the suppression of invalid characters just in time or like automatic filling of partially done input are not possible with the default features of the WPF. Implementing these benefits leads into the same expensive work like it does for Windows.Forms.
And even outsourcing the validation code when data binding is used does not centralize the implementation. This must be redone for every dialog (alternatively for every view model). The validation of input may be collected within a separate module of the whole application, but the next application requires a new implementation.
2.3 Conclusion
The validation of user input is not trivial and does often lead into implementation errors. This is reflected specifically when requirements exist which demand a more comfortable input behaviour that is going beyond the norm. This includes gimmicks like the suppression of invalid characters, the automatic filling of partial input as well as the automatic conversion from uppercase to lowercase or vice versa.
The way usually gone is to implement new controls that inherit from the existing ones to increase comfort and safety. The result is a separate control that accepts an integer number within a specified range, another control that accepts a decimal fraction within a specified range, another control that enables the input of dates or times in a specified range, another control that enables the definition of an input mask and so on.
This guides into many problems. Some of them are listed exemplarily here:
- The controls must be reimplemented for each target framework (WPF, Windows.Forms etc.).
- The controls must be reimplemented for each used control of 3rd-party libraries.
- Many controls cannot be reimplemented, like the input boxes in grids (they may be inheritable, but the grid will not use them).
3 The Libraries
The validation framework that I will present here solves all of the problems described above with a minimalistic effort. I started to develop the solution some years ago in C++ and have ported them to .NET. The last extensions was made to support WPF (without or with using the MVVM pattern).
3.1 Validators
The basic class hierarchy was originally inspirated by the validation classes of the Borland Pascal Turbo Vision and the Borland C++ OWL frameworks. But the classes of these frameworks have some major disadvantages:
- They cannot be used outside the framework they are developed for and
- they cannot be configured sufficiently to cover more use cases than the simple validation of input text.
The basic validator (class Validator) of my validation framework supports the following capabilities that are specialized by derived classes:
- Validation of partially input text (this includes the possibility of just in time modifications)
- Validation of completely input text
- Definition of a user defined error message
- Justification of the minimum and maximum number of characters that are allowed to be input
The hierarchy of the validators defined in the Ganzer.dll assembly is shown in the following figure:
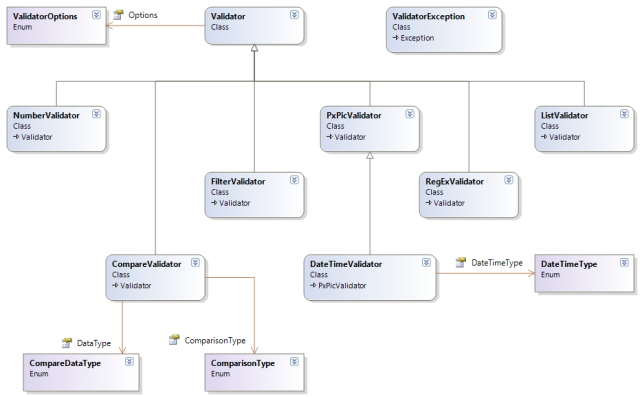
The Validator class does already test the following attributes:
- An empty text is invalid if
ValidatorOptions.NeedsInput is specified (the default for the Validator class) - A text that does contain whitespaces only is invalid if
ValidatorOptions.BlanksValid is not specified (the default for all validation classes) - A text is invalid if its length is less than
Validator.MinLength or if its length is greater than Validator.MaxLength
For all other traits more specialized validators are derived from Validator. The derived validators that are already included in the framework cover the most requirements of most applications. You will find more detailed descriptions in the table below.
The usage of a validator is very easy. A validator is not necessarily for strings that are input by the user. It may also be used to validate strings that are read from a file or from a database. To explain the principally usage of a validator I will start with a console application.
The most important method is Validator.Validate() that must be used to validate a string. Here is an example:
string ReadNumberFromConsole()
{
String input = Console.ReadLine();
Validator validator = new NumberValidator(-100, 100);
validator.Validate(input);
return input;
} The overload of Validator.Validate() used in the above Listing throws an exception of type ValidatorException if the input is invalid. If this is not suitable for some purposes the overload that accepts a second argument of type ValidatorException can be used instead:
string ReadNumberFromConsole()
{
String input = Console.ReadLine();
Validator validator = new NumberValidator(-100, 100);
ValidatorException x;
if( validator.Validate(input, out x) )
{
return input;
}
Console.WriteLine(x.Message);
return null;
}A more common input method that uses validators is shown in the ConsoleValidatorTutorial project that is attached to this article.
private static string ReadString( string prompt, Validator validator )
{
Debug.Assert(!string.IsNullOrEmpty(prompt));
for( ; ; )
{
try
{
Console.Write(prompt + ": ");
string input = Console.ReadLine();
if( validator != null )
validator.Validate(input);
return input;
}
catch( ValidatorException x )
{
Console.WriteLine(x.Message);
}
}
} This method is used to input and validate different data. The next code presents another section of the ConsoleValidatorTutorial project (within the project there are more samples that uses other validators):
private static void ReadAndDisplay( string prompt, Validator validator )
{
Console.WriteLine(Resources.StrTheInputText, ReadString(prompt, validator));
}
private static void DemonstrateValidator()
{
Validator validator = new Validator();
ReadAndDisplay(Resources.StrInputAnything, validator);
validator.MinLength = 3;
ReadAndDisplay(Resources.StrInputAtLeastThreeChars, validator);
validator.MinLength = 5;
validator.MaxLength = 5;
ReadAndDisplay(Resources.StrInputExactlyFiveChars, validator);
validator.Options = ValidatorOptions.None;
ReadAndDisplay(Resources.StrInputExactlyFiveCharsOrNothing, validator);
} The above code explains some of the basic capabilities of the Validator class. As you can see in the above figure there are many classes that extents the validation behaviour. I will shortly describe the validation classes and their purposes:
| Validator | Description |
Validator | Basic validator that checks the number of input characters |
NumberValidator | Enables the input of either Int64 or Decimal values (can be casted to other numeric types) and checks whether the input number is within a specified range |
DateTimeValidator | Enables the input of a date, a time or both of them and checks whether the input time is within a specified range |
PxPicValidator | Checks whether a text complies to a specified picture (the pictures are equal to the input masks of the Paradox database) |
FilterValidator | Filters the input by a specified portion of characters to allow and/or deny |
RegExValidator | Checks whether a text complies to a specified regular expression |
ListValidator | Checks whether a text is within a portion of allowed texts |
CompareValidator | Compares a text with a specified one. |
There are some more validators derived from CompareValidator in the assemblies Ganzer.Wpf.dll and Ganzer.Windows.Forms.dll. This validators reference texts from other controls and are specialized for WPF respective Windows.Forms. Therefore they are not parts of the common Ganzer.dll assembly.
Perhaps you want to lern more about the possibilities of the several validation classes before you start reading the next chapter. The attached file contains a project named ValidatorTests. You can start this and play with several inputs and options.
3.2 Links
Instead of writing new controls (that derive from
TextBox, ComboBox, etc.) to use the validators in an easy way it makes sense to use a small set of classes that just link a validator to an already existing control. I have noticed that most of the controls (especially that of 3rd-party libraries) that enables input of text uses a simple TextBox control inernally. It is mostly easy to get this control, e.g. from a grid like the UltraGrid from Infragistics. Inheriting from an existing link to support the text boxes from the grid is much more easy than writing a new grid that uses derived text boxes.
This chapter is divided into several sections: WPF, Windows.Forms and MVVM. Even if you are not interested in WPF you should work this section anyhow, because all basics shown here are equal in Windows.Forms and will not be repeated later.
If you are interested in MVVM only, you may skip the sections "WPF" and "Windows.Forms". The linkage of a validator with a control in MVVM is indeed the same as in WPF, but due to data binding this is encapsulated in XAML by other classes.
3.2.1 WPF
The first sample is really simple. A dialog with a single input line where the user is prompted to input a customer number:

The number is of a fictive format that is choosen to show some just in time gimmicks like translation from lowercased to uppercased letters or the automatic filling of required text. The validator that supports this is the PxPicValidator. The name is an abbreviation for "Paradox Picture". Paradox is a meanwhile obsolete database from Borland. But this database has got very fine input capabilities based on picture masks. The PxPicValidator emulates this.
The meanings of the picture's characters are as follows:
| Character | Meaning |
| & | Allow an uppercased letter only (considers current culture settings) |
| # | Allow a decimal digit only |
| others | As they are |
There are many more of special characters available. They are described in the code documentation of the PxPicValidator.Picture property.
Back to the dialog: Traditionally a programmer would write code that validates the input when the user has clicked the OK button of the dialog. But if you want to implement the automatic filling of the requiered text that is always equal (all characters that are other than & or #) or if you want to change a lowercased character to an uppercased one while it is currently input you will have a lot of work.
With the validation framework we simply have to link a suitable validator with the input box:
public partial class SimpleInputDialog : Window
{
private ValidatorLink _customerNumberLink;
public SimpleInputDialog()
{
_customerNumberLink = new TextBoxLink(
_edtCustomerNumber,
new PxPicValidator("&&-DE/N-55.###/###", ValidatorOptions.NeedsInput | ValidatorOptions.AutoFill),
LinkOptions.None);
}
}Explanations:
Line A: The name of the control (specified in the designer) to link the validator with.
Line B: The validator to link the control with.
Line C: Here we can put some options that influence the behaviour of the link. In this case wo don't set any option.
Thats all to do to validate the input. Try this and you will see the following:
- First you cannot input anything but letters.
- Small letters will be automatically changed to uppercase when they are input at the leading two positions.
- After the second letter is input all following text until the dot is filled up automatically.
- Behind the dot you cannot input anything but a decimal digit.
- The / is automatically filled after you input the third digit.
The validator in the code above is defined with the option ValidatorOptions.NeedsInput. This means that an empty text is invalid. The user must enter a text that matches the complete picture mask. To ensure the verification of this when the user clicks the OK button the only thing to do is either to handle the button's Click event or the Window's Closing event:
private void _btnOK_Click( object sender, RoutedEventArgs e )
{
if( _customerNumberLink.Validate() )
DialogResult = true;
} In the tutorial project the Window's Closing event is used to validate all. In both cases the result is the same: The user cannot close the dialog by the OK button if the input is not valid.
And that's all! Nothing left to do! It does not matter how many controls have to be validated. Each control to validate can be linked to a suitable validator with only one line of code a time.
When many controls must be validated it can be laboriously to call Validate() for each link separately. To avoid this the class ValidatorLinkCollection can be used. Insert each link into this collection and validate the collection instead of validating each link separatley:
public partial class SimpleInputDialog : Window
{
private ValidatorLinkCollection _validatorLinks = new ValidatorLinkCollection();
public SimpleInputDialog()
{
_validatorLinks.Add(new TextBoxLink(
_edtCustomerNumber,
new PxPicValidator("&&-DE/N-55.###/###", ValidatorOptions.NeedsInput | ValidatorOptions.AutoFill),
LinkOptions.None));
}
private void _btnOK_Click( object sender, RoutedEventArgs e )
{
if( _validatorLinks.ValidateAll() )
DialogResult = true;
}
}
For an example the tutorial project contains a more complex dialog that is shown in the following figure:
All data is fictive and may not cover real requirements for an employee, but these collection of datas shows some benefits of the validators and links:
- A name must be input. More than this: the user cannot leave the text box as long as a name is input (exception: moving to the "Cancel" button is always allowed if its property
IsCancel is true). - The number must be input in the format "#/###-&&". The number may be left blank.
- The salary must be displayed with currency symbol. I,m sitting in germany wherefore the symbol is € in the figure (the system's default) but this is fully configurable. When the user enters this input line, the text shall be displayed without the curreny symbol to make editing more easy. The currency symbol must be displayed again when the user leaves this input line. The input must not be empty and must be a negative number (the minus sign cannot be input). Equal to "Name" this text box cannot be left on invalid input.
- The Code is any hex-number. Equal to "Name" this text box cannot be left on invalid input.
After the dialog was build within the designer there is nothing left to do than this:
public partial class ComplexInputDialog : Form
{
private ValidatorLinkCollection _validatorLinks = new ValidatorLinkCollection();
public ComplexInputDialog()
{
_validatorLinks.Add(new TextBoxLink(
_edtName,
new Validator(),
LinkOptions.ForceValid));
_validatorLinks.Add(new TextBoxLink(
_edtNumber,
new PxPicValidator("#/###-&&"),
LinkOptions.ForceValid));
_validatorLinks.Add(new TextBoxLink(
_edtSalary,
new NumberValidator(0m, decimal.MaxValue, "C", "G", ValidatorOptions.NeedsInput),
_edtCode,
LinkOptions.ForceValid | LinkOptions.DoFormat | LinkOptions.TextChangeFormats));
_validatorLinks.Add(new TextBoxLink(
_edtCode,
new FilterValidator("0-9a-fA-F", ValidatorOptions.NeedsInput),
LinkOptions.ForceValid));
}
private void _btnOK_Click( object sender, RoutedEventArgs e )
{
if( !_validatorLinks.ValidateAll() )
DialogResult = true;
}
} Explanations:
Line A: The option ForceValid forces the user to do a valid input. This means, that the control cannot be left as long as the input is invalid.
Line B: The salary shall formatted depending on the status of the input focus. The optional third and fourth arguments specifies the display and the edit format for this validator.
Line C: I explained that the user can always move to the "Cancel" button. This is implicitly ensured when the button is marked as IsCancel. Here we want that the user can also move to the "Code" line if the input salary is invalid (this is against the above requirements but it shall demonstrate another feature of the links). To enable this it is possible to specify one ore more controls. Here it is the "Code" text box. Equal to the "Cancel" button, the user can move the focus from "Salary" to "Code" on invalid input.
OK - why should we do this? Well, there may be some circumstances that require such a behaviour. E.g. an input line where the user can input the name of a file. The input filename must be valid and must not be empty. A button nearby the input line opens a dialog where the user can choose the name. The user should be able to move to the button even if the input file name is invalid.
Line D: The salary shall be formatted depending on whether the control has got the input focus or not. The option DoFormat forces the link to format the text whenever the input focus of the control has been changed. The option TextChangeFormats causes a formatting of the text if this is changed by other actions than user input, e.g. when the user does paste the content of the clipboard. Both options make sence for instances of DateTimeValidator and NumberValidator.
This should be enough for this chapter. You may think that the complex dialog above is really a little too lightwight to call it "complex". Well, you are right. But due to the length of this article I decided to reach the goal by a smaller sample. The attached file contains a project named ValidatorTests where you can find a truly complex UI with several tab pages and many controls that have to be validated.
3.2.2 Windows.Forms
The link classes for Windows.Forms work in the same way as the classes for WPF do. They even named the same. The differences are marginal:
- The option
LinkOptions.ShowMessageOnBinding is not available for Windows.Forms because the binding does not support the required kind of error handling here. Therefore bindings are not directly supported by the links for Windows.Forms. Instead of this option an instance of ErrorProvider can be used to notify an error without displaying a message box. - The option
LinkOptions.HandleValidating is available for Windows.Forms only because the Control.Validating event is not available in WPF. - To allow moving the input focus to the "Cancel" button on invalid input, in Windows.Forms the property
CausesValidation must be set to false (there is no IsCancel property). This can be done for each control that shall not prevent changing of focus on invalid input. - There are no validation rules in Windows.Forms. Therefore no equivalent to the
ValidatorValidationRule class (not explained yet) does exist in Windows.Forms. - The namespace is
Ganzer.Windows.Forms.Validation instead of Ganzer.Wpf.Validation.
Windows.Forms handles the OK button in another way than WPF does. In WPF it is necessary to hande the Click event of the OK button to set the DialogResult property of the window. This is done automatically in Windows.Forms if the DialogResult property of the button is set to DialogResult.OK. For this reason it is mostly the best way not to create a Click-handler and to do the final validation within the Form.Closing event:
protected override void OnClosing( CancelEventArgs e )
{
if( DialogResult == DialogResult.Cancel )
base.OnClosing(e);
else
{
if( _customerNumberLink.Validate() )
{
base.OnClosing(e);
if( !e.Cancel )
TransferData(TransferDirection.ToData);
}
else
{
DialogResult = 0;
e.Cancel = true;
}
}
}All other is identical to WPF. Therefore it is redundant to repeat the source codes here. The FormsValidatorTutorial project contains the whole source code for Windows.Forms. It is the same code as the code for WPF (as far as the validation code is concerned).
3.2.3 MVVM
In this section I want to explain how to use the validation classes in an application that implements the MVVM pattern.
It is
important for you to know that there are many ways to use the validation classes and the links without breaking the pattern. The way I explain here is only my favorite way.
3.2.3.1 Basics
We want to build the same simple sample dialog that are used in the "WPF" section above:
The source code can be found in the WpfValidatorTutorial project. This is the same project that contains the sample dialogs from the "WPF" section above.
The window does only contain the buttons and a content presenter of type ContentControl. Its Content property is bound to the current binding of the window (in XAML):
<ContentControl Name="_content" Content="{Binding}" Focusable="False" /> The ressources of the window contains the following template (within the XAML file):
<DataTemplate DataType="{x:Type mvvm:SimpleDialogViewModel}">
  <mvvm:SimpleDialogView />
</DataTemplate>
SimpleDialogView is a custom control that contains the group box with the label and the input line. We must set the DataContext property of the window to an instance of SimpleDialogViewModel:
private void _btnShowSimpleMvvmDialog_Click( object sender, RoutedEventArgs e )
{
   GenericDialog dialog = new GenericDialog();

   dialog.Owner = this;
   dialog.DataContext = new SimpleDialogViewModel();

   dialog.ShowDialog();
}
Now, we will take a look at the view model:
public class SimpleDialogViewModel : BasicViewModel
{
private string _customerNumber;
public string CustomerNumber
{
get
{
return _customerNumber;
}
set
{
_customerNumberValidator.Validate(value);
if( _customerNumber == value )
return;
_customerNumber = value;
OnPropertyChanged("CustomerNumber");
}
}
private static Validator _customerNumberValidator =
new PxPicValidator("&&-DE/N-55.###/###",
ValidatorOptions.NeedsInput | ValidatorOptions.AutoFill);
public static Validator CustomerNumberValidator
{
get
{
return _customerNumberValidator;
}
}
public SimpleDialogViewModel()
: base(Resources.StrSimpleDialogViewModelName)
{
}
}This is a very small view model because it does simply contain the data CustomerNumber. With the comments in the setter of the property you can see that a suitable validator can be used to check whether the number to set is valid. _customerNumberValidator.Validate(value) throws an exception with an appropriate message if the number is invalid. The validator can be static, because all instances must validate its customer number in the same way.
So far so good, but how does the view bind the validator to its input box?
Well, this is done by the static class ValidationService. This defines some attached properties to bind a validator to a control. Implicitly a ValidatorLink object is created when a validator is bound. The lines of interest are the lines that defines the TextBox:
<UserControl x:Class="WpfValidatorTutorial.Mvvm.SimpleDialogView"
xmlns="http://schemas.microsoft.com/winfx/2006/xaml/presentation"
xmlns:x="http://schemas.microsoft.com/winfx/2006/xaml"
xmlns:mc="http://schemas.openxmlformats.org/markup-compatibility/2006"
xmlns:d="http://schemas.microsoft.com/expression/blend/2008"
xmlns:gwv="clr-namespace:Ganzer.Wpf.Validation;assembly=Ganzer.Wpf"
mc:Ignorable="d">
<Grid>
<GroupBox Header="Customer Number"
HorizontalAlignment="Stretch"
VerticalAlignment="Stretch">
<Grid>
<Grid.RowDefinitions>
<RowDefinition />
<RowDefinition />
</Grid.RowDefinitions>
<Label Grid.Row="0"
Content="_Input the Number in the Format &&-DE/N-55.###/###:"
Target="{Binding ElementName=_edtCustomerNumber}"
Margin="3,3,3,0"
Padding="0" />
<TextBox Name="_edtCustomerNumber"
Text="{Binding CustomerNumber}"
gwv:ValidationService.Validator="{Binding CustomerNumberValidator}"
gwv:ValidationService.Options="ShowMessageOnBinding"
Grid.Row="1"
MinWidth="250"
Margin="3" />
</Grid>
</GroupBox>
</Grid>
</UserControl> The options are set to LinkOptions.ShowMessageOnBinding. This is necessary to display a message box.
Briefly mentioned: If this option is not set (and if the control is bound) the binding will be marked as invalid by the link and a red border is drawn around the control to notify the user about errors. To display the error message we can use WPF integrated standards - maybe setting the tooltip like this:
<Style TargetType="TextBox">
  <Style.Triggers>
    <Trigger Property="Validation.HasError" Value="true">
      <Setter Property="ToolTip" Value="{Binding RelativeSource={RelativeSource Self}, Path=(Validation.Errors)[0].ErrorContent}"/>
    </Trigger>
  </Style.Triggers>
</Style>
In that case we would neither need a message box nor the option ShowMessageOnBinding.
Back to the topic: The above sample shows how to define the validator within the view model. The advantage of this is, that the validation of the property and the input is always equal and cannot differ accidentally when the algorithm is changed. On the other hand, it is also possible to define the validator in the
resources of the XAML file. At this point you are entirely free.
As you can see in the XAML file, one line of code is already enough to do the complete validation of a window with default bindings. But this works fine with non model windows only that has to update the bound view model just in time. Modal dialogs must handle the transfer to the bound properties in another way. No property of the bound view model must be changed when the user cancels the modal dialog. The complete changed data must be
committed only when the user clicks the OK button. This behaviour can be implemented by using validation groups.
3.2.3.2 Validation groups
In all the above exercises to WPF and Windows.Forms a ValidatorLinkCollection is used to validate all inputs before they are
transferred into the properties of the underlying data. With MVVM we have to do something other. At first, an automatic commit must be prevented. This is simply done by a binding group. The XAML file of the tutorial's generic dialog contains the following code:
<Window.BindingGroup>
  <BindingGroup />
</Window.BindingGroup>
The Click event of the OK button is handled in the code-behind file of the dialog:
private void _btnOK_Click( object sender, RoutedEventArgs e )
{
if( ValidationService.ValidateGroup(_content) )
{
BindingGroup.CommitEdit();
DialogResult = true;
}
}The class ValidationService defines the static method ValidateGroup(). The first argument defines the control where to start validation. In this case it is the content presenter that is named "_content". The above code validates all controls that are child controls of the content presenter and that are linked to a validator in the default validation group.
It is possible to define a validation group for a linked control by the attached property ValidationService.Group. We did not set any group in the above example. Therefore a default group is used for the bound control.
Another overloading of ValidateGroup() enables the specification of a group as second argument. This can be used to validate the controls of a particular group. Explicit definitions of validation groups makes sense for complex user interfaces where a couple of controls must be validated time to time
independently of other controls.
3.2.3.3 More complexity
The
tutorial project does also contain the more complex dialog that is described in the "WPF" section:
The XAML code of the view that is inserted into the generic dialog contains a style that sets the tool tip of an invalid input line to the error message (this is set by the link). Therefore it is not necessary to use a message box to display the error message. To demonstrate this, the options does not contain ForceValid and moving the input focus is always allowed. All other behaviour is equal to the example in the section "WPF".
The following code shows the XAML file. The complete validation is done by the lines that sets the attached properties of the ValidationService class within the text boxes:
 <UserControl x:Class="WpfValidatorTutorial.Mvvm.ComplexDialogView"
             xmlns="http://schemas.microsoft.com/winfx/2006/xaml/presentation"
             xmlns:x="http://schemas.microsoft.com/winfx/2006/xaml"
             xmlns:mc="http://schemas.openxmlformats.org/markup-compatibility/2006"
             xmlns:d="http://schemas.microsoft.com/expression/blend/2008"
             xmlns:gwv="clr-namespace:Ganzer.Wpf.Validation;assembly=Ganzer.Wpf"
             mc:Ignorable="d">
  <UserControl.Resources>
    <Style TargetType="TextBox">
      <Style.Triggers>
        <Trigger Property="Validation.HasError" Value="true">
          <Setter Property="ToolTip" Value="{Binding RelativeSource={RelativeSource Self}, Path=(Validation.Errors)[0].ErrorContent}"/>
        </Trigger>
      </Style.Triggers>
    </Style>
  </UserControl.Resources>
  <Grid>
    <GroupBox Header="Employee"
              HorizontalAlignment="Stretch"
              VerticalAlignment="Stretch">
      <Grid>
        <Grid.RowDefinitions>
          <RowDefinition Height="Auto" />
          <RowDefinition Height="Auto" />
          <RowDefinition Height="Auto" />
          <RowDefinition Height="Auto" />
        </Grid.RowDefinitions>
        <Grid.ColumnDefinitions>
          <ColumnDefinition Width="Auto" />
          <ColumnDefinition Width="Auto" />
        </Grid.ColumnDefinitions>
        <Label Grid.Column="0"
               Grid.Row="0"
               Content="_Name:"
               Target="{Binding ElementName=_edtName}"
               Margin="3,5,3,0"
               Padding="0" />
        <TextBox Grid.Column="1"
                 Grid.Row="0"
                 Name="_edtName"
                 Text="{Binding Name}"
                 gwv:ValidationService.Validator="{Binding NameValidator}"
                 Width="250"
                 Margin="3" />
        <Label Grid.Column="0"
               Grid.Row="1"
               Content="N_umber:"
               Target="{Binding ElementName=_edtNumber}"
               Margin="3,5,3,0"
               Padding="0" />
        <TextBox Grid.Column="1"
                 Grid.Row="1"
                 Name="_edtNumber"
                 Text="{Binding Number}"
                 gwv:ValidationService.Validator="{Binding NumberValidator}"
                 Width="250"
                 Margin="3" />
        <Label Grid.Column="0"
               Grid.Row="2"
               Content="_Salary:"
               Target="{Binding ElementName=_edtSalary}"
               Margin="3,5,3,0"
               Padding="0" />
        <TextBox Grid.Column="1"
                 Grid.Row="2"
                 Name="_edtSalary"
                 Text="{Binding Salary}"
                 gwv:ValidationService.Validator="{Binding SalaryValidator}"
                 gwv:ValidationService.Options="DoFormat,TextChangeFormats"
                 TextAlignment="Right"
                 Width="250"
                 Margin="3" />
        <Label Grid.Column="0"
               Grid.Row="3"
               Content="_Code:"
               Target="{Binding ElementName=_edtCode}"
               Margin="3,5,3,0"
               Padding="0" />
        <TextBox Grid.Column="1"
                 Grid.Row="3"
                 Name="_edtCode"
                 Text="{Binding HexCode}"
                 gwv:ValidationService.Validator="{Binding HexCodeValidator}"
                 Width="250"
                 Margin="3" />
      </Grid>
    </GroupBox>
  </Grid>
</UserControl>
Sure, the validators must be created within the view model (or within the
resources), but I think that "more easy" is nearly impossible.
3.2.3.4 Validation rules
You can also use a validation rule with a validator. The rule that enable the usage of validators is ValidatorValidationRule that is derived from ValidationRule.
For this explanation the view model class may be named NumberViewModel and may contain the property Counter as well as the static property CounterValidator. Because a validation rule cannot implement dependency properties it is necessary to define the property CounterValidator as static within the view model (or create a validator within the ressources). The XAML code may be look like follows:
<TextBox gwv:ValidationService.Validator="{Binding.CounterValidator}"
		   Name="_edtCounter"
		   TextAlignment="Right"
		   Margin="0,3,0,0">
  <Binding Path="Counter" UpdateSourceTrigger="PropertyChanged">
    <Binding.ValidationRules>
      <gwv:ValidatorValidationRule Validator="{x:Static local:NumberViewModel.CounterValidator}" />
    </Binding.ValidationRules>
  </Binding>
</TextBox>
3.3 Customizing
The validators as well as the links can be customized by many options. I think it is not expediant to describe all possibilities here because the code is well documented - I hope . Instead of that I will give an overview of how to implement own validators and links.
3.3.1 Validators
Implementing a new validator ist not difficult. There are three methods that can be overridden if required:
DoValidation(): This is the main validation method and is called by all Validator.Validate() overloads. Remark that you should not throw an exception here on invalid input. Instead of that set the out parameter to an exception that describes the error. DoInputValidation(): This method is called for partial input by Validator.IsValidInput(). The given text contains the current input and can be modified if necessary. Examples for this can be found in many classes like FilterValidator, PxPicValidator or ListValidator. DoFormatText(): This is called by Validator.FormatText() when the text shall be formatted either for displaying or for editing purposes. Examples for this can be found in the classes DateTimeValidator or NumberValidator.
3.3.2 Links
Creating a new link is much more complicated than creating a new validator. And WPF and Windows.Forms works very differently. So it is difficult to give you some common guides. It may be the best solution to explore the code of the existing links to understand how they do work.
I have tried to find the greatest commonalities, but how to get/set text from/to a control differs extremly (compare the implementations of TextBoxLink, ComboBoxLink,
NumericUpDownLink, and DateTimePickerLink to it). So there are many abstract methods and properties in the basic ValidatorLink class that must be overridden by inheritors. In WPF it must also be considered that a property can be bound. Binding leads into unusable results if this is ignored.
Therefore I invite you to study the source code and its documentation.
If you are sincerely interested in how to implement a fully functional validator link for the UltraGrid of Infragistics (Windows.Forms) I could provide the code. I already did this for a project I have worked on. It is implemented in Visual Basic and the comments are in
German, but I think this does not matter. You may use that in your projects or you may simply study it to get an idea of how to link such complex controls. At the end it is more easy than it seems at the first moment.
3.4 Known issues
- The libraries are grown up for several years. Therefore they may contain some different styles of coding and documentation.
RegExValidator works fine but does not implement automatic filling like the PxPicValidator does. That is because a regular expression is much more difficult to parse than the Paradox picture masks and I did not find enough time to implement this yet. (I would be delighted if any of you does already know how to parse a regular expression and is able to implement an automation within the method DoInputValidation(). How this could be implemented in practice can be looked up in the PxPicValidator class.) - Data binding is not considered by the links in Windows.Forms. There was no reason for me to implement this yet. In some practical projects I found that this does not matter. Maybe you will find some circumstances where the links does not work correctly when a control is bound in Windows.Forms.
- The link classes are not completely refactored yet. This means: there are some duplicate code fragments and there may also be a better way for inheritance. Frankly I am dissatisfied with the current solution. I did not change this yet because it runs .
- ASP is not supported by the links. You can use the validator classes directly in the code-behind files to validate an input, but I am not a Web developer and do simply not know how to write functional links for ASP. Perhaps it is not necessary because the already integrated validation behavour of ASP works fine.
- I have never tested the WPF validation links with Silverlight. I do not know whether it works.
Last but not least: If you think that the libraries are useful and if some of you quest for a collaboration I would be
pleased to share the project (maybe on CodePlex). I have no experience with this yet. Therefore I would need some feedback and help.
I am a software developer since many years and have worked on several large projects especially in financial sectors and the logistics industry.
My favorite programming languages are C, C++ und newly C#.
I am the architect and chief developer of Tricentis TDM Studio (former Q-up) - a generator that primarily creates template based synthetic data for software testing.


 General
  News
News  Suggestion
  Question
  Bug
Bug  Answer
  Joke
Joke  Praise
  Rant
Rant  Admin
Admin 


 )?
)?