Introduction
Architects and developers are always on constant demand from the business to build applications that are flexible and easily maintainable. Elimination of duplication is a golden rule since the age old days of development. Huge effort involving significant time investment in design, exploration of appropriate patterns that would suit the scenarios, brainstorming sessions, architectural & design reviews, POCs etc. is required to achieve a reasonable level of flexibility & maintainability. Depending upon the capability of the platform that is chosen for the development, this effort level will vary.
Microsoft ASP.NET MVC is one of such platforms where we can build flexible & easily maintainable applications with minimal effort. It also provides capabilities through which we can avoid duplications to maximum extent.
In this article, Iam going to show how we can build a flexible, UI workflow application through ASP.NET MVC & Windows Workflow Foundation combination, along with a simple example. This sample application will demonstrate how we can avoid validation logic duplication and decouple the application from the workflow logic.
The word “flexibility” in the context of this article means:
- Capability to move the individual data fields across the pages without any major effort
- Facility to change the process flow path/re-ordering of the pages though simple configuration.
Data persistence considerations
There are multiple options available in regarding persistence of the data entered by the users, across multiple steps of a particular UI based workflow process. Here is a list, along with advantages / dis-advantages:
| | Advantages | Disadvantages |
| 1. Storing data of each step in DB | In case user left in between the process at a particular step because of any interuptions (loss of connectivity, crashing of browser etc.) then he has an option to resume the process next time when he comes back – This will increase Reliability
[Limitation – usually this type of approach will be adopted by using Cookie created out of a Session ID, MAC address etc. User will not be able to resume if he visits the site from a different machine next time – We can have a work arround here where in users credentials can be collected in the first step itself & that can be used to identify the user next time]
|
- Overhead of storing unnecessary data of an user in the system before commitment – There could be a need to periodically flush out the data from the DB in case user never comes back
- Server round trip [But we can work arround this through AJAX calls]
|
| 2. Storing data of each step in Session and finally storing in DB after successful validation | Data is not stored in DB and hence there is no need to have a separate process for flushing out unnecessary data. |
- Increases the server memory consumption
- Not Reliable in case users looses Session due to multiple reasons (Browser crashing, Session timeout, Application pool re-cycling etc.)
|
| 3. Serializing the data within the page and finally storing in DB after successful validation | Data is not stored in DB and hence there is no need to have a separate process for flushing out unnecessary data. | The size of the individual pages may bloat and hence it will affect the response time |
| 4. Have multiple panels / Divs (jQuery based) in the same page for different steps and storing data in DB finally after validation |
- Responsive user interface
- No unnecessary server round trips and hence optimum utilization of the server resources and database
|
- Not as reliable as there is always a chance for the users to loose the data in case of browser crashes.
- We will not have flexibity to re-order the pages / change the process flow path with minumum effort.
|
Choosing any of the above options will depend also on the functional and business requirements. The sample application explained in this article will adopt the approach 3.
It will demonstrate a simple 3 step employee registration workflow process.
Model Binding
Model Binding is the powerful, customizable feature of ASP.NET MVC where the incoming data in the HTTP request is automatically polulated into the model classes. As a developer, we no need to worry about the plumbing code for extracting the values from Forms collections or querystrings and pump them into classes. Basically there are 2 types of model binding: Explicit binding and implicit binding. By calling TryUpdateModel method, we can explicitely trigger the binding process. By having the parameters of the Action Methods with the names of the parameters same as attributes of model class or by having the model class itself as a parameter to an action method, we can have the values from the HTTP request implicitely available.
In the sample application, “Employee” is the model class. TryUpdateModel is called in the OnActionExecuting event so that the object of the Employee model class will get automatically polulated with the user data entries.
Client side validation through Model State
Conventional approach towards validation is usually use javascripts to perform the data entry validations at the client side. Sometimes, we may also need to perform business rules validations at the client side through javascript. Server side validations will be also performed as only having client side validations is not a reliable approach. Server side validations will be accomadated in the server side language like C#. Problem with this approach is that over the period of time, we will end up in duplicated data / business rules validation logic.
Answer to this problem is to go with an approach where Model will be made responsible for maintaining and enforcing all the validations. So that, when there is a need to change the validation logic, it need to be performed only in the models and will get reflected in all the places.
ASP.NET MVC facilitates us with different options to perform validations, simply through plain C# code itself. It helps in pumping business rules into HTTP request process pipeline, enabling us to prompt validation messages to users at the client side.
ASP.NET MVC uses a temporary storage area named “ModelState” to store all the validation errors that ocurred during a model binding operation. A call to the method ModelState.IsValid will indicate whether the model binding operation had any validation errors. If any errors are there, then this method will return false. ASP.NET MVC provides mechanisms to prompt the error messages in the modelstate to the end users. To enable a model (C# class) to use this facility, it should implement IDataErrorInfo .
In our sample application, our model [C# class] “Employee” implements this interface:
using System;
using System.Collections.Generic;
using System.Linq;
using System.Web;
using System.ComponentModel;
namespace WizardTypeUITwo.Models
{
[Serializable]
public class Employee : IDataErrorInfo
{
public string Name { get; set; }
public int? Age { get; set; }
public string CurrentEmplrName { get; set; }
public int? Salary { get; set; }
public string Email { get; set; }
public int? Mobile { get; set; }
public string this[string columnName]
{
get
{
if ((columnName == "Name") && string.IsNullOrEmpty(Name))
return "Please enter a name";
if ((columnName == "Age") && !Age.HasValue)
return "Please enter a numeric age";
if ((columnName == "CurrentEmplrName") && string.IsNullOrEmpty(
CurrentEmplrName))
return "Please enter current employer name";
if ((columnName == "Salary") && !Salary.HasValue)
return "Please enter salary";
if ((columnName == "Email") && !IsValidEmailAddress(Email))
return "Please enter a valid email address";
if ((columnName == "Mobile") && !Mobile.HasValue)
return "Please enter mobile number";
return null;
}
}
private static bool IsValidEmailAddress(string email)
{
return (email != null) && (email.IndexOf("@") > 0);
}
public string Error { get { return null; } }
}
}
Step1.aspx is the view related to first step in the employee registration process. By using the html helper methods, we can prompt the users with the error validation messages.
<%= Html.ValidationSummary("Please correct the errors and try again.") %>


    <label for="Name">Name:</label>
    <%= Html.TextBox("Name", Model.Name) %>
    <%= Html.ValidationMessage("Name", "*") %>
By making a call to ModelState.IsValid before performing any operation at the server side, we can restrict the user from moving to the next in the process flow. In this sample application, only after filling appropriate info, the user is allowed to move to next step (Step2.aspx)
State Management
As detailed earlier, one key of the consideration in a multi-step web form application is about persistence of the data while the user is navigating through different pages. TempData is a new feature available in ASP.NET MVC. It can be used to store the data across HTTP redirections. The speciality of TempData is that data stored in it will survive only for one more HTTP request and then automatically it will be removed.
In our sample application, a combination of TempData and 2 key events OnActionExecuting and OnResultExecuted are used for temporary data persistence.
OnActionExecuting event will get executed before every action method runs and OnResultExecuted will run after the execution of every action method.
Decoupling process flow logic
For an application which invloves users to navigate across multiple steps (like shopping cart to order confirmation process in e-commerce web apps., multi-step new user registration process in some of the web sites, leave application & approval process in intranet apps. etc.) options available are either encapsulating the workflow logic within the application logic or to keeping it away from the application logic.
Decoupling the application logic from the workflow logic will provide flexibility where the sequence of the workflow can be modified without touching the application code. This will make the application easily mainainable.
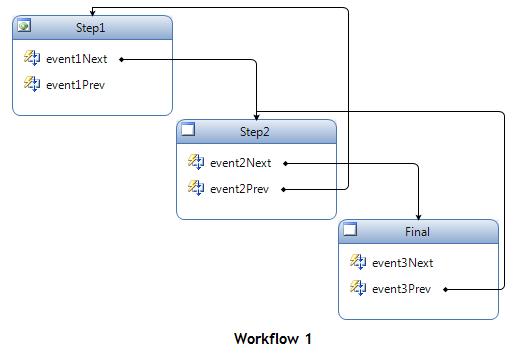

In our sample application, the normal workflow sequence involves 3 steps [Workflow3], followed in sequence: Step1, Step2, Step 3 & final. We have other 2 variations of this workflow: Workflow 1 & Workflow 2. The sequence for Workfflow 1 is: Step1, Step2, and Final. The sequence for Workfflow 2 is: Step1, Step3, and Final. All these workflows are abstracted out and housed in Windows Workflow Foundation as state machine workflows.
In our application, the name of the each step in the workflow resembles the name of the web pages. We have one to one mapping between the workflow steps & pages so that workflow drives the UI navigation. Practically it may not be always possible to have one-to-one mapping. In such cases, we can have steps mapped to some configuration info where we always change the pages well.
Flexibility in Action!
The action method “Process” in the Controller class “EmployeeController” is the heart of the application. Based on the user action (whether user clicked “Next” button or “Back” button), it will communicate with the workflow through a utility class “WorkflowUtil” and root the navigation.
public ActionResult Process(string nextButton, string backButton)
{


    if (wrkFlw == null && selectedWrkflw != "")
    {
        wrkFlw = new WorkflowUtil(selectedWrkflw);
    }

    if ((nextButton != null) && ModelState.IsValid)
    {
        page = wrkFlw.MoveNext();
        return View(page, employeeObj);
    }

    else if (backButton != null)
    {
        ModelState.Clear();
        page = wrkFlw.MovePrev();
        return View(page, employeeObj);
    }
    else
        return View(page, employeeObj);

}
The workflow type that will be used for navigation is based on the configuration.
<appSettings>
    <add key="WorkflowType" value="Workflow3"/>
</appSettings>
The “StartWorkflow” method in the “WorkflowUtil” class will start the respective workflow.
switch (WorkflowType)
{
case "Workflow1":
    wfInstance = _wfRuntime.CreateWorkflow(typeof(EmpRegWorkflow.Workflow1));
    break;
case "Workflow2":
    wfInstance = _wfRuntime.CreateWorkflow(typeof(EmpRegWorkflow.Workflow2));
    break;
case "Workflow3":
    wfInstance = _wfRuntime.CreateWorkflow(typeof(EmpRegWorkflow.Workflow3));
    break;

default:
    wfInstance = _wfRuntime.CreateWorkflow(typeof(EmpRegWorkflow.Workflow3));
    break;
}

wfInstance.Start();
Just by changing the single configuration info to “Workflow1” or “Workflow2”, we can change the enitre navigation path of the employee registration process.
Based on the current state, the windows workflow will move the workflow to the next step and will return its name. Accordingly, the process method will direct the user to the next page. We can have a detailed discussion on windows workflow foundation & event driven activities. Since the purpose of this article to discuss an approach on leveraging workflow foundation to build a ASP.NET MVC based UI workflow application, it is not discussed here in detail.
If we have not leveraged windows workflow foundation, we would have had more methods in the “EmployeeController” class mapping to the steps in the workflow, making the application logic code brittle & bloated, resulting in a tightly coupled application which is not easily maintainable
If we want to move “Age” field from the Step1 to Step2, it is a very simple matter of “cut & paste”. No effort for changing the application code, validation code, testing etc. Just 1 second!
Just cut the following code from Step1.aspx to Step2.aspx. That’s it.
<p>
 <label for="Age">Age:</label>
 <%= Html.TextBox("Age", Model.Age) %>
 <%= Html.ValidationMessage("Age", "*") %>
</p>
The change will get reflected immedietly in the application without hindering process flow. This is flexibility. This shows the power of ASP.NET MVC.
Wrap Up
Through effectively leveraging the capabilites of ASP.NET MVC & windows workflow foundation, we can build more flexible, wizard type UI workflow applications that can withstand small to medium scale process flow changes. We can adopt the same approach in the scenarios of dynamic workflow applications where the path of workflow changes based on the user inputs.
If we build a workflow application, by analysing the all possible potential variations of a business process / workflow in the beginning itself and hosted the respective variations in windows workflow foundation, the system will be agile so that process changes can be done without major effort. ASP.NET MVC & Windows workflow foundation combination will workout well as a cost effective solution for UI workflow problems rather than costly BPM / workflow products.


 General
  News
News  Suggestion
  Question
  Bug
Bug  Answer
  Joke
Joke  Praise
  Rant
Rant  Admin
Admin 


 - Gnana