Overview
In this introduction I will show you how to create a web based form for database CRUD (Create Read Update Delete) operations based on Dojos datagrid. The data editing is done in a popup frame, not directly in the grid. The datagrid form supports keyboard navigation (cursor, Enter for edit, Delete for record deletion and F2 for adding a new record). This article is based on what I learned while using Dojo for implementing a CRUD web based system. Maybe some is wrong or misinterpreted by me, so please don’t hesitate to contact me if you find any errors or have suggestions.
In the “using the code” section you will find how to use the code to implement a simple company phone list application in less than 90 minutes.
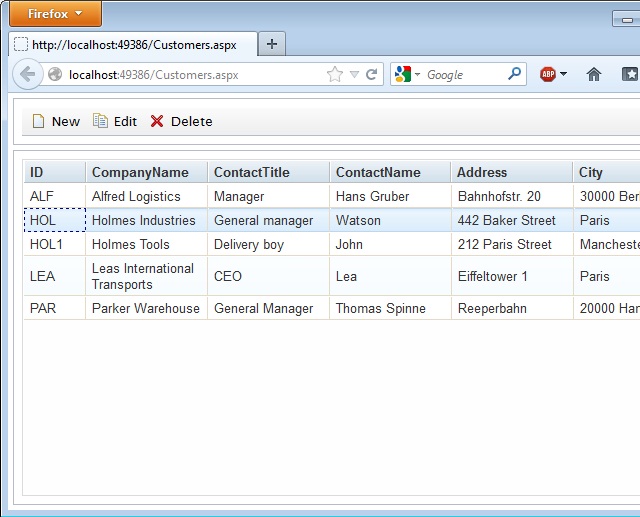
This is how it will look like :
This is a screenshot of editing a record:

Download the Visual Web Developer Express 2010 Solution of the general introduction
Introduction
As a programmer you face very often the task to create forms for data editing that are used by users with different levels of computer experience. Nearly every user is able to browse the Internet, so it is widely common to use web based systems instead of desktop applications, especially in business environments.
This article will show you how to use the Dojo JavaScript framework to build a simple data create/read/update /delete operations (CRUD) form .
Background
I was looking for a way to create web based (ASPX on IIS) forms for CRUD database operations.
Key requirements to the framework
I had four key requirements
- The data should be shown in some kind of data grid with keyboard navigation support
- The operations should not generate a full postback on saving/deleting items
- Editing should be done in a popup window. Inline editing should be possible too
- The used framework should have an open license, so it should be free to use
On the list of evaluated frameworks I had nearly all free frameworks (JavaScript or ASPX based).
The grid control the in the default aspx controls was not what I was thinking about. The main missing feature was the keyboard navigation. Another drawback was that the users experience of the default grid control is far beyond a desktop grid.
I evaluated several grid controls for JQuery which and noticed every grid had its pros & cons. I didn’t found one that does all the tasks for me, especially the inline editing seems to be a huge issue.
DHTMLX is nearly the perfect toolkit, it’s running at client side, has dozens of controls, is very mature and has a healthy support forum. The only bad thing about it is its license. It’s free for GPL’d projects, but I can’t go this way all the time. If you have a budget for it, give it a try, it has nearly every base feature you need for normal operations and is very customizable, you won’t be sorry.
Dojo is a JavaScript toolkit that runs at client side and had nearly all features I was looking for and as an extra it offers a lot of other controls. It is licensed: “Academic Free License >= 2.1 OR the modified BSD license” which is more than perfectly for my use case. It seems to be very mature but it lacks a little of documentation. The online documentation is quite ok but there are no books about Dojo available that cover the current version. I did a few prototypes that cover inline editing as well as editing in a popup window. This article is focused on editing in a popup window.
Dojo has three main objects, dojo that has the common methods, dijit the user interface object and dojox that covers addition dojo projects like grids and charting. (This article is about dojox.grid)
Referencing dojo in your html/aspx page
Dojo has to be referenced together with it’s style files to the head tag of your html file.
The default CSS style is named claro. No other references are required to use Dojo. Needed modules are defined later and loaded by Dojo internally. This makes Dojo very different than other JavaScript frameworks where you have to include every .js file which modules you use.
Building the user interface
In Dojo you have the option to build the UI using html like tags or create JavaScript objects at runtime. I’ve chosen to create the grid and toolbar at runtime in JavaScriptand just added a few divs and a span as a placeholder for the controls.
I placed an additional toolbar at the top of the screen with buttons to Add, Edit and Delete records.
(The toolbar object is defined in dijit/Toolbar)
The popup where the user is working on the data is realized as an Dojo dijit/Dialog object that shows a separate aspx page that handles the code for adding and update the data to the database and calls a JavaScript function in case of saving o.k. or error.
Getting the data to the grid
Dojo provides an abstraction layer for data that should be bound to controls with an object in dojo.data depending if it should be writable or read only. This abstraction layer is able to handle paging, loading on demand and has several other features. In most cases I experience a number of records between a few dozens to a few hundreds, so I decided to load all records on page load and work with them. Due to the fact that we use AJAX callbacks, there is no need to reload the whole page, so we do o.k. from a performance view. But if you are expecting huge datasets please check the dojo.data section in the documentation.
This sample contains a small SqlCE database called Customers.sdf (located in the App_Data folder) which contains one table for the customers. On the “page load” event all records are fetched, and injected to the JavaScript code.
Sorting the data
Dojos grid supports sorting on clicking on the table header columns like nearly all grid controls. The sorting is done at client side but it’s case sensitive by default, which is very uncommon. This means you have A to Z in capital letters at the top, than the lower cased a to z. To make the sort behavior the expected order a custom comparator has to be implemented on datastore (not the grid) level.
Getting rid of the mouseover in the grid
The grid controls CSS style defines a mouseover bar that looks pretty but does not work in my scenario (not from in a technical way, it irritates the user on identifying which row is currently selected). I tried to overwrite the style dynamically as well as statically in my aspx page without success. So it ended up that I edited the CSS file “claroGrid.css” directly to hide the mouseover bar.
KeyBoard navigation
The grid supports row selection using the cursor keys once it has the focus. I added additional event handlers to capture the enter key stroke to open the edit popup. In dojo this is done by using the dojo.connect function.
Delete a record
The deletion process at database level is done in a separate aspx page which is provided with the record id as id URL parameter. The page is called via JSONP and will report it’s result by “OK:” or something else that is displayed to notify the user. This could be implemented to the edit record page but I decided to have it separate to make the code more readable.
Database connectivity
I used a “SQL Server Compact Edition” database file for this project. If you have trouble accessing it, please check if you have installed the 3.5 version to your server/development machine.
I will provide a download link in the references section below.
I had to add code to the global.asax to make the database file accessible to ASP.NET .
Interesting code segments (in order of appearance in the sources)
I will explain important or interesting code segments in this section.
Variables
I declared this global variable in my JavaScript:
var deleteUrl = "./services/DeleteCustomer.aspx";
var editUrl = "./services/EditCustomer.aspx";
var gridColumns = [
{ name: "ID", field: "CustomerID", width: "50px" },
{ name: "CompanyName", field: "CompanyName", width: "auto", editable: false },
{ name: "ContactTitle", field: "ContactTitle", width: "auto", editable: false },
{ name: "ContactName", field: "ContactName", width: "auto", editable: false },
{ name: "Address", field: "Address", width: "auto", editable: false },
{ name: "City", field: "City", width: "auto", editable: false },
] ;
var idColumnName = "CustomerID";
var defaultSortField = "CompanyName";
var defaultSortDescending = false;
var caseInsitiveSortedColumns =["CompanyName","ContactTitle"...];
var popUpDialogWidth = "600px";
var popUpDialogHeight = "380px";
var popUpDialogIframeWidth = "100%";
var popUpDialogIframeHeight = "330px";
var gridData= <%=Daten%>
The deletUrl and the editUrl are the URL addresses that points to the web pages that are used as a data service.
The gridColumns Array defines the data store and the grid layout. Possible options in this array:
- name -> The displayed column title in the header of the grid
- field -> The name of the data field provided by the injected JavaScript (see customer.aspx.cs)
- width -> The width of the column (possible values: 50px, auto)
- editable -> Indicates if the cells value is editable in the grid (false for this project)
The idColumnName gets the name of the id data field used in all services. (It’s essential that this is the same in all services aspx files!)
The defaultSortField gets the name of the data field that should be used for the default sorting within the grid after loading, the variable defaultSortDescending indicates the sort direction.
As mentioned earlier, Dojo sorts by default case sensitive the grids values. All columns, that should be sorted case insensitive have to be added with their display name to the array caseInsensitiveSortedColumns.
Loading Dojo modules
Loading the Dojo modules will be done using the require method that Dojo provides and will automatically create instances of the module objects available in a function that is called directly after the module loading that can be used for initialization:
require([   "dojox/grid/DataGrid",
            "dojo/data/ItemFileWriteStore",
            "dojo/date/locale",
            "dojo/_base/lang",
            "dijit/form/HorizontalSlider",
            "dojox/grid/cells/dijit",
            "dojox/grid/Selection",
            "dojo/store/JsonRest",
            "dojo/store/Memory",
            "dojo/store/Cache",
            "dojo/data/ObjectStore",
            "dojo/query",
            "dijit/Toolbar",
            "dijit/form/Button",
            "dojo/_base/array",
            "dojo/parser",
            "dijit/layout/ContentPane",
            "dijit/layout/BorderContainer",
            "dijit/Dialog",
            'dojo/data/ItemFileWriteStore',
            'dojo/io/script'
        ],
function (  DataGrid,
            ItemFileWriteStore,
            locale,
            lang,
            HorizontalSlider,
            Cells_dijit,
            Selection,
            JsonRest,
            Memory,
            Cache,
            ObjectStore,
            query,
            Toolbar,
            Button,
            array,
            parser,
            cContentPane,
            borderContainer,
            dialog,
            ItemFileWriteStore,
            Script)
{ .... });
Please note that the name of the objects that are generated are defined in the function parameter.
Creating the toolbar
The toolbar is created by using the following code and can easily extended by adding new buttons to the array buttonDefinition :
var buttonDefinition = [
["new", "New", "NewPage"],
["edit", "Edit", "Copy"],
["delete", "Delete", "Delete"]
];
toolbar = new Toolbar({}, "toolbar");
array.forEach(buttonDefinition, function (but)
{
var button = new Button(
{
label: but[1],
showLabel: true,
iconClass: "dijitEditorIcon dijitEditorIcon" + but[2],
id: but[0],
onClick: toolbarButtonClick
});
toolbar.addChild(button);
});The images to the buttons are provided by the Dojo framework, no additional image files are needed, they are bundled with the Dojo framework.
Creating the data store for the grid
The grids data store is created by just using one line of code using the data that is fetched by the aspx.cs file and injected as an JavaScript array into the global variable gridData.
gridStore = new ItemFileWriteStore({ data: gridData });
Make the column sorting case insensitive
To make columns sorting case insensitive, two things are needed:
- A comparator Map for the grid store
- The comparator function itself
Setting up the comparatorMap is done by this code:
gridStore.comparatorMap={};
array.forEach(caseInsitiveSortedColumns, function (colName)
{
gridStore.comparatorMap[colName] = caseInsensitiveComparator;
});The inner function is looping through the list of Column Names that should be sorted case insensitive and adds a comparator for this column to the comparatorMap.
The implementation of the comparator compares two values and returns a numeric value smaller, equal or greater than zero based on the comparison:
function caseInsensitiveComparator (a,b)
{
    if (a.toLowerCase() < b.toLowerCase())
    {
        return -1
    }
    else if (a.toLowerCase() > b.toLowerCase())
    {
        return 1;
    }
    else
    {
        return 0;
    }
}
The most important point is that the strings will be converted to lower case before comparing them.
Create the grid (finally)
Creating the grid is done by instantiating a new DataGrid object and defining to which
html div tag the grid should be added:
grid = new DataGrid(
{
"class": "grid",
rowsPerPage: "10000",
width: "auto",
store: dataStore = gridStore,
sortFields:[{attribute:defaultSortField,descending: defaultSortDescending}],
structure: gridColumns
}, "grid"); The parameters are self-explaining the only two things to note are the store assignment, where we assign the previous generated store object and the structure assignment which gets the data from the global variable array named gridColumns.
Adding keyboard event handlers
Event handler in Dojo will be added to controls using the dojo.connect method. I added handler for the Enter key, the Delete key and the F2 key.
dojo.connect(grid, "onKeyPress", function (e)
{
    switch(e.charOrCode)
    {
        case dojo.keys.ENTER:
        {
            ...
            break;
        }
        case dojo.keys.DELETE:
        {
            ...
            break;
        }
        case dojo.keys.F2:
        {
            ...
            break;
        }
    }
});
Using the code
In this section I will show how to use the code by creating a simple company intranet phone list which stores the employees name, the surname, the office number and the internal phone number:
Download the complete Visual Web Developer Express 2010 Solution of the Company Phone List
Needed files
To implement the code you need to download the zip file “Dojo-CRUD-Sample.zip” and unzip it somewhere to your file system. (Alternatively you could download the “CompanyPhoneList.zip” which contains complete “Microsoft Visual Web Developer 2010 express” solution.
The steps below assumes that you work with the “Dojo-CRUD-Sample.zip” )
Preparing the project
Create a new blank project named CompanyPhoneList in Visual Studio or Visual Web Developer. The programming language selection should be set to C#. (In Visual Studio 2010 you should select “Empty ASP.NET-Webapplication” ).
Copy the dojo folder from the downloaded and extracted zip file by dragging it to the solution explorer and drop it on the project name. (If you use Visual Studio instead of Visual Web Developer make sure you drop it on the project, not the solution. In Visual Studio your solution could have more than one project.)
Do the same thing for the css folder to have style sheet information for the pages.
Right click on the project in the solution explorer and select Add -> ASP.NET-Folder -> App_Data
This folder will hold the XML file we use as a database called PhoneList.xml .
Right click again on the project in the solution explorer and click on Add -> New folder and name it “services” .
Add three additional websites, one for the phone list, one for the data edit service and a third one for the record deletion service. In theory both service functions could be implemented in one page, but I prefer to have it separate. We will need these files:
Name
| Location
| Purpose
|
CompanyPhoneList.aspx
| /
| Main phone list page
|
CompanyPhoneList_Edit.aspx
| /services/
| Saving edited/new records
|
CompanyPhoneList_Delete.aspx
| /services/
| Deletion of records
|
Your solution should now look like this (Your result may vary a little depending on your Windows/VS/VWD language, mine is German):
You might want to right click on the “CompanyPhoneList.aspx” file and select “make it startup page”.
CompanyPhoneList.aspx
In the CompanyPhoneList.aspx.cs file we start implementing the needed database access functionality. Internally we work with a DataTable that is stored in (serialized to) the App_Data folder. If the file does not exist the Page will create a new blank database.
Replace the whole source code except the class definition by this code (Overwrite any existing PageLoad event handler):
public string dataInJsArrayFormat = string.Empty;
protected void Page_Load(object sender, EventArgs e)
{
DataTable dtData;
string databaseFileName = Path.Combine(AppDomain.CurrentDomain.BaseDirectory, @"App_Data\PhoneList.xml");
try
{
if (!Page.IsPostBack)
{
if (File.Exists(databaseFileName))
{
dtData = new DataTable();
dtData.ReadXml(databaseFileName);
}
else
{
dtData = new DataTable("PhoneList");
dtData.Columns.Add(new DataColumn("id", typeof(Int32)));
dtData.Columns[0].AutoIncrement = true;
dtData.Columns[0].AutoIncrementSeed = 1;
dtData.Columns[0].AutoIncrementStep = 1;
dtData.Columns.Add(new DataColumn("name", typeof(String)));
dtData.Columns.Add(new DataColumn("surname", typeof(String)));
dtData.Columns.Add(new DataColumn("officeNo", typeof(String)));
dtData.Columns.Add(new DataColumn("phoneNo", typeof(String)));
dtData.WriteXml(databaseFileName, XmlWriteMode.WriteSchema);
}
StringBuilder sbResult = new StringBuilder();
int rowCounterExported = 0;
foreach (DataRow dr in dtData.Rows)
{
rowCounterExported++;
if (rowCounterExported > 1)
sbResult.Append(",");
sbResult.Append("{" + enq("id") + ":" + enq(dr["id"].ToString()) + ",");
sbResult.Append(enq("name") + ":" + enq(dr["name"].ToString()) + ",");
sbResult.Append(enq("surname") + ":" + enq(dr["surname"].ToString()) + ",");
sbResult.Append(enq("officeNo") + ":" + enq(dr["officeNo"].ToString()) + ",");
sbResult.Append(enq("phoneNo") + ":" + enq(dr["phoneNo"].ToString()) );
sbResult.Append("}");
}
string resultText = " { identifier: 'id', label: 'CompanyPhoneList', items:[";
resultText += sbResult.ToString();
resultText += "]}";
dataInJsArrayFormat = resultText;
}
}
catch (Exception eX)
{
Response.Write("Error:" + eX.Message);
}
}
private string enq(string txt)
{
string result = txt.Replace("\"", "\\\"");
result = result.Replace("\'", "\\\'");
result = result.Replace("\n", "\\\n");
result = result.Replace("\r", "\\\r");
return "\"" + result + "\"";
} The source code is pretty forward and self-explaining. All it does is to load or create a ADO.NET DataTable from a XML file.
Let the IDE fix all unresolved references with the right using statements. After that a build should do without any error. Now switch to the CompanyPhoneList.aspx in source code view.
Open the unzipped Customers.aspx in an editor of your choice and copy everything starting at the “<head” tag to the clipboard and paste it and replace everything in In the CompanyPhoneList.aspx starting at the “<head” tag.
Do the following modifications:
Pressing Ctrl-F5 should build and run the solution show up an empty grid if everything went fine.
CompanyPhoneList_Edit.aspx
Add this JavaScript code to the head element of the .aspx page for the edit popup, this will set the focus to the element at parameter:
<script language="javascript" type="text/javascript">
function setFocusAndSelectText(elemntName)
{
document.getElementById(elemntName).focus();
document.getElementById(elemntName).select();
}
</script> Replace the existing body tag by this one which does focus and select the value in the
surname textbox:
<body onload="window.setTimeout('setFocusAndSelectText(\'tbSurname\');',200);">Remove the existing div tag from the form tag (if any was created by VS) and add this tags to the form tag:
<asp:Panel runat="server" ID="pnSurname" GroupingText="Surname">
<asp:TextBox ID="tbSurname" runat="server" AutoComplete="Off" Width="95%"></asp:TextBox><asp:RequiredFieldValidator ID="RequiredFieldValidator1" runat="server" ControlToValidate="tbSurname" ErrorMessage=" *" ForeColor="Red" Font-Bold="true"></asp:RequiredFieldValidator>
</asp:Panel>
<asp:Panel runat="server" ID="pnName" GroupingText="Name"><asp:TextBox ID="tbName" runat="server"  AutoComplete="Off" Width="95%"></asp:TextBox></asp:Panel>
<asp:Panel runat="server" ID="pnOfficeNo" GroupingText="Office no"><asp:TextBox ID="tbOfficeNo" runat="server" AutoComplete="Off" Width="95%"></asp:TextBox></asp:Panel>
<asp:Panel runat="server" ID="pnPhoneNo" GroupingText="Phone no"><asp:TextBox ID="tbPhoneNo" runat="server"  AutoComplete="Off" Width="95%"></asp:TextBox></asp:Panel>
<asp:Panel ID="Panel1" runat="server" Width="100%" HorizontalAlign="Right">
<br />
<asp:Button ID="btSave"  runat="server" Text="SAVE" onclick="btSave_Click" />
</asp:Panel>
This will add a panel with a description and an input field to the popup.
Next we have to add code to the CompanyPhoneList_Edit.aspx.cs file. Add this code to the automatic generated Page_Load event it will load the record that should be edited:
DataTable dtData;
string databaseFileName = Path.Combine(AppDomain.CurrentDomain.BaseDirectory, @"App_Data\PhoneList.xml");
try
{
string id2Edit = string.Empty;
try
{
id2Edit = Request.Params["id"].ToString();
}
catch { }
if ((!Page.IsPostBack) && (!String.IsNullOrEmpty(id2Edit)))
{
if (File.Exists(databaseFileName))
{
dtData = new DataTable();
dtData.ReadXml(databaseFileName);
DataRow[] dr = dtData.Select("id = " + id2Edit);
if ((dr != null) && (dr.Length == 1))
{
tbName.Text = dr[0]["name"].ToString();
tbSurname.Text = dr[0]["surname"].ToString();
tbOfficeNo.Text = dr[0]["officeNo"].ToString();
tbPhoneNo.Text = dr[0]["phoneNo"].ToString();
}
else
{
Page.ClientScript.RegisterStartupScript(this.GetType(), "onLoad", "parent.closePopupAndShowError(\"Record not found, maybe already deleted!\");", true);
}
}
else
{
Page.ClientScript.RegisterStartupScript(this.GetType(), "onLoad", "parent.closePopupAndShowError(\"Record not found, maybe already deleted!\");", true);
}
}
}
catch (Exception eX)
{
Page.ClientScript.RegisterStartupScript(this.GetType(), "onLoad", "parent.closePopupAndShowError(\"Error:" + eX.Message + "\");", true);
}
This is the code that does the actual save process that has to be inserted below the
Page_Load event:
protected void btSave_Click(object sender, EventArgs e)
{
DataTable dtData;
string databaseFileName = Path.Combine(AppDomain.CurrentDomain.BaseDirectory, @"App_Data\PhoneList.xml");
try
{
string id2Edit = string.Empty;
bool newRecordAdded = false;
try
{
id2Edit = Request.Params["id"].ToString();
}
catch { }
if (File.Exists(databaseFileName))
{
dtData = new DataTable();
dtData.ReadXml(databaseFileName);
if (!String.IsNullOrEmpty(id2Edit))
{
DataRow[] dr = dtData.Select("id = " + id2Edit);
if ((dr != null) && (dr.Length == 1))
{
dr[0]["name"] = tbName.Text;
dr[0]["surname"] = tbSurname.Text;
dr[0]["officeNo"] = tbOfficeNo.Text;
dr[0]["phoneNo"] = tbPhoneNo.Text;
dtData.AcceptChanges();
}
else
{
Page.ClientScript.RegisterStartupScript(this.GetType(), "onLoad", "parent.closePopupAndShowError(\"Record not found, maybe already deleted!\");", true);
}
}
else
{
newRecordAdded = true;
DataRow drNew = dtData.NewRow();
drNew["name"] = tbName.Text;
drNew["surname"] = tbSurname.Text;
drNew["officeNo"] = tbOfficeNo.Text;
drNew["phoneNo"] = tbPhoneNo .Text;
dtData.Rows.Add(drNew);
dtData.AcceptChanges();
id2Edit = drNew["id"].ToString();
}
dtData.WriteXml(databaseFileName, XmlWriteMode.WriteSchema);
StringBuilder sb = new StringBuilder();
sb.Append("{ \"name\" : \"");
sb.Append(encodeJsonSpecialChars(tbName.Text));
sb.Append("\",\"surname\":\"");
sb.Append(encodeJsonSpecialChars(tbSurname.Text));
sb.Append("\",\"officeNo\":\"");
sb.Append(encodeJsonSpecialChars(tbOfficeNo.Text));
sb.Append("\",\"phoneNo\":\"");
sb.Append(encodeJsonSpecialChars(tbPhoneNo.Text));
sb.Append("\",\"id\":\"");
sb.Append(id2Edit.ToString());
sb.Append("\"}");
Page.ClientScript.RegisterClientScriptBlock(this.GetType(), "ret", "retVal=" + sb.ToString(), true);
if (newRecordAdded == true)
Page.ClientScript.RegisterStartupScript(this.GetType(), "onLoad", "parent.newRecordSaved(retVal);", true);
else
Page.ClientScript.RegisterStartupScript(this.GetType(), "onLoad", "parent.editedRecordSaved(retVal);", true);
}
else
{
Page.ClientScript.RegisterStartupScript(this.GetType(), "onLoad", "parent.closePopupAndShowError(\"Database not found!\");", true);
}
}
catch (Exception eX)
{
Page.ClientScript.RegisterStartupScript(this.GetType(), "onLoad", "parent.closePopupAndShowError(\"Error:" + eX.Message + "\");", true);
}
} One additional helper function has to be added and we are done with this code file:
(Placing it directly below the btSave_Click event would do fine)
private string encodeJsonSpecialChars(string txt)
{
string result = txt.Replace("\"", "\\\"");
result = result.Replace("\'", "\\\'");
result = result.Replace("\n", "\\\n");
result = result.Replace("\r", "\\\r");
return result;
}
If you build the project and open it in a browser record editing should work as well as adding a new record. Please remind the Key board shortcuts F2 for new record and Enter for editing the currently selected record.
CompanyPhoneList_Delete.aspx
In the .aspx file remove all all lines except the first one. This o.k. because this page only response to a JSONP request.
Switch to the code file (CompanyPhoneList_Delete.aspx.cs) and add this code that does the actual deletion of the record to the automatic generated Page_Load event:
string resultText = string.Empty;
string callBackFuncName = string.Empty;
try
{
Response.Clear();
Response.ContentType = "text/javascript";
DataTable dtData = new DataTable();
string id2Delete = String.Empty;
string databaseFileName = Path.Combine(AppDomain.CurrentDomain.BaseDirectory, @"App_Data\PhoneList.xml");
try
{
callBackFuncName = Request.Params["callback"].ToString();
}
catch { }
try
{
id2Delete = Request.Params["id"].ToString();
}
catch { }
if (!String.IsNullOrEmpty(id2Delete))
{
dtData.ReadXml(databaseFileName);
DataRow[] dr = dtData.Select("id = '" + id2Delete + "'");
if ((dr != null) && (dr.Length == 1))
{
dtData.Rows.Remove(dr[0]);
dtData.WriteXml(databaseFileName, XmlWriteMode.WriteSchema);
resultText = "OK:";
}
else
throw new Exception("Record to delete not found !");
}
else
throw new Exception("Record to delete not specified!");
}
catch (Exception eX)
{
resultText = "Error:" + eX.Message;
}
Response.Write(callBackFuncName + " ('" + resultText + "');");
Response.End();
Conclusion
Using Dojo you could easily create web based forms for CRUD database operations using
Microsoft’s ASP.NET platform.
References
The Dojo toolkit’s homepage (2012-07-20 07:16):
http://dojotoolkit.org/The Dojo foundations homepage (2012-07-20 07:20):
http://dojofoundation.org/
SQL Server Compact Edition Version 3.5 could be downloaded here (2012-07-20 07:16):
http://www.microsoft.com/de-de/download/details.aspx?id=5783
Legal Stuff
Microsoft, ASP.NET, Visual Studio and Visual Web Developer are registered trademarks of
Microsoft Corporation in the United States and other countries. (http://www.microsoft.com)
I didn’t found any trademark information about the Dojo framework. Maybe it is
trademarked by the Dojo foundation. In case it is, it is mentioned by this.
History
20120720 Initial release
This member has not yet provided a Biography. Assume it's interesting and varied, and probably something to do with programming.


 General
  News
News  Suggestion
  Question
  Bug
Bug  Answer
  Joke
Joke  Praise
  Rant
Rant  Admin
Admin 


