Table of Contents
DotNetNuke (DNN) is a web application Open Source Platform and has grown in popularity over the years because it does a very good job of solving the problem of basic web solution. There are few DNN articles available on The Code Project. I have mentioned them in Reference and Further study section. I have been working with DNN for the last 1 year. It seems great to me. This article is only for those who are working with DNN or have just started or having interest in DNN. In this article, I am going to explain how we can create a user and assign roles to the user, and how to create custom roles and assign them to particular users. Hope it will be helpful for those who are starting with DNN. Please give your valuable suggestions and feedback.
For creating a user In DNN, you have to log in using Admin Account. By default, Admin Password is "dnnadmin". After logged in, you do not have to click on Admin > User Accounts.
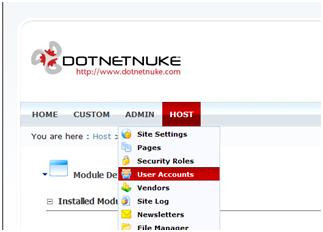
After clicking on "User Accounts" menu, a new user details page will come up with all the existing user details.

Based on the selected alphabets, a user list will be displayed. Selecting all will show all the user details. For creating a new user, we need to click in "Add New User" Link from Bottom Section. After that, the following screen will come:
This screen is for user creation. We need to fill this form. There are two checkboxes associated with it. One makes sure that the user is Authorized and another one will send a notification mail to the user. Fill the form and Click on Add New User Link. You will be automatically redirected to the user Accounts pages. Click on All link to show all the users.
Use Delete (Cross) Icon to delete the user and Use Edit (Pencil) icon to Edit the user. This is all about user creation in DNN. Now let’s see how we can assign the role to a particular user. Before that, I just want to give a small overview of roles and its uses in DNN.
Using "Roles" is one of the greatest features in DNN. Based on that, we can give rights to user to view pages, View Modules, access menus, etc. Roles can be customizable. We can restrict a user to view some page or some part of a Page based on the role only. In this article, I have explained how to give access to a particular page for a specific group of members. Let's see how we can assign a role to a newly created user.
First of all, we need to click on Edit (Pencil) icon for that user to whom we want to add a Role. Let's say I clicked on Edit icon of user "Abhijit Jana", the following screen will come.
So, we can edit everything over here. But our objective is to add the Role. Click on "Manage Roles for this User" Link. This will redirect you to Create and Assign Role Page. Below is the screen for that.
Here we can select the Roles for user. One user can have multiple Roles. We can give the effective and Expiry date for roles too. Just Select Role from "Security Role" Dropdown and Select date if needed then click on the "Add Role to User" Link. This means selected role is now given to that user. We can also remove the added role in a similar way by clicking on Delete (Cross) Icon.
Let's have a look into creating custom roles and assigning it to the user.
Creating new roles are very simple. From Admin Menu Clicks on "Security Roles" Link. The following screen will come:
This will open a new page with the list of all existing Roles.
Now, I am going to create a new Role, click on Down Arrow Icon with Security Roles (Lock Icon), and select "Add New Role" as shown in the picture given below:
Here we need to give the Role Name and Description with other details. Then we need to click on the Update button to save the Role:
On update, "Sales Team" roles will be added with the list of Roles. We can use the Edit (Pencil) Icon to Edit the Role.
I have already discussed how to assign a role to a user. We need to flow the same steps. Below are the sample screen shots where I am assigning the newly created "Sales Team" Role to a user.
As I have already discussed, we can have access of pages and modules based on the role. Here I give a simple example. I will write a complete article on that. Suppose we are having a page called Custom and we need to give access permission to only Sales Team Roles user. What we need to do is as follows:
- Edit the Page Settings
- Give Sales Team View Permission of that Page
In the picture shown below, we have to select the page and need to open it in Edit Mode. Then, we will have the section for set Permission.
Permission Section will show you all the available Roles in DNN. You need to select the Check box to whom you want to give the permission.
This is all about creating user and roles in DNN. This is all about DNN Beginners. This is the step by step guide for creating users, assigning roles, creating new roles, etc. Please give your feedback and suggestions for improvement.
Note: There may be more articles available. If you want me to add them over here, please let me know by posting in the message forum. I will update the list.
- Initial post: 27-Sept-2009: Sunday


 General
  News
News  Suggestion
  Question
  Bug
Bug  Answer
  Joke
Joke  Praise
  Rant
Rant  Admin
Admin 


